How To Create A Water Lily In Illustrator
Water lilies are beautiful flowers and ideal tutorial material. To get to our result, we’ll be doing a lot of clever actions, mostly rotating and duplicating, and we’ll have a lot of room for experimentation as well. For instance, we can try out different ways to build the layers of petals, and we can play with different shades of pink gradients.
This tutorial shows the basic steps I followed; but in creating this flower, I did way more than what is presented here. You see, every creation is never straightforward or perfect right away. It takes some trial and error, because I also needed to find the method that can be most easily explained.
Load The Water Lily Swatches
To make it easy to apply colors and gradients repeatedly, I have saved the swatches I used in an Illustrator swatch library file. The easiest way to use a swatch library file is simply by opening it as a regular Illustrator file via File → Open. You may still modify the settings of the document, such as dimensions and color, via File → Document Setup.
If a document is already open and all set up, then you can load it into your Illustrator document by going to the swatches panel options menu, choosing Open Swatch Library → Other Library…, browsing to the Water-lily-Swatches.ai file, selecting it and clicking “Open”. Then, select the swatches and drag them into the main swatches panel of your document (Window → Swatches). Make sure the swatches are displayed in list view; go to the Swatches panel options menu again, and choose “Small List View.” This way, you will also see the names of the swatches.
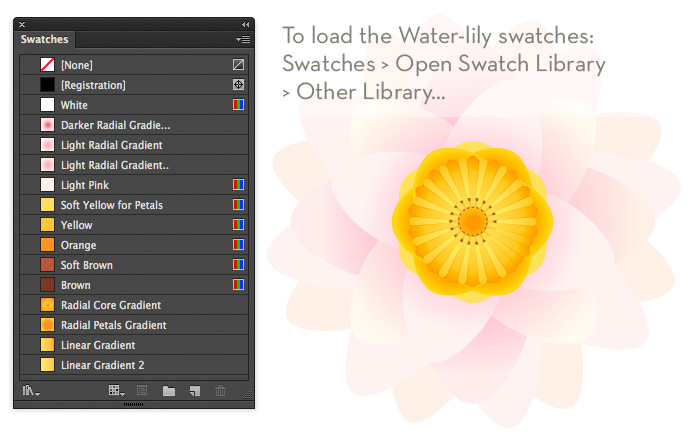
We’ll start by building the various layers of petals, level by level. Then, we’ll create the inner part of the flower, which I’ll call the “core.” At the very end, I’ll briefly explain how I created the environment of the water and floating leaves. To help you with this part, I have added all of the colors and gradients to the Illustrator swatch library file.
Creating The Petals
Looking at the typical shape of a water lily’s petal, I figured that using the Ellipse tool would not give us the exact result we’re after. The petal has a rather pointy tip, so I thought to use a tool that I hardly ever use, the Arc tool. This tool is hidden under the Line tool in the tools panel (hold down your mouse click to reveal the hidden tools). First, we’ll set the right options in the Arc options window.
Create The First Petal
Define the Arc tool’s options.
To make sure you can preview things in the Arc options window, click “Fill swatch” in the tools panel, and select the “Light Pink” color swatch from the swatches panel. We’ll also need a vertical guide because we will create one fourth of a petal and then reflect this shape using the vertical guide as the axis. Drag a vertical guide from the rulers somewhere towards the center of your document. If rulers aren’t visible in your document, go to View → Rulers → Show Rulers or hit Command/Control + R.
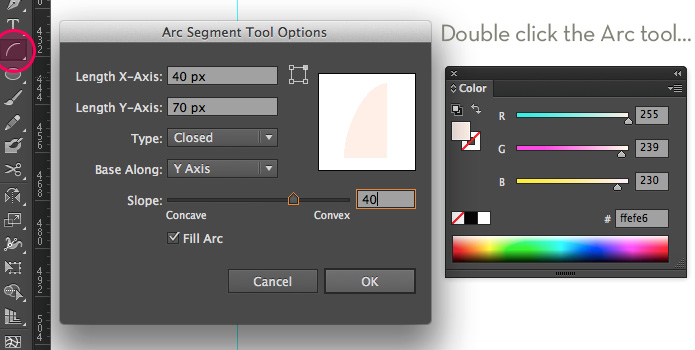
Now, double-click the Arc tool in the tools panel. In the Arc options window that appears, enter the value 40 px for the x-axis’ length and 70 px as the y-axis’ length. Also, for the “Type” option, choose Closed; for “Base Along,” choose Y Axis; for “Slope,” select a value of 40; and enable the “Fill Arc” check box.
Create the arc.
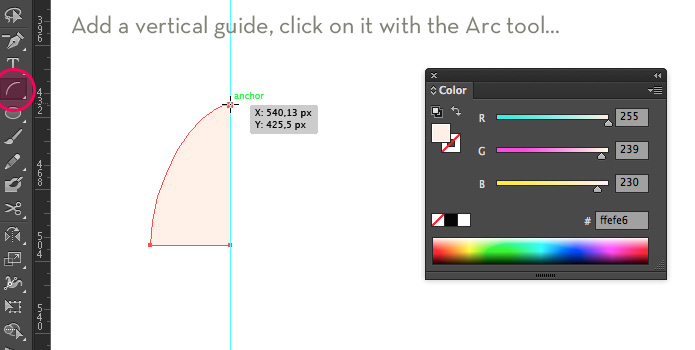
With the Arc tool still selected, click precisely on the vertical guide. The Arc window will appear showing the settings you’ve entered. Just click “OK” to create the arc object.
Copy-reflect the arc object around the vertical axis.
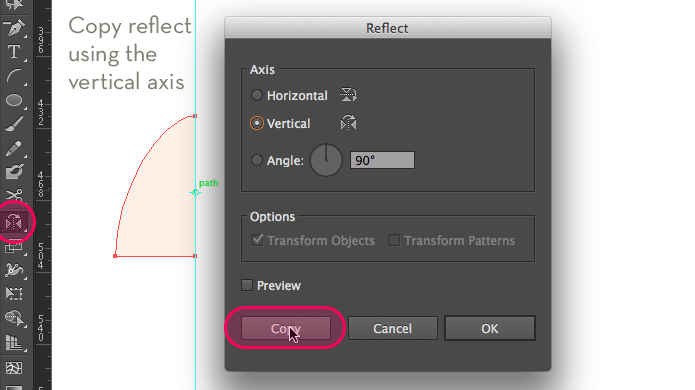
With the arc object selected, select the Reflect tool from the tools panel (hidden under the Rotate tool), and click precisely on the vertical guide while holding down the Alt/Option key. In the Reflect options window that appears, select the vertical axis, and click “Copy.”
Copy-reflect the two arc objects around the horizontal axis.
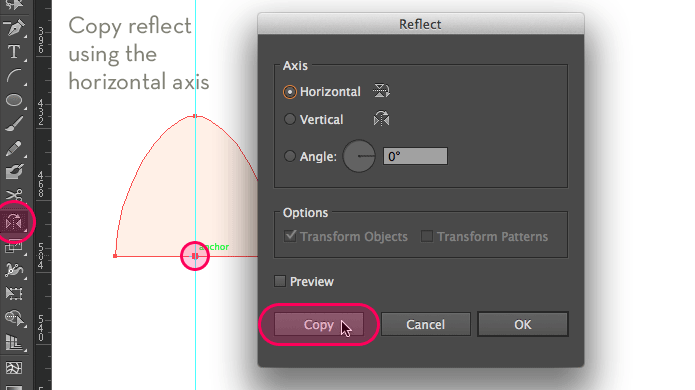
Make sure both arc objects are selected. Then select the Reflect tool again, and click precisely on the bottom line of the two objects while holding down the Alt/Option key to invoke the Reflect options window. This time, select the horizontal axis and click “Copy.”
Unite the four objects.
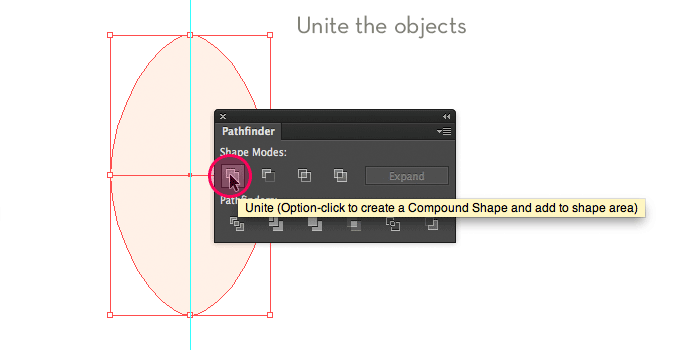
Select the four arc objects, go to the Pathfinder panel, and choose “Unite.” This will unite the four shapes into one. Now you have created one petal, which is the flower’s most important base element. We will use this object multiple times during this tutorial. It’s time to let those petals fly!
Creating The Middle-Level Petals
Copy-rotate the petal.
First, drag a horizontal guide from the rulers somewhere to the bottom of the petal. The intersection of both guides will serve as the center of the flower. The position of this point is crucial, so make sure it is positioned as shown here:
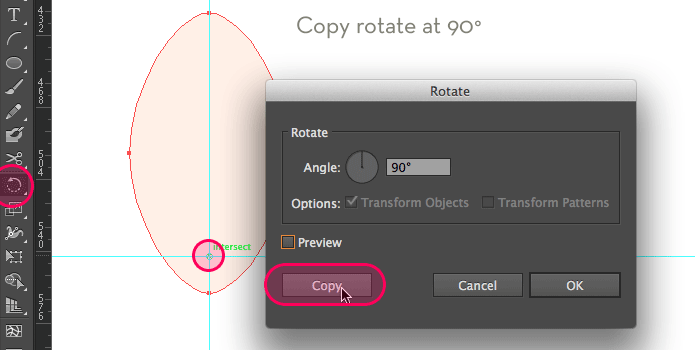
Select the Rotate tool, and click precisely on the guides’ intersecting point while holding down Alt/Option. In the Rotate options window that appears, enter a value 90° and hit “Copy” to duplicate the object. Repeat this transformation action twice by hitting Command/Control + D two times (or go to Object → Transform Again twice).
Apply a radial gradient.
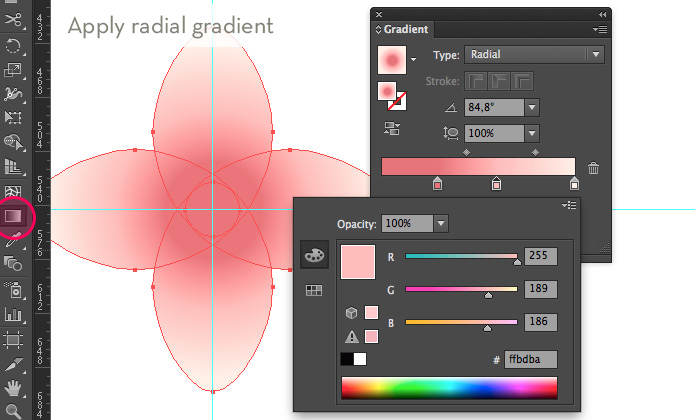
Select all objects and select the radial gradient swatch named “Darker Radial Gradient.” The gradient will now be applied to each petal separately, with the dark area at the center of the each petal. To change the position to the center of the flower, we need to reapply this gradient by selecting the Gradient tool and click-dragging the mouse from the center of the flower to the outside (i.e. the end of a petal). I usually do this in a straight horizontal movement, holding down the Shift key.
Copy rotate at 45°.
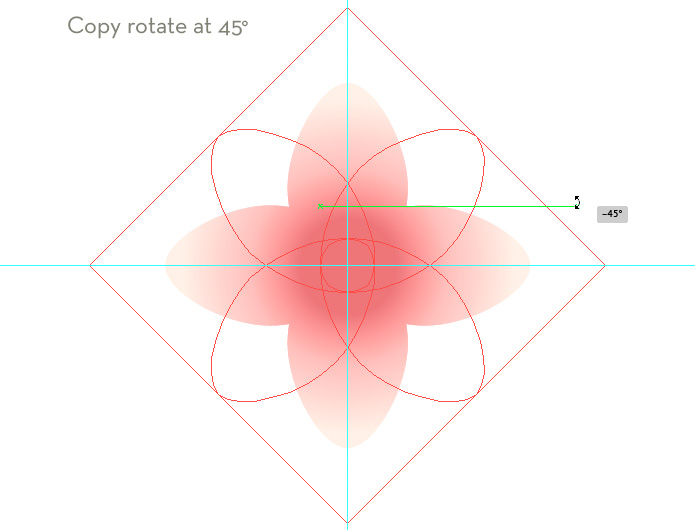
With the object still selected, copy-rotate the object by copying the object (Command/Control + C) and pasting it in front (Command/Control + F, or in the menu, Edit → Paste in Front). With the Selection tool selected, mouse over a corner of the bounding box until the rotate cursor appears. Hold down the mouse and slowly rotate the object while holding down the Shift key so that the rotation jumps to 45°. When it reaches 45°, first release the mouse, then the Shift key.
Apply a new gradient.
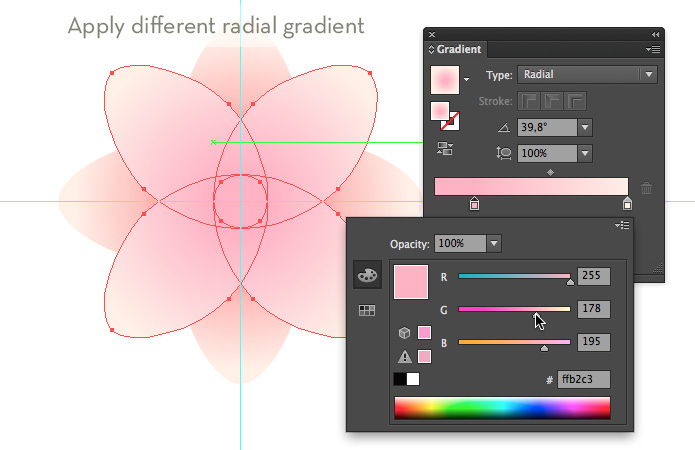
Select the “Light Radial Gradient 2” swatch from the swatches panel to apply this gradient to the new petals. If you like, you can tweak some of the color swatches in the gradient by double-clicking on the gradient stops (in the Gradient panel), or by sliding them to the left or right. While working on this project, I’ve tweaked them here and there, saving the gradients I like best. Feel free to play around by making them a bit more white or more pink, etc.
Creating The Bottom-Level Petals
From now on, keep things as organized as possible, because we will be creating different levels of petals to build up the flower. Aside from the flower’s core and stamen, which are each on a separate layer, we’re working with five different levels, putting each level on a separate layer:
- the top yellow petals (to be created in the last step),
- the yellow petals (to be created in the last step),
- the top petals (to be created in a later step),
- the middle petals,
- the bottom petals (to be created in this step).
Create the first bottom-level petals.
Name the layer with the middle-level petals that we’ve just created by double-clicking the layer. I’ve called it “middle petals.” Select the topmost vertical petal, copy it, and lock the “middle petals” layer by clicking in the column next to the eye icon of the layer in the Layers panel. A lock icon should appear. Create a new layer by clicking “Create New Layer” at the bottom of the Layers panel. Paste the petal in the exact same place by hitting Command/Control + Shift + V. Double-click the layer and name it “bottom petals.” With the layer still selected in the Layers panel, drag the layer to below the “middle petals” layer.
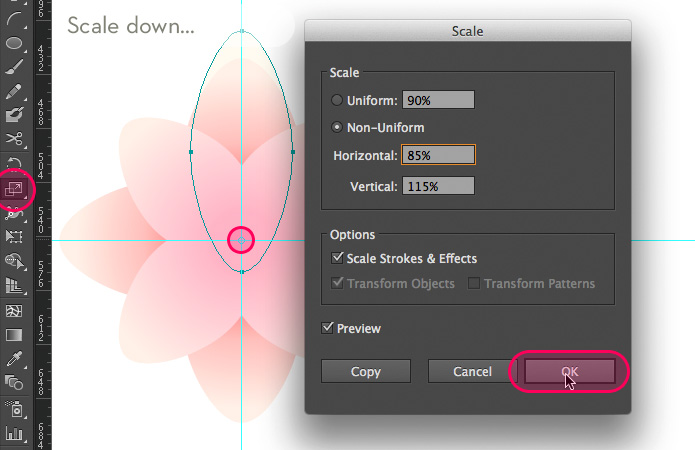
First, we’ll resize the petal a bit, making it taller. Select the Scale tool, and click precisely at the intersecting point of the two guides (i.e. the center of the flower) while holding down Option/Alt to invoke the Scale window. Choose the “Non-uniform” option, and enter 85% for “Horizontal” and 115% for “Vertical.” Check the “Preview” option to see how this will look, and click “OK.”
Apply a gradient.
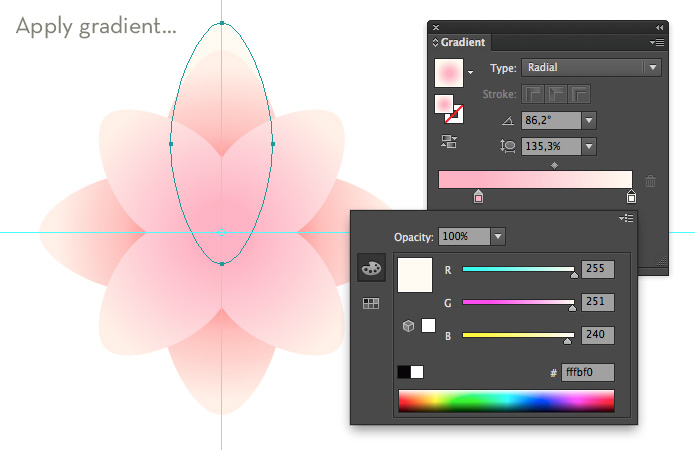
Apply the “Light Radial Gradient 2” by selecting the swatch from the Swatches panel and then selecting the Gradient tool. Now, drag vertically straight towards the top of the petal, starting from the center of the flower, holding down the Shift key. To keep the petal light near the end, stop about one fourth from the end.
Copy rotate at 45°.
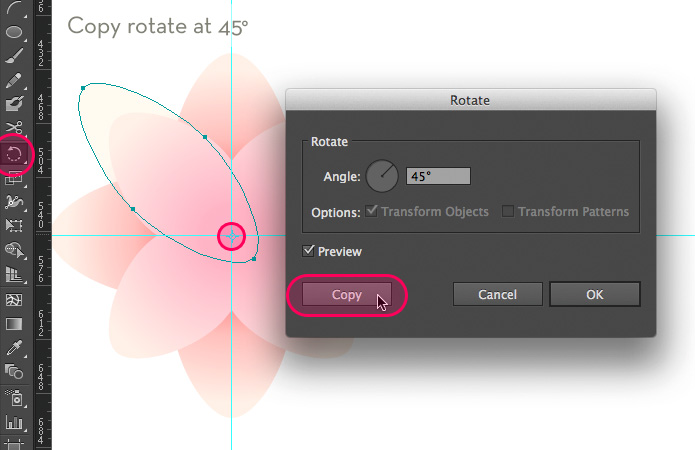
With the petal still selected, select the Rotate tool and click precisely at the guides’ intersecting point while holding down Alt/Option. In the Rotate options window that appears, enter a value of 45° and hit “Copy” to duplicate the object. Repeat this transformation six times by hitting Command/Control + D six times.
Rotate at 27.5°.
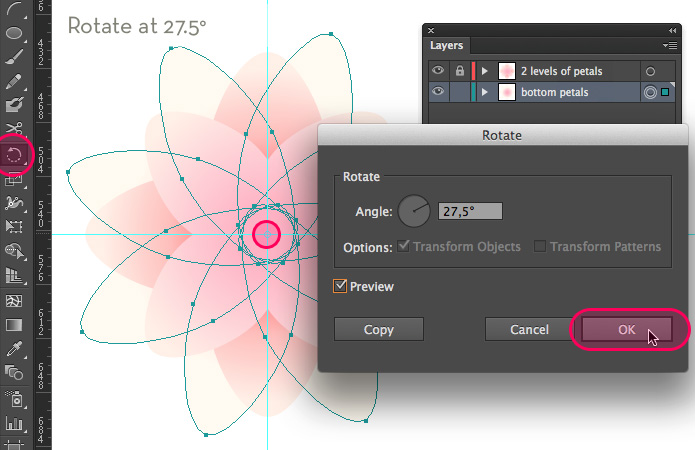
To create a bit of natural variation in the positions of the levels of petals, we’ll rotate them by 27.5°. You could, of course, choose another value — for instance, keeping the petals perfectly symmetrical and going for 22.5° instead, which is exactly half of 45°. It’s totally up to you. Make sure all petals of this level are selected. Click precisely at the guides’ intersecting point again while holding down Alt/Option. In the Rotate options window, enter a value of 27.5° and hit “OK.”
Tweak the gradient where needed.
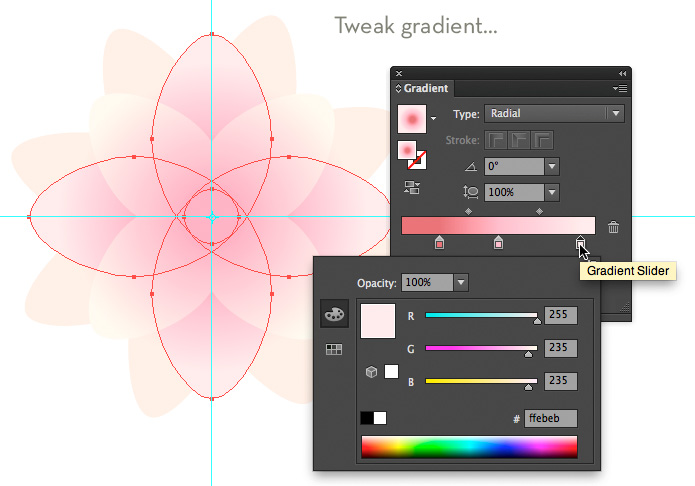
While creating these different levels of petals, you can tweak the gradients of the petals at any time, making them a bit lighter or darker. Do this by sliding the gradient stops to the left or right or by changing the color of the gradient color stops (by double-clicking one of the stops of the gradient in the Gradient panel). You could, of course, leave this part till the very end, too.
Copy rotate at 27.5°.
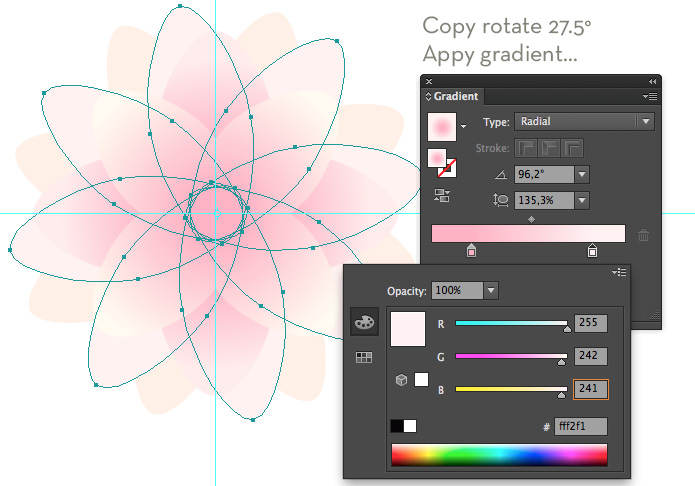
Click precisely at the guides’ intersecting point again while holding down Alt/Option, and enter a value of 27.5° in the Rotate options window. Hit “Copy” to copy this action. Choose another value here if you like. If you go for a fully symmetrical style, then try 22.5°. Apply a gradient that is light near the end of the petals. Select one of the light radial swatches and tweak if needed.
Creating The Top Level Of Petals
To finish off the petals, we need to add yet one more level of petals at the top. Select the four petals stacked at the top (first unlocking the “middle petals” layer by clicking the lock icon of the layer in the Layers panel), and put them in your copy memory by hitting Command/Control + C. Lock both the “middle petals” and “bottom petals” layers, and create a new layer by clicking the “Create New Layer” icon at the bottom of the Layers panel. Name the layer by double-clicking it; I’ve named mine “top petals.” Now, paste the petals in the exact same place by hitting Command/Control + Shift + V.
Rotate at 27.5°.
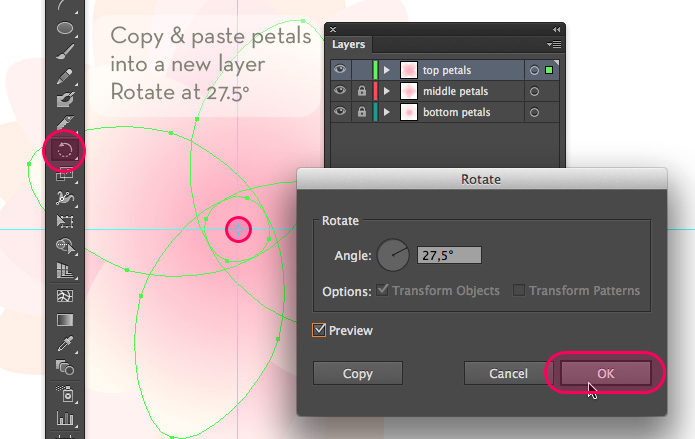
With the petals still selected, select the Rotate tool and click precisely at the center of the flower while holding down Option/Alt. Enter a value of 27.5° and hit “OK.” Again, choose whatever value you think fits best. Just check “Preview” to peek at the result.
Apply a radial gradient.
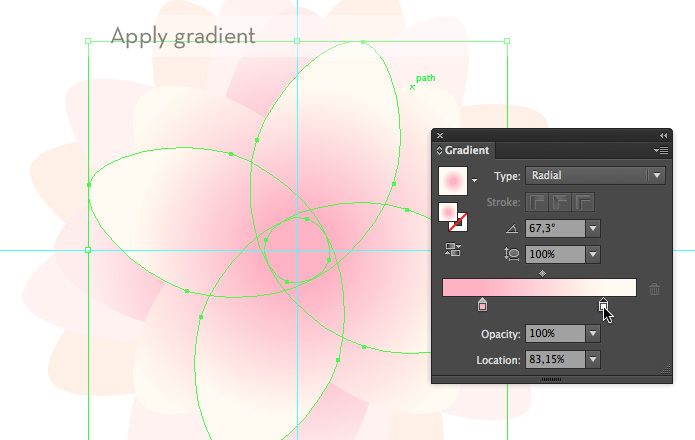
Apply the radial gradient swatch named “Light Radial Gradient 3.” This gradient is almost the same as “Light Radial Gradient 2”, but the lighter color is a bit lighter and the color stop has been moved a little to the left to shorten the transition of the gradient, thus making the petal lighter from the middle to the end. Again, play around with the gradient color stops to create the effect you like best.
Creating The Core And Stamen
In the next step, we’ll create the core of the flower. To get started, lock the three layers. Create a new layer, naming it “core” (or whatever you like).
Creating The Core
Draw a circle and apply a gradient.
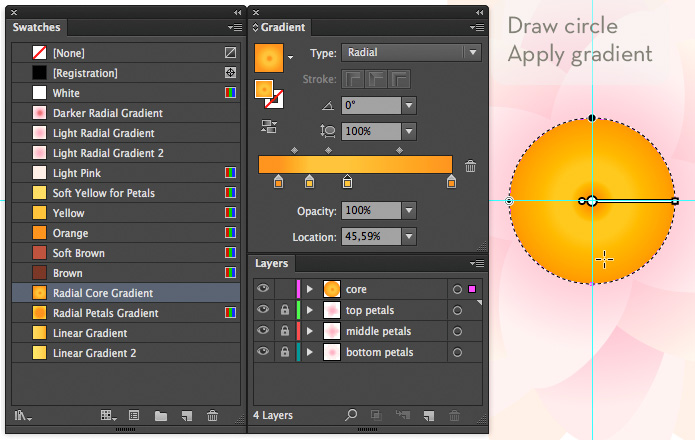
Select the Ellipse tool and draw a circle from the center out, holding down Alt/Option + Shift while dragging. Apply the radial gradient named “Radial Core Gradient” from the Swatches panel.
Creating The Stamen
Create a filament by drawing a rounded rectangle.
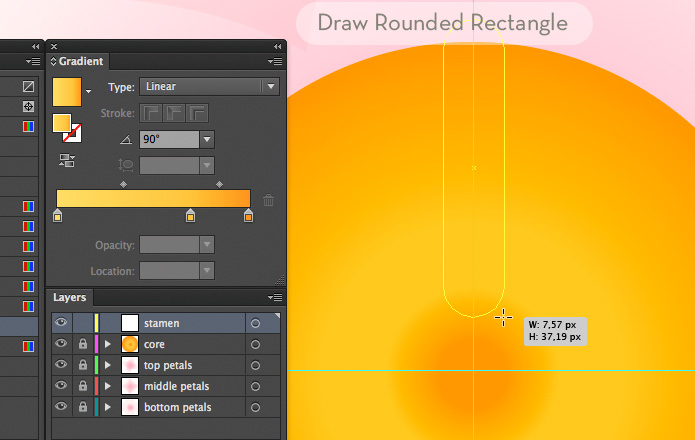
First, lock the “core” layer, and create a new layer, naming it “stamen.” Select the Rounded Rectangle tool, and draw a vertical rounded rectangle, as shown in the image above. Start at the top, to the left of the vertical guide, and drag diagonally to the bottom-right of the vertical guide. While dragging, you can modify the radius of the rounded corners using the up and down arrow keys.
Horizontally align the center.
To position the object perfectly in the center, select both the object and the “core” circle below it. Temporarily unlock the “core” layer to be able to select it. To select the second object in a row, hold down the Shift key and select the core circle again, but this time without holding Shift. You should see an extra-thick selection line; this means that this will be the target object to align with, and so this object will stay in its position, and only other objects will move as needed. Now, select the “Horizontal Align Center” option from the control bar at the top. If you don’t see this bar, go to Window → Control. After aligning the object, make sure to lock the “core” layer again.
Apply a linear gradient.
Apply a “Linear Gradient,” and enter 90° in the “angle” field.
Scale down the bottom anchor points.
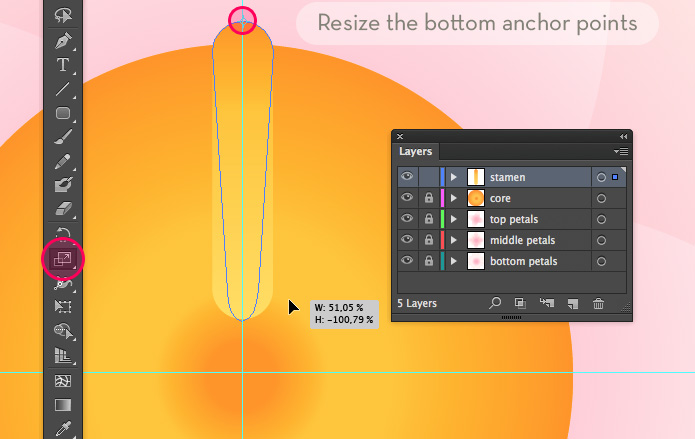
Now, we need to make the bottom part of the filament smaller. Select the Direct Selection tool (white arrow), and draw a selection over the three bottom anchor points. Select the Scale tool, and click precisely to the top anchor point of the object. Make sure you see the scale arrow cursor first somewhere near the bottom-right of the object. Now, start dragging from right to left to make the bottom part smaller (see the image for a reference). Turning on the smart guides might also help; go to View → Smart Guides (or hit Command/Control + U to toggle them on and off).
Cut a slice to create the anther.
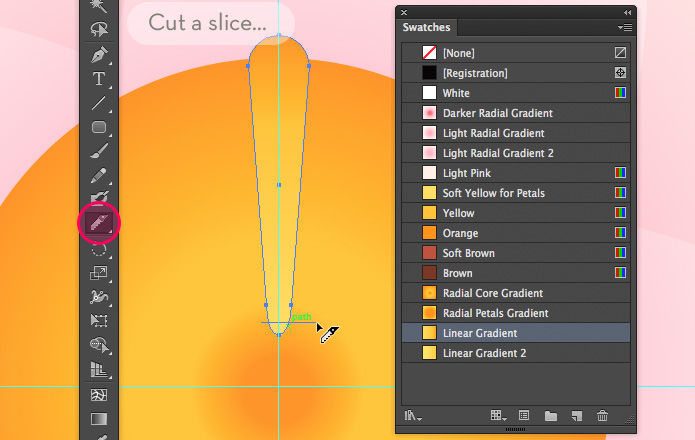
Now we’ll create the anther. Select the Knife tool, which is hidden under the Eraser tool. Hold down both Shift and Alt/Option, and drag from left to right, crossing the object in a straight line at the very bottom (as shown in the image above). Now, the object will be cut in two parts, the filament and the anther. Select only the bottom part, and apply the “Soft Brown” color from the swatches panel.
Copy and paste in front and apply different colors.
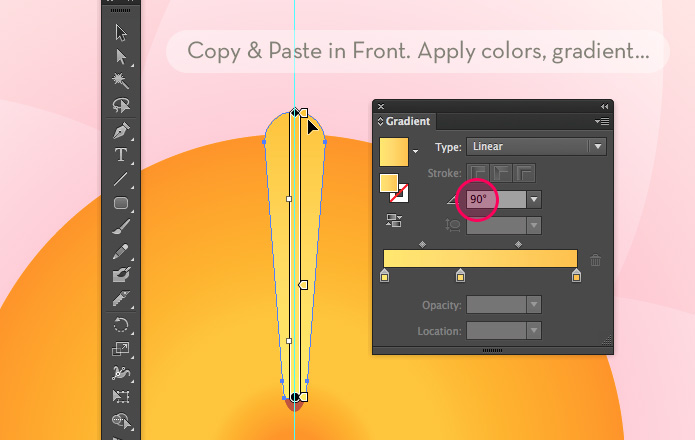
Copy the two objects and paste them in front by hitting Command/Control + F. Apply “Linear gradient 2” to the filament, making sure to enter 90° in the “angle” field. Give the anther a “Brown” color.
Scale down and rotate manually.
In this step, we need to position the second stamen next to the first, but slightly rotated, with the rotation from the center of the flower, and also slightly smaller. We’ll first scale down the object and then rotate it into position. First, make sure the stamen is properly selected. Mouse over the top-left corner of the bounding box until you see the resizing arrows. Click and drag slightly towards the bottom right to make the object smaller. There is no need to keep the proportions exact; just make the object slightly smaller (see the image below).
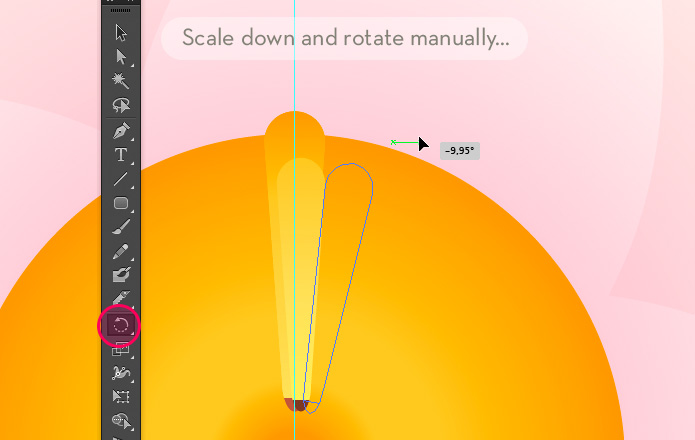
With the object still selected, mouse over the top-right corner of the bounding box until the rotate arrows cursor appear. Click and drag to rotate the object just slightly. An alternative here is to use the Rotate tool and rotate the object from the center of the flower. I don’t have exact measurements to give you because it all depends on the sizes of the two stamens. As you’ll see in the following steps (the second image that follows), this might require a bit of trial and error to get right.
Copy-rotate at 20°.
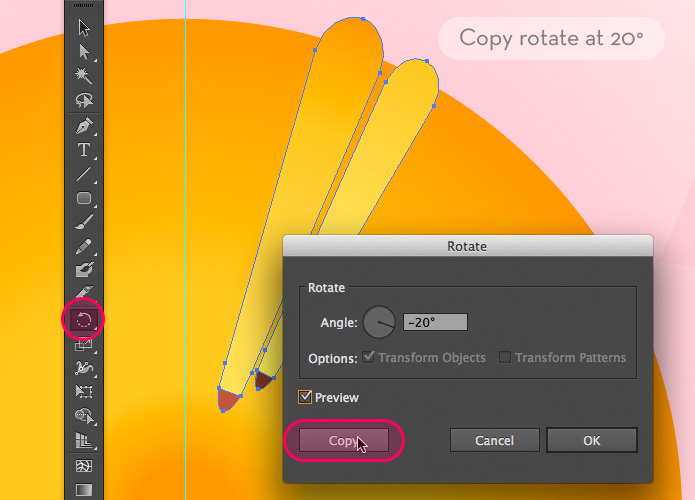
When both stamens are aligned nicely, select them both and Alt/Option-click at the center of the flower. In the Rotate window that appears, make sure the Preview option is checked, and enter a value of 20°. Click “Copy” to copy them.
Tweak to get it right.
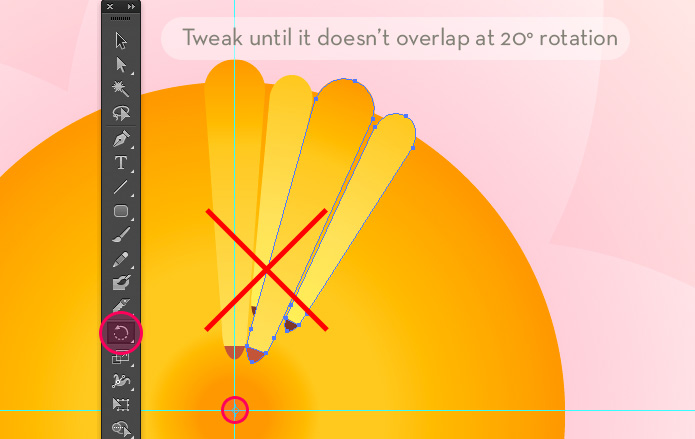
If you end up with the result in the image above, then you’ll need to undo your action (using the shortcut Command/Control + Z) and reposition the second stamen. Make sure the stamens don’t overlap when you rotate the second one. You might need to make both stamen a bit thinner or smaller, adjust the rotation angle, or adjust the position of the second stamen; this step might require some trial and error to get right. Another option is to go with another rotation value (for example, 24°) to end up with fewer stamen (say, 15 instead of 18) — see the next step.
Transform again until you get a full circle of stamens.
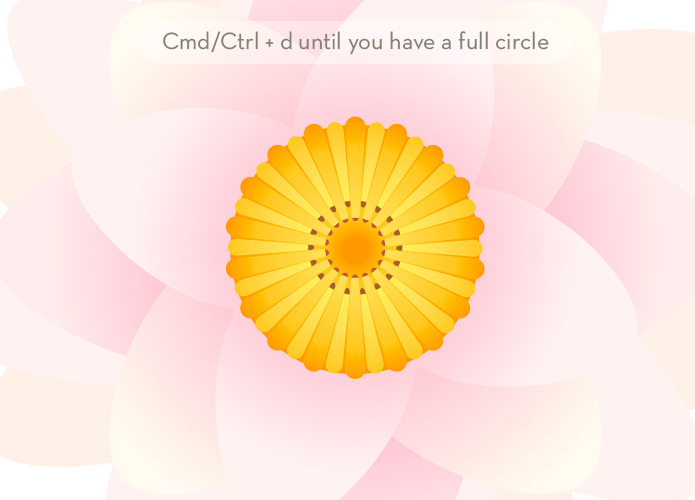
When the rotations of all four stamens are right (after having hit the “Copy” button), repeat hitting Command/Control + D to apply the transformation again and again, until a full circle is drawn (as shown in the image above).
Creating The Core Petals
Creating The First Layer Of Petals
Copy and paste a petal in place and resize it.
We need to do one final step to complete the flower, and that is create a layer of small yellow petals around the core of the flower. First, create a new layer, and name it (I’ve named it “yellow petals”).
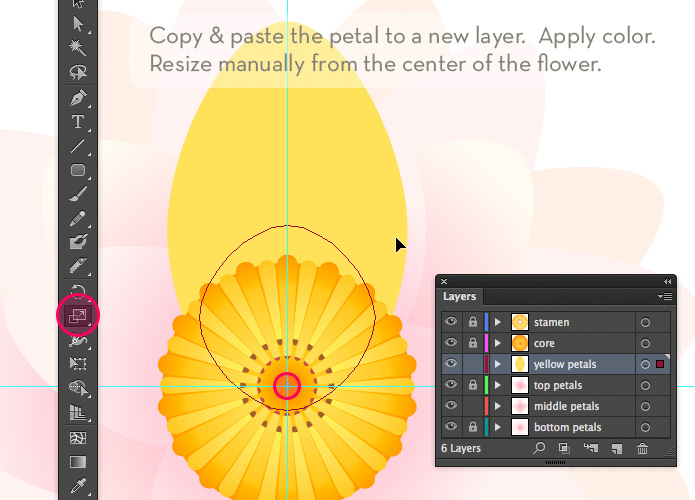
Unlock the “middle petals” layer, and select the vertical petal at the top. Copy the petal, re-lock “middle petals,” click the new “yellow petals” layer, and paste the petal in the exact same place by hitting Command/Control + Shift + V. Apple the color named “Soft Yellow for Petals.” Select the Scale tool, click the center of the flower, and manually scale down the petal, as shown in the image above.
Copy rotate at 60°.
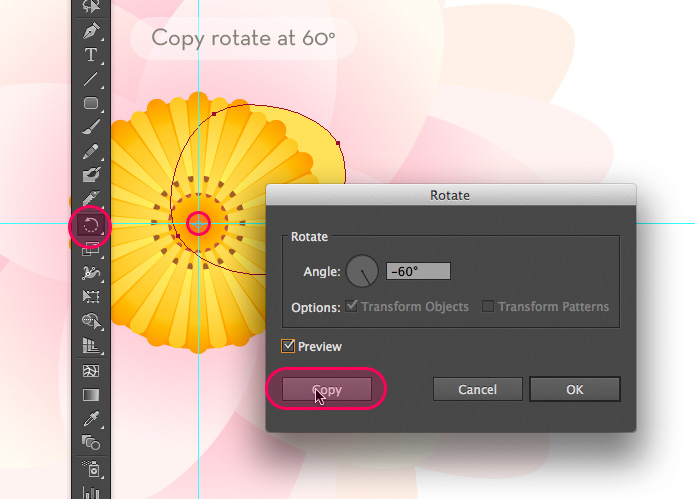
Select the Rotate tool and Alt/Option-click in the center of the flower. In the rotate window, enter a value of 60°, and click “Copy.” Hit Command/Control + D four times in a row to duplicate this transform action to complete the circle of petals.
Creating The Second Layer Of Petals
Duplicate the layer of petals.
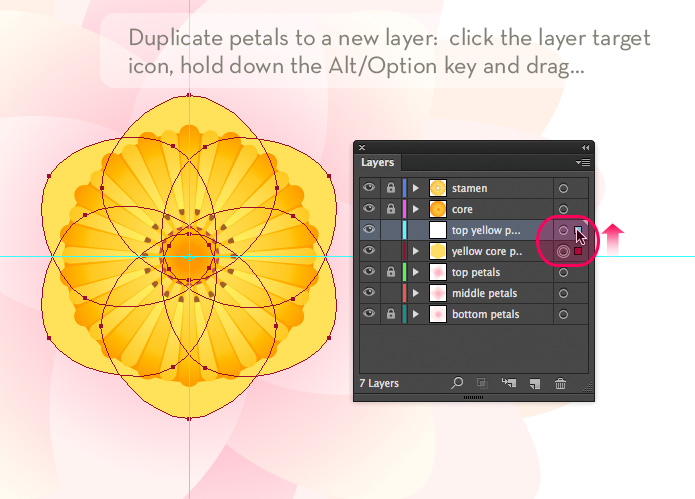
We could do the same actions as before for this next step and copy and paste the layer of petals in place on a new layer. Instead, we’ll duplicate the petals directly onto a new layer, just to demonstrate another easy technique.
First, create the new layer on top of the current one, and name it something like “top yellow petals.” Select the layer of petals by going to the Layers panel and clicking in the area to the right of the circle icon, located on the right side of the current layer. This selects — or, more precisely, targets — all selectable objects of the layer. A small colored square will appear, indicating the selected art. This square wouldn’t appear if this layer was empty, which makes this a handy check whenever you want to remove unnecessary layers during or at the end of the process. We’ll duplicate the selection onto the new layer by holding down Alt/Option and click-dragging the colored square to the new layer above (see the image above).
Apply a gradient
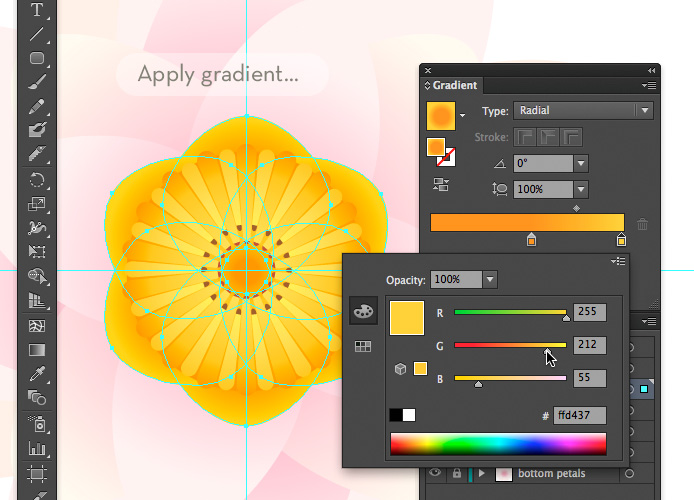
Lock the “yellow petals” layer so that you don’t accidentally modify it. Select the newly duplicated petals, and apply the “Radial Petals Gradient” swatch.
Copy rotate at 30°.
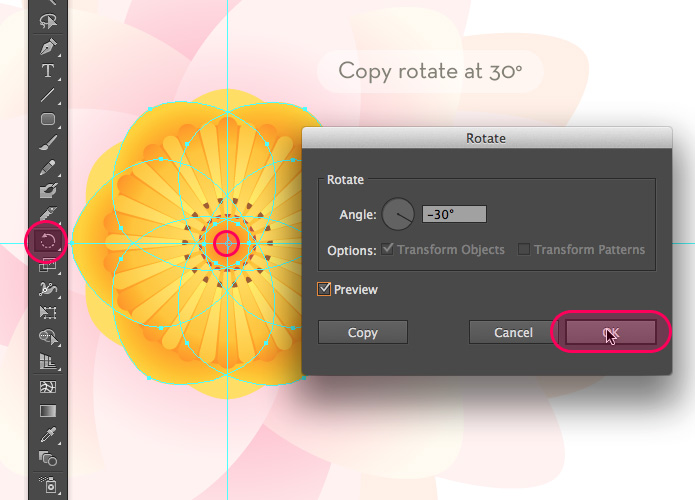
Select the Rotate tool and click precisely at the center of the flower, holding down Alt/Option. In the Rotate window that appears, enter a value of 30°, and click “Copy.”
Create An Environment
That’s it! The flower is now finished. All that’s left is to add a layer of water and leaves below, give the flower a subtle shadow, etc. For the water, I used a radial gradient, making sure the lighter blue surrounds the flower. To help you create this environment, I’ve added all of the colors and gradients that I used to the Illustrator swatches library.

For the shape of the leaves, I created a circle and a very sharp triangle at the top, which I then subtracted to create that characteristic sliver. I used the Minus Front Pathfinder option to do this, but you could easily use the Shapebuilder tool instead, holding down Alt/Option to remove the triangle shape. Then, it’s a matter of duplicating, rotating and scaling the leaves and applying different shades of green.
There you have it! I hope you’ve enjoyed this tutorial and maybe even learned a few things here and there. Keep experimenting, and keep it fun!
Further Reading
- How To Create A Dramatic Vector Illustration
- The Process Behind Good Illustration (Part 1)
- Inspiring Illustrator Artworks By Artists Around The World
- 40 Excellent Adobe Illustrator Tutorials


 Agent Ready is the new Headless
 SurveyJS: White-Label Survey Solution for Your JS App


