Optimizing The Design Workflow With Fireworks Extensions, Part 2
In my previous article on Smashing Magazine, I discussed seven excellent extensions that could fundamentally change your Web design workflow in Adobe Fireworks. The extensions expand Fireworks’ capabilities by adding valuable functionality that could make a huge impact on your overall productivity as a designer.
I have to admit, though, that at the time, I was able only to scratch the surface of what’s possible with Fireworks, so I’d like to add to the list six more extensions. As functionality, they are a bit more “niche” than the extensions in the previous set, but no less valuable in any sense. These are extensions that I always install whenever I set up Adobe Fireworks for myself or anyone on my team and that have proven to be big time-savers over the period that I’ve been using them.
Again, to help you more easily navigate the article, you can refer to the following list:
1. Text Commands
Ever wish you could manipulate text in Fireworks like you can in a text editor? Frankly, I never do because I don’t expect Fireworks to offer powerful text-manipulation abilities. (It’s a graphic design app, after all — the usual workflow is to create and edit your text in another program and then bring it into a Fireworks PNG file.)
Turns out, that’s not (always) the case!
Text Commands by Aaron Beall bring a lot of useful functionality to the manipulation of text objects in Fireworks. Below is a brief overview of what the commands do.
Change Text Case
Do you have a a few paragraphs of text with messed-up formatting and would hate having to retype everything in the correct case? This extension comes with commands to change the case of any text — not just to uppercase or lowercase, but also to sentence case (i.e. the first letter in a sentence), title case (the first letter of every word) and small-caps (regardless of whether your font supports them!).
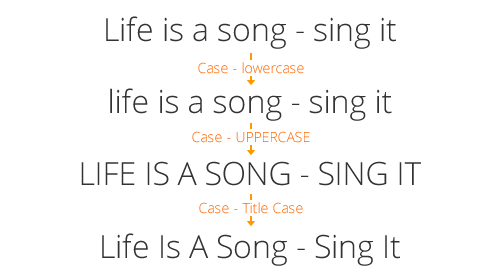
Text Commands enable you to easily change selected text to lowercase, uppercase or title case.
Paste Text Attributes
This command brings one of my favorite features from Microsoft Office — copy formatting — to Fireworks.
Simply copy some text to the clipboard, select another text block, run the “Paste Text Attributes” command, and voilà! All properties of the first copied text object are automatically applied to the second one!
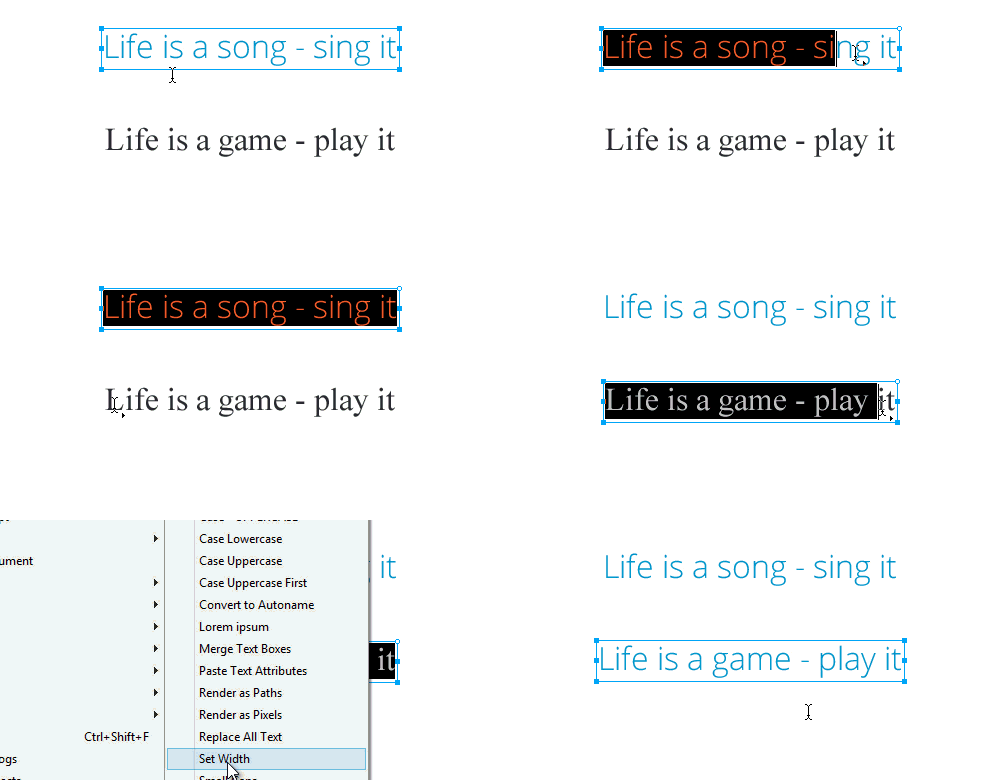
Copy formatting for text objects in Fireworks? Possible!
Split And Merge Text Boxes
If you have differently styled blocks of text contained within one text object, and you need to separate them later for ease of composition, the Split Text Boxes command can do that automatically.
Let’s say you have a text object that contains a headline and some paragraph text below it. If you need to split these so that they can be positioned independently, simply select the text object and apply the command. The command will analyze the block of text, check which portions of the text have different properties, and then split them into separate text boxes.
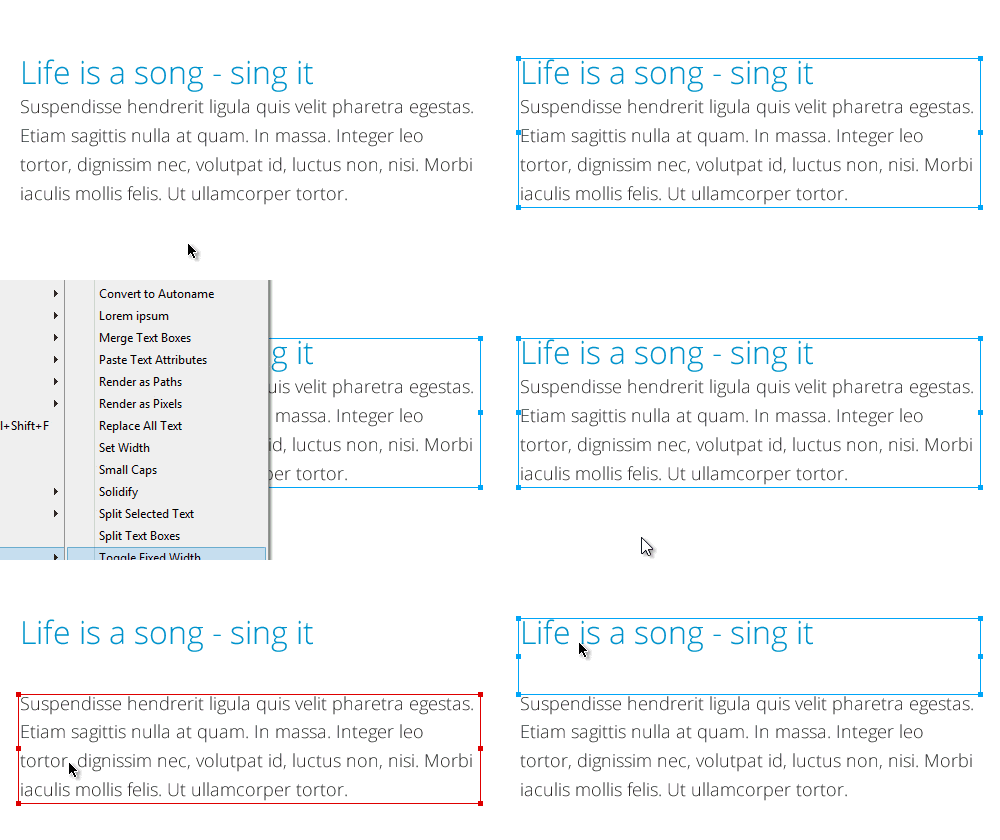
Split a text box into multiple boxes, based on text properties.
Alternatively, you can also merge multiple text objects into a single object with flowing text. When merging text objects, the command figures out the sequence based on the positioning of the objects relative to each other. You can also choose to include text (such as a non-breaking space) between objects when they are merged.
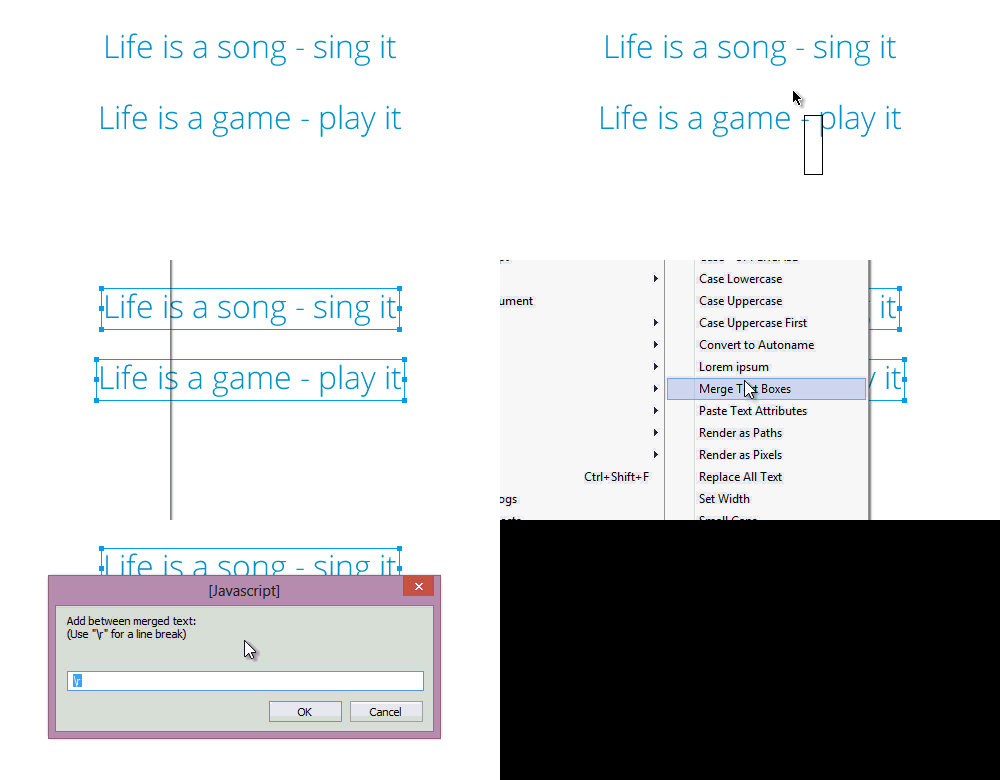
Merge text boxes in Fireworks.
Replace All Text
Sometimes you want to apply a change to multiple text blocks in your design — say, to add a ™ (trademark symbol) to all instances of a brand name, or maybe even to change a bunch of button labels at once.
To do this, simply select all of the text boxes that you want to modify, apply the “Replace All Text” command and specify what the changed text should be.
To retain the existing text and only add to it (say, to wrap quotation marks around a sentence, as in the example below), substitute {T} for the original text.
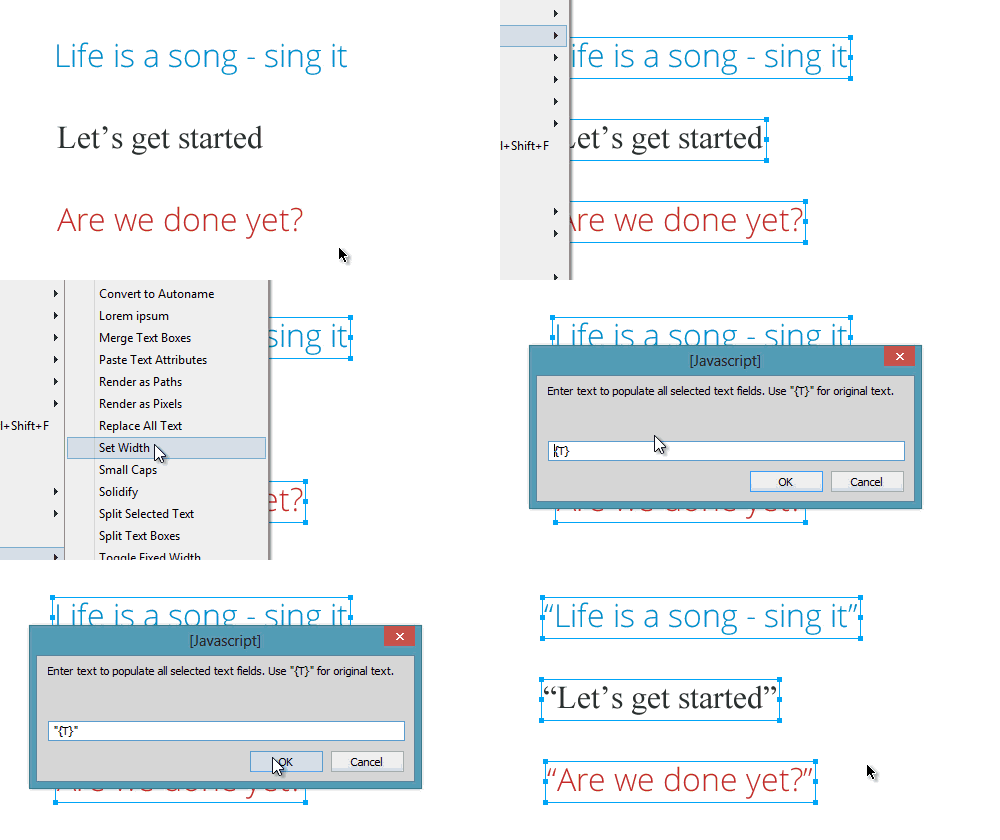
Adding quotation marks to multiple text boxes the easy way.
Sometimes you’ll need to change multiple instances of a label or paragraph. Instead of selecting each instance individually and making the change, select all of the text objects, hit the “Replace All Text” command, and enter the new text. Done!
Lorem Ipsum
No more copying and pasting from a text file every time you need some dummy text for a mockup. Simply create a new text box where you want it, hit the Lorem Ipsum command, and a paragraph of random text will be added. If nothing is selected on the canvas, then the command will create a new text object and apply the last used font properties to it.
You can also easily customize the dummy text generated by the extension, by opening the command’s Lorem ipsum.jsf file (located in ../Fireworks/Configuration/Commands/Text/) and replacing the Lorem Ipsum text lines with your own. (JSF is a special JavaScript Fireworks extension file. It can be easily opened and edited with a simple text editor, just like any normal JavaScript file.)
Even better, the Lorem Ipsum command is quite smart. Each time you run it, the first paragraph of the text will not be “Lorem ipsum…,” but a random paragraph selected from all of the paragraphs available in the extension!
Note: Alternatively, you can try John Dunning’s Lorem Ipsum auto shape. It offers more advanced functionality and control over the particular amount of text you need in a text block. I plan to cover this extension in more detail in another article soon.
2. Modify Commands
Fireworks already provides a ton of ways to modify objects, both vector and raster. Getting a certain look is often an exercise in combining these settings for the object, and results will vary drastically according to your expertise with Fireworks and the time you have at hand.
Aaron Beall’s Modify Commands offer a series of modification presets that reduce the number of steps involved in applying multiple settings to objects to a single click! These are not meant for every occasion, but they can be invaluable in certain instances.
Here’s a look at what the extension packs.
Randomize Properties
The title of this collection of extensions says it all. If you need to create a series of objects with random properties such as size, color and opacity, use the Randomize commands in this extension pack.
One use of this command would be to create a bokeh effect for a background. You can randomize the size, color, opacity, blur, position and rotation of the selected objects based on certain criteria. You can also apply random styles to selected objects, from those already set in the document. For more tips on getting creative with bokeh, take a look at this step-by-step guide.
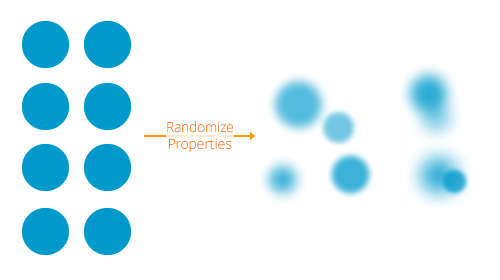
Randomizing the properties of the objects selected on the canvas.
Explode And Scatter
Need to scatter a shape around the canvas to create visual chaos? You can use the Scatter command to automatically spread clones of an object over or around another object, or use the Explode command to create a more dynamic effect.
Both commands come with variables you can set to get the desired effect.
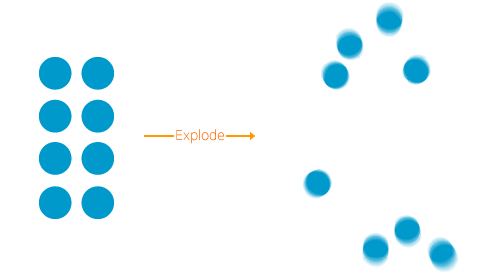
The Explode command in action.
Flatten And Smooth
Although vector objects have many advantages, sometimes you’ll need to convert a few vector objects to bitmaps (i.e. rasterize them). The “Flatten Objects to Bitmaps” command lets you do just that. Select the objects to rasterize, and the command will convert each one into a single bitmap oject. Note that this is different from the “Flatten Selection” function in Fireworks (accessed in the menu via Modify → Flatten Selection), which will convert all selected objects into a single bitmap object.
You can also smoothen the edges of objects with the “Smooth and Flatten” command, which scales up the selected objects, flattens them, and then scales them back down.
Paste Selective Attributes
You can paste the attributes of a copied object to any other object in Fireworks (a super-useful feature!), but what if you want to use only the live filters from the copied object and not its color and stroke? The “Paste Selective Attributes” command lets you select which attributes to paste and leaves the rest out.
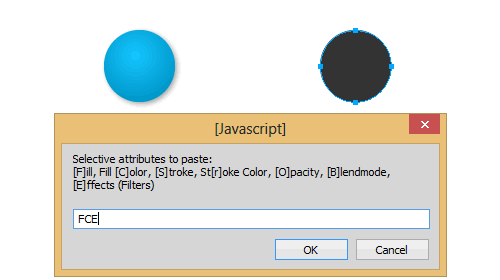
Paste selective attributes.
With the help of this command, the “Paste Attributes” feature in Fireworks (usually accessed with the shortcuts Control/Command + C and then Control/Command + Alt + Shift + V) becomes even more useful and powerful!
Seamless Tile
This is one of my favorite commands from this extension. If you use a lot of background patterns, then you’ve probably attempted to create seamless patterns at some point. This command automates the process by blending the edges of the pattern to a specified extent.
In a recent article on Smashing Magazine, Ivo Mynttinen mentioned this feature, too:
"Download and try the Modify Commands pack, by Aaron Beall. It includes “Seamless Tile” — a very useful command for seamless textures. It does not work equally well for all types of textures, but for the most types it can help you create a seamless pattern in Fireworks really easy. The command creates seamless textures from selected objects on the canvas, by blending their edges automatically (based on a specified percentage)."
3. Path Commands
Next up from Aaron Beall is the excellent Path Commands extension, which adds superpowers to Fireworks’ handling of vector paths and objects. If you are one of those who miss Adobe Illustrator for the powerful control it gives you over paths, wait till you try these out!
The commands take existing object-manipulation techniques and add a few twists that are extremely helpful if you create a lot of vector artwork in Fireworks — which designers of illustrations and icons certainly do.
To be honest, I don’t use every command in the set, so this is not a comprehensive review, but rather a list of the Path Commands I use most.
Manipulate Objects
With this command, you can arc the bottom of a shape outward or inward as much as you need, apply a fisheye lens effect to any object, or deform a shape based on a selected path. This can be a huge time-saver when you want to make some complex changes to the shape of an object. The image below shows a text object being made wavy.
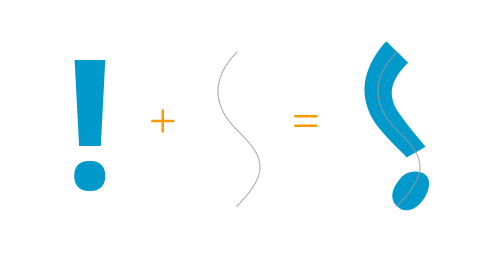
Deform to Path command.
Deform to Path can be a powerful command on its own. Using it, you can invert a shape relative to the canvas, similar to how “Invert Selection” works in Photoshop.
Deform to Path can be useful in a couple of other situations:
- You can distort a narrow ellipse object to a curved path to create a path that tapers at both ends (something like the custom stroke feature in Illustrator), or use an ellipse along a curved path to create a “swoosh” (à la Nike).
- You can distort an arrow vector shape along an S-shaped curve to get a curved arrow that zig-zags around other objects on the canvas.
Combine Paths
With this command, you can blend two paths and their properties by adding a specified number of steps between them; distribute clones of an object over each point in another path; or trim multiple paths to create separate objects from overlapping parts of the shape.
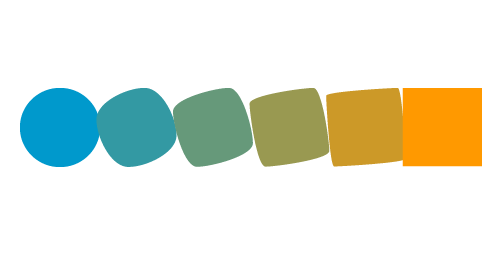
Combine Paths command.
Manipulate Individual Paths
These commands allow you to divide paths in multiple ways according to their position and z-index, to open or close any path, and even to measure the total length of a path in pixels.
There’s also a “Convert Stroke to Fill” command that will come in very handy if you do a lot of illustration work in Fireworks and need to treat outlines as filled objects so that they scale properly. “Convert Stroke to Fill” also provides a way to simulate gradients on a stroke (similar to how it is done in Adobe Illustrator). The workflow is simple: select an object with a stroke and run the command; then, on the new object with a solid fill, you can easily add a gradient.
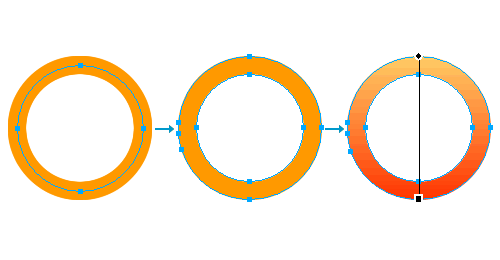
With the “Convert Stroke to Fill” command, you can select an object with a stroke (left), run the command, and the stroke on the object will be converted to an object with a fill (center). You can then apply a gradient to the resulting object (right).
A Word On Paths
All commands in this set will work only if applied to paths. Shapes drawn with the regular shape tools, such as Rectangle and Ellipse, are not paths by default but special vector objects, so you will need to ungroup them before using these commands. The same goes for Auto Shapes as well — you will need to ungroup them before using these commands on them.
When you need to work with text, simply convert it to regular vector paths (select the text object, then Text → Convert to Paths).
4. Linked Images
A great feature of Illustrator, InDesign and some other design applications is the ability to link external images within a design, so that changes to the external files are reflected in your design without the need to reimport them manually. (Smart objects in Photoshop provide something similar, although it is not exactly an elegant solution.)
Fireworks, on the other hand, does not provide any way to link external images to a design for on-the-fly updates.
John Dunning to the rescue, again! John’s Linked Images extension provides this very ability in Fireworks.
Let’s say you are working on a website design, and the client hasn’t finalized the logo yet. Fire up the Linked Images panel, click the “Insert” button to select the current version of the logo from your hard drive (it can be in Fireworks PNG, Photoshop PSD, Illustrator AI or any other supported image format), and place it in the layout.
Later, when the logo has been updated, simply select the imported image and run the Refresh command to reimport the latest version of the source file.
Or, double-click the linked image’s name in the panel, edit the logo image that opens up, go back to your design and hit “Refresh.” Voilà! The latest version of the logo will appear in your file, without your having to mess with deleting or replacing anything in the design.
You can even update the image everywhere it appears in the document — including on multiple pages — with the “Refresh All in Document” command in the Linked Images panel.
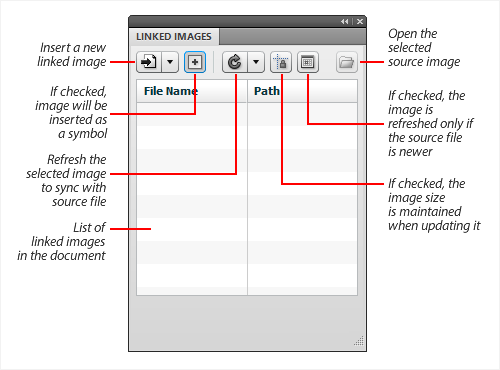
The Linked Images panel.
When inserting a linked image, you can also add it as a Fireworks symbol if you are going to use it in multiple instances.
If you have resized the image in your artwork, there is also an option to retain the size of the object when refreshing so that any changes to the source image don’t mess up your design in any way.
For the many options that Linked Images offers, check the detailed documentation on John’s website.
The Linked Images panel supports all image file formats that Fireworks supports (but see note below), including:
- Fireworks editable PNG (
.fw.png); - Photoshop PSD (
.psd); - Illustrator AI (
.ai); - EPS (
.eps); - All standard “flattened” image formats, such as PNG8/24/32, JPEG, GIF, BMP and TIFF.
Note: When importing Fireworks PNG files, Linked Images offers 100% file compatibility. When importing Photoshop and Illustrator files, some limitations will apply; for example, if Fireworks doesn’t support a particular object or feature in a PSD or AI file (such as gradient meshes in Adobe Illustrator files), then those objects will simply be ignored upon being imported. Keep this in mind when working with linked PSD and AI files. For best results, then, work with Fireworks PNG files whenever possible.
5. Adjustments Panel
You will often need variations of a color in a design — perhaps a slightly darker or slightly brighter variant. This is usually pretty easy to do in Fireworks: select an object, go to the Mixer panel, and change the hue, saturation or brightness value.
But when a change is applied to a group of objects with different colors, Fireworks ends up applying the same color value to all objects, irrespective of their original colors — which we don’t want.
Enter the Adjustments Panel by John Dunning. It lets you change the color properties of multiple objects while retaining their individual identities. Here’s how you would go about it:
- Select all of the objects you need to edit.
- Open the Adjustments panel, and choose whether to alter their fill color, stroke color or both.
- Choose what to change — hue, saturation, brightness, opacity, stroke width.
- Use the number buttons at the top of the panel to reduce or increase the selected property in increments of 1 or 10.
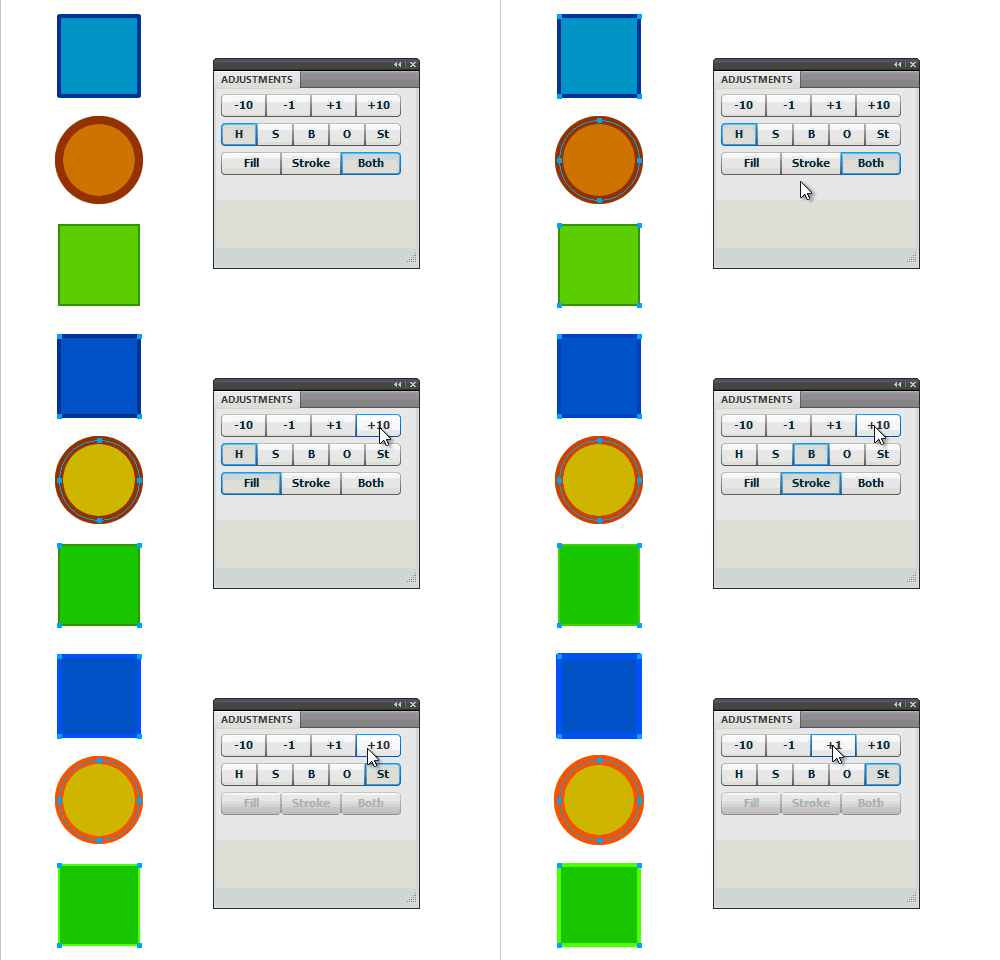
The Adjustments panel in action.
The adjustments apply to gradients as well as to flat fill colors, so this is a great time-saver when creating variations of buttons and other UI elements, either for the same design you’re working on or when creating various color options in general.
6. CSS Sprite Maker
Adobe Fireworks CS6 introduced quite a few Web design-friendly features, including automatic CSS sprite creation. CSS sprites have long been favored for enabling Web designers and developers to consolidate a set of images into a single image, with portions being made visible as necessary. The problem has always been that the tediousness of creating these increases with the number of elements and of variations in size.
Note: To learn more about CSS sprites, read the excellent articles “The Mystery of CSS Sprites: Techniques, Tools and Tutorials,” by Sven Lennartz, and “CSS Sprites Revisited,” by Niels Matthijs.
While you can now create CSS sprites directly in Fireworks CS6, not everyone has the latest version. For the rest of us, there’s the CSS Sprite Maker extension, which you can get from Adobe Exchange.
Note: The developer of the extension seems to have gone missing from the Web. His website and blog are offline, and the extension is not being updated anymore. Fortunately, it still works just fine in recent versions of Fireworks, including CS5.1 and CS6.)
This extension is actually made up of two panels, “CSS Sprite Maker” and “Tools.” The former enables you to create sprites, while the latter provides some nifty tools to help with the process. Let’s look at each.
CSS Sprite Maker
The core feature of this panel is to help you create CSS sprites. The process is simple.
- Create a new document (the canvas’ size doesn’t matter), and pull in all of the images needed for the sprite. The size of the images doesn’t matter, nor does the layout — you can even leave them all in a stack, as they appear after being imported.
- Next, choose a name for the sprite image, add padding between the objects if needed, define class names, and hit a button.
- The icons will be automatically laid out and the canvas resized accordingly, and you’ll have an image, a CSS file and an HTML file with all of the details on using the sprite!
![]()
The CSS Sprite Maker panel in action. (The icons in this example are from the free icon set Crystal Project by Everaldo).
There are two options for creating a sprite:
- The first, a general CSS sprite, neatly packs the images together based on how much padding you want between them, and fits them into a rectangular shape of the correct size.
- A second option, a diagonal CSS sprite, has the advantage of hover and disabled states.
You will first need to rename the elements using the “Utility” section of the Tools panel (see the description below) before creating the diagonal sprite, otherwise you’ll run into an error message. Once you’ve figured out that part, though, being able to create hover and disabled states is quite nifty. The extension will automatically duplicate all elements, group them and apply appropriate styles to each one — creating a slightly higher brightness for the hover state and a grayscale conversion for the disabled state (you can change these settings by editing the filters yourself, if you prefer).
Note: The extension does not automatically write the CSS code for hover states to the images. Instead, it creates different classes for each state by appending a modifier (that you can specify) to the class name of the normal state.
The workflow is quite simple. Create (or import) a few icons, place them on the canvas, and name each individual object in the Layers panel. Next, open the CSS Sprite Maker panel, and in the “Diagonal CSS Sprite” section, give the export a name, a prefix and a primary class, and set the padding. Then, click the “Export” button. Done!
![]()
Settings for diagonal CSS sprites. Notice that the “hover” and “disabled” styles are optional (with a little checkbox beside each).
(You can also watch a screencast, saved from the author’s website before it went down.)
Tools
The Tools panel has a few features to help you prepare images for the sprite. If your images are all of different sizes, just select them, set a size, and hit “Create.” The extension will add a transparent box behind each image and group it with the image so that each one has objects of the same size.
You can also change the objects’ names en masse. Simply define the name and the extension will apply it, along with a numeric sequence for all selected images. Lastly, to arrange the icons in a grid exactly the way you want, just enter the grid values under the Guidelines section and hit the “Create” button to add the horizontal and vertical guides accordingly.
![]()
CSS Sprite Maker panel: Tools
So, Which Should I Use?
Comparing the CSS Sprite Maker panel with the CSS Sprites feature available in Fireworks CS6, I have to admit that I prefer this extension simply because there’s no need to create slices before exporting. Besides, the grouping and naming tools in the extension make preparing the sprite much easier as of now.
But it’s a matter of preference, of course, and if you’re using Fireworks CS6, you can try both options for CSS sprites and see which one suits you better!
Wrapping Up
The Fireworks community has contributed many powerful commands and panels. In my my last article, I reviewed the following extensions: Grids Panel, Guides Panel, Smart Resize Auto Shape, Tables Auto Shape, Placeholder Auto Shape, Orange Commands and QuickFire.
Today, we’ve looked at another set: Text Commands, Modify Commands, Path Commands, Linked Images, Adjustments Panel and CSS Sprite Maker. All of these extensions I use often and are powerful enough to warrant discussing at length. They should help you work faster and better in Fireworks, just as they’ve helped me.
I am planning one more article on the subject, so stay tuned!
Other Resources
- “Working With CSS Sprites in Fireworks CS6,” Priyanka Herur, Adobe Developer Connection
- “Diagonal CSS Sprites,” Aaron Barker
Fireworks Extensions
Further Reading
- Sketch, Illustrator or Fireworks?
- Switching From Adobe Fireworks To Sketch: Ten Tips And Tricks
- The Present And Future Of Adobe Fireworks
- The Power of Adobe Fireworks: What Can You Achieve With It?


 Agent Ready is the new Headless
 SurveyJS: White-Label Survey Solution for Your JS App