Building An Online Magazine App For Windows 8, Part 1: The HTML5 App
Back in 2010, Microsoft shifted its focus from propriety Web technology to open Web technology. The first fruits of this refocus materialized a few years later — in Internet Explorer, the Windows operating system, its developer tools and its cloud software.
Things have changed for the better so far:
- With version 10, Internet Explorer has finally grown up and become a fast modern browser.
- You can build native Windows apps with JavaScript, HTML5 and CSS — apps that look and feel solid and have modern user interfaces.
- On the server side, ASP.NET lets you own your own markup and HTTP services (finally), with Web developer-friendly tools like Razor and Web API.
- At the cloud level, Microsoft has thrown its full weight behind Windows Azure, hosting HTTP servers en masse.
Across the board, Web developers should see significant improvements, making Windows an HTML5-friendly platform.
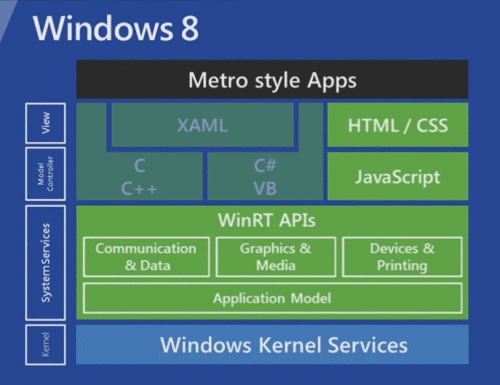
Windows 8 apps that reflect Microsoft’s “modern UI” can be built using a variety of technologies — HTML5, JavaScript and CSS being among them. Access to the native API enables you to do a lot more than you could from a browser. (Larger view)
A Two-Part Whirlwind Tour
In this first article in our two-part series, we’ll look at an HTML5 app that runs natively on Windows 8. In the second part, we’ll tie it up with the server and cloud. It will be a whirlwind tour through Microsoft-based Web development in 2013, with a hands-on case study and some code.
If you code along with us, you’ll end up with an online magazine app, built with Web technology. The Windows 8 app will present articles fetched in JSON format from a content host running on Windows Azure. You will have a personally branded touch-friendly magazine app that you can submit to the Windows Store, that integrates with the Search and Share charms and that displays articles you manage in a cloud-based content management system (CMS).
In this first part, we’ll explain how you can launch and customize a pre-baked HTML5-based Windows Store app. In the second part, we’ll guide you through setting up your own content host, from where you can publish articles.
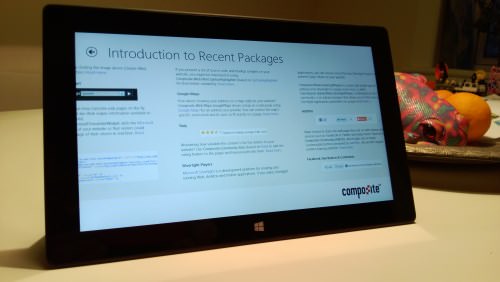
Our app will run on any Windows 8 machine, including Windows RT devices such as the Microsoft Surface RT. (Larger view)
The source code presented here, as well as the CMS back end, are all open source and easy to adapt, and the hosting and tools referred to here are available free of charge.
Throughout, you will find code snippets and links to relevant in-depth articles, and I’ll pass along some of the gotchas that I learned while building this app.
What You’ll Need To Get Started
To develop and debug a Windows Store app, you’ll need to be running Windows 8, either natively or via a virtual machine. To edit the HTML, CSS and so on, you can use your favorite editor and compile the app via the command line; here, I’ll be using Visual Studio 2012. You can download Visual Studio Express 2012 for Windows 8 for free.
A Barebones App
Before diving into the pre-baked app, we should get to know the playing field a bit. So, here is what the code for a barebones Windows Store app might look like:
<!DOCTYPE html>
<html>
    <head>
    </head>
    <body>
        <img src="https://upload.wikimedia.org/wikipedia/commons/2/28/HelloWorld.svg" />
    </body>
</html>
To compile this into an app, Visual Studio will also need a project file and a manifest file (which contains meta data about your app). However, the HTML document above is all you really need to get a “Hello World.”
What you add is up to you, as long as it runs in Internet Explorer (IE) 10. (You can safely use CSS3, canvas, video, SVG, your favorite JavaScript libraries, etc.) In addition, you will also have the option to use the Windows Store API from JavaScript, to take advantage of Windows 8-specific features.
In our pre-baked app, we will use the Windows Store API. Even though it is optional, we will need it if we want things to feel native and to integrate with Windows 8.
Downloading And Launching The Magazine App
The source code for the magazine app is available on GitHub. If you don’t have Git on your machine, simply download the ZIP file and extract the source code.
Once it’s downloaded, launch the project file, Composite.AppFeed.Client.Template.jsproj. When Visual Studio has launched, hit F5 to run the app.
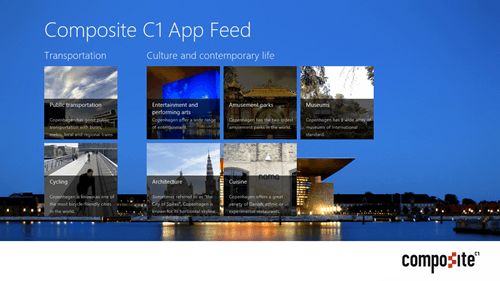
The app’s main view shows articles within tiles that are familiar from Windows 8’s UI. (Larger view)
Our app has the following basic features:
- It’s a simple navigation app, with grouped items, a group view and an item view.
- Clicking a group’s name will display the group view. Clicking an item’s tile will show the item.
- Search and Share charms, device rotation, docking and the app bar all work.
- Offline mode is supported (cached content is shown).
- Rich HTML content is supported, including things like video.
- It has the modern UI navigation experience expected in Windows 8 apps.
The Search and Share charms are part of a canonical charms menu in Windows 8, invoked by swiping in from the right edge (or moving your mouse to one of the right corners). The Search charm, as the name suggests, lets the user search, in our case, through articles in the app. The Share charm integrates with the user’s mail and social media accounts, enabling the user to share the URL of a given article.
In the following few sections, we will customize the design.
The sample content you see in the app is downloaded from the Web from various sources (including an existing blog, CodePlex and StackOverflow) and gives an idea of what existing raw Web content could look like when presented via this app. We will replace this default feed with one you control in part two.
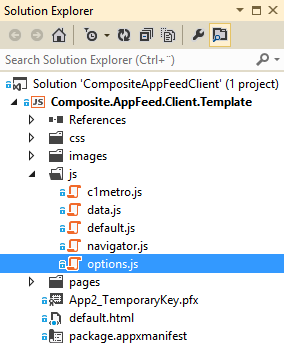
The project explorer shows files that make up the HTML5 app.
Making The App Your Own
The project’s structure is pretty straightforward. The css, images and js folders contain global resources for the app, while the individual pages (including HTML, CSS and JavaScript) are defined below the pages folder. In the root, we have default.html, which is the app’s starting point, and package.appxmanifest, which contains meta data used by the operating system (OS) to present the app.
Once you know your way around the sources, you can customize as you wish. To customize the UI quickly, focus on the following files.
/package.appxmanifest
Edit the package.appxmanifest file. In the “Application UI” tab, specify your app’s title, language and description. In the “Packaging” tab, set a unique package name and publisher display name.
You can customize other things, such as the appearance of the tile for your app. The images for your tiles can be replaced in the /images folder (see below).
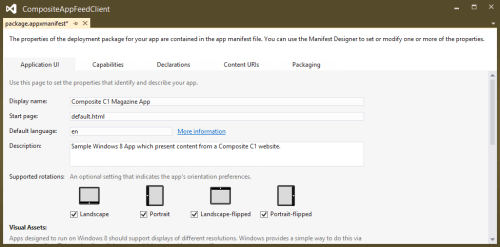
The app’s manifest file is where you control how the app shows up in the OS. (Larger view)
/images Folder
Right-click the /image folder, select Open Folder in File Explorer, and replace the various-sized logos with your own. These logos will be used to create the tiles for the Windows 8 start screen and your app’s splash screen. You can change the background on the main page by replacing background_mini.jpg. Change inapplogo.png to customize the footer.

Use PNG and JPEG images in your app and to represent the app on the start screen. (Larger view)
/css/default.css
Set the colors for the app’s bar and background at the top of default.css.
/js/options.js
In options.js, you can set the app’s title and details such as the “About” page’s URL, the privacy page’s URL and the alert text for offline mode.
At a minimum, customize the title and websiteUrl. Later on, when you’re running your own content host, change dataHostUrl, but keep it as is for now.
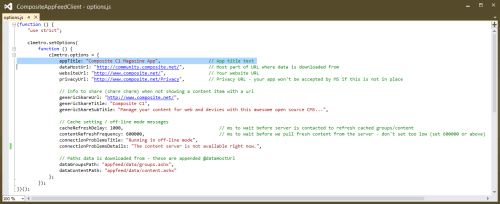
The app’s global settings are controlled via JavaScript. (Larger view)
If you will be submitting your app to the Windows Store, pay attention to the value of privacyUrl; this is the URL that gets loaded when the user invokes yours app’s privacy policy, via the Settings charm. Because your app will be contacting a server on the Internet to fetch articles, you will need to explain your privacy policy to the user in order for your app to be approved by Microsoft. More on that in part two.
Diving Deeper Into The App
If you’ve updated the colors, titles, URLs and images, as explained above, then the major design elements of your magazine app should be branded to your liking. The next step is, obviously, to get your own content host up and running. But before we cover this, let’s cover a few pointers on further customizing the app.
IE 10 And The Windows Store App API
When building your app, you can safely use the HTML5 and CSS3 features of IE 10, including canvas and SVG. You can use any JavaScript library out there, such as AngularJS, jQuery or LESS. You are not required to test your pages in other browsers or in older versions of IE.
The Windows Store app API is by far the biggest change from the Web developer’s traditional experience. If you wish to interact with the OS, go through this API using JavaScript. The API also contains a host of other features that make JavaScript even more powerful. The API is unobtrusive in that you don’t have to care about it until you need to interact with the OS or want to use one of its features.
Here are a few APIs used by this app:
WinJSenables more advanced JavaScript features (such as the Promise object and XHR), which are excellent for writing asynchronous network interactions.Windows.UI,Windows.ApplicationModelandWindows.Storagelet you plug into the native OS and UI to do things such as interact with the charms menu and read and write to local files.WinJS.UIcontains presentation controls that act in accordance with Windows 8’s modern UI, including the scrollable list view that you see when launching the application.
For more on this, see “Windows API for Windows Store Apps.”
Single-Page Navigation
This app uses a single-page navigation model, meaning that HTML, CSS and JavaScript for individual subpages are loaded into /default.html as you invoke links. This enables you to preserve state across pages and to get smooth page transitions; but it also changes how page-specific CSS and scripts are written.
Below the /pages folder, you will find subfolders with HTML, CSS and JavaScript, making up the individual pages of the app, and this is where you can customize the individual views to your heart’s content.
Due to the single-page navigation model, expect the HTML, CSS and JavaScript from /default.html to stay with you all the time. When you navigate a subpage, scripts and CSS are loaded dynamically, and the HTML of a subpage is loaded into the /default.html div with the ID contenthost.
When you navigate from one page to another, CSS rules will not be unloaded, which means that any global selectors you style in a CSS file for a subpage will stick. If this is not desirable, you can prefix subpage-specific CSS selectors with a unique class name that identifies the subpage.
An example is this rule from /pages/groupedItems/groupedItems.css:
.groupeditemspage .groupeditemslist .group-header .group-title, .groupeditemspage .pagetitle {
    color: #eeeeee;
}
The class name groupeditemspage is set in /pages/groupedItems/gropuedItems.html and only there. This enables us to set a light color for title text, but only for this particular subpage. When we navigate to one of the other subpages, the groupeditemspage class will no longer be in the DOM, and titles will fall back to a dark color, even though the CSS rules above still load.
It is worth mentioning that I’m using JavaScript (see /js/navigation.js) to lift this page-specific class name up to the body element on the current page every time the user navigates; this enables me to style all elements on the current DOM. If I didn’t do this, I would only be able to style elements below contenthost in default.html. If you study groupedItems.css, you will see a background image being set, and it only works because of this “move the subpage class up the DOM” trick — a small generic hack that lets us do more with CSS.
Single-Page Navigation Requires You To Unregister Resources
You also need to care about unregistering resources, such as removing event listeners when a subpage is unloaded. Because the DOM is always kept alive, failing to unregister subpage resources on unloading can lead to undesirable results.
An example is this handler from /pages/groupedItems/groupedItems.js:
unload: function () {
   var dataTransferManager = Windows.ApplicationModel.DataTransfer.DataTransferManager.getForCurrentView();
   dataTransferManager.removeEventListener("datarequested", shareDataRequested);
}
Earlier in the subpage’s life, we subscribed to a data request event (which happens when a user invokes the Share charm), and we need to unsubscribe from this event when the user navigates away from that particular subpage.
A Few Words About CSS Media Queries
Your app can run on both classic Windows 8 PCs and ARM-based devices, such as the Surface RT tablet. In addition to a multitude of screen resolutions, be prepared for things such as horizontal to vertical rotation of the device and your app being snapped next to another one.
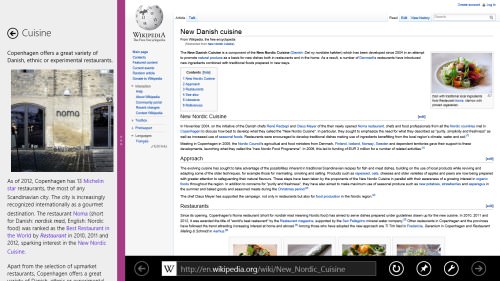
Windows 8 let you run two apps side by side, with one being “snapped.” Here, our app is snapped next to the Web browser, which lets users follow links in articles within the app without losing focus. (Larger view)
This you can do by using CSS media queries for Windows 8 apps. Below are a few sample declarations.
@media screen and (-ms-view-state: snapped) {
    .groupdetailpage .itemslist .win-groupheader {
        visibility: hidden;
    }
}
@media screen and (-ms-view-state: fullscreen-portrait) {
    .groupdetailpage .itemslist .win-horizontal.win-viewport .win-surface {
        margin-left: 100px;
    }
}
You can also respond to rotation and snap events in scripting. For example, see the updateLayout handler in groupedItems.js.
Testing And Debugging
The coding and debugging experience is slightly different than in normal Web development. For starters, your HTML app will run in a 100% chromeless full-screen environment, so the developer toolbar is not where you are used to seeing it. You’ll find it inside Visual Studio instead, which means you’ll have to jump between Visual Studio and your running app to inspect elements and so on.
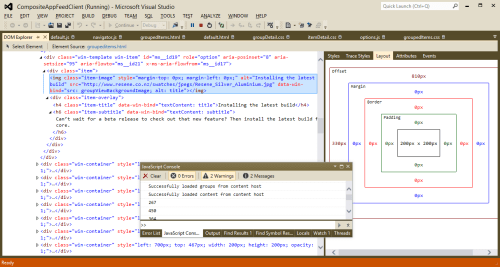
The DOM explorer in Visual Studio 2012 looks and feels like most other developer toolbars. (Larger view)
On the bright side, you’ll have a nice spacious development canvas and excellent JavaScript debugging capabilities. And if you are running dual monitors, the experience is quite nice and seamless.
While your app is running, you will find a “DOM Explorer” tab in Visual Studio, which represents the page you are currently viewing. The “Select Element” button will bring focus to your HTML app and let you select an element, just like in the developer toolbars you know.
Visual Studio can launch your app locally, via a simulator and on a remote device. The simulator lets you emulate different device sizes and test things such as touch events, geo-location services and changes in orientation, even though you are sitting in front of a classic PC.
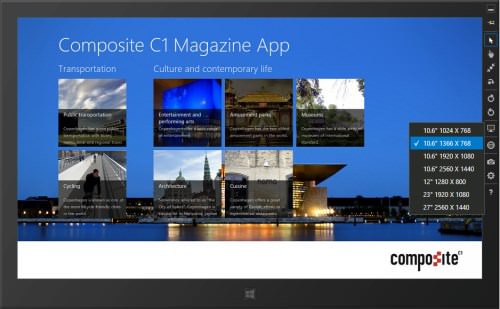
The simulator can launch a new log-in session on your Windows 8 machine, displaying everything as if it were running on the device you have selected. This lets you test how your app will behave (including with touch actions) on different device sizes and orientations. (Larger view)
Remote machine debugging is surprisingly easy to get up and running. Apart from letting you instantly test your app on a device like Surface RT, it is also an easy way to get your app onto a device. Once the app has been launched this way, it will stay on the device and can be used for demoing and so forth.
A Few Common Problems And How To Avoid Them
During development, I ran into two issues that took me way too much time to figure out. To save you from repeating my experience, I’ll leave you with two pointers as you polish the app.
If you ever find yourself developing a Windows Store app that fetches data from your local network, via a virtual private network or the like, you might need to edit package.appxmanifest and enable “Private Network (Client & Server)” in the “Capabilities” tab. If this setting is not enabled and you are trying to read data from a local test server, then network communication will be blocked (with no usable hints). Uncheck this again before submitting the app, unless you expect users to need this feature.
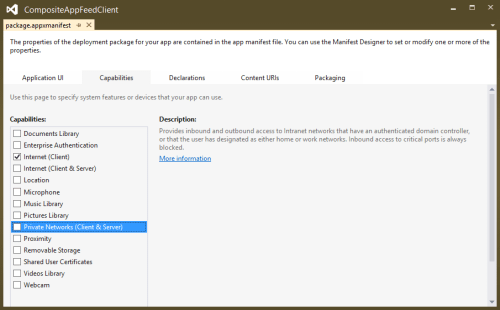
You have to explicitly opt in to access things such as location, the webcam, private networks and the microphone. Users will be informed of this usage. To keep users from getting suspicious, select only what you need. (Larger view)
If you write code that interacts with the Share charm and your code fails inside the datarequested handler or you stop a debugging session there, then you will experience a bug whereby the Share charm stops working, even if you restart the debugging session. The easiest way to fix this is to launch the Task Manager and restart explorer.exe.
What To Expect In Part 2
In the second and last part of this series, we’ll walk through setting up the CMS back end, getting it online and having the app read content from it. With the customized app and the back end online, you’ll have something of real value to publish, and we’ll briefly touch on how to do just that.
If you plan to submit your app to the Microsoft Store, now is a good time to sign up for a developer account. If you choose the “individual account,” you will get up and running a whole lot faster; the “company account” requires verification but lets you publish apps using more features. Make sure you know the differences between the two account types before signing up. There is a $49 annual registration fee, while submitting apps is free.
Further Reading
- Beyond The Browser: From Web Apps To Desktop Apps
- Creating Universal Windows Apps With React Native
- Testing For And With Windows Phone
- Why You Should Consider React Native For Your Mobile App


 Agent Ready is the new Headless
 SurveyJS: White-Label Survey Solution for Your JS App

