Customizing Admin Columns In WordPress
(This is a sponsored article.) If you manage a WordPress website, you've probably faced a common problem. How do you get insight into all of your content at a glance? WordPress' admin area does not show you much about your pages, posts, users and comments. That can make it hard to find the right page, to check if all associated fields are properly filled, or simply to get a general sense of your website's content. Does this sound familiar to you? Read on because we will demonstrate some simple custom solutions and a ready-to-deploy plugin to overcome this problem.
A modern WordPress website usually consists of much richer content than simply titles and chunks of text. Plugins such as Advanced Custom Fields and WooCommerce introduce custom fields that store specific pieces of content, such as prices, additional images, subtitles and so forth. Those functions on their own are great, but how do you keep track of all of that content when you can still only see the title, date and author in your admin screens? The answer is, you can't.
In this tutorial, we'll tackle this problem by showing you some easy-to-implement custom code. For those of you who don't want to code, we'll show you how to configure the Admin Columns plugin to do the job for you.
Also, you will learn how to:
- add new columns to the posts overview,
- sort your posts by these columns,
- create a filtering form to find your content,
- use Admin Columns to edit your content inline (without having to navigate to the individual post).
A Motivating Use Case
Imagine that you're tasked with building or managing a website containing a real-estate agency's portfolio. On the website, you display pictures, house addresses, locations, number of rooms and other attributes. On the admin screen, you manage the portfolio, adding, removing and editing existing real estate. The columns WordPress shows by default (title, author, publication date, number of comments) are hardly relevant for your real-estate website, and you'd be more interested in seeing the existing pictures and information about the real-estate listings as a whole.
Let's look at a standard admin overview screen for custom post types:
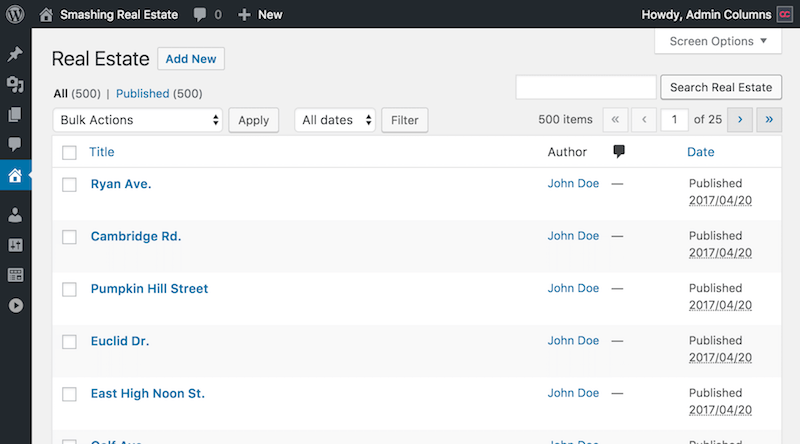
This would be pretty useful if this were our website’s blog posts or news items, right? But for our real-estate portfolio, this gives us no information at all. The same goes for web shops, car dealerships, creative portfolios and so forth. Luckily, there’s a solution. We’ll work towards a far more pleasing overview of our real-estate portfolio, which will look like this:
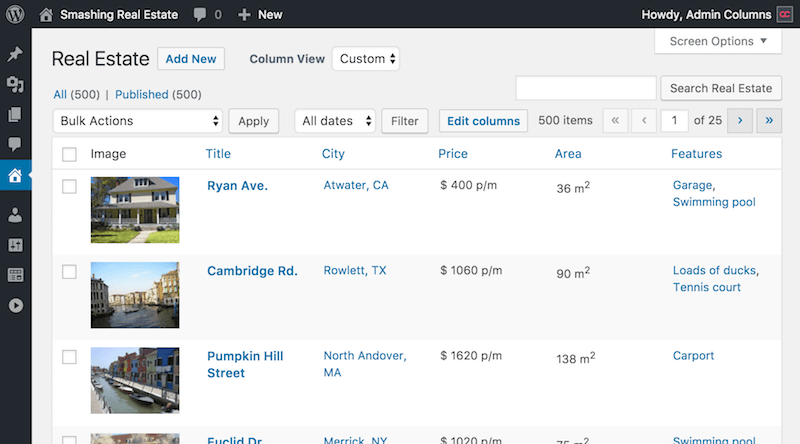
As you can see, this gives us a lot of insight into our real-estate portfolio. It’s now much easier to find, validate and, as you’ll see, edit the content.
We'll provide a step-by-step guide to adding custom columns to your WordPress admin screens, sorting them and adding custom filters. We'll also show you how to do this with the Admin Columns plugin. (If you don't want to code, you can just skip to that part right away.)
Managing Columns With Code
First up is the management of columns for admin screens: adding columns that are specific to your content type, removing columns that are obsolete, and reordering columns. For this goal, WordPress offers the Columns API. It's available for users and taxonomies as well, but we'll focus on the posts screen.
Changing the existing columns can be accomplished using two WordPress hooks: manage_[post_type]_posts_columns, which allows you to remove, reorder and add columns, and manage_[post_type]_posts_custom_column. In place of [post_type], enter the post type you wish to target. For pages, for example, you would use manage_page_posts_columns and manage_page_posts_custom_column, respectively.
If you haven't heard about WordPress hooks, we encourage you to move on to the "Managing Columns With the Admin Columns Plugin" section. It explains how you can manage your columns without touching any code. But if you feel like learning, then read more about WordPress hooks (filters and actions).
“Where Do I Place My Code?”
To add all of this custom functionality, we need a place to run our code. This is best done in a plugin. In this tutorial, for example, we're creating a custom plugin to run all of this code in. If you don't know how to create a plugin, you can learn how.
All of the code snippets we'll provide will go in our custom plugin. It is advisable to place such code in a plugin, not in your theme.
Adding, Removing And Reordering Columns
The first hook for managing columns (manage_posts_columns) is a filter that handles the array of columns. The standard array of filters for the posts overview is this:
[
  [cb]          => <input type="checkbox" />
  [title]       => Title
  [author]      => Author
  [categories]  => Categories
  [tags]        => Tags
  [comments]    => [..] Comments [..]
  [date]        => Date
]
We're going to remove a few columns from this list and add a few. To do so, we'll add a callback to the manage_posts_columns filter and append our custom columns to the columns array. Note that we're using the manage_realestate_posts_columns hook. Here, realestate is the name of our post type, passed as the first argument to the register_post_type function for registering custom post types. We use it in place of [post_type] in the manage_[post_type]_posts_columns filter.
add_filter( 'manage_realestate_posts_columns', 'smashing_filter_posts_columns' );
function smashing_filter_posts_columns( $columns ) {
  $columns['image'] = __( 'Image' );
  $columns['price'] = __( 'Price', 'smashing' );
  $columns['area'] = __( 'Area', 'smashing' );
  return $columns;
}
The first line adds our function smashing_filter_posts_columns as a callback to the filter that handles the columns that are displayed. The second line defines the callback function. Lines 2 to 4 add our custom columns to the list of columns. Finally, line 6 returns the resulting columns list.
Note: The smashing_ part before our functions is just a best practice to make sure that our function name is unique in WordPress. The __ function is used for translating the string to the user's preferred language. Notice that for both "Price" and "Area," we use smashing as the text domain, which WordPress uses to determine what source should be used to translate the string. We can omit this for translating "Image" because WordPress already includes translations of this word itself. You can read more about text domains in the WordPress Codex.
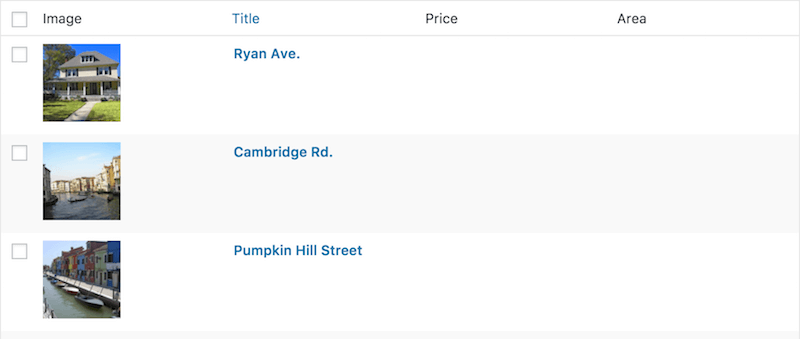
We've added columns to display an image, the price and the area, and the array with the new columns has been returned. The resulting real-estate list looks like this:
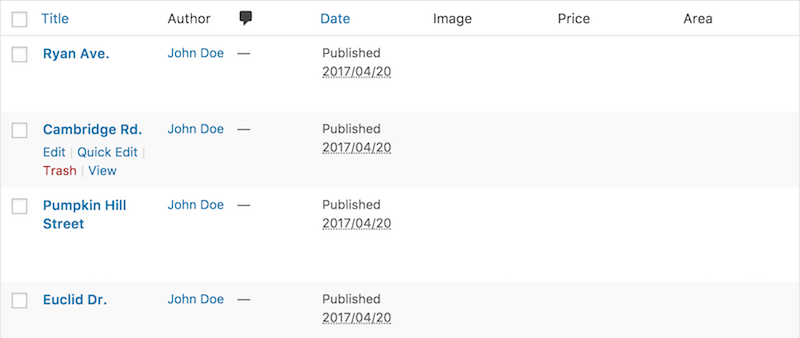
We still have to do two things:
- Remove the "Author," "Date" and "Comments" columns, which are irrelevant to our real-estate content.
- Reorder the columns so that "Image" is first.
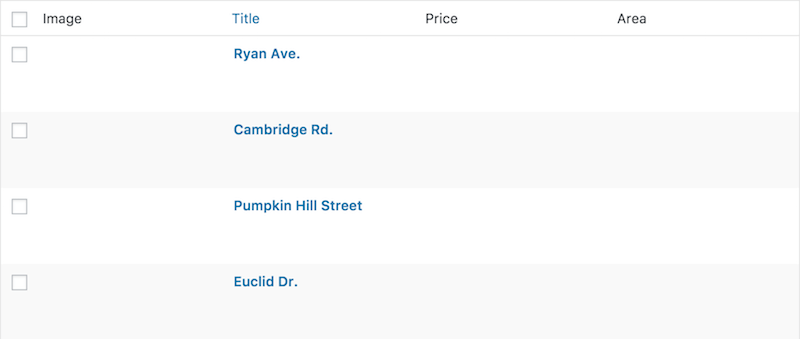
We'll modify our function to accomplish this. Note that we do not explicitly remove the three columns mentioned above, but simply construct an entire new array of columns precisely as we need them. The modified lines are highlighted.
add_filter( 'manage_realestate_posts_columns', 'smashing_realestate_columns' ); function smashing_realestate_columns( $columns ) {$columns = array( 'cb' => $columns['cb'], 'image' => __( 'Image' ), 'title' => __( 'Title' ), 'price' => __( 'Price', 'smashing' ), 'area' => __( 'Area', 'smashing' ), );return $columns; }
Our new real-estate overview screen is starting to take shape: Irrelevant columns have been removed, and new ones have been added in the right positions.
Populating Columns
Next up is populating our columns. Again, WordPress provides a pretty simple hook to do so: the manage_[post_type]_posts_custom_column action. Unlike the previously discussed hook, this is not a filter, so it only allows us to add content, not to change it. Thus, in the callback for this action, we're simply going to echo the column content that we want to display.
Let's start by adding the "Image" column.
add_action( 'manage_realestate_posts_custom_column', 'smashing_realestate_column', 10, 2);
function smashing_realestate_column( $column, $post_id ) {
  // Image column
  if ( 'image' === $column ) {
    echo get_the_post_thumbnail( $post_id, array(80, 80) );
  }
}
We added a callback function, smashing_realestate_column, to the action 'manage_realestate_posts_custom_column', taking two parameters: the column name and the post ID. This is indicated by the fourth parameter, add_action: It specifies the number of arguments expected by the callback function. The third parameter, called the priority of the hook, determines in what order the callback functions registered to the hook should be executed. We'll leave it at the default, which is 10. This callback function populates a single post's "Image" column.
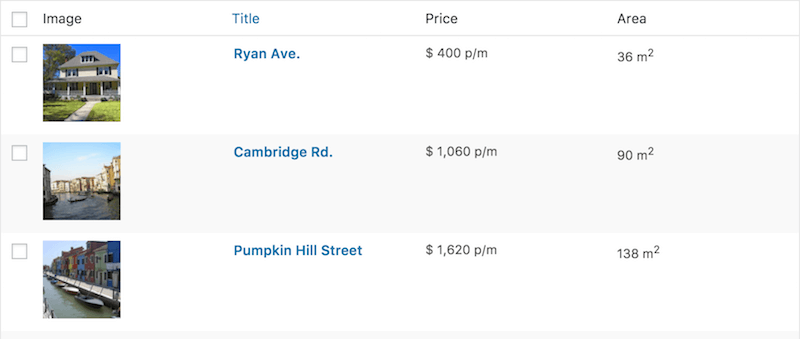
The remaining two columns, “Price” and “Area,” are stored as custom fields with the keys price_per_month and area, respectively. We’ll display these in the same way as we did with the image, displaying “n/a” when a price or surface area value is not available. The implementation is very similar for both columns. Starting with the price column, the changed lines in our smashing_realestate_column function are highlighted in the code block below.
add_action( 'manage_realestate_posts_custom_column', 'smashing_realestate_column', 10, 2); function smashing_realestate_column( $column, $post_id ) { // Image column if ( $column == 'image' ) { echo get_the_post_thumbnail( $post_id, array( 80, 80 ) ); }// Monthly price column if ( 'price' === $column ) { $price = get_post_meta( $post_id, 'price_per_month', true ); if ( ! $price ) { _e( 'n/a' ); } else { echo '$ ' . number_format( $price, 0, '.', ',' ) . ' p/m'; } }}
Next up is the area column. Except for the unit (square meters, m2, instead of dollars), the code is pretty much the same:
add_action( 'manage_realestate_posts_custom_column', 'smashing_realestate_column', 10, 2 ); function smashing_realestate_column( $column, $post_id ) { [...]// Surface area column if ( 'area' === $column ) { $area = get_post_meta( $post_id, 'area', true ); if ( ! $area ) { _e( 'n/a' ); } else { echo number_format( $area, 0, '.', ',' ) . ' m2'; } }}
That's it! Our real-estate overview page now contains all relevant information that we want to display:
Let’s move on to some of the more funky stuff. Let’s add some sorting functionality to our columns!
Making Columns Sortable
Making columns sortable is relatively easy in WordPress, yet it's rarely implemented for custom columns. Sorting helps you organize content and enables you to find content quickly. For example, we could sort our real-estate overview by price and then find our cheapest and most expensive pieces of property.
We'll start by adding our "price" column to the list of sortable columns:
add_filter( 'manage_edit-realestate_sortable_columns', 'smashing_realestate_sortable_columns');
function smashing_realestate_sortable_columns( $columns ) {
  $columns['price'] = 'price_per_month';
  return $columns;
}
This code hooks into the manage_edit-realestate_sortable_columns filter and adds smashing_realestate_sortable_columns as a callback function (line 1). The "price" column is made sortable by adding it to the list of sortable columns in line 3. Note that the array key, price, is the name we've given our column before. The array value is used to tell WordPress what it should sort by. We could, for example, use WordPress' native sorting strategies to sort by title, date or comment count.
In our case, however, we want to sort by a custom field. This requires us to create another function, which needs to alter the posts query if we're trying to sort by price. We're going to use the pre_get_posts action. It allows us to change the WP_Query object (the object that WordPress uses to query posts) and fires before posts are queried. We check whether to sort by price and, if so, change the query accordingly:
add_action( 'pre_get_posts', 'smashing_posts_orderby' );
function smashing_posts_orderby( $query ) {
  if( ! is_admin() || ! $query->is_main_query() ) {
    return;
  }

  if ( 'price_per_month' === $query->get( 'orderby') ) {
    $query->set( 'orderby', 'meta_value' );
    $query->set( 'meta_key', 'price_per_month' );
    $query->set( 'meta_type', 'numeric' );
  }
}
Lines 1 and 2 add the callback function to the action and start the definition of the callback function, respectively. Line 3 then checks whether we're in the admin panel and whether the query is the main posts query (see the Codex for more information). If not, we don't change the query. Then, we check whether the current sorting strategy is by price. If it is, we adjust the query accordingly: We set the meta_key value to price_per_month, telling WordPress to retrieve this custom field for all real estate, and we set the orderby key to meta_value, which tells WordPress to sort by the value belonging to the specified meta key. Finally, we tell WordPress to sort numerically instead of alphabetically, because "price" is a numerical column.
Note: You might have noticed that the filter we hook into is named manage_edit-realestate_sortable_columns, whereas you might have expected it to be manage_realestate_sortable_columns (without the edit-). This is simply an inconsistency in filter naming in WordPress.
The result is a sortable price column:
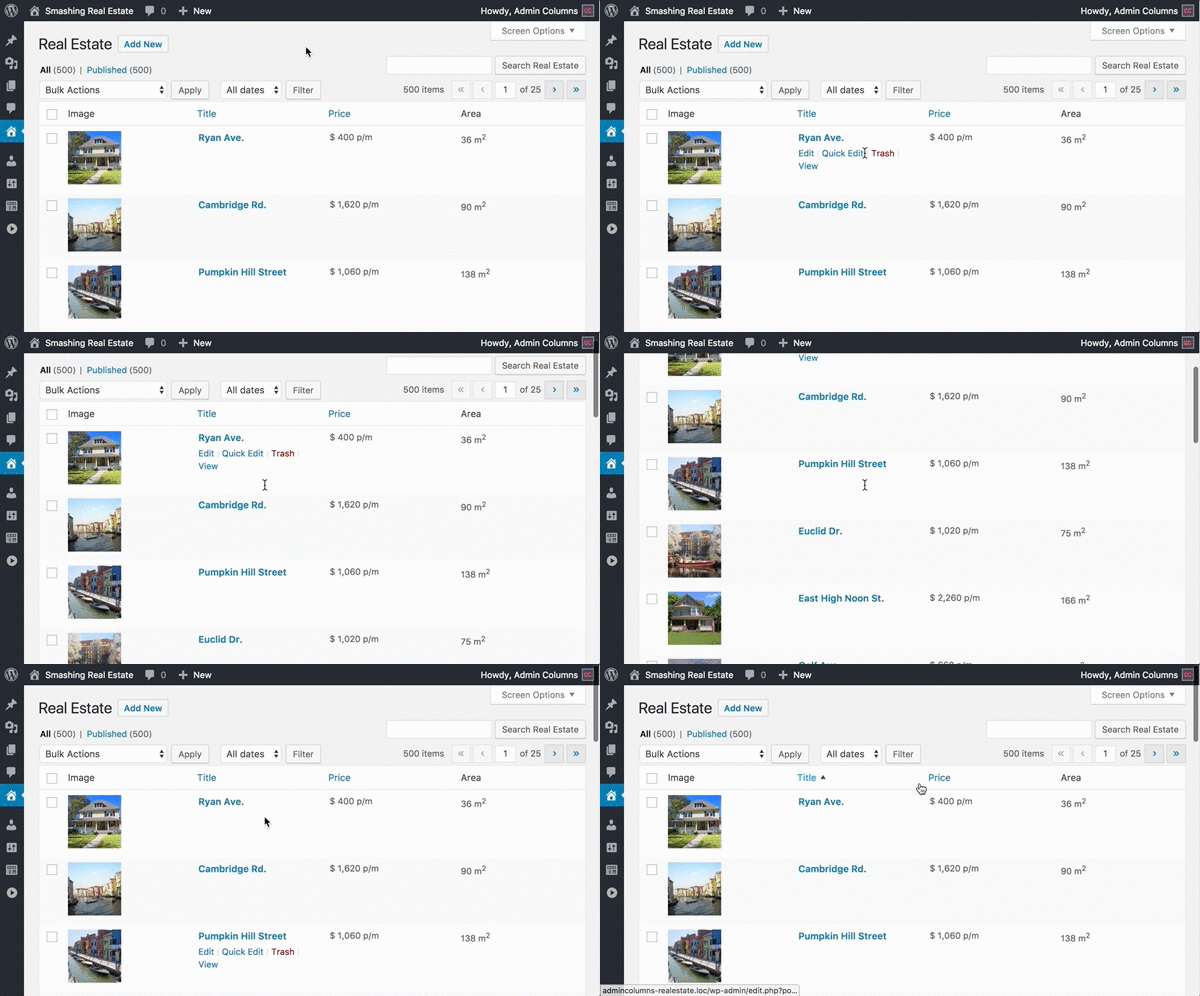
The same procedure can be repeated for the "area" column. For textual columns, which should be sorted alphabetically, be sure to leave out the `$query->set( 'meta_type', 'numeric' )` part.
Managing Columns With The Admin Columns Plugin
Now that we've covered the programming part of this tutorial, it's time to move on to the much simpler method: using the Admin Columns plugin. Without touching any code and using a simple drag-and-drop interface, you can manage columns with just a few clicks. More than 150 column types exist. It comes with optional fields that let you customize how a column is named and behaves. In this last part of the tutorial, we're going to show you how to set up Admin Columns to create the exact same overview as before. On top of that, we will show you how you can then filter and edit content directly from the content-overview screens.
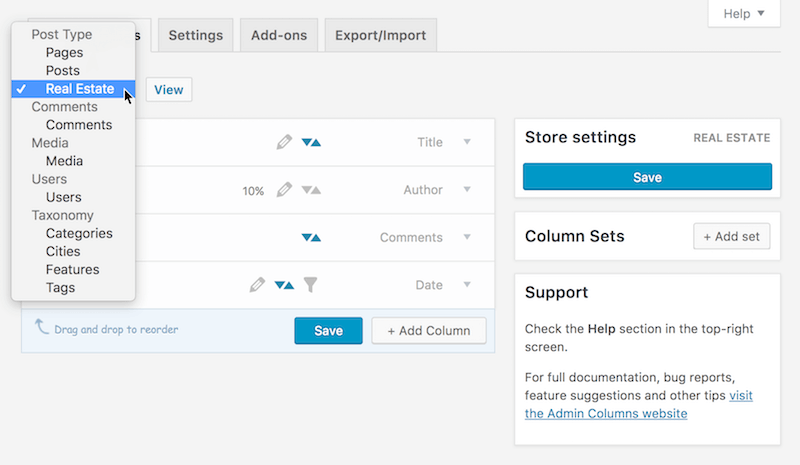
First off, install Admin Columns as you would install any plugin, and activate it. It's ready for use right away, so let's start to manage our columns by going to the "Column Settings" page.
Admin Columns lets you control the columns per content type (for example, posts, pages, users or comments) using the dropdown box highlighted in the image above. In our case, we will select the post type "Real Estate." You will see the screen immediately showing the columns that are currently active for this post type.
Adding, Removing And Reordering Columns
Let's clean up a bit by removing columns we don't need for our real-estate overview:
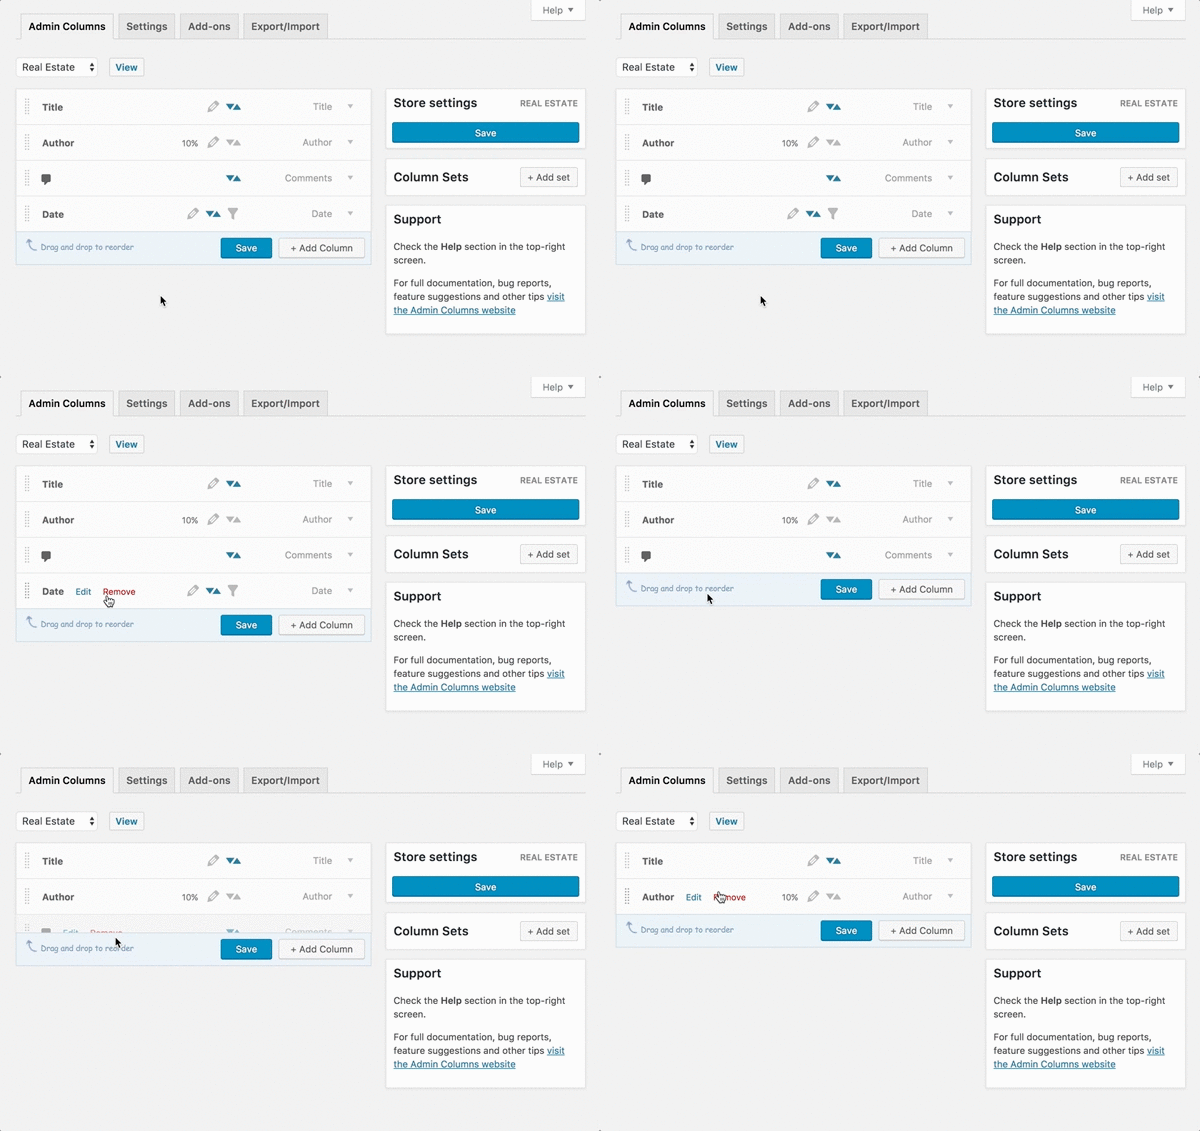
Wasn't that easy? We will continue by adding our first relevant column: the featured image that shows a picture of the property. To do so, simply click the "Add Column" button, choose the "Featured Image" column type from the dropdown, and fill in the appropriate settings:
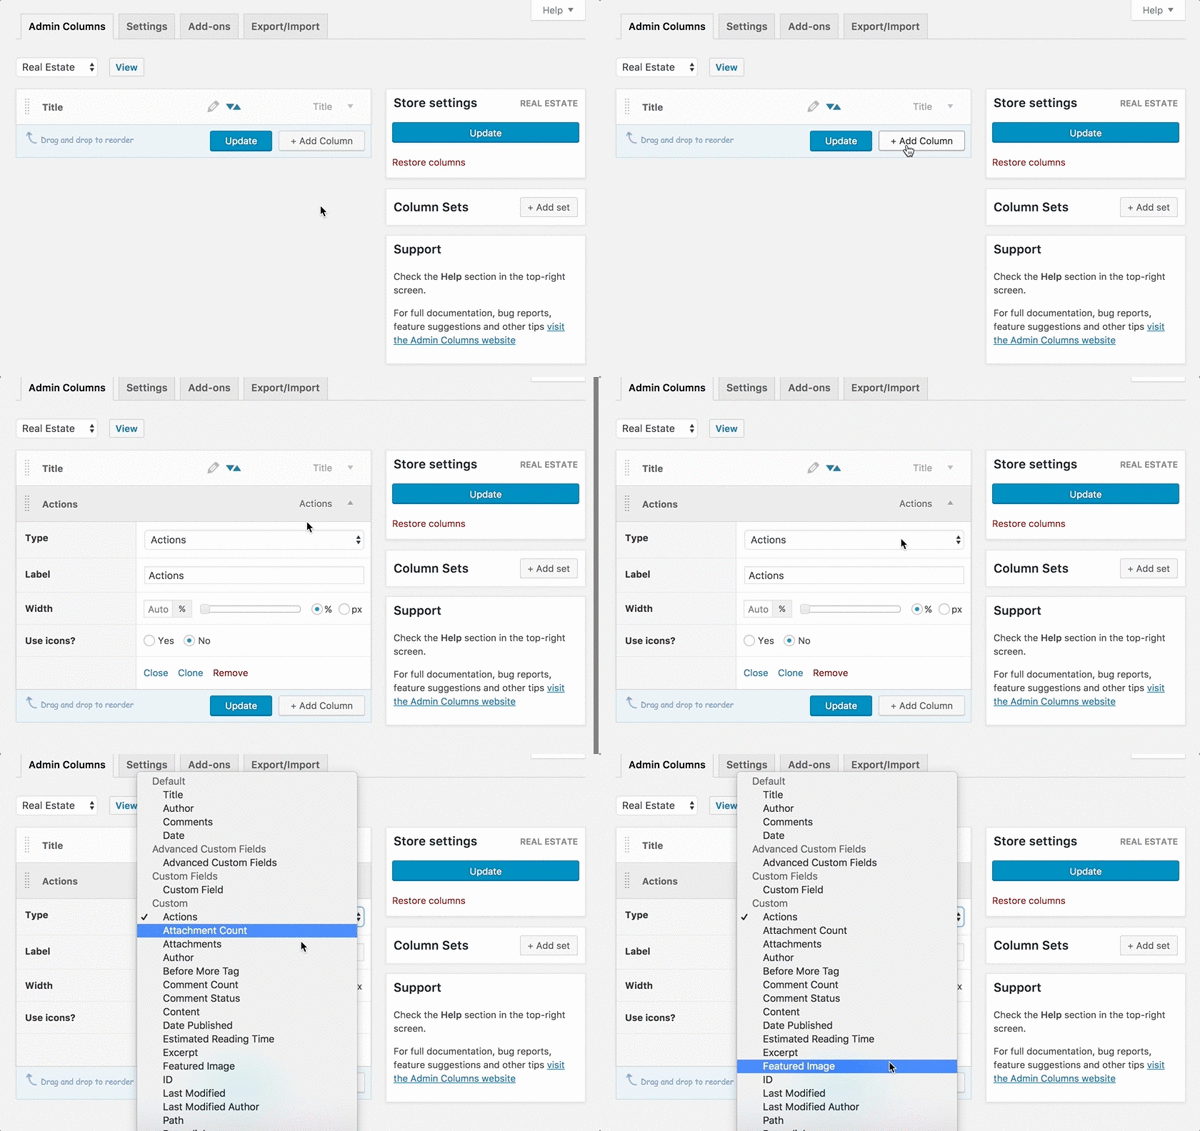
As you can see, Admin Columns shows relevant display options for your columns to give you full control over their appearance. Here, you're asked to specify the dimensions of the image to display. Later, we will see that Admin Columns shows the appropriate options when you select a different column type. For these options, Admin Columns tries to present sensible defaults, to minimize the time required to add new columns.
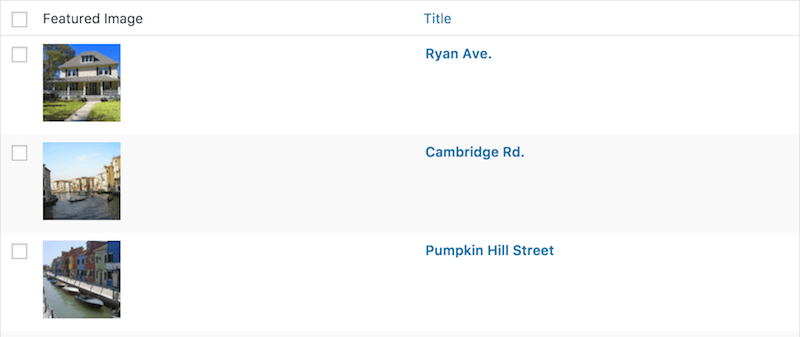
The last part showed us how to drag the column to the first position. Admin Columns lets you reorder columns simply by dragging them around. Our real-estate screen now looks like this:
We’re now going to add the two columns to display the property’s living area and monthly rent. Because we’ve added these custom fields using the Advanced Custom Fields plugin, we will use Admin Columns’ ACF integration plugin for this task. However, the “Custom Field” column would have also sufficed for this purpose.
The animation below shows the process of adding the "Area" and "Price" columns:
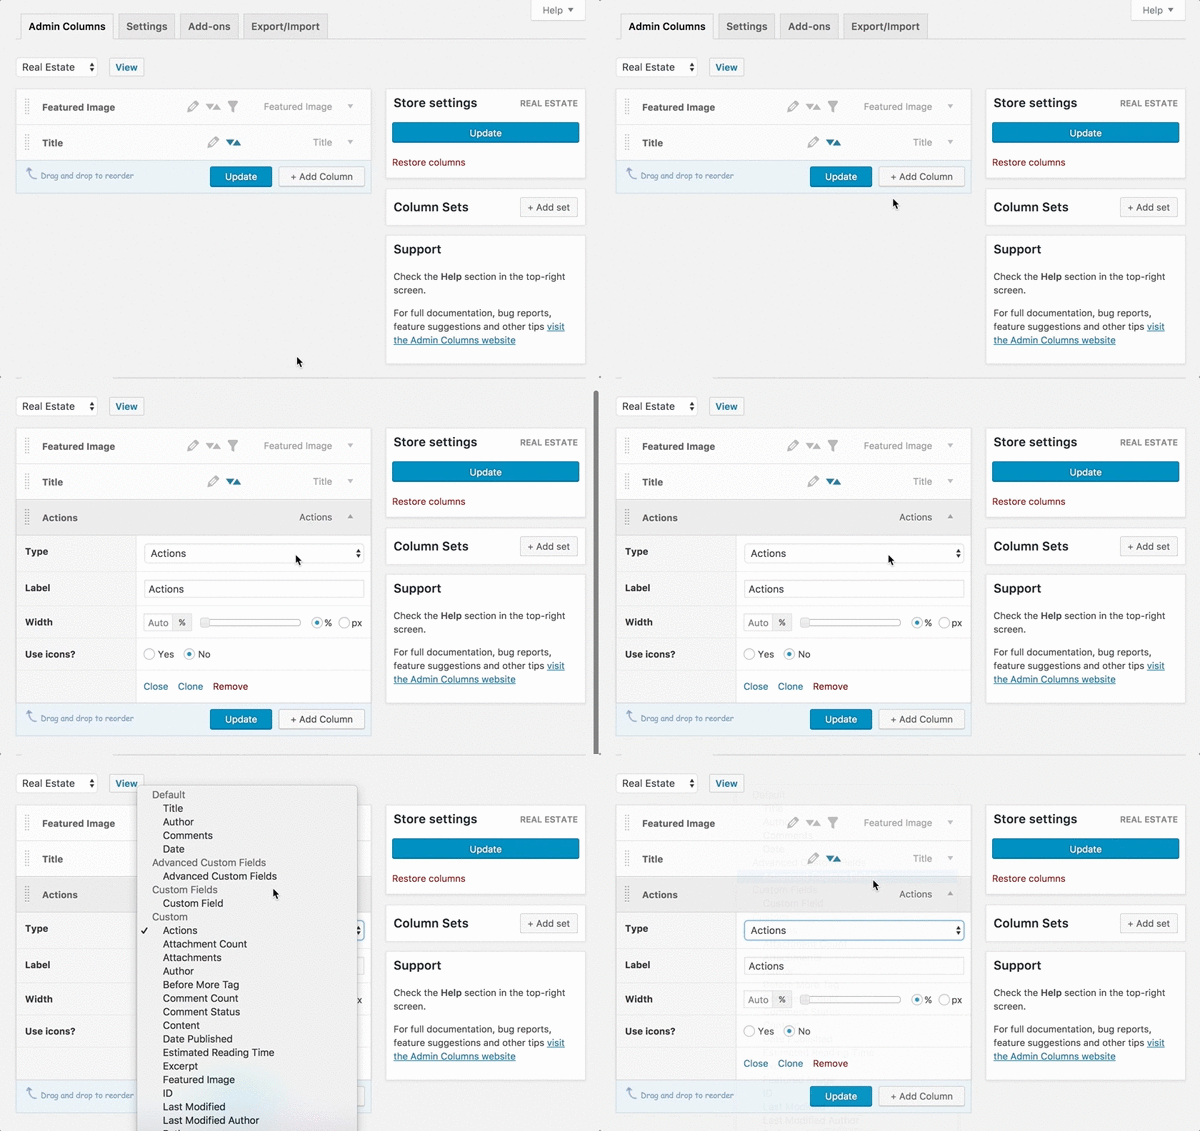
Note: Admin Columns offers integration add-ons for quite a few other plugins, including WooCommerce, Ninja Forms and Yoast SEO.
For those who followed the code examples and paid close attention, we did not add the "City" column. It's a little trickier to do that with code, but with Admin Columns it's a breeze. We simply select the "Taxonomy" column and pick the "City" taxonomy, and voilà! Our result is there. Didn't we tell you? It's a breeze!
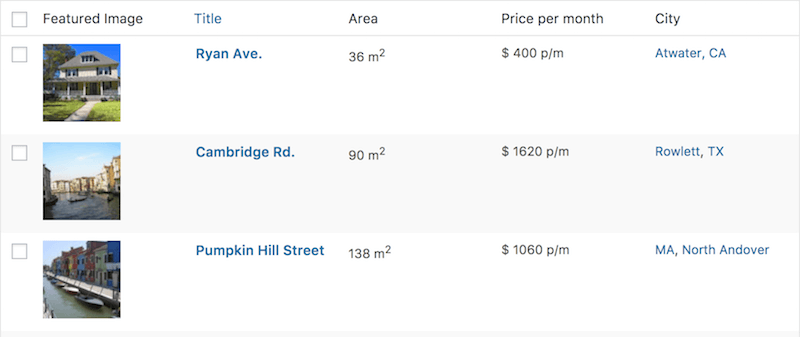
Depending on your mouse-handling speed, we’ve achieved this result, from top to bottom, in somewhere between two and three minutes!
Sorting And Filtering With Admin Columns
Most of what you've seen so far is part of the free version of Admin Columns, which can be downloaded from WordPress.org. However, there is also Admin Columns Pro, which offers additional features. We'll discuss the most prominent features for this use case: sorting, filtering and editing. These features will help you to quickly find and update your content right from the overview screen.
Although the features might be pretty self-explanatory, I'll explain them really quickly in the context of Admin Columns.
Sorting will display your content in a particular order based on the value of a column. It's great for getting insight into your content very quickly. For example, it enables you see which pages have a page template and to order them alphabetically. For a regular blog, you could quickly find out which users have authored the highest number of posts by sorting users according to their post count.
Filtering helps you to find content faster. You can filter columns that have a specific value, or a value within some range (for numeric columns) or without any value set at all. For instance, you could find e-commerce products within a price range, or posts missing a featured image or custom field. You could even use multiple filters together to target content more precisely.
Let's get back to our use case and consider a simple example: We want to find houses with the largest surface areas. This will take us only a few seconds because we can simply make the "Area" column sortable and sort by that column in the real-estate overview screen:
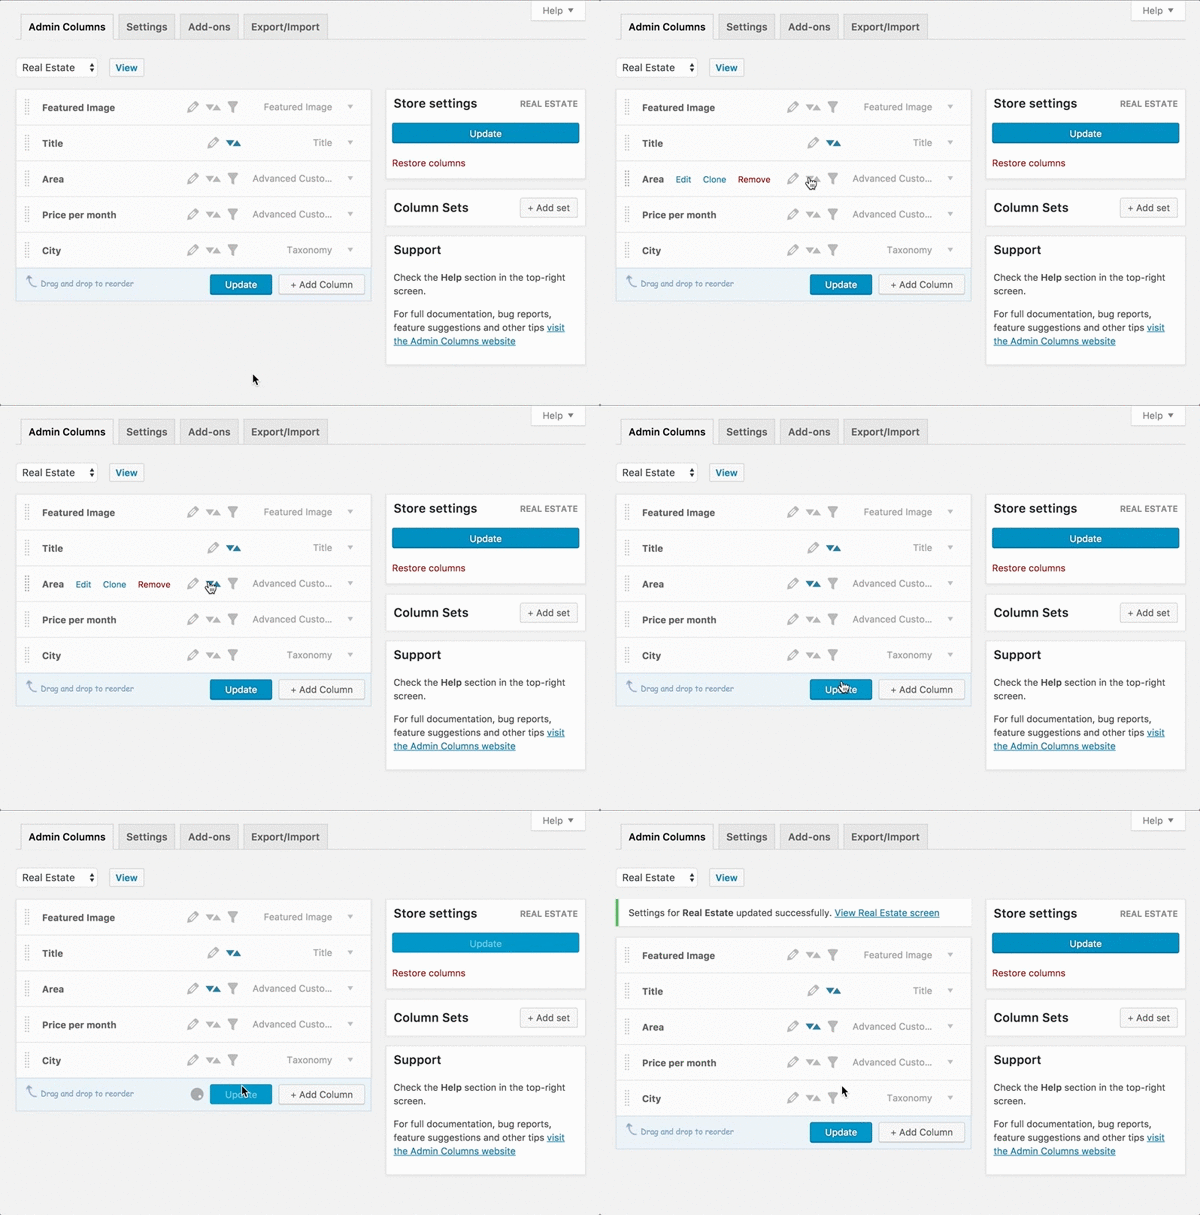
Now, let's take it a step further by adding a filter: We want to find the top 10 houses with the largest surface areas, but only those with a monthly rental price between $300 and $500. Again, a few clicks are enough:
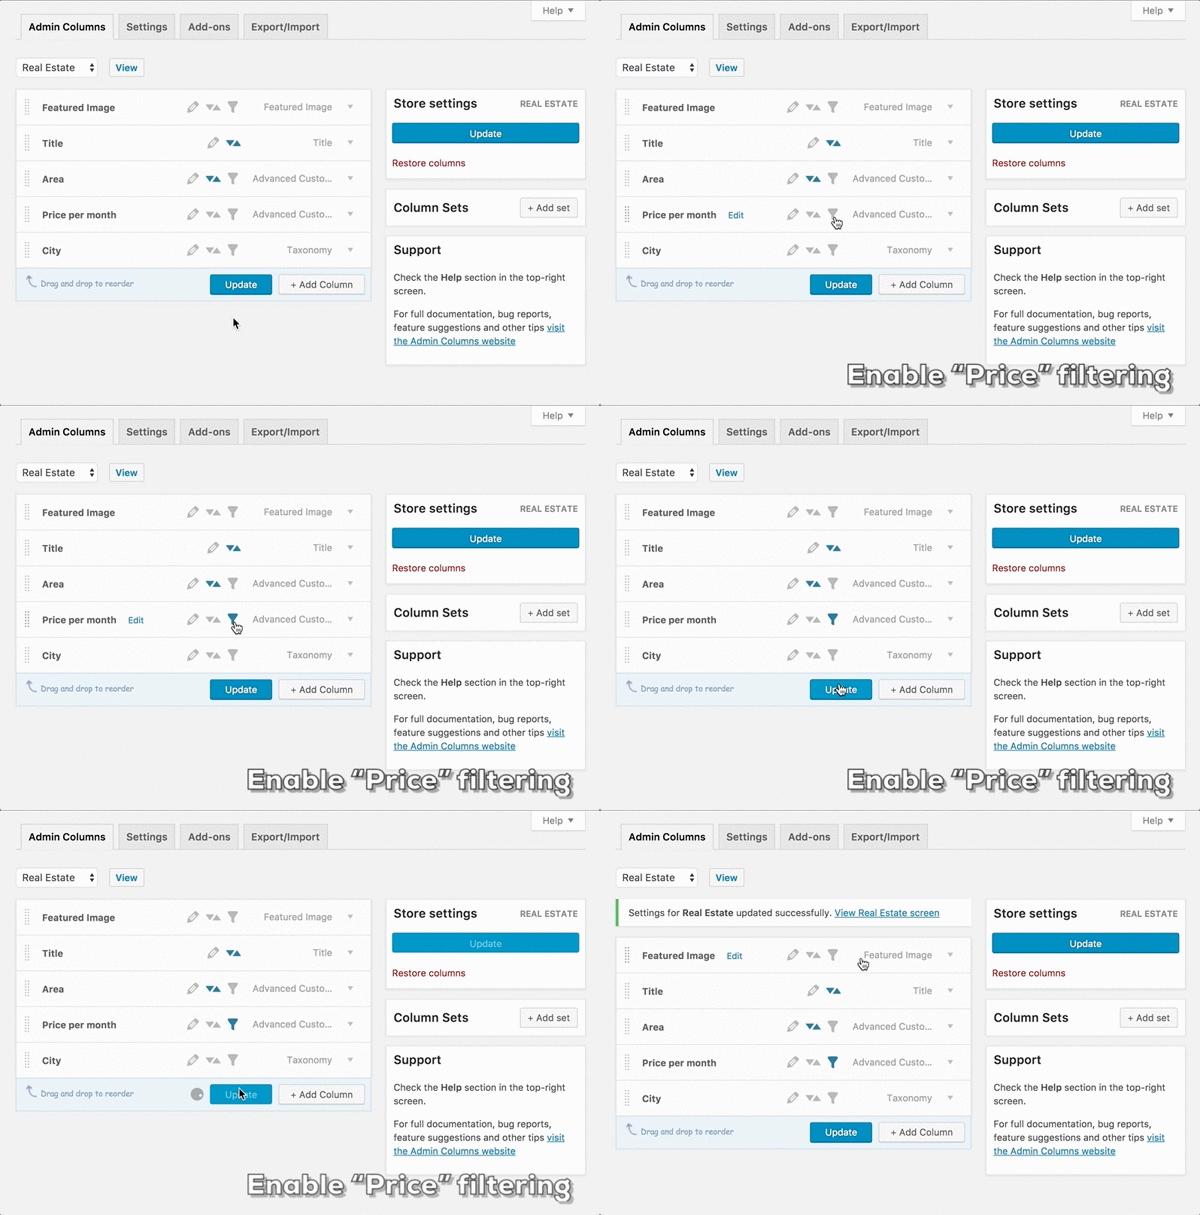
There are, of course, many other ways to sort and filter. Combined, the features are a powerful tool to gain insight into your content.
Editing With Admin Columns
The real-estate overview screen now shows all relevant information and allows you to find the content you need. However, one thing is lacking: To edit our content, we have to go to the editing page, find the fields we want to change, update them, click "Update," and go back to our overview screen.
What if we could do the same process in just three simple steps: click, edit, save? With Admin Columns Pro, we can.
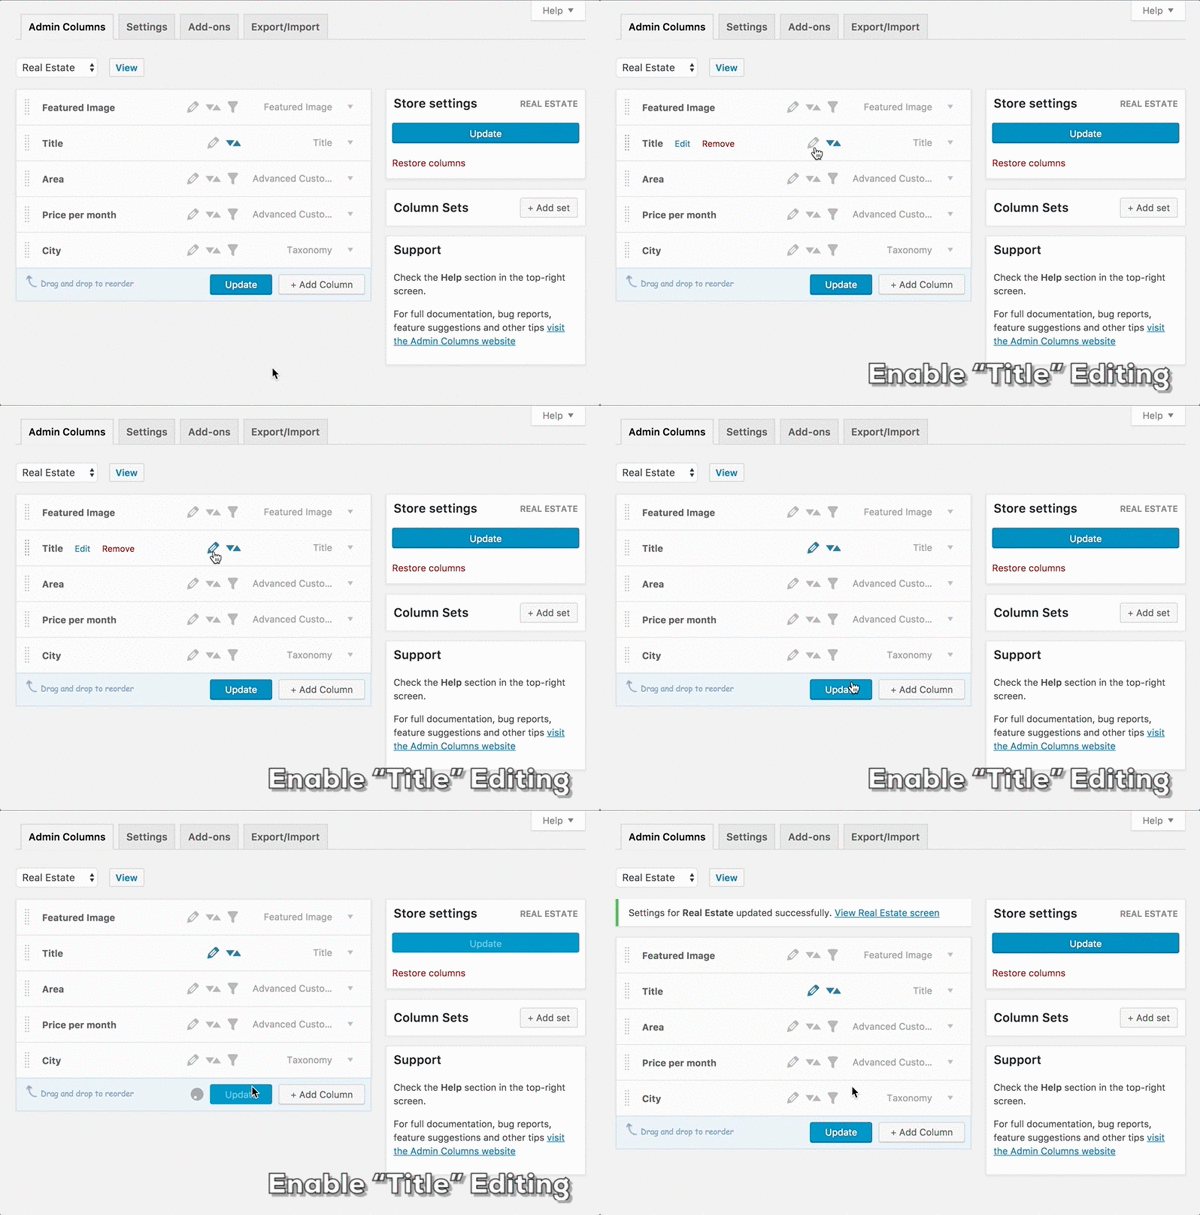
The screenshot above shows "direct editing" mode for the property title, and it's available for almost all custom columns. In Admin Columns Pro, inline editing can be toggled from the columns settings screen. It automatically detects your content type and adds editability accordingly. With images, for instance, the media gallery will pop up.
In this example, we've used the Advanced Custom Fields add-on for Admin Columns, which comes with all business and developer licenses. It detects your ACF fields and adds them as possible columns. They are automatically sortable, filterable and editable — just toggle the corresponding icon.
The result is pretty neat: Our real-estate overview screen adds editing icons to all cells, and just by clicking, editing and saving, we can update our content. Let's see that in practice: We've enabled direct editing for all of our custom columns, and we're going to use that functionality to quickly update our content:
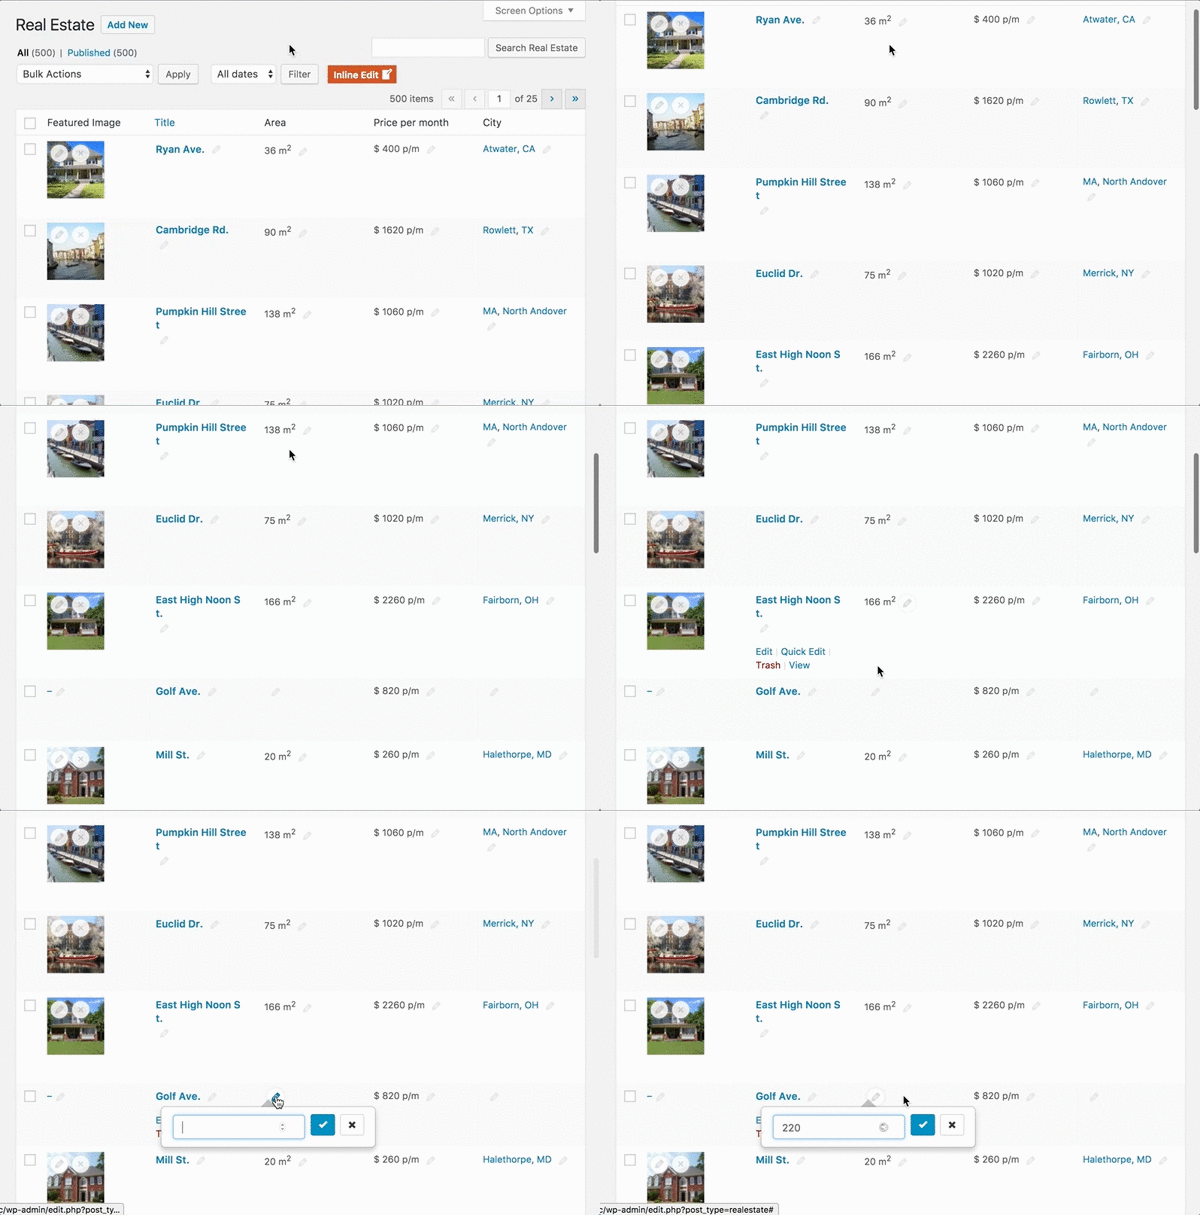
The changes are instantly saved. Should anything go wrong, undo and redo buttons are available to quickly revert.
Direct editing is supported for almost all columns. With the Advanced Custom Fields and WooCommerce add-ons, Admin Columns gives you a native editing experience as if you were editing from the details page.
Wrapping Up
Admin Columns can do much more cool stuff, but there's just not enough room in this article. Why not take a look and check out some of the awesome features for yourself? We hope to see you there!
Further Reading
- WordPress Playground: From 5-Minute Install To Instant Spin-Up
- The Problem With WordPress Is Positioning, Not Plugins
- Gatsby Headaches And How To Cure Them: i18n (Part 1)
- How To Host A WordPress Site On Amazon Lightsail


 SurveyJS: White-Label Survey Solution for Your JS App
 Agent Ready is the new Headless