Keeping Node.js Fast: Tools, Techniques, And Tips For Making High-Performance Node.js Servers
If you’ve been building anything with Node.js for long enough, then you’ve no doubt experienced the pain of unexpected speed issues. JavaScript is an evented, asynchronous language. That can make reasoning about performance tricky, as will become apparent. The surging popularity of Node.js has exposed the need for tooling, techniques and thinking suited to the constraints of server-side JavaScript.
When it comes to performance, what works in the browser doesn’t necessarily suit Node.js. So, how do we make sure a Node.js implementation is fast and fit for purpose? Let’s walk through a hands-on example.
Tools
Node is a very versatile platform, but one of the predominant applications is creating networked processes. We’re going to focus on profiling the most common of these: HTTP web servers.
We’ll need a tool that can blast a server with lots of requests while measuring the performance. For example, we can use AutoCannon:
npm install -g autocannon
Other good HTTP benchmarking tools include Apache Bench (ab) and wrk2, but AutoCannon is written in Node, provides similar (or sometimes greater) load pressure, and is very easy to install on Windows, Linux, and Mac OS X.
After we’ve established a baseline performance measurement, if we decide our process could be faster we’ll need some way to diagnose problems with the process. A great tool for diagnosing various performance issues is Node Clinic, which can also be installed with npm:
npm install -g clinic
This actually installs a suite of tools. We’ll be using Clinic Doctor and Clinic Flame (a wrapper around 0x) as we go.
Note: For this hands-on example we’ll need Node 8.11.2 or higher.
The Code
Our example case is a simple REST server with a single resource: a large JSON payload exposed as a GET route at /seed/v1. The server is an app folder which consists of a package.json file (depending on restify 7.1.0), an index.js file and a util.js file.
The index.js file for our server looks like so:
'use strict'

const restify = require('restify')
const { etagger, timestamp, fetchContent } = require('./util')()
const server = restify.createServer()

server.use(etagger().bind(server))

server.get('/seed/v1', function (req, res, next) {
  fetchContent(req.url, (err, content) => {
    if (err) return next(err)
    res.send({data: content, url: req.url, ts: timestamp()})
    next()
  })
})

server.listen(3000)
This server is representative of the common case of serving client-cached dynamic content. This is achieved with the etagger middleware, which calculates an ETag header for the latest state of the content.
The util.js file provides implementation pieces that would commonly be used in such a scenario, a function to fetch the relevant content from a backend, the etag middleware and a timestamp function that supplies timestamps on a minute-by-minute basis:
'use strict'

require('events').defaultMaxListeners = Infinity
const crypto = require('crypto')

module.exports = () => {
  const content = crypto.rng(5000).toString('hex')
  const ONE_MINUTE = 60000
  var last = Date.now()

  function timestamp () {
    var now = Date.now()
    if (now — last >= ONE_MINUTE) last = now
    return last
  }

  function etagger () {
    var cache = {}
    var afterEventAttached = false
    function attachAfterEvent (server) {
      if (attachAfterEvent === true) return
      afterEventAttached = true
      server.on('after', (req, res) => {
        if (res.statusCode !== 200) return
        if (!res._body) return
        const key = crypto.createHash('sha512')
          .update(req.url)
          .digest()
          .toString('hex')
        const etag = crypto.createHash('sha512')
          .update(JSON.stringify(res._body))
          .digest()
          .toString('hex')
        if (cache[key] !== etag) cache[key] = etag
      })
    }
    return function (req, res, next) {
      attachAfterEvent(this)
      const key = crypto.createHash('sha512')
        .update(req.url)
        .digest()
        .toString('hex')
      if (key in cache) res.set('Etag', cache[key])
      res.set('Cache-Control', 'public, max-age=120')
      next()
    }
  }

  function fetchContent (url, cb) {
    setImmediate(() => {
      if (url !== '/seed/v1') cb(Object.assign(Error('Not Found'), {statusCode: 404}))
      else cb(null, content)
    })
  }

  return { timestamp, etagger, fetchContent }

}
By no means take this code as an example of best practices! There are multiple code smells in this file, but we’ll locate them as we measure and profile the application.
To get the full source for our starting point, the slow server can be found over here.
Profiling
In order to profile, we need two terminals, one for starting the application, and the other for load testing it.
In one terminal, within the app, folder we can run:
node index.js
In another terminal we can profile it like so:
autocannon -c100 localhost:3000/seed/v1
This will open 100 concurrent connections and bombard the server with requests for ten seconds.
The results should be something similar to the following (Running 10s test @ https://localhost:3000/seed/v1 — 100 connections):
| Stat | Avg | Stdev | Max |
|---|---|---|---|
| Latency (ms) | 3086.81 | 1725.2 | 5554 |
| Req/Sec | 23.1 | 19.18 | 65 |
| Bytes/Sec | 237.98 kB | 197.7 kB | 688.13 kB |
Results will vary depending on the machine. However, considering that a “Hello World” Node.js server is easily capable of thirty thousand requests per second on that machine that produced these results, 23 requests per second with an average latency exceeding 3 seconds is dismal.
Diagnosing
Discovering The Problem Area
We can diagnose the application with a single command, thanks to Clinic Doctor’s –on-port command. Within the app folder we run:
clinic doctor --on-port=’autocannon -c100 localhost:$PORT/seed/v1’ -- node index.js
This will create an HTML file that will automatically open in our browser when profiling is complete.
The results should look something like the following:
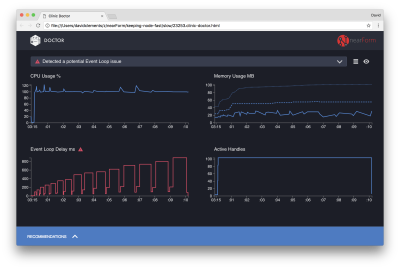
The Doctor is telling us that we have probably had an Event Loop issue.
Along with the message near the top of the UI, we can also see that the Event Loop chart is red, and shows a constantly increasing delay. Before we dig deeper into what this means, let’s first understand the effect the diagnosed issue is having on the other metrics.
We can see the CPU is consistently at or above 100% as the process works hard to process queued requests. Node’s JavaScript engine (V8) actually uses two CPU cores in this case because the machine is multi-core and V8 uses two threads. One for the Event Loop and the other for Garbage Collection. When we see the CPU spiking up to 120% in some cases, the process is collecting objects related to handled requests.
We see this correlated in the Memory graph. The solid line in the Memory chart is the Heap Used metric. Any time there’s a spike in CPU we see a fall in the Heap Used line, showing that memory is being deallocated.
Active Handles are unaffected by the Event Loop delay. An active handle is an object that represents either I/O (such as a socket or file handle) or a timer (such as a setInterval). We instructed AutoCannon to open 100 connections (-c100). Active handles stay a consistent count of 103. The other three are handles for STDOUT, STDERR, and the handle for the server itself.
If we click the Recommendations panel at the bottom of the screen, we should see something like the following:
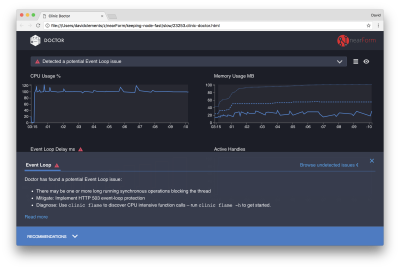
Short-Term Mitigation
Root cause analysis of serious performance issues can take time. In the case of a live deployed project, it’s worth adding overload protection to servers or services. The idea of overload protection is to monitor event loop delay (among other things), and respond with “503 Service Unavailable” if a threshold is passed. This allows a load balancer to fail over to other instances, or in the worst case means users will have to refresh. The overload-protection module can provide this with minimum overhead for Express, Koa, and Restify. The Hapi framework has a load configuration setting which provides the same protection.
Understanding The Problem Area
As the short explanation in Clinic Doctor explains, if the Event Loop is delayed to the level that we’re observing it’s very likely that one or more functions are “blocking” the Event Loop.
It’s especially important with Node.js to recognize this primary JavaScript characteristic: asynchronous events cannot occur until currently executing code has completed.
This is why a setTimeout cannot be precise.
For instance, try running the following in a browser’s DevTools or the Node REPL:
console.time('timeout')
setTimeout(console.timeEnd, 100, 'timeout')
let n = 1e7
while (n--) Math.random()
The resulting time measurement will never be 100ms. It will likely be in the range of 150ms to 250ms. The setTimeout scheduled an asynchronous operation (console.timeEnd), but the currently executing code has not yet complete; there are two more lines. The currently executing code is known as the current “tick.” For the tick to complete, Math.random has to be called ten million times. If this takes 100ms, then the total time before the timeout resolves will be 200ms (plus however long it takes the setTimeout function to actually queue the timeout beforehand, usually a couple of milliseconds).
In a server-side context, if an operation in the current tick is taking a long time to complete requests cannot be handled, and data fetching cannot occur because asynchronous code will not be executed until the current tick has completed. This means that computationally expensive code will slow down all interactions with the server. So it’s recommended to split out resource intense work into separate processes and call them from the main server, this will avoid cases where on rarely used but expensive route slows down the performance of other frequently used but inexpensive routes.
The example server has some code that is blocking the Event Loop, so the next step is to locate that code.
Analyzing
One way to quickly identify poorly performing code is to create and analyze a flame graph. A flame graph represents function calls as blocks sitting on top of each other — not over time but in aggregate. The reason it’s called a ‘flame graph’ is because it typically uses an orange to red color scheme, where the redder a block is the “hotter” a function is, meaning, the more it’s likely to be blocking the event loop. Capturing data for a flame graph is conducted through sampling the CPU — meaning that a snapshot of the function that is currently being executed and it’s stack is taken. The heat is determined by the percentage of time during profiling that a given function is at the top of the stack (e.g. the function currently being executed) for each sample. If it’s not the last function to ever be called within that stack, then it’s likely to be blocking the event loop.
Let’s use clinic flame to generate a flame graph of the example application:
clinic flame --on-port=’autocannon -c100 localhost:$PORT/seed/v1’ -- node index.js
The result should open in our browser with something like the following:

The width of a block represents how much time it spent on CPU overall. Three main stacks can be observed taking up the most time, all of them highlighting server.on as the hottest function. In truth, all three stacks are the same. They diverge because during profiling optimized and unoptimized functions are treated as separate call frames. Functions prefixed with a * are optimized by the JavaScript engine, and those prefixed with a ~ are unoptimized. If the optimized state isn’t important to us, we can simplify the graph further by pressing the Merge button. This should lead to view similar to the following:
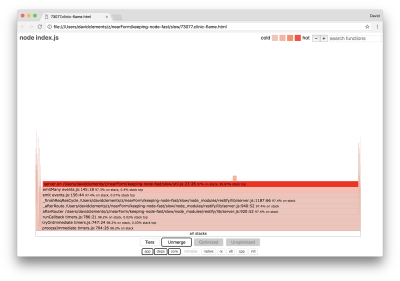
From the outset, we can infer that the offending code is in the util.js file of the application code.
The slow function is also an event handler: the functions leading up to the function are part of the core events module, and server.on is a fallback name for an anonymous function provided as an event handling function. We can also see that this code isn’t in the same tick as code that actually handles the request. If it was, functions from core http, net and stream modules would be in the stack.
Such core functions can be found by expanding other, much smaller, parts of the flame graph. For instance, try using the search input on the top right of the UI to search for send (the name of both restify and http internal methods). It should be on the right of the graph (functions are alphabetically sorted):
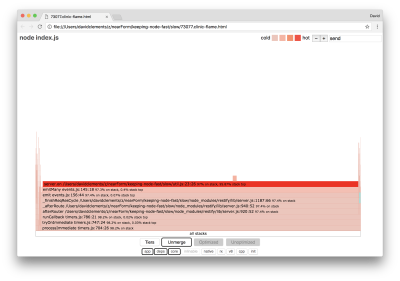
Notice how comparatively small all the actual HTTP handling blocks are.
We can click one of the blocks highlighted in cyan which will expand to show functions like writeHead and write in the http_outgoing.js file (part of Node core http library):
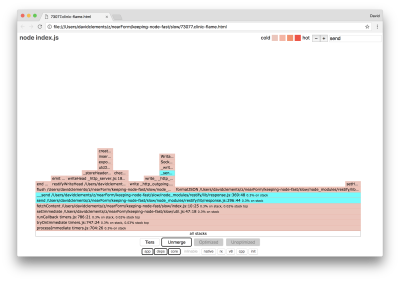
We can click all stacks to return to the main view.
The key point here is that even though the server.on function isn’t in the same tick as the actual request handling code, it’s still affecting the overall server performance by delaying the execution of otherwise performant code.
Debugging
We know from the flame graph that the problematic function is the event handler passed to server.on in the util.js file.
Let’s take a look:
server.on('after', (req, res) => {
  if (res.statusCode !== 200) return
  if (!res._body) return
  const key = crypto.createHash('sha512')
    .update(req.url)
    .digest()
    .toString('hex')
  const etag = crypto.createHash('sha512')
    .update(JSON.stringify(res._body))
    .digest()
    .toString('hex')
  if (cache[key] !== etag) cache[key] = etag
})
It’s well known that cryptography tends to be expensive, as does serialization (JSON.stringify) but why don’t they appear in the flame graph? These operations are in the captured samples, but they’re hidden behind the cpp filter. If we press the cpp button we should see something like the following:
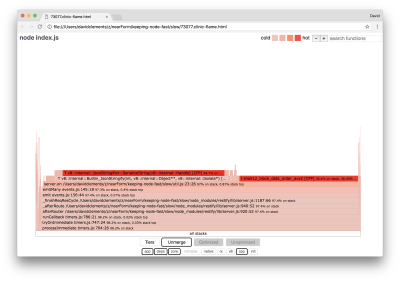
The internal V8 instructions relating to both serialization and cryptography are now shown as the hottest stacks and as taking up most of the time. The JSON.stringify method directly calls C++ code; this is why we don’t see a JavaScript function. In the cryptography case, functions like createHash and update are in the data, but they are either inlined (which means they disappear in the merged view) or too small to render.
Once we start to reason about the code in the etagger function it can quickly become apparent that it’s poorly designed. Why are we taking the server instance from the function context? There’s a lot of hashing going on, is all of that necessary? There’s also no If-None-Match header support in the implementation which would mitigate some of the load in some real-world scenarios because clients would only make a head request to determine freshness.
Let’s ignore all of these points for the moment and validate the finding that the actual work being performed in server.on is indeed the bottleneck. This can be achieved by setting the server.on code to an empty function and generating a new flamegraph.
Alter the etagger function to the following:
function etagger () {
  var cache = {}
  var afterEventAttached = false
  function attachAfterEvent (server) {
    if (attachAfterEvent === true) return
    afterEventAttached = true
    server.on('after', (req, res) => {})
  }
  return function (req, res, next) {
    attachAfterEvent(this)
    const key = crypto.createHash('sha512')
      .update(req.url)
      .digest()
      .toString('hex')
    if (key in cache) res.set('Etag', cache[key])
    res.set('Cache-Control', 'public, max-age=120')
    next()
  }
}
The event listener function passed to server.on is now a no-op.
Let’s run clinic flame again:
clinic flame --on-port='autocannon -c100 localhost:$PORT/seed/v1' -- node index.js
This should produce a flame graph similar to the following:
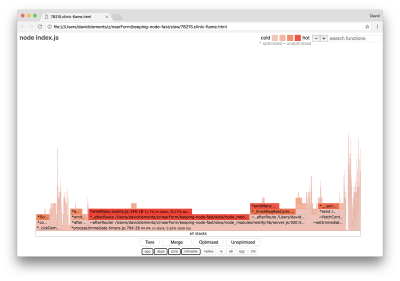
This looks better, and we should have noticed an increase in request per second. But why is the event emitting code so hot? We would expect at this point for the HTTP processing code to take up the majority of CPU time, there’s nothing executing at all in the server.on event.
This type of bottleneck is caused by a function being executed more than it should be.
The following suspicious code at the top of util.js may be a clue:
require('events').defaultMaxListeners = Infinity
Let’s remove this line and start our process with the --trace-warnings flag:
node --trace-warnings index.js
If we profile with AutoCannon in another terminal, like so:
autocannon -c100 localhost:3000/seed/v1
Our process will output something similar to:
(node:96371) MaxListenersExceededWarning: Possible EventEmitter memory leak detected. 11 after listeners added. Use emitter.setMaxListeners() to increase limit
  at _addListener (events.js:280:19)
  at Server.addListener (events.js:297:10)
  at attachAfterEvent
    (/Users/davidclements/z/nearForm/keeping-node-fast/slow/util.js:22:14)
  at Server.
    (/Users/davidclements/z/nearForm/keeping-node-fast/slow/util.js:25:7)
  at call
    (/Users/davidclements/z/nearForm/keeping-node-fast/slow/node_modules/restify/lib/chain.js:164:9)
  at next
    (/Users/davidclements/z/nearForm/keeping-node-fast/slow/node_modules/restify/lib/chain.js:120:9)
  at Chain.run
    (/Users/davidclements/z/nearForm/keeping-node-fast/slow/node_modules/restify/lib/chain.js:123:5)
  at Server._runUse
    (/Users/davidclements/z/nearForm/keeping-node-fast/slow/node_modules/restify/lib/server.js:976:19)
  at Server._runRoute
    (/Users/davidclements/z/nearForm/keeping-node-fast/slow/node_modules/restify/lib/server.js:918:10)
  at Server._afterPre
    (/Users/davidclements/z/nearForm/keeping-node-fast/slow/node_modules/restify/lib/server.js:888:10)
Node is telling us that lots of events are being attached to the server object. This is strange because there’s a boolean that checks if the event has been attached and then returns early essentially making attachAfterEvent a no-op after the first event is attached.
Let’s take a look at the attachAfterEvent function:
var afterEventAttached = false
function attachAfterEvent (server) {
  if (attachAfterEvent === true) return
  afterEventAttached = true
  server.on('after', (req, res) => {})
}
The conditional check is wrong! It checks whether attachAfterEvent is true instead of afterEventAttached. This means a new event is being attached to the server instance on every request, and then all prior attached events are being fired after each request. Whoops!
Optimizing
Now that we’ve discovered the problem areas, let’s see if we can make the server faster.
Low-Hanging Fruit
Let’s put the server.on listener code back (instead of an empty function) and use the correct boolean name in the conditional check. Our etagger function looks as follows:
function etagger () {
  var cache = {}
  var afterEventAttached = false
  function attachAfterEvent (server) {
    if (afterEventAttached === true) return
    afterEventAttached = true
    server.on('after', (req, res) => {
      if (res.statusCode !== 200) return
      if (!res._body) return
      const key = crypto.createHash('sha512')
        .update(req.url)
        .digest()
        .toString('hex')
      const etag = crypto.createHash('sha512')
        .update(JSON.stringify(res._body))
        .digest()
        .toString('hex')
      if (cache[key] !== etag) cache[key] = etag
    })
  }
  return function (req, res, next) {
    attachAfterEvent(this)
    const key = crypto.createHash('sha512')
      .update(req.url)
      .digest()
      .toString('hex')
    if (key in cache) res.set('Etag', cache[key])
    res.set('Cache-Control', 'public, max-age=120')
    next()
  }
}
Now we check our fix by profiling again. Start the server in one terminal:
node index.js
Then profile with AutoCannon:
autocannon -c100 localhost:3000/seed/v1
We should see results somewhere in the range of a 200 times improvement (Running 10s test @ https://localhost:3000/seed/v1 — 100 connections):
| Stat | Avg | Stdev | Max |
|---|---|---|---|
| Latency (ms) | 19.47 | 4.29 | 103 |
| Req/Sec | 5011.11 | 506.2 | 5487 |
| Bytes/Sec | 51.8 MB | 5.45 MB | 58.72 MB |
It’s important to balance potential server cost reductions with development costs. We need to define, in our own situational contexts, how far we need to go in optimizing a project. Otherwise, it can be all too easy to put 80% of the effort into 20% of the speed enhancements. Do the constraints of the project justify this?
In some scenarios, it could be appropriate to achieve a 200 times improvement with a low hanging fruit and call it a day. In others, we may want to make our implementation as fast as it can possibly be. It really depends on project priorities.
One way to control resource spend is to set a goal. For instance, 10 times improvement, or 4000 requests per second. Basing this on business needs makes the most sense. For instance, if server costs are 100% over budget, we can set a goal of 2x improvement.
Taking It Further
If we produce a new flame graph of our server, we should see something similar to the following:
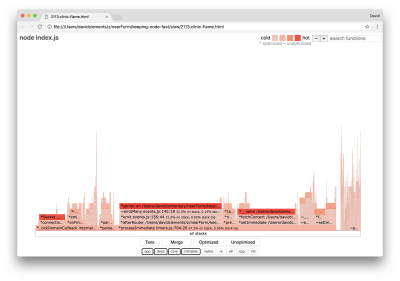
The event listener is still the bottleneck, it’s still taking up one-third of CPU time during profiling (the width is about one third the whole graph).
What additional gains can be made, and are the changes (along with their associated disruption) worth making?
With an optimized implementation, which is nonetheless slightly more constrained, the following performance characteristics can be achieved (Running 10s test @ https://localhost:3000/seed/v1 — 10 connections):
| Stat | Avg | Stdev | Max |
|---|---|---|---|
| Latency (ms) | 0.64 | 0.86 | 17 |
| Req/Sec | 8330.91 | 757.63 | 8991 |
| Bytes/Sec | 84.17 MB | 7.64 MB | 92.27 MB |
While a 1.6x improvement is significant, it arguable depends on the situation whether the effort, changes, and code disruption necessary to create this improvement are justified. Especially when compared to the 200x improvement on the original implementation with a single bug fix.
To achieve this improvement, the same iterative technique of profile, generate flamegraph, analyze, debug, and optimize was used to arrive at the final optimized server, the code for which can be found here.
The final changes to reach 8000 req/s were:
- Don’t build objects and then serialize, build a string of JSON directly;
- Use something unique about the content to define it’s Etag, rather than creating a hash;
- Don’t hash the URL, use it directly as the key.
These changes are slightly more involved, a little more disruptive to the code base, and leave the etagger middleware a little less flexible because it puts the burden on the route to provide the Etag value. But it achieves an extra 3000 requests per second on the profiling machine.
Let’s take a look at a flame graph for these final improvements:
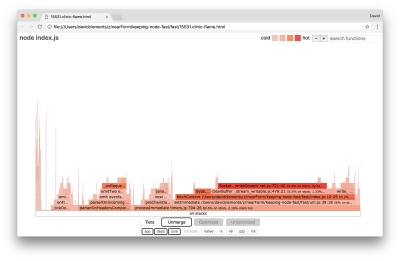
The hottest part of the flame graph is part of Node core, in the net module. This is ideal.
Preventing Performance Problems
To round off, here are some suggestions on ways to prevent performance issues in before they are deployed.
Using performance tools as informal checkpoints during development can filter out performance bugs before they make it into production. Making AutoCannon and Clinic (or equivalents) part of everyday development tooling is recommended.
When buying into a framework, find out what it’s policy on performance is. If the framework does not prioritize performance, then it’s important to check whether that aligns with infrastructural practices and business goals. For instance, Restify has clearly (since the release of version 7) invested in enhancing the library’s performance. However, if low cost and high speed is an absolute priority, consider Fastify which has been measured as 17% faster by a Restify contributor.
Watch out for other widely impacting library choices — especially consider logging. As developers fix issues, they may decide to add additional log output to help debug related problems in the future. If an unperformant logger is used, this can strangle performance over time after the fashion of the boiling frog fable. The pino logger is the fastest newline delimited JSON logger available for Node.js.
Finally, always remember that the Event Loop is a shared resource. A Node.js server is ultimately constrained by the slowest logic in the hottest path.
Further Reading
- Modern Methods For Improving Drupal’s Largest Contentful Paint Core Web Vital
- Event Calendars For Web Made Easy With These Commercial Options
- The Complex But Awesome CSS border-image Property
- Building And Dockerizing A Node.js App With Stateless Architecture With Help From Kinsta


 SurveyJS: White-Label Survey Solution for Your JS App
 Register now for WAS 2026


 Register for free to attend Axe-con

