Writing A Multiplayer Text Adventure Engine In Node.js: Creating The Terminal Client (Part 3)
I first showed you how to define a project such as this one, and gave you the basics of the architecture as well as the mechanics behind the game engine. Then, I showed you the basic implementation of the engine — a basic REST API that allows you to traverse a JSON-defined world.
Today, I’m going to be showing you how to create an old-school text client for our API by using nothing other than Node.js.
Other Parts Of This Series
Reviewing The Original Design
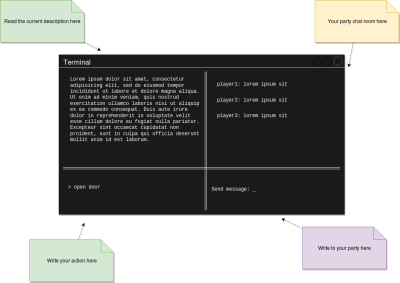
When I first proposed a basic wireframe for the UI, I proposed four sections on the screen:

Although in theory that looks right, I missed the fact that switching between sending game commands and text messages would be a pain, so instead of having our players switching manually, we’ll have our command parser make sure it is capable of discerning whether we’re trying to communicate with the game or our friends.
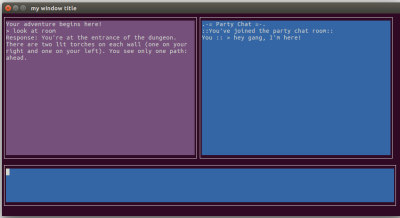
So, instead of having four sections in our screen, we’ll now have three:

That is an actual screenshot of the final game client. You can see the game screen on the left, and the chat on the right, with a single, common input box at the bottom. The module we’re using allows us to customize colors and some basic effects. You’ll be able to clone this code from Github and do what you want with the look and feel.
One caveat though: Although the above screenshot shows the chat working as part of the application, we’ll keep this article focused on setting up the project and defining a framework where we can create a dynamic text-UI based application. We’ll focus on adding chat support on the next and final chapter of this series.
The Tools We’ll Need
Although there are many libraries out there that let us create CLI tools with Node.js, adding a text-based UI is a completely different beast to tame. Particularly, I was able to find only one (very complete, mind you) library that would let me do exactly what I wanted: Blessed.
This library is very powerful and provides a lot of features we won’t be using for this project (such as casting shadows, drag&drop, and others). It basically re-implements the entire ncurses library (a C library which allows developers to create text-based UIs) which has no Node.js bindings, and it does so directly in JavaScript; so, if we had to, we could very well check out its internal code (something I wouldn’t recommend unless you absolutely had to).
Although the documentation for Blessed is quite extensive, it mainly consists of individual details about each method provided (as opposed to having tutorials explaining how to actually use those methods together) and it is lacking examples everywhere, so it might be difficult to dig into it if you have to understand how a particular method works. With that being said, once you understand it for one, everything works the same way, which is a big plus since not every library or even language (I’m looking at you, PHP) has a consistent syntax.
But documentation aside; the big plus for this library is that it works based on JSON options. For example, if you wanted to draw a box on the top right corner of the screen, you would do something like this:
var box = blessed.box({
  top: ‘0',
  right: '0',
  width: '50%',
  height: '50%',
  content: 'Hello {bold}world{/bold}!',
  tags: true,
  border: {
    type: 'line'
  },
  style: {
    fg: 'white',
    bg: 'magenta',
    border: {
      fg: '#f0f0f0'
    },
    hover: {
      bg: 'green'
    }
  }
});
As you can imagine, other aspects of the box are defined there as well (such as it’s size), which can perfectly be dynamic based on the terminal’s size, type of border and colors — even for hover events. If you’ve done front-end development at some point, you’ll find a lot of overlap between the two.
The point I’m trying to make here is that everything regarding the representation of the box is configured through the JSON object passed to the box method. That, to me, is perfect because I can easily extract that content into a configuration file, and create a business logic capable of reading it and deciding which elements to draw on screen. Most importantly, it will help us get a glimpse of how they’ll look once they’ve been drawn.
This will be the base for the entire UI aspect of this module (more on that in a second!).
Architecture Of The Module
The main architecture of this module relies entirely on the UI widgets which we’ll be showing. A group of these widgets is considered a screen, and all these screens are defined in a single JSON file (which you can find inside the /config folder).
This file has over 250 lines, so showing it here makes no sense. You can look at the full file online, but a small snippet from it looks like this:
"screens": {
        "main-options": {
            "file": "./main-options.js",
            "elements": {
                "username-request": {
                    "type": "input-prompt",
                    "params": {
                        "position": {
                            "top": "0%",
                            "left": "0%",
                            "width": "100%",
                            "height": "25%"
                        },
                        "content": "Input your username: ",
                        "inputOnFocus": true,
                        "border": {
                          "type": "line"
                        },
                        "style": {
                          "fg": "white",
                          "bg": "blue",
                          "border": {
                              "fg": "#f0f0f0"
                          },
                          "hover": {
                            "bg": "green"
                          }
                        }
                    }
                },
                "options": {
                    "type": "window",
                    "params": {
                        "position": {
                            "top": "25%",
                            "left": "0%",
                            "width": "100%",
                            "height": "50%"
                        },
                        "content": "Please select an option: \n1. Join an existing game.\n2. Create a new game",
                        "border": {
                          "type": "line"
                        },
                        "style": {
                        //...
                        }
                    }
                },
                "input": {
                    "type": "input",
                    "handlerPath": "../lib/main-options-handler",
                   //...
                }
            }
        }
The “screens” element will contain the list of screens inside the application. Each screen contains a list of widgets (which I’ll cover in a bit) and every widget has its blesses-specific definition and related handler files (when applicable).
You can see how every “params” element (inside a particular widget) represents the actual set of parameters expected by the methods we saw earlier. The rest of the keys defined there help provide context about what type of widgets to render and their behavior.
A few points of interest:
Screen Handlers
Every screen element has file property which references the code associated to that screen. This code is nothing but an object that must have an init method (the initialization logic for that particular screen takes place inside of it). Particularly, the main UI engine, will call that init method of every screen, which in turn, should be responsible for initializing whatever logic it may need (i.e setting up the input boxes events).
The following is the code for the main screen, where the application requests the player to select an option to either start a brand new game or join an existing one:
const logger = require("../utils/logger")

module.exports = {
    init: function(elements, UI) {
        this.elements = elements
        this.UI = UI
        this.id = "main-options"
        this.setInput()
    },

    moveToIDRequest: function(handler) {
        return this.UI.loadScreen('id-requests', (err, ) => {

        })
    },

    createNewGame: function(handler) {
        handler.createNewGame(this.UI.gamestate.APIKEY, (err, gameData) => {
              this.UI.gamestate.gameID = gameData._id
              handler.joinGame(this.UI.gamestate, (err) => {
                return this.UI.loadScreen('main-ui', {
                    flashmessage: "You've joined game " + this.UI.gamestate.gameID + " successfully"
                },  (err, ) => {

                })
              })

          })
    },

    setInput: function() {

        let handler = require(this.elements["input"].meta.handlerPath)
        let input = this.elements["input"].obj
        let usernameRequest = this.elements['username-request'].obj
        let usernameRequestMeta = this.elements['username-request'].meta
        let question = usernameRequestMeta.params.content.trim()


        usernameRequest.setValue(question)

        this.UI.renderScreen()

         let validOptions =  {
             1: this.moveToIDRequest.bind(this),
             2: this.createNewGame.bind(this)
         }

        usernameRequest.on('submit', (username) => {

            logger.info("Username:" +username)
            logger.info("Playername: " + username.replace(question, ''))
            this.UI.gamestate.playername = username.replace(question, '')

            input.focus()

            input.on('submit', (data) => {
                let command = input.getValue()
                  if(!validOptions[+command]) {
                      this.UI.setUpAlert("Invalid option: " + command)
                      return this.UI.renderScreen()
                  }
                  return validOptions[+command](handler)
            })


        })
        return input
    }
}
As you can see, the init method calls the setupInput method which basically configures the right callback to handle user input. That callback holds the logic to decide what to do based on the user’s input (either 1 or 2).
Widget Handlers
Some of the widgets (usually input widgets) have a handlerPath property, which references the file containing the logic behind that particular component. This is not the same as the previous screen handler. These don’t care about the UI components that much. Instead, they handle the glue logic between the UI and whatever library we’re using to interact with external services (such as the game engine’s API).
Widget Types
Another minor addition to the JSON definition of the widgets is their types. Instead of going with the names Blessed defined for them, I’m creating new ones in order to give me more wiggle room when it comes to their behavior. After all, a window widget might not always “just display information”, or an input box might not always work the same way.
This was mostly a preemptive move, just to ensure I have that ability if I ever need it in the future, but as you’re about to see, I’m not using that many different types of components anyway.
Multiple Screens
Though the main screen is the one I showed you in the screenshot above, the game requires a few other screens in order to request things such as your player name or whether you’re creating a brand new game session or even joining an existing one. The way I handled that was, again, through the definition of all these screens in the same JSON file. And to move from one screen into the next one, we use the logic inside the screen handler files.
We can do this simply by using the following line of code:
this.UI.loadScreen('main-ui', (err ) => {
 if(err) this.UI.setUpAlert(err)
 })
I’ll show you more details about the UI property in a second, but I’m just using that loadScreen method to re-render the screen and picking the right components off of the JSON file using the string passed as parameter. Very straightforward.
Code Samples
It’s now time to check out the meat and potatoes of this article: the code samples. I’m just going to highlight what I think are the small gems inside it, but you can always take a look at the full source code directly in the repository anytime.
Using Config Files To Auto Generate The UI
I’ve already covered part of this, but I think it’s worth exploring the details behind this generator. The gist behind it (file index.js inside the /ui folder) is that it is a wrapper around the Blessed object. And the most interesting method inside it, is the loadScreen method.
This method grabs the configuration (through the config module) for one specific screen and goes through its content, trying to generate the right widgets based on each element’s type.
loadScreen: function(sname, extras, done) {
        if(typeof extras == "function") {
            done = extras
        }

        let screen = config.get('screens.' + sname)
        let screenElems = {}

        if(this.screenElements.length > 0) { //remove previous screen
            this.screenElements.map( e => e.detach())
            this.screen.realloc()
        }

        Object.keys(screen.elements).forEach( eName => {
            let elemObj = null
            let element = screen.elements[eName]
            if(element.type == 'window') {
                elemObj = this.setUpWindow(element)
            }
            if(element.type == 'input') {
                elemObj = this.setUpInputBox(element)
            }

            if(element.type == 'input-prompt') {
                elemObj = this.setUpInputBox(element)
            }
            screenElems[eName] = {
                meta: element,
                obj: elemObj
            }
        })

        if(typeof extras === 'object' && extras.flashmessage) {
            this.setUpAlert(extras.flashmessage)
        }


        this.renderScreen()
        let logicPath = require(screen.file)
        logicPath.init(screenElems, this)
        done()
    },
As you can see, the code is a bit lengthy, but the logic behind it is simple:
- It loads the configuration for the current specific screen;
- Cleans up any previously existing widgets;
- Goes over every widget and instantiates it;
- If an extra alert was passed as a flash message (which is basically a concept I stole from Web Dev in which you setup a message to be shown on screen until the next refresh);
- Render the actual screen;
- And finally, require the screen handler and execute it’s “init” method.
That’s it! You can check out the rest of the methods — they’re mostly related to individual widgets and how to render them.
Communication Between UI And Business Logic
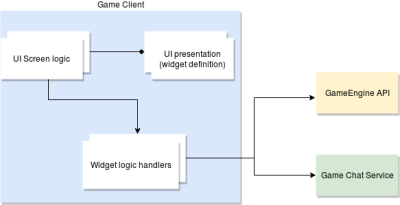
Although in the grand scale, the UI, the back-end and the chat server all have a somewhat layered-based communication; the front end itself needs at least a two-layered internal architecture in which the pure UI elements interact with a set of functions that represent the core logic inside this particular project.
The following diagram shows the internal architecture for the text client we’re building:

Let me explain it a bit further. As I mentioned above, the loadScreenMethod will create UI presentations of the widgets (these are Blessed objects). But they are contained as part of the screen logic object which is where we set up the basic events (such as onSubmit for input boxes).
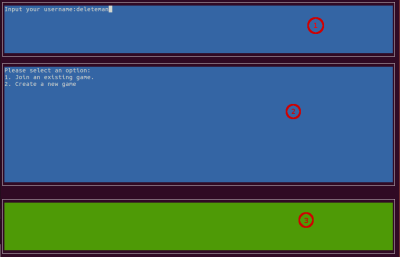
Allow me to give you a practical example. Here is the first screen you see when starting the UI client:

There are three sections on this screen:
- Username request,
- Menu options / information,
- Input screen for the menu options.
Basically, what we want to do is to request the username and then ask them to pick one of the two options (either starting up a brand new game or joining an existing one).
The code that takes care of that is the following:
module.exports = {


    init: function(elements, UI) {
        this.elements = elements
        this.UI = UI
        this.id = "main-options"
        this.setInput()
    },

    moveToIDRequest: function(handler) {
        return this.UI.loadScreen('id-requests', (err, ) => {

        })
    },

    createNewGame: function(handler) {

        handler.createNewGame(this.UI.gamestate.APIKEY, (err, gameData) => {
              this.UI.gamestate.gameID = gameData._id
              handler.joinGame(this.UI.gamestate, (err) => {
                return this.UI.loadScreen('main-ui', {
                    flashmessage: "You've joined game " + this.UI.gamestate.gameID + " successfully"
                },  (err, ) => {

                })
              })

          })
    },

    setInput: function() {

        let handler = require(this.elements["input"].meta.handlerPath)
        let input = this.elements["input"].obj
        let usernameRequest = this.elements['username-request'].obj
        let usernameRequestMeta = this.elements['username-request'].meta
        let question = usernameRequestMeta.params.content.trim()


        usernameRequest.setValue(question)

        this.UI.renderScreen()

         let validOptions =  {
             1: this.moveToIDRequest.bind(this),
             2: this.createNewGame.bind(this)
         }

        usernameRequest.on('submit', (username) => {

            logger.info("Username:" +username)
            logger.info("Playername: " + username.replace(question, ''))
            this.UI.gamestate.playername = username.replace(question, '')

            input.focus()


            input.on('submit', (data) => {
                let command = input.getValue()
                  if(!validOptions[+command]) {
                      this.UI.setUpAlert("Invalid option: " + command)
                      return this.UI.renderScreen()
                  }
                  return validOptions[+command](handler)
            })


        })


        return input
    }
}
I know that’s a lot of code, but just focus on the init method. The last thing it does is to call the setInput method which takes care of adding the right events to the right input boxes.
Therefore, with these lines:
let handler = require(this.elements["input"].meta.handlerPath)
let input = this.elements["input"].obj
let usernameRequest = this.elements['username-request'].obj
let usernameRequestMeta = this.elements['username-request'].meta
let question = usernameRequestMeta.params.content.trim()
We’re accessing the Blessed objects and getting their references, so that we can later set up the submit events. So after we submit the username, we’re switching focus to the second input box (literally with input.focus() ).
Depending on what option we choose from the menu, we’re calling either of the methods:
createNewGame: creates a new game by interacting with its associated handler;moveToIDRequest: renders the next screen in charge of requesting the game ID to join.
Communication With The Game Engine
Last but certainly not least (and following the above example), if you hit 2, you’ll notice that the method createNewGame uses the handler’s methods createNewGame and then joinGame (joining the game right after creating it).
Both these methods are meant to simplify the interaction with the Game Engine’s API. Here is the code for this screen’s handler:
const request = require("request"),
    config = require("config"),
    apiClient = require("./apiClient")

let API = config.get("api")
module.exports = {

    joinGame: function(apikey, gameId, cb) {
        apiClient.joinGame(apikey, gameId, cb)
    },

    createNewGame: function(apikey, cb) {
        request.post(API.url + API.endpoints.games + "?apikey=" + apikey, { //creating game
            body: {
                cartridgeid: config.get("app.game.cartdrigename")
            },
            json: true
        }, (err, resp, body) => {
            cb(null, body)
        })

    }
}
There you see two different ways to handle this behavior. The first method actually uses the apiClient class, which again, wraps the interactions with the GameEngine into yet another layer of abstraction.
The second method though performs the action directly by sending a POST request to the correct URL with the right payload. Nothing fancy is done afterwards; we’re just sending the body of the response back to the UI logic.
Note: If you’re interested in the full version of the source code for this client, you can check it out here.
Final Words
This is it for the text-based client for our text adventure. I covered:
- How to structure a client application;
- How I used Blessed as the core tech for creating the presentation layer;
- How to structure the interaction with the back-end services from a complex client;
- And hopefully, with the full repository available.
And while the UI might not look exactly like the original version did, it does fulfill its purpose. Hopefully, this article gave you an idea of how to architect such an endeavor and you were inclined to try it for yourself in the future. Blessed is definitely a very powerful tool, but you’ll have to have patience with it while learning how to use it and how to navigate through their docs.
In the next and final part, I’ll cover how I added the chat server both on the back-end as well as for this text client.
See you on the next one!
Other Parts Of This Series
Further Reading
- A Guide To Test-Driven Development Using Node.js
- Building And Dockerizing A Node.js App With Stateless Architecture With Help From Kinsta
- Converting Plain Text To Encoded HTML With Vanilla JavaScript
- The Era Of Platform Primitives Is Finally Here


 SurveyJS: White-Label Survey Solution for Your JS App
 Agent Ready is the new Headless


