Translating Design Wireframes Into Accessible HTML/CSS

Email Newsletter
Weekly tips on front-end & UX.
Trusted by 182,000+ folks.
This article has been kindly supported by our dear friends at Deque who help us all make websites and mobile apps accessible. Thank you!
All too often, accessibility doesn’t cross a designer’s mind when creating user interfaces. Overlooking accessibility considerations in the design phase can trickle down through to your website or application and have a large impact on your users. Whether it is usability testing, creating prototypes, adopting an accessible pattern library, or even just annotating wireframes, designers must incorporate accessibility into their workflow. Instead of overloading QA engineers to find accessibility defects, thinking of accessibility from the start, or “shifting left,” can have a tremendously positive impact on the content you create.
Shifting Left
There are many studies that show the changes in the cost of fixing defects at different stages of the development process. Based on the cost of fixing a defect at the design stage as having a factor of 1x, these [studies show cost differences]() that increase to 6x during implementation, 15x during testing after code commit, and as high as 100x if caught after the defect makes it into production. Research by the NIST estimates the defects fixing costs being as 10x during integration testing and 15x during system testing but only 30x in production.[^2] Regardless of what your organization’s actual costs are, one thing is certain: catching defects in the design and development phase is orders-of-magnitude less expensive than later in the process.
Deque has assembled data from 20 years of accessibility testing. Based on our data, a trend that we have seen over the last five years, as Web applications have increased in complexity, is that the number of defects per page has been increasing steadily to between 30 and 50 defects per page. These defect numbers often dwarf any functional defect rates and amplify the value in shifting accessibility testing and fixing as far left in the process as possible.
“
This article is aimed at giving you an overview of how this can be achieved.
The Design Phase
Annotations
Annotations are textual or graphical explanations added to a design to inform the implementer of intent. Similar to a designer annotating things like color and font-size, accessibility information must also be conveyed in designs. Let’s dive into a simple audio player widget and assess what kinds of annotations we will need.
Our audio player will consist of three controls:
- A control to go to the previous track (when applicable)
- A control to play and pause the currently playing audio track
- A control to go to the next track (when applicable)
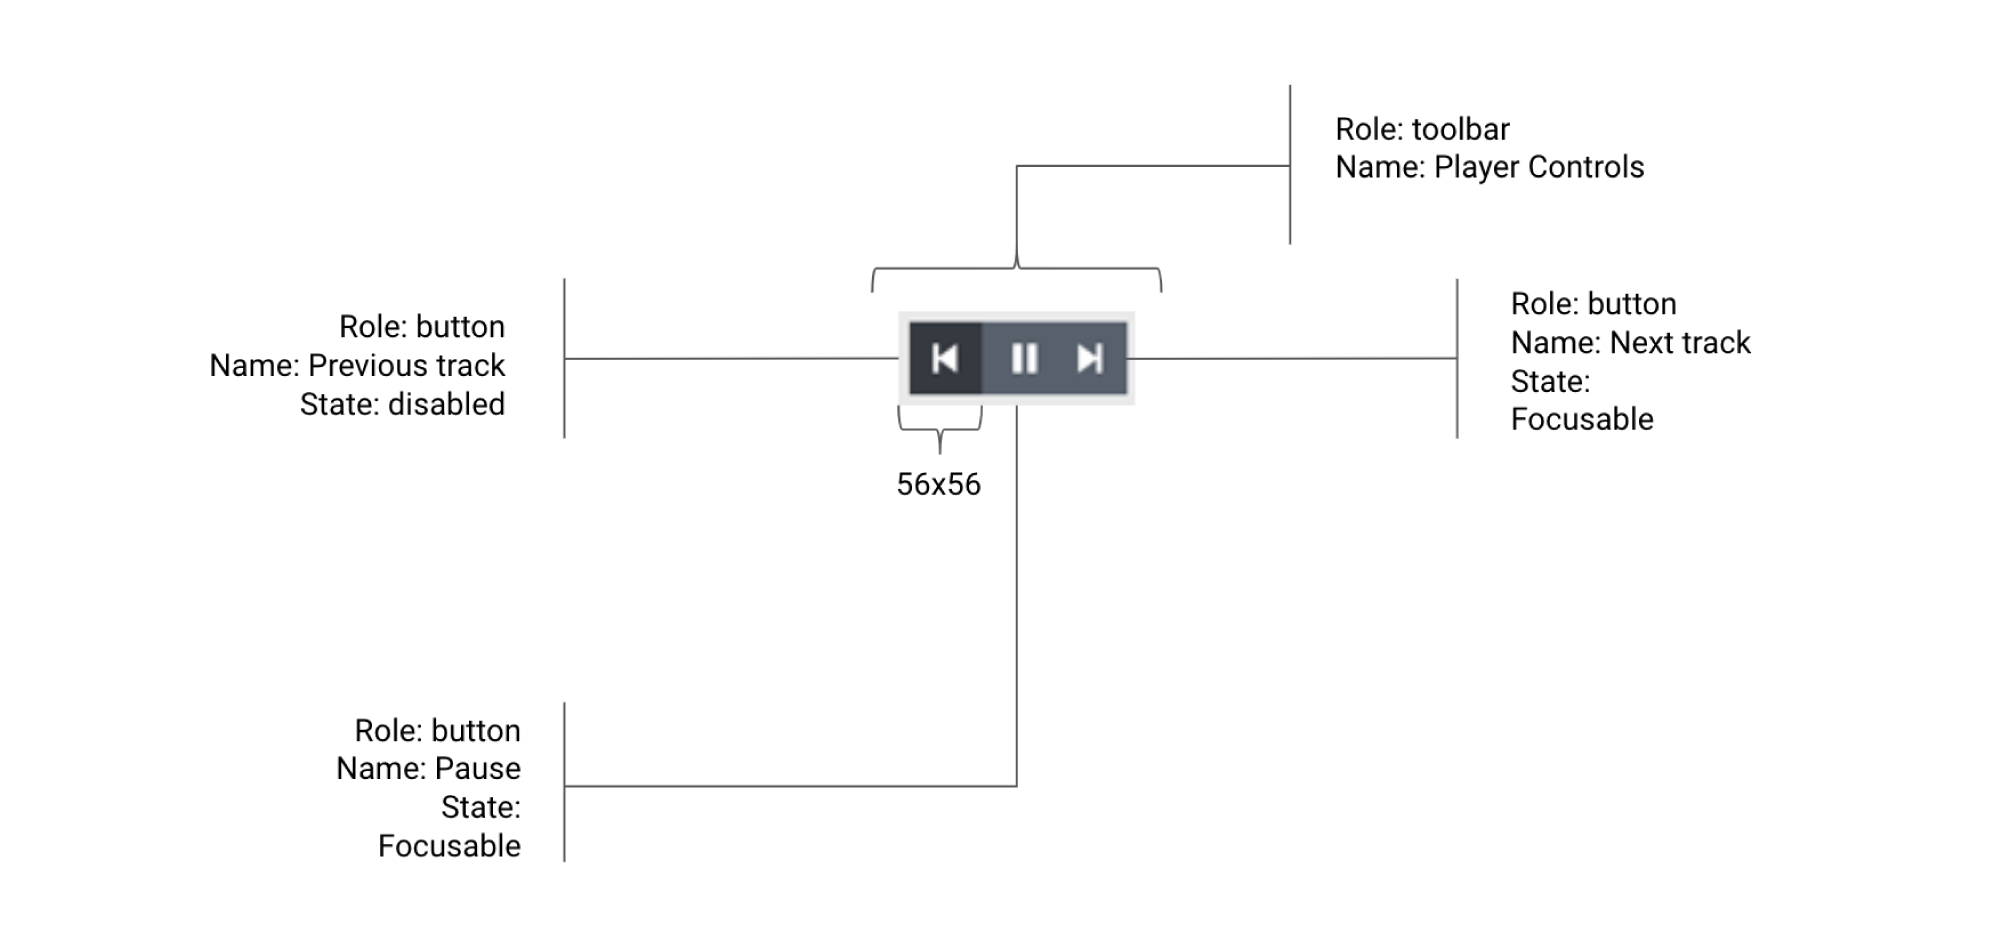
Name, Role And State
The accessible name of a component will dictate what an assistive technology user will be informed of when interacting with it. It is very important to annotate each of our audio player controls because, visually, they are represented with iconography alone and no textual content. This means that we will annotate the 3 controls with accessible names of “Previous track,” “Pause,” and “Next track.”
Next, we want to think about the purpose of each of these 3 controls. Since they are clickable elements that perform audio player actions, the obvious choice of role here is “button”. This is not something that should be assumed through the design but, rather, this is something that designers must annotate to ensure the implementers add this semantic information to the controls. Having the roles mapped out from the start will save you from having to go back and add them to the controls after the implementation has already taken place.
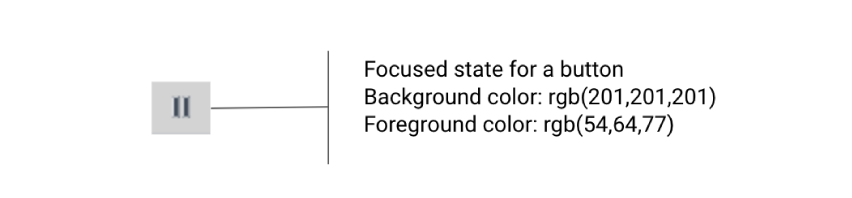
Finally, just as designers map out how a control appears when hovered, they must be thinking about the various states of their widget in terms of accessibility. In the case of our audio player, we actually have quite a few states to annotate for the implementer. Starting with the “Previous track” button, we know that it should be disabled when there is no previous track to play. The play/pause button should toggle the audio player between the playing and paused states. This means we need to annotate that the accessible name needs to match that state. The button’s accessible name should be “Pause” when audio is playing and “Play” when audio is paused. For the “Next track” button, we should annotate the fact that it should be disabled when there is no next track. Lastly, the hover and focus states for each of the buttons should be annotated so keyboard users have some visual indication of the currently focused control in the audio player.
Interaction for the entire component
When on first track: disable “previous track” button
When on last track: disable “next track” button
When playing, display the “pause” button and hide the “play” button
When not playing: display the “play” button and hide the “pause” button
After clicking “play”, place focus on the “pause” button
After clicking “pause” place focus on the “play” button
Usability Testing
Usability testing, a UX research methodology in which a researcher has a user perform a series of tasks and analyzes their behavior, is a very important stage in the design phase. Information gathered from usability testing is vital in shaping digital user experiences. Performing this testing with users with disabilities is extremely important because it allows your team to get an idea of how easily these users will be able to interact with the content they are creating. If you are doing usability testing on an existing system, you will be able to get a very realistic scenario set up for the participant which is great when it comes to users who rely on various assistive technologies.
If you are doing usability testing on a non-existing system, be prepared to deal with accessibility challenges surrounding the output of design software. The interactive prototypes outputted from these tools are often extremely different from what the end product will be in a browser or on an OS platform. In addition, these “functional prototypes” are usually extremely inaccessible. If possible, find a close alternative out in the wild that you can use in your prototype’s place, which can give you a good idea of how your participants will interact with your system. For example, if you are building a new mobile navigation component, find an existing one on the Internet, and do usability testing with it. Determine what worked in this alternative and learn what needs to be improved. Either way, always be prepared to make accommodations for your usability testing participants based on their disabilities. Ensuring that the tests go smoothly without any roadblocks will not only make your participants happy but will also allow you to get through more testing in less time.
Pattern Libraries
Pattern libraries are collections of user interface components and are extremely beneficial in both the design and the development phases. Having a sufficient set of UI components at your fingertips makes building fully functional applications much easier. For the designer, these components help keep a nice consistency across your application which improves the overall experience for your users. For the developer, having fully-tested, accessible, reusable components help produce high-quality content rapidly. These components should be treated with special care in terms of accessibility because they will presumably be used numerous times through your application(s).
Work With the Developers
Speaking with fellow developers and designers at conferences and meetups, I frequently hear of divided teams in which the designers and developers work in complete isolation from one another. Not only should developers be included in the design phase in things like design review meetings, but designers should also be included in the development phase.
Collaboration is key when it comes to creating awesome accessible content.
“
Oftentimes, developers are privy to implementation details that can help shape design comps or even pivot an approach to solving a design problem. Likewise, designers can help keep developers in check when it comes to implementing their designs accessibly because detail-oriented aspects such as spacing and specific color usage can have a huge impact on accessibility. While the developers implement a design, designers should pay close attention to things like focus indication, tab order, reading order, fonts, colors, and even accessible names and alt texts of images. Because, after all, what good are all of those amazing accessibility-specific annotations if the developer ignores them?
The Development Phase
Automate Accessibility Testing
Us developers love the idea that certain things in our workflows can be completely automated. Thankfully, there are many amazing accessibility automation libraries available, which your team should leverage to assist in creating sustainable accessible interfaces. Static analysis tools such as eslint-plugin-jsx-a11y can provide immediate feedback to developers warning them of potential accessibility issues while they are coding. Developers can even set their text editor up to display these warnings right as they type code, catching these defects live as they pop up.
Accessibility rules engines, such as axe-core, can be integrated into almost any framework or environment and can help catch many extremely common accessibility issues. A great way to ensure your entire team is creating accessible content is to integrate these types of tools into your CI (continuous integration) and CD (continuous delivery) pipelines. Writing accessibility-specific test cases (unit or end-to-end) is another great form of automation. On my team, we have all of the above configured so no pull requests can even be merged until all of our accessibility automation tests have passed. This means we can guarantee minimal accessibility defects even make it to our dev servers and definitely won’t make it into production.
Manage Accessibility Defects Systematically
Accessibility issues should be treated no differently than security or functionality defects. They should be triaged and prioritized regularly with the rest of the “normal” workload. Measuring progress and gathering metrics specific to accessibility defects can also be useful, especially if your team is just beginning to ramp up on accessibility. This can also help identify your system’s weak points or bottlenecks. If your team participates in sprint retrospectives (or something similar), accessibility should be a talking point. Reflecting on what works and what doesn’t is a healthy exercise and can lead to enhancements in your team’s overall approach towards sustainable accessibility.
This Cool Axe Beta tool
We’ve talked about accessibility automation, which is a great starting point for testing. However, inevitably, a human must pick up where the robots leave off to get full accessibility testing coverage. Manual testing requires a deep understanding of accessibility as well as the W3C Web Content Accessibility Guidelines, or “WCAG.” The axe Beta application assists in getting you through this manual testing without having to be an expert in accessibility. It has a large suite of Intelligent Guided Tests, which ask extremely simple questions and does all of the heavy liftings for you!
Given that we always strive to automate everything, one might react skeptically to the assertion that accessibility testing cannot be fully automated and requires a human brain to cover all bases. However, let’s take images as an example and what information, if any, they provide in the context of a webpage. An accessibility automation library cannot derive informational intent by scanning or processing an image. Even if we feed a machine learning algorithm an image and it can spit out a perfect description of what is in that image, it doesn’t know what that image conveys in the context of the page. The information a given image conveys, or whether that image is used solely as decoration, is completely up to the author of the content.
Tying It All Together
Having accessibility in mind from the very beginning of development makes creating accessible content much easier than making these considerations late in the software development lifecycle. Baking accessibility into the ideation, design and implementation of your software creates a more sustainable product.
Set your team up for success by utilizing resources such as WCAG, ARIA, ARIA Authoring Practices, and Stack Overflow. Prevent accessibility defects from finding their way into your software by leveraging accessibility automation libraries and integrating them into your continuous integration servers. Our team has worked hard on filling in the gap between automated and manual testing, we’d love for you to give axe Beta a try! If accessibility defects are handled systematically, not only can you rid your applications of these issues, but you can prevent them from finding their way back in the future.
Do you want to join me in a free workshop on this exact topic? Register for our upcoming Translating Design Wireframes Virtual Workshop which will be split into two 3 hour sessions.
Further Reading
- Mobile Accessibility Barriers For Assistive Technology Users
- How To Succeed In Wireframe Design
- It’s Time To Talk About “CSS5”
- Recreating YouTube’s Ambient Mode Glow Effect