Managing Long-Running Tasks In A React App With Web Workers

Email Newsletter
Weekly tips on front-end & UX.
Trusted by 182,000+ folks.
 Celebrating 10 million developers
 SurveyJS: White-Label Survey Solution for Your JS App
 Register Free Now


Response time is a big deal when it comes to web applications. Users demand instantaneous responses, no matter what your app may be doing. Whether it’s only displaying a person’s name or crunching numbers, web app users demand that your app responds to their command every single time. Sometimes that can be hard to achieve given the single-threaded nature of JavaScript. But in this article, we’ll learn how we can leverage the Web Worker API to deliver a better experience.
In writing this article, I made the following assumptions:
- To be able to follow along, you should have at least some familiarity with JavaScript and the document API;
- You should also have a working knowledge of React so that you can successfully start a new React project using Create React App.
If you need more insights into this topic, I’ve included a number of links in the “Further Resources” section to help you get up to speed.
First, let’s get started with Web Workers.
What Is A Web Worker?
To understand Web Workers and the problem they’re meant to solve, it is necessary to get a grasp of how JavaScript code is executed at runtime. During runtime, JavaScript code is executed sequentially and in a turn-by-turn manner. Once a piece of code ends, then the next one in line starts running, and so on. In technical terms, we say that JavaScript is single-threaded. This behavior implies that once some piece of code starts running, every code that comes after must wait for that code to finish execution. Thus, every line of code “blocks” the execution of everything else that comes after it. It is therefore desirable that every piece of code finish as quickly as possible. If some piece of code takes too long to finish our program would appear to have stopped working. On the browser, this manifests as a frozen, unresponsive page. In some extreme cases, the tab will freeze altogether.
Imagine driving on a single-lane. If any of the drivers ahead of you happen to stop moving for any reason, then, you have a traffic jam. With a program like Java, traffic could continue on other lanes. Thus Java is said to be multi-threaded. Web Workers are an attempt to bring multi-threaded behavior to JavaScript.
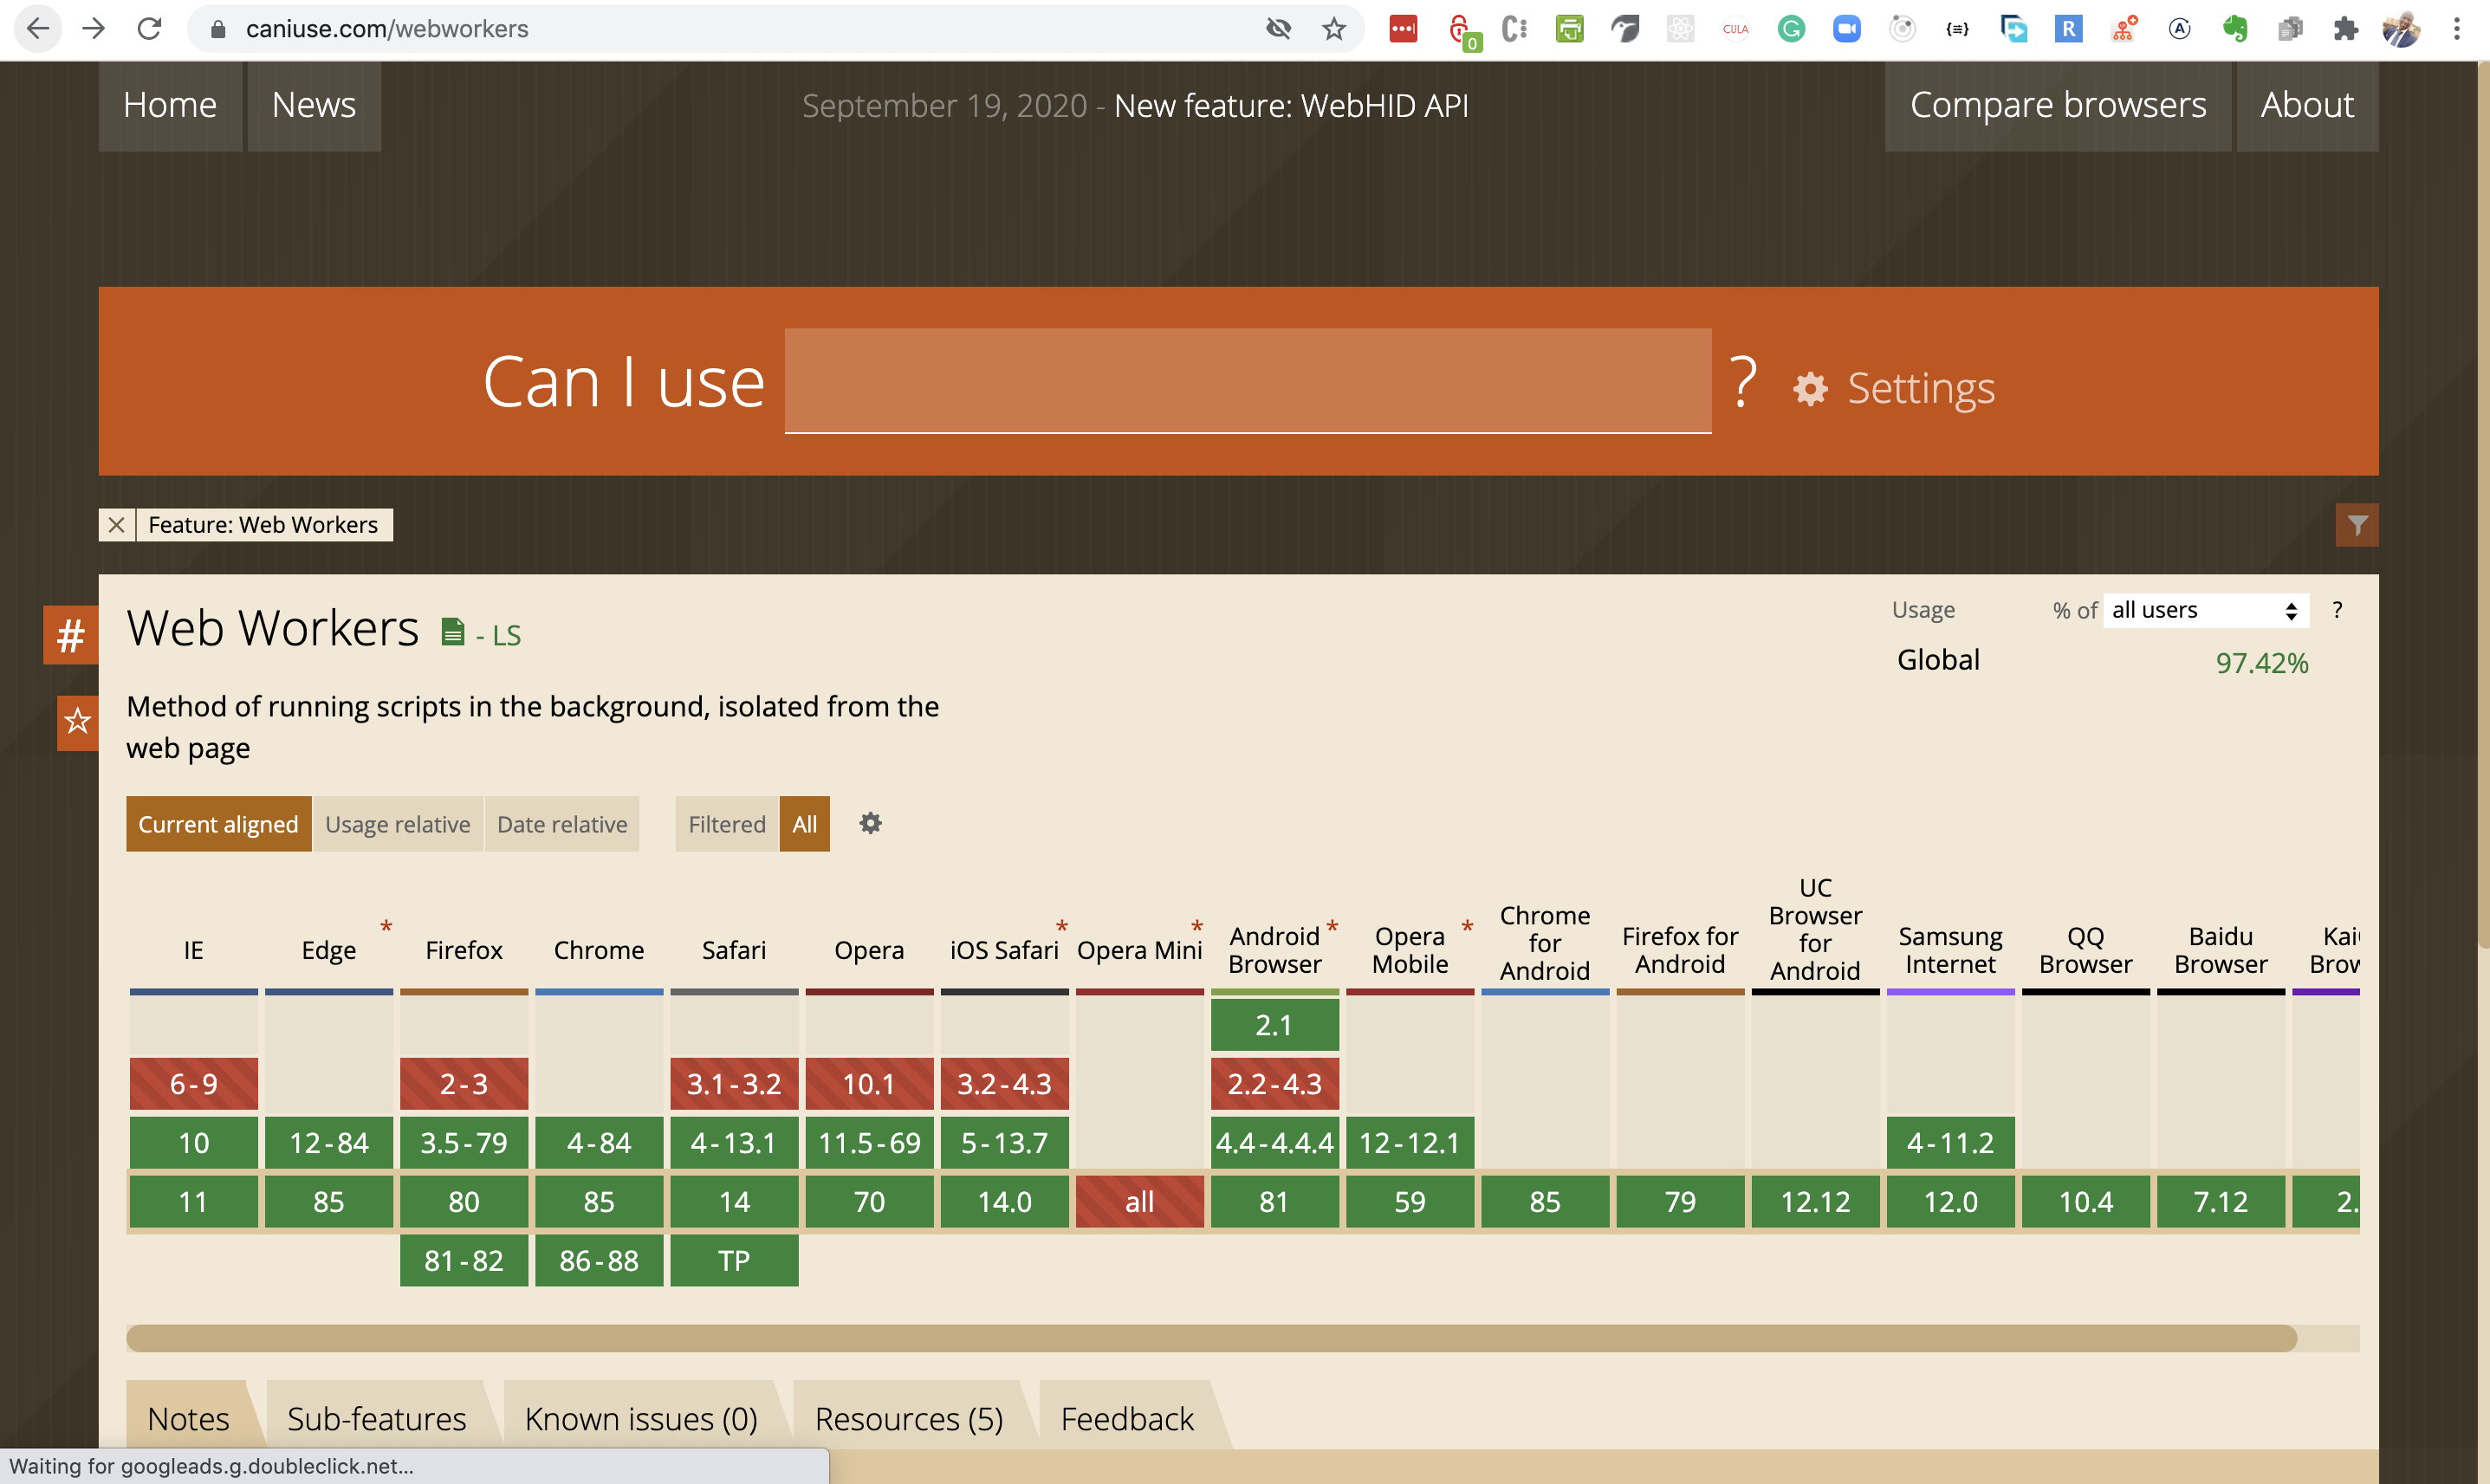
The screenshot below shows that the Web Worker API is supported by many browsers, so you should feel confident in using it.
Web Workers run in background threads without interfering with the UI, and they communicate with the code that created them by way of event handlers.
An excellent definition of a Web Worker comes from MDN:
“A worker is an object created using a constructor (e.g.Worker()that runs a named JavaScript file — this file contains the code that will run in the worker thread; workers run in another global context that is different from the currentwindow. Thus, using thewindowshortcut to get the current global scope (instead ofselfwithin aWorkerwill return an error.”
A worker is created using the Worker constructor.
const worker = new Worker('worker-file.js')It is possible to run most code inside a web worker, with some exceptions. For example, you can’t manipulate the DOM from inside a worker. There is no access to the document API.
Workers and the thread that spawns them send messages to each other using the postMessage() method. Similarly, they respond to messages using the onmessage event handler. It’s important to get this difference. Sending messages is achieved using a method; receiving a message back requires an event handler. The message being received is contained in the data attribute of the event. We will see an example of this in the next section. But let me quickly mention that the sort of worker we’ve been discussing is called a “dedicated worker”. This means that the worker is only accessible to the script that called it. It is also possible to have a worker that is accessible from multiple scripts. These are called shared workers and are created using the SharedWorker constructor, as shown below.
const sWorker = new SharedWorker('shared-worker-file.js')To learn more about Workers, please see this MDN article. The purpose of this article is to get you started with using Web workers. Let’s get to it by computing the nth Fibonacci number.
Computing The Nth Fibonacci Number
Note: For this and the next two sections, I’m using Live Server on VSCode to run the app. You can certainly use something else.
This is the section you’ve been waiting for. We’ll finally write some code to see Web Workers in action. Well, not so fast. We wouldn’t appreciate the job a Web Worker does unless we run into the sort of problems it solves. In this section, we’re going to see an example problem, and in the following section, we’ll see how a web worker helps us do better.
Imagine you were building a web app that allowed users to calculate the nth Fibonacci number. In case you’re new to the term ‘Fibonacci number’, you can read more about it here, but in summary, Fibonacci numbers are a sequence of numbers such that each number is the sum of the two preceding numbers.
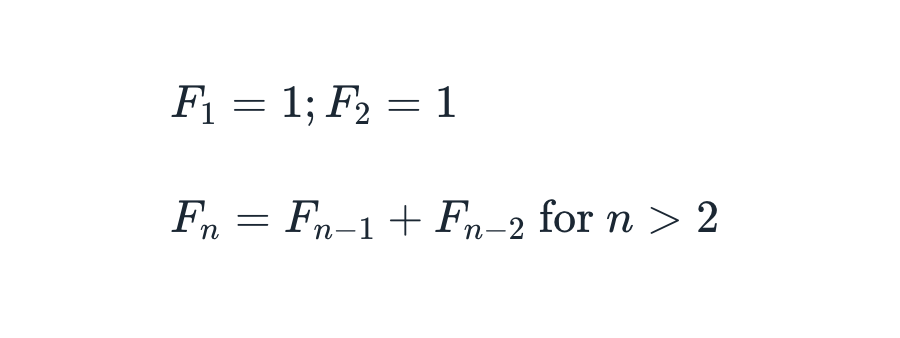
Mathematically, it is expressed as:
Thus the first few numbers of the sequence are:
1, 1, 2, 3, 5, 8, 13, 21, 34, 55, 89 ...
In some sources, the sequence starts at F0 = 0, in which case the formula below holds for n > 1:

In this article we’ll start at F1 = 1. One thing we can see right away from the formula is that the numbers follow a recursive pattern. The task at hand now is to write a recursive function to compute the nth Fibonacci number (FN).
After a few tries, I believe you can easily come up with the function below.
const fib = n => {
  if (n < 2) {
    return n // or 1
  } else {
    return fib(n - 1) + fib(n - 2)
  }
}
The function is simple. If n is less than 2, return n (or 1), otherwise, return the sum of the n-1 and n-2 FNs. With arrow functions and ternary operator, we can come up with a one-liner.
const fib = n => (n < 2 ? n : fib(n-1) + fib(n-2))This function has a time complexity of 0(2n). This simply means that as the value of n increases, the time required to compute the sum increases exponentially. This makes for a really long-running task that could potentially interfere with our UI, for large values of n. Let’s see this in action.
Note: This is by no means the best way to solve this particular problem. My choice of using this method is for the purpose of this article.
To start, create a new folder and name it whatever you like. Now inside that folder create a src/ folder. Also, create an index.html file in the root folder. Inside the src/ folder, create a file named index.js.
Open up index.html and add the following HTML code.
<!DOCTYPE html>
<html>
<head>
  <link rel="stylesheet" href="styles.css">
</head>
<body>
  <div class="heading-container">
    <h1>Computing the nth Fibonnaci number</h1>
  </div>
  <div class="body-container">
    <p id='error' class="error"></p>
    <div class="input-div">
      <input id='number-input' class="number-input" type='number' placeholder="Enter a number" />
      <button id='submit-btn' class="btn-submit">Calculate</button>
    </div>
    <div id='results-container' class="results"></div>
  </div>
  <script src="/src/index.js"></script>
</body>
</html>
This part is very simple. First, we have a heading. Then we have a container with an input and a button. A user would enter a number then click on “Calculate”. We also have a container to hold the result of the calculation. Lastly, we include the src/index.js file in a script tag.
You may delete the stylesheet link. But if you’re short on time, I have defined some CSS which you can use. Just create the styles.css file at the root folder and add the styles below:
body {
    margin: 0;
    padding: 0;
    box-sizing: border-box;
  }

  .body-container,
  .heading-container {
    padding: 0 20px;
  }

  .heading-container {
    padding: 20px;
    color: white;
    background: #7a84dd;
  }

  .heading-container > h1 {
    margin: 0;
  }

  .body-container {
    width: 50%
  }

  .input-div {
    margin-top: 15px;
    margin-bottom: 15px;
    display: flex;
    align-items: center;
  }

  .results {
    width: 50vw;
  }

  .results>p {
    font-size: 24px;
  }

  .result-div {
    padding: 5px 10px;
    border-radius: 5px;
    margin: 10px 0;
    background-color: #e09bb7;
  }

  .result-div p {
    margin: 5px;
  }

  span.bold {
    font-weight: bold;
  }

  input {
    font-size: 25px;
  }

  p.error {
    color: red;
  }

  .number-input {
    padding: 7.5px 10px;
  }

  .btn-submit {
    padding: 10px;
    border-radius: 5px;
    border: none;
    background: #07f;
    font-size: 24px;
    color: white;
    cursor: pointer;
    margin: 0 10px;
  }
Now open up src/index.js let’s slowly develop it. Add the code below.
const fib = (n) => (n < 2 ? n : fib(n - 1) + fib(n - 2));

const ordinal_suffix = (num) => {
  // 1st, 2nd, 3rd, 4th, etc.
  const j = num % 10;
  const k = num % 100;
  switch (true) {
    case j === 1 && k !== 11:
      return num + "st";
    case j === 2 && k !== 12:
      return num + "nd";
    case j === 3 && k !== 13:
      return num + "rd";
    default:
      return num + "th";
  }
};
const textCont = (n, fibNum, time) => {
  const nth = ordinal_suffix(n);
  return `
  <p id='timer'>Time: <span class='bold'>${time} ms</span></p>
  <p><span class="bold" id='nth'>${nth}</span> fibonnaci number: <span class="bold" id='sum'>${fibNum}</span></p>
  `;
};
Here we have three functions. The first one is the function we saw earlier for calculating the nth FN. The second function is just a utility function to attach an appropriate suffix to an integer number. The third function takes some arguments and outputs a markup which we will later insert in the DOM. The first argument is the number whose FN is being computed. The second argument is the computed FN. The last argument is the time it takes to perform the computation.
Still in src/index.js, add the below code just under the previous one.
const errPar = document.getElementById("error");
const btn = document.getElementById("submit-btn");
const input = document.getElementById("number-input");
const resultsContainer = document.getElementById("results-container");

btn.addEventListener("click", (e) => {
  errPar.textContent = '';
  const num = window.Number(input.value);

  if (num < 2) {
    errPar.textContent = "Please enter a number greater than 2";
    return;
  }

  const startTime = new Date().getTime();
  const sum = fib(num);
  const time = new Date().getTime() - startTime;

  const resultDiv = document.createElement("div");
  resultDiv.innerHTML = textCont(num, sum, time);
  resultDiv.className = "result-div";
  resultsContainer.appendChild(resultDiv);
});
First, we use the document API to get hold of DOM nodes in our HTML file. We get a reference to the paragraph where we’ll display error messages; the input; the calculate button and the container where we’ll show our results.
Next, we attach a “click” event handler to the button. When the button gets clicked, we take whatever is inside the input element and convert it to a number, if we get anything less than 2, we display an error message and return. If we get a number greater than 2, we continue. First, we record the current time. After that, we calculate the FN. When that finishes, we get a time difference that represents how long the computation took. In the remaining part of the code, we create a new div. We then set its inner HTML to be the output of the textCont() function we defined earlier. Finally, we add a class to it (for styling) and append it to the results container. The effect of this is that each computation will appear in a separate div below the previous one.
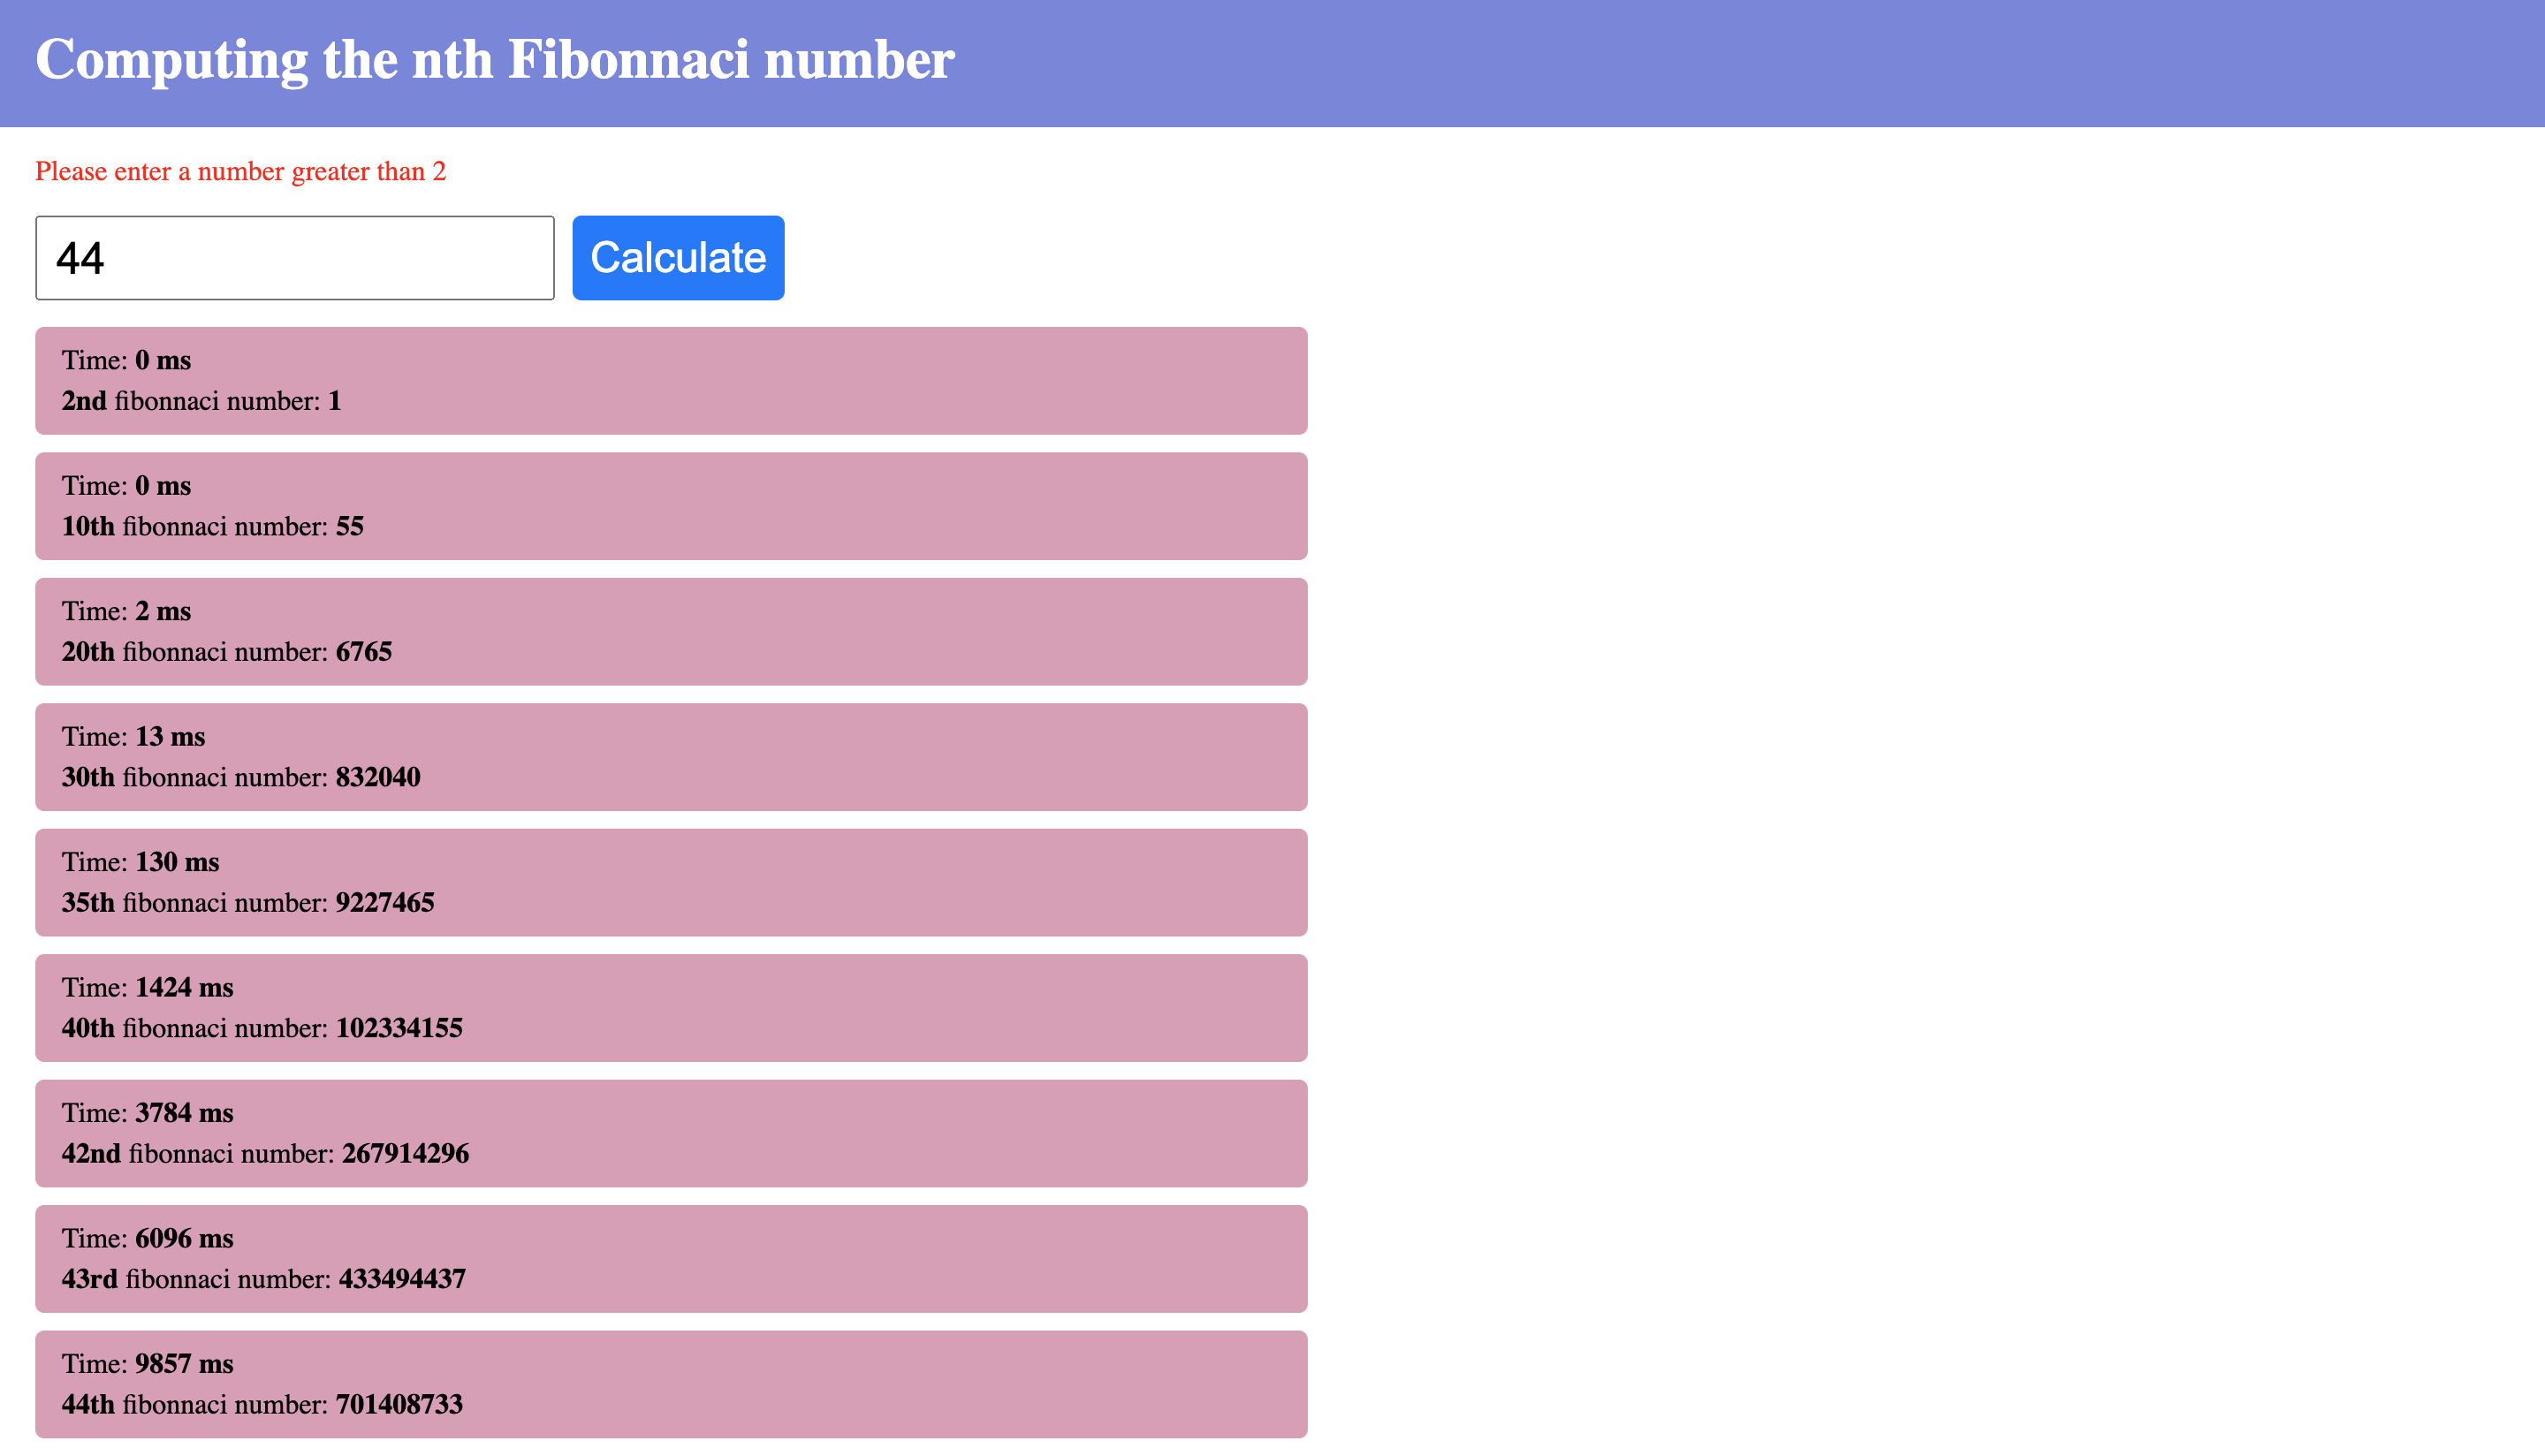
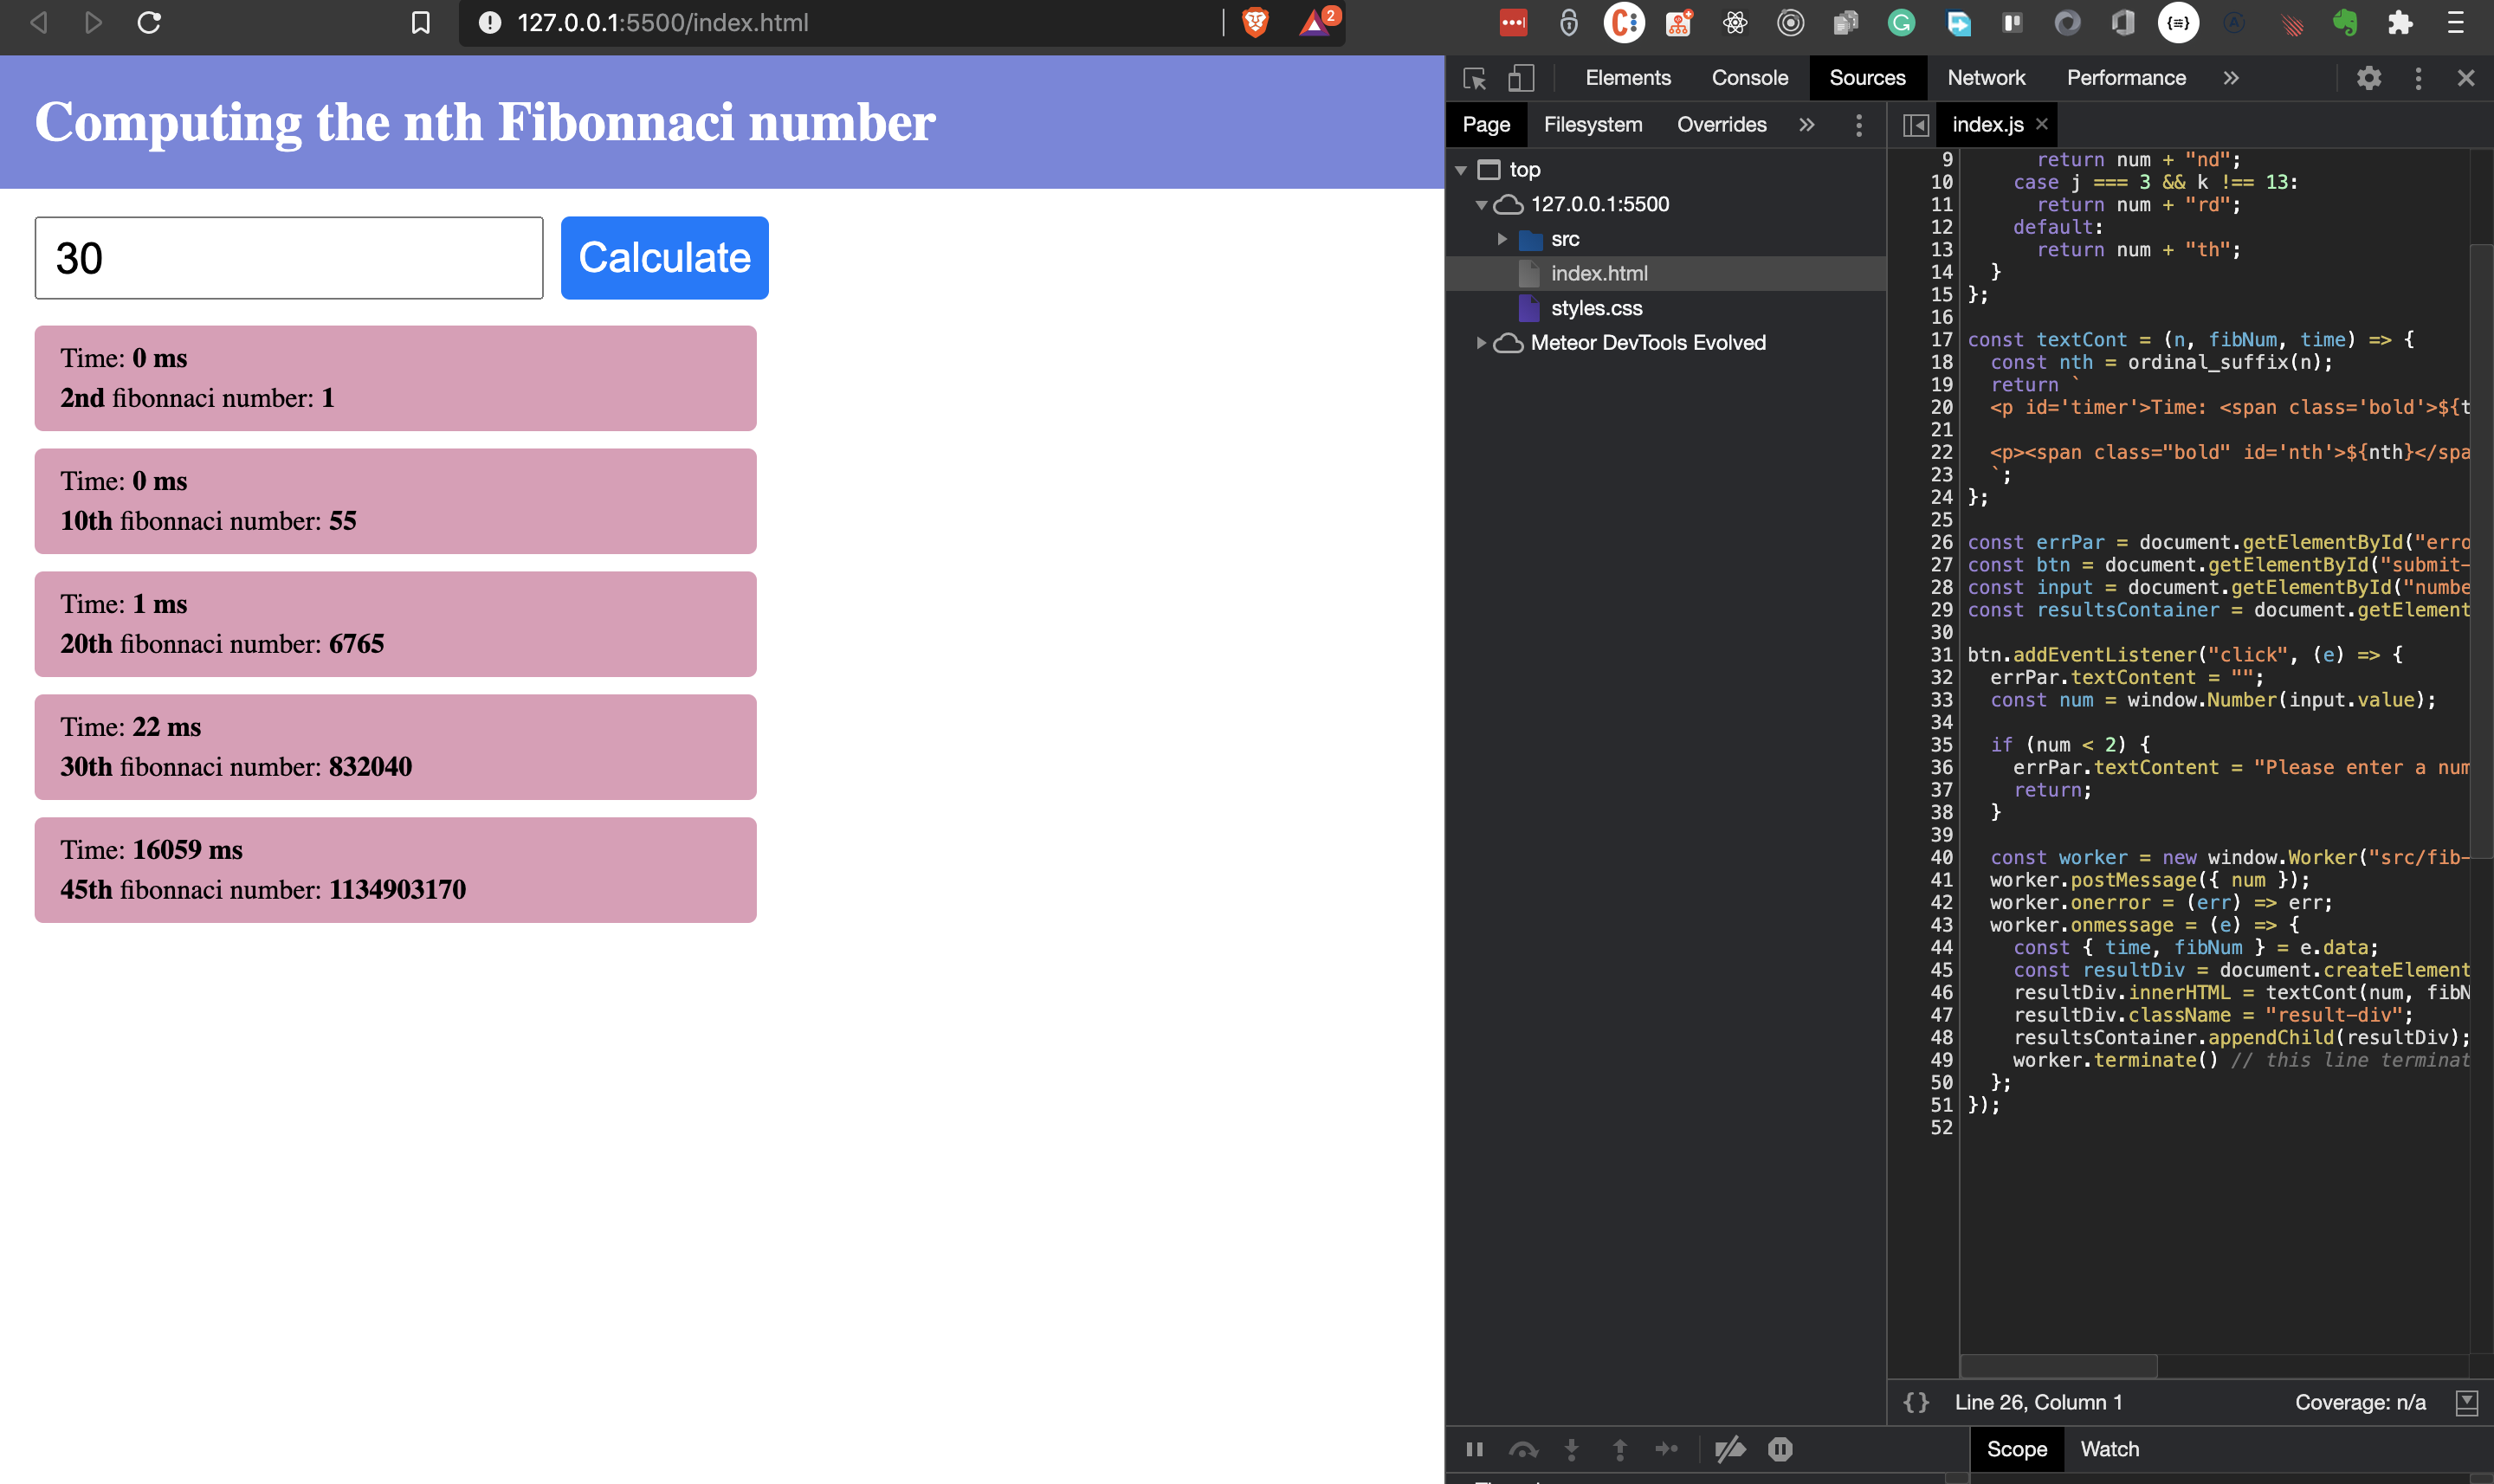
We can see that as the number increases, the computation time also increases (exponentially). For instance, from 30 to 35, we had the computation time jump from 13ms to 130ms. We can still consider those operations to be “fast”. At 40 we see a computation time of over 1 second. On my machine, this is where I start noticing the page become unresponsive. At this point, I can no longer interact with the page while the computation is on-going. I can’t focus on the input or do anything else.
Recall when we talked about JavaScript being single-threaded? Well, that thread has been “blocked” by this long-running computation, so everything else must “wait” for it to finish. It may start at a lower or higher value on your machine, but you’re bound to reach that point. Notice that it took almost 10s to compute that of 44. If there were other things to do on your web app, well, the user has to wait for Fib(44) to finish before they can continue. But if you deployed a web worker to handle that calculation, your users could carry on with something else while that runs.
Let’s now see how web workers help us overcome this problem.
An Example Web Worker In Action
In this section, we’ll delegate the job of computing the nth FN to a web worker. This will help free up the main thread and keep our UI responsive while the computation is on-going.
Getting started with web workers is surprisingly simple. Let’s see how. Create a new file src/fib-worker.js. and enter the following code.
const fib = (n) => (n < 2 ? n : fib(n - 1) + fib(n - 2));

onmessage = (e) => {
  const { num } = e.data;
  const startTime = new Date().getTime();
  const fibNum = fib(num);
  postMessage({
    fibNum,
    time: new Date().getTime() - startTime,
  });
};
Notice that we have moved the function that calculates the nth Fibonacci number, fib inside this file. This file will be run by our web worker.
Recall in the section What is a web worker, we mentioned that web workers and their parent communicate using the onmessage event handler and postMessage() method. Here we’re using the onmessage event handler to listen to messages from the parent script. Once we get a message, we destructure the number from the data attribute of the event. Next, we get the current time and start the computation. Once the result is ready, we use the postMessage() method to post the results back to the parent script.
Open up src/index.js let’s make some changes.
...

const worker = new window.Worker("src/fib-worker.js");

btn.addEventListener("click", (e) => {
  errPar.textContent = "";
  const num = window.Number(input.value);
  if (num < 2) {
    errPar.textContent = "Please enter a number greater than 2";
    return;
  }

  worker.postMessage({ num });
  worker.onerror = (err) => err;
  worker.onmessage = (e) => {
    const { time, fibNum } = e.data;
    const resultDiv = document.createElement("div");
    resultDiv.innerHTML = textCont(num, fibNum, time);
    resultDiv.className = "result-div";
    resultsContainer.appendChild(resultDiv);
  };
});
The first thing to do is to create the web worker using the Worker constructor. Then inside our button’s event listener, we send a number to the worker using worker.postMessage({ num }). After that, we set a function to listen for errors in the worker. Here we simply return the error. You can certainly do more if you want, like showing it in DOM. Next, we listen for messages from the worker. Once we get a message, we destructure time and fibNum, and continue the process of showing them in the DOM.
Note that inside the web worker, the onmessage event is available in the worker’s scope, so we could have written it as self.onmessage and self.postMessage(). But in the parent script, we have to attach these to the worker itself.
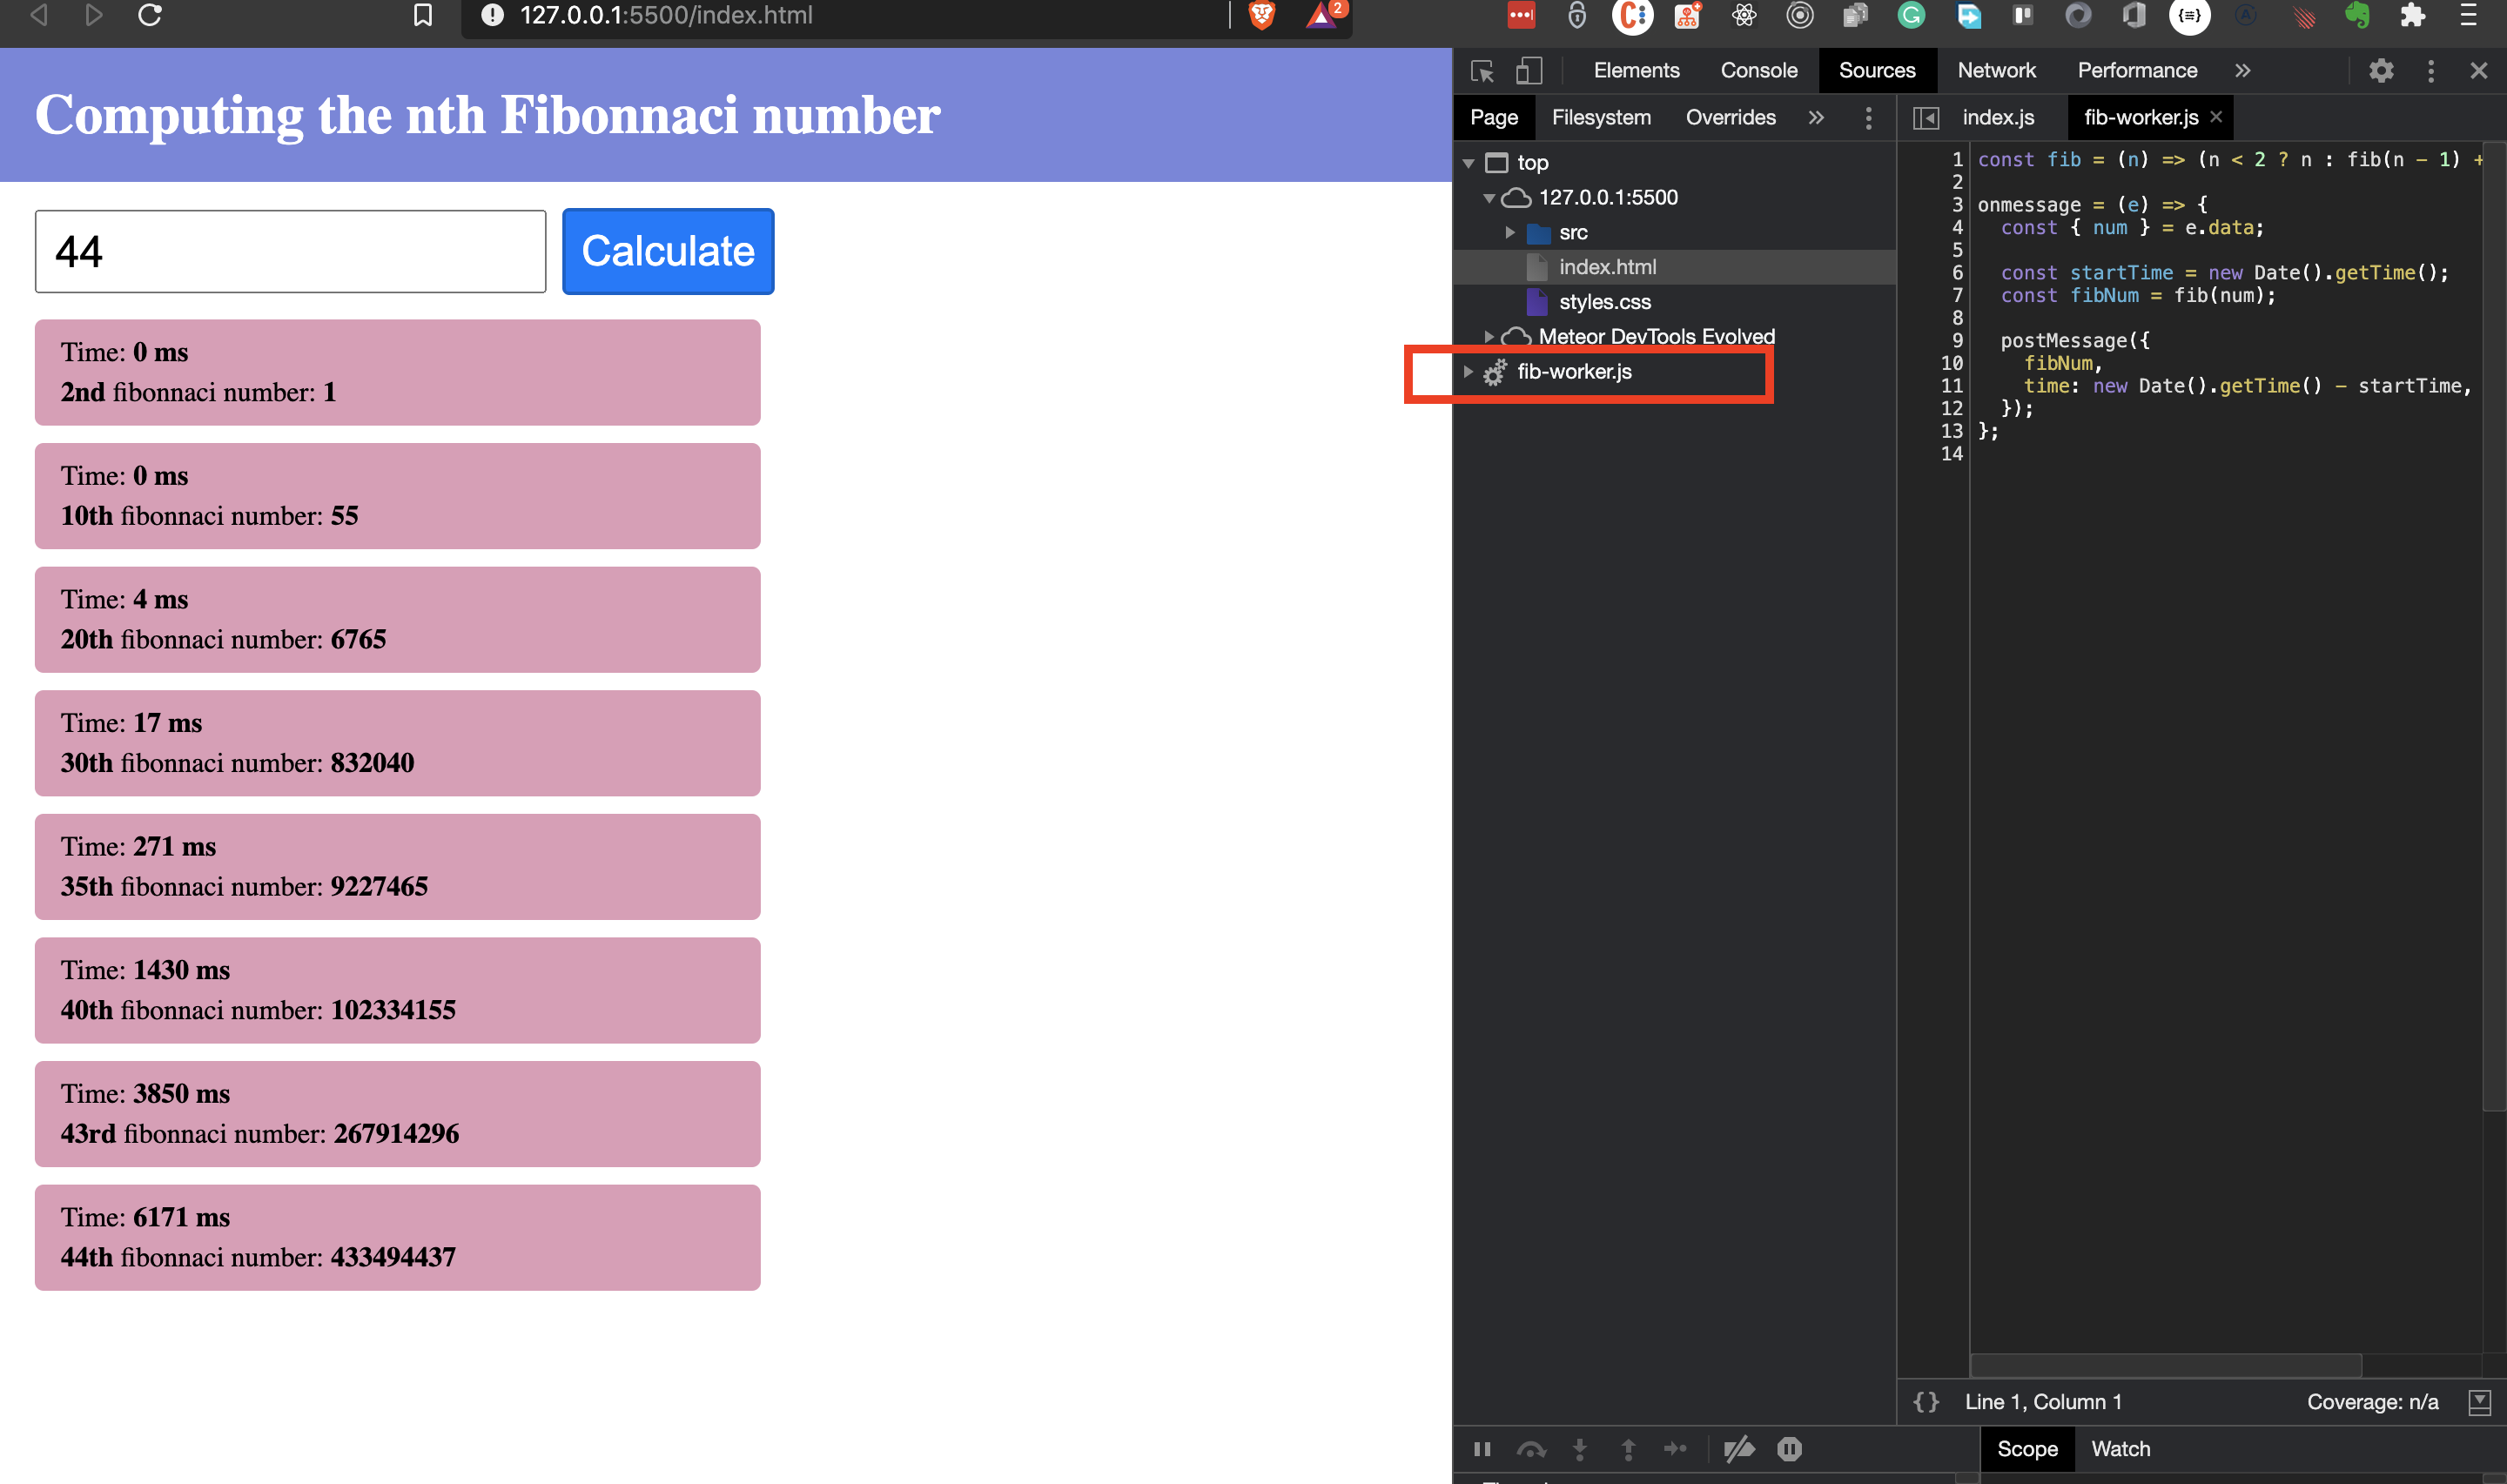
In the screenshot below you would see the web worker file in the sources tab of Chrome Dev Tools. What you should notice is that the UI stays responsive no matter what number you enter. This behavior is the magic of web workers.
We’ve made a lot of progress with our web app. But there’s something else we can do to make it better. Our current implementation uses a single worker to handle every computation. If a new message comes while one is running, the old one gets replaced. To get around this, we can create a new worker for each call to calculate the FN. Let’s see how to do that in the next section.
Working With Multiple Web Workers
Currently, we’re handling every request with a single worker. Thus an incoming request will replace a previous one that is yet to finish. What we want now is to make a small change to spawn a new web worker for every request. We will kill this worker once it’s done.
Open up src/index.js and move the line that creates the web worker inside the button’s click event handler. Now the event handler should look like below.
btn.addEventListener("click", (e) => {
  errPar.textContent = "";
  const num = window.Number(input.value);

  if (num < 2) {
    errPar.textContent = "Please enter a number greater than 2";
    return;
  }

  const worker = new window.Worker("src/fib-worker.js"); // this line has moved inside the event handler
  worker.postMessage({ num });
  worker.onerror = (err) => err;
  worker.onmessage = (e) => {
    const { time, fibNum } = e.data;
    const resultDiv = document.createElement("div");
    resultDiv.innerHTML = textCont(num, fibNum, time);
    resultDiv.className = "result-div";
    resultsContainer.appendChild(resultDiv);
    worker.terminate() // this line terminates the worker
  };
});
We made two changes.
- We moved this line
const worker = new window.Worker("src/fib-worker.js")inside the button’s click event handler. - We added this line
worker.terminate()to discard the worker once we’re done with it.
So for every click of the button, we create a new worker to handle the calculation. Thus we can keep changing the input, and each result will hit the screen once the computation finishes. In the screenshot below you can see that the values for 20 and 30 appear before that of 45. But I started 45 first. Once the function returns for 20 and 30, their results were posted, and the worker terminated. When everything finishes, we shouldn’t have any workers on the sources tab.
We could end this article right here, but if this were a react app, how would we bring web workers into it. That is the focus of the next section.
Web Workers In React
To get started, create a new react app using CRA. Copy the fib-worker.js file into the public/ folder of your react app. Putting the file here stems from the fact that React apps are single-page apps. That’s about the only thing that is specific to using the worker in a react application. Everything that follows from here is pure React.
In src/ folder create a file helpers.js and export the ordinal_suffix() function from it.
// src/helpers.js

export const ordinal_suffix = (num) => {
  // 1st, 2nd, 3rd, 4th, etc.
  const j = num % 10;
  const k = num % 100;
  switch (true) {
    case j === 1 && k !== 11:
      return num + "st";
    case j === 2 && k !== 12:
      return num + "nd";
    case j === 3 && k !== 13:
      return num + "rd";
    default:
      return num + "th";
  }
};
Our app will require us to maintain some state, so create another file, src/reducer.js and paste in the state reducer.
// src/reducers.js

export const reducer = (state = {}, action) => {
  switch (action.type) {
    case "SET_ERROR":
      return { ...state, err: action.err };
    case "SET_NUMBER":
      return { ...state, num: action.num };
    case "SET_FIBO":
      return {
        ...state,
        computedFibs: [
          ...state.computedFibs,
          { id: action.id, nth: action.nth, loading: action.loading },
        ],
      };
    case "UPDATE_FIBO": {
      const curr = state.computedFibs.filter((c) => c.id === action.id)[0];
      const idx = state.computedFibs.indexOf(curr);
      curr.loading = false;
      curr.time = action.time;
      curr.fibNum = action.fibNum;
      state.computedFibs[idx] = curr;
      return { ...state };
    }
    default:
      return state;
  }
};
Let’s go over each action type one after the other.
SET_ERROR: sets an error state when triggered.SET_NUMBER: sets the value in our input box to state.SET_FIBO: adds a new entry to the array of computed FNs.UPDATE_FIBO: here we look for a particular entry and replaces it with a new object which has the computed FN and the time taken to compute it.
We shall use this reducer shortly. Before that, let’s create the component that will display the computed FNs. Create a new file src/Results.js and paste in the below code.
// src/Results.js

import React from "react";

export const Results = (props) => {
  const { results } = props;
  return (
    <div id="results-container" className="results-container">
      {results.map((fb) => {
        const { id, nth, time, fibNum, loading } = fb;
        return (
          <div key={id} className="result-div">
            {loading ? (
              <p>
                Calculating the{" "}
                <span className="bold" id="nth">
                  {nth}
                </span>{" "}
                Fibonacci number...
              </p>
            ) : (
              <>
                <p id="timer">
                  Time: <span className="bold">{time} ms</span>
                </p>
                <p>
                  <span className="bold" id="nth">
                    {nth}
                  </span>{" "}
                  fibonnaci number:{" "}
                  <span className="bold" id="sum">
                    {fibNum}
                  </span>
                </p>
              </>
            )}
          </div>
        );
      })}
    </div>
  );
};
With this change, we start the process of converting our previous index.html file to jsx. This file has one responsibility: take an array of objects representing computed FNs and display them. The only difference from what we had before is the introduction of a loading state. So now when the computation is running, we show the loading state to let the user know that something is happening.
Let’s put in the final pieces by updating the code inside src/App.js. The code is rather long, so we’ll do it in two steps. Let’s add the first block of code.
import React from "react";
import "./App.css";
import { ordinal_suffix } from "./helpers";
import { reducer } from './reducer'
import { Results } from "./Results";
function App() {
  const [info, dispatch] = React.useReducer(reducer, {
    err: "",
    num: "",
    computedFibs: [],
  });
  const runWorker = (num, id) => {
    dispatch({ type: "SET_ERROR", err: "" });
    const worker = new window.Worker('./fib-worker.js')
    worker.postMessage({ num });
    worker.onerror = (err) => err;
    worker.onmessage = (e) => {
      const { time, fibNum } = e.data;
      dispatch({
        type: "UPDATE_FIBO",
        id,
        time,
        fibNum,
      });
      worker.terminate();
    };
  };
  return (
    <div>
      <div className="heading-container">
        <h1>Computing the nth Fibonnaci number</h1>
      </div>
      <div className="body-container">
        <p id="error" className="error">
          {info.err}
        </p>

        // ... next block of code goes here ... //

        <Results results={info.computedFibs} />
      </div>
    </div>
  );
}
export default App;
As usual, we bring in our imports. Then we instantiate a state and updater function with the useReducer hook. We then define a function, runWorker(), that takes a number and an ID and sets about calling a web worker to compute the FN for that number.
Note that to create the worker, we pass a relative path to the worker constructor. At runtime, our React code gets attached to the public/index.html file, thus it can find the fib-worker.js file in the same directory. When the computation completes (triggered by worker.onmessage), the UPDATE_FIBO action gets dispatched, and the worker terminated afterward. What we have now is not much different from what we had previously.
In the return block of this component, we render the same HTML we had before. We also pass the computed numbers array to the <Results /> component for rendering.
Let’s add the final block of code inside the return statement.
        <div className="input-div">
          <input
            type="number"
            value={info.num}
            className="number-input"
            placeholder="Enter a number"
            onChange={(e) =>
              dispatch({
                type: "SET_NUMBER",
                num: window.Number(e.target.value),
              })
            }
          />
          <button
            id="submit-btn"
            className="btn-submit"
            onClick={() => {
              if (info.num < 2) {
                dispatch({
                  type: "SET_ERROR",
                  err: "Please enter a number greater than 2",
                });
                return;
              }
              const id = info.computedFibs.length;
              dispatch({
                type: "SET_FIBO",
                id,
                loading: true,
                nth: ordinal_suffix(info.num),
              });
              runWorker(info.num, id);
            }}
          >
            Calculate
          </button>
        </div>
We set an onChange handler on the input to update the info.num state variable. On the button, we define an onClick event handler. When the button gets clicked, we check if the number is greater than 2. Notice that before calling runWorker(), we first dispatch an action to add an entry to the array of computed FNs. It is this entry that will be updated once the worker finishes its job. In this way, every entry maintains its position in the list, unlike what we had before.
Finally, copy the content of styles.css from before and replace the content of App.css.
We now have everything in place. Now start up your react server and play around with some numbers. Take note of the loading state, which is a UX improvement. Also, note that the UI stays responsive even when you enter a number as high as 1000 and click “Calculate”.
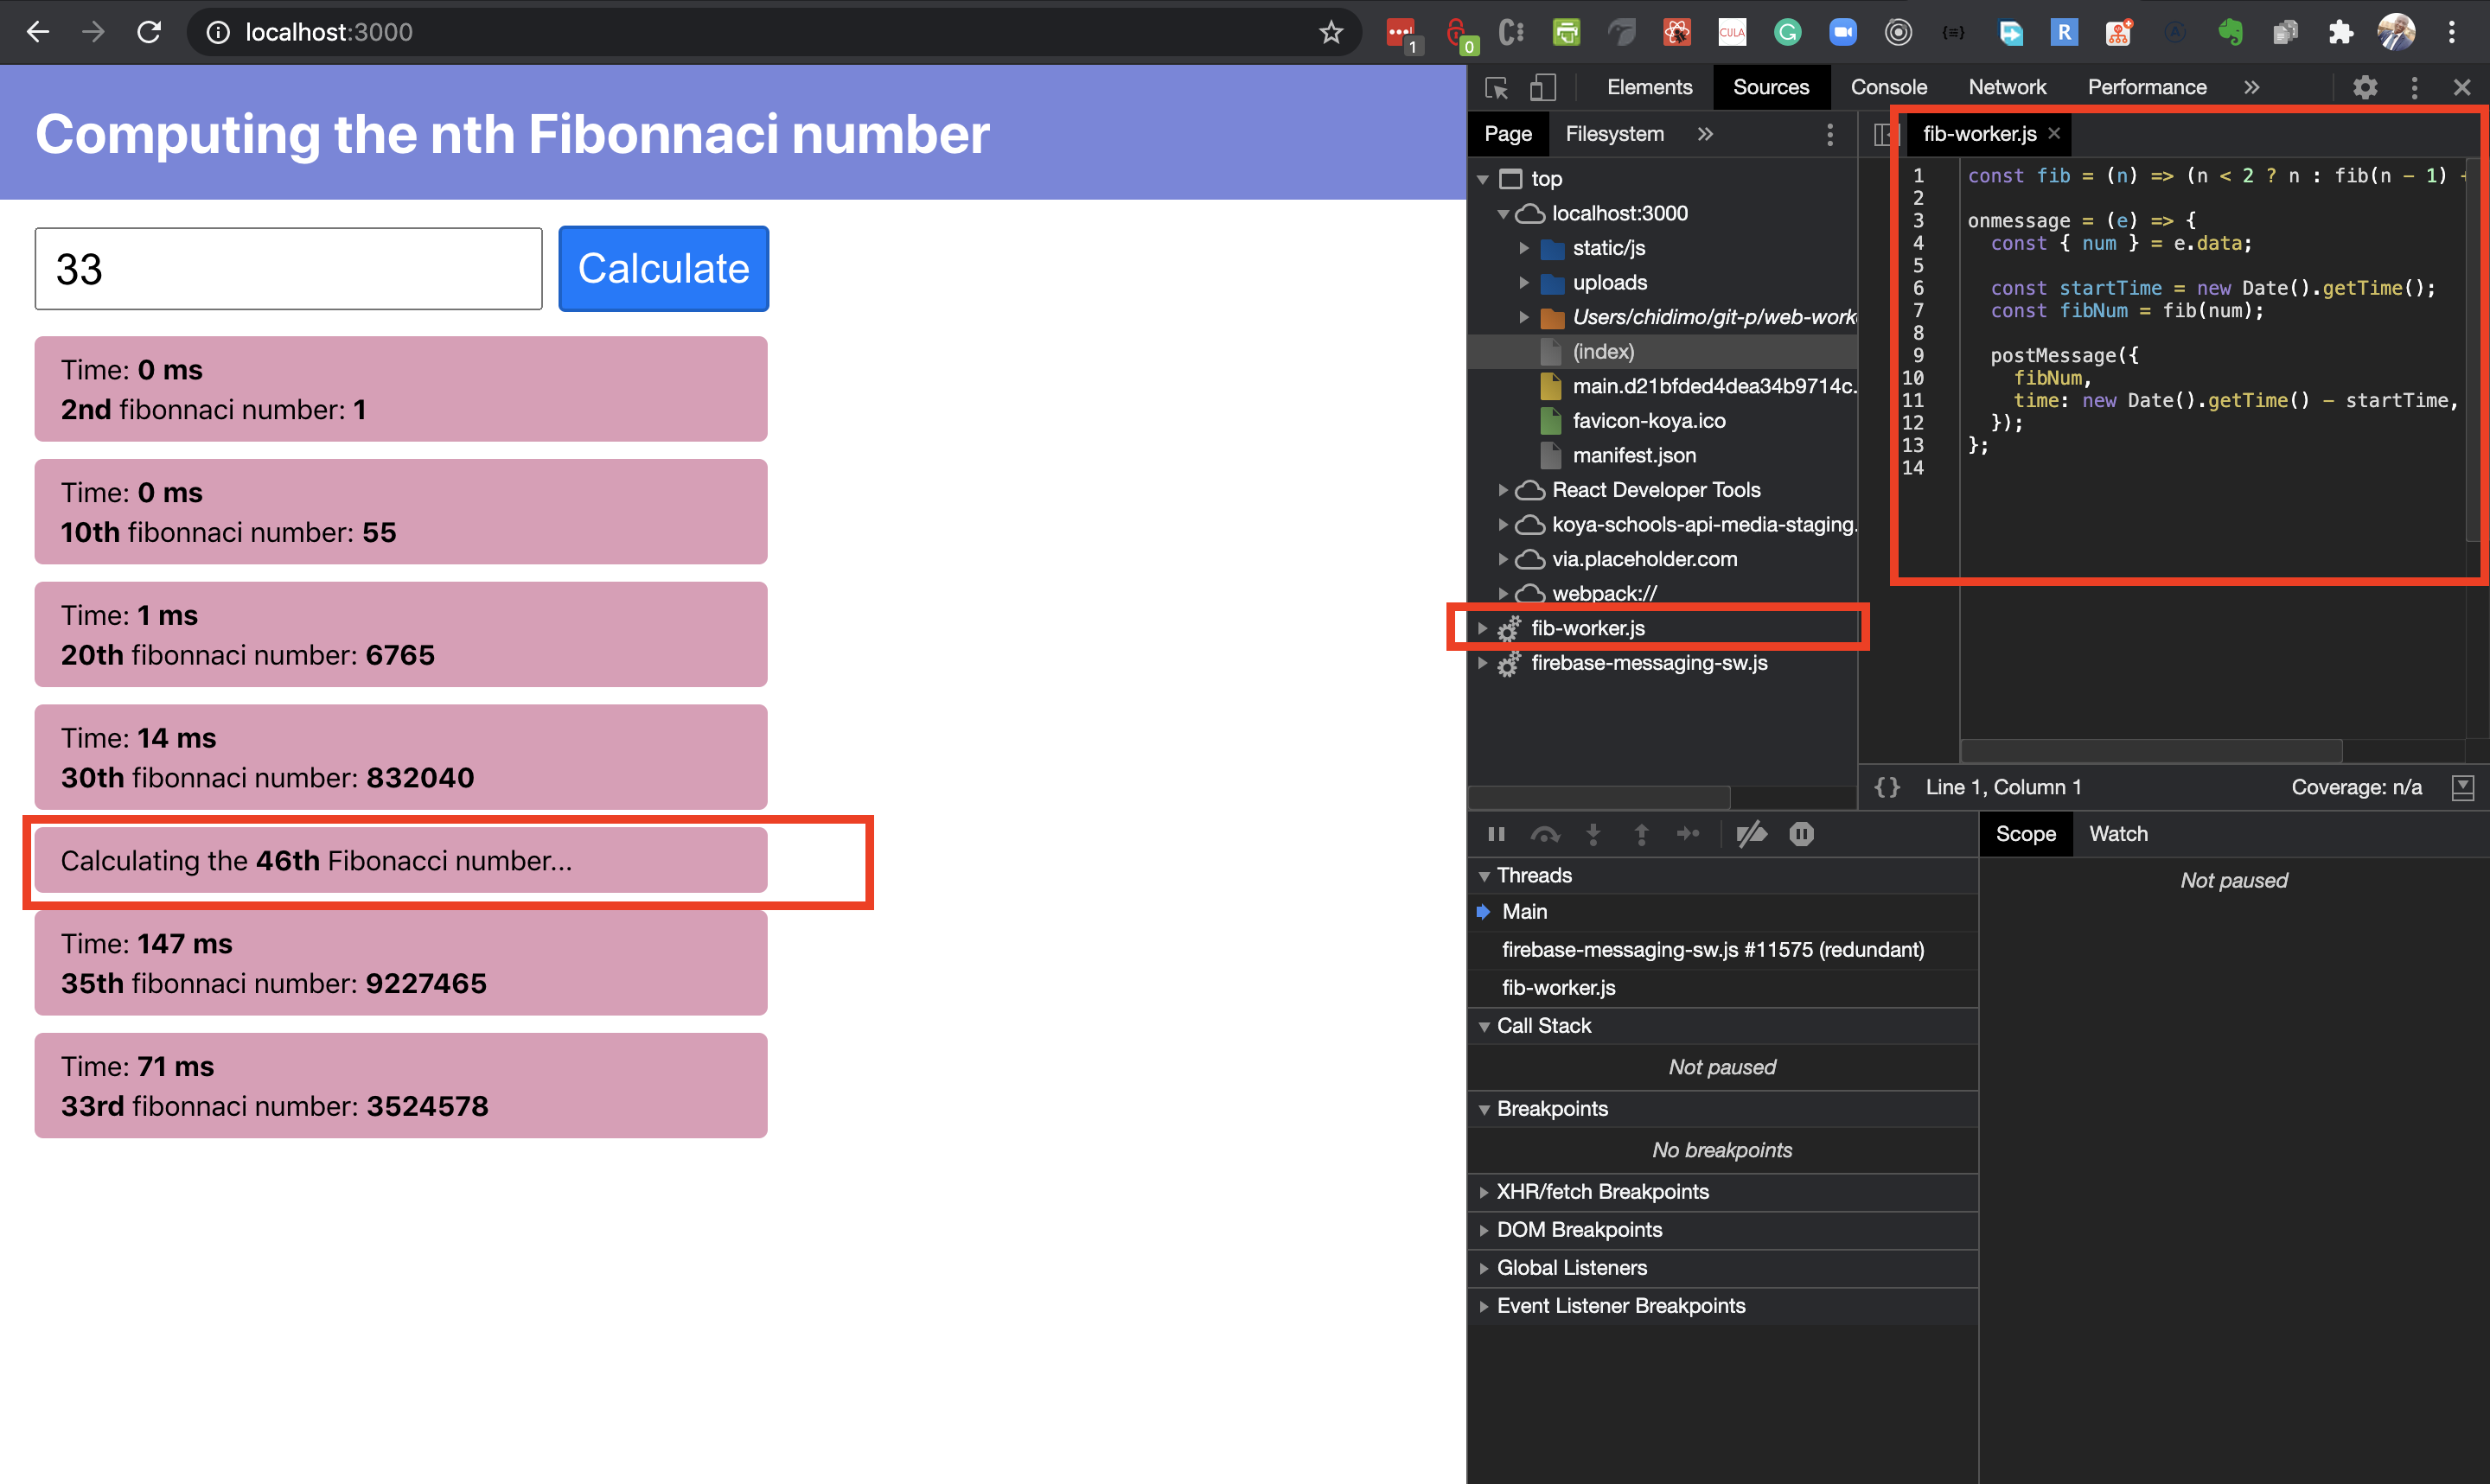
Note the loading state and the active worker. Once the 46th value is computed the worker is killed and the loading state is replaced by the final result.
- The source code for this React app is available on Github and there’s a hosted app on vercel.
Conclusion
Phew! It has been a long ride, so let’s wrap it up. I encourage you to take a look at the MDN entry for web workers (see resources list below) to learn other ways of using web workers.
In this article, we learned about what web workers are and the sort of problems they’re meant to solve. We also saw how to implement them using plain JavaScript. Finally, we saw how to implement web workers in a React application.
I encourage you to take advantage of this great API to deliver a better experience for your users.
Other Resources
Console.time(), MDN web docs- {JSON} Placeholder, official website
- Using Web Workers, MDN web docs
- Fibonacci number, Wikipedia
- Conditional (ternary) operator, MDN web docs
Document, Web APIs, MDN web docs- Getting Started, Create React App (docs)
Function.prototype.toString(), MDN web docs- IIFE, MDN web docs
workerSetup.js, Awesome Fullstack Tutorials, GitHub- “Parallel Programming In JavaScript Using Web Workers,” Uday Hiwarale, Medium
Further Reading
- Reporting Core Web Vitals With The Performance API
- Level Up Your CSS Skills With The :has() Selector
- Sticky Headers And Full-Height Elements: A Tricky Combination
- A Guide To Redux Toolkit With TypeScript


