Building A Conversational N.L.P Enabled Chatbot Using Google’s Dialogflow

Email Newsletter
Weekly tips on front-end & UX.
Trusted by 182,000+ folks.
 See User Testing Live


 Custom Web Forms for Angular, React, & Vue. Your backend.
 Celebrating 10 million developers
Ever since ELIZA (the first Natural Language Processing computer program brought to life by Joseph Weizenbaum in 1964) was created in order to process user inputs and engage in further discussions based on the previous sentences, there has been an increased use of Natural Language Processing to extract key data from human interactions. One key application of Natural language processing has been in the creation of conversational chat assistants and voice assistants which are used in mobile and web applications to act as customer care agents attending to the virtual needs of customers.
In 2019, the Capgemini Research Institute released a report after conducting a survey on the impact which chat assistants had on users after being incorporated by organizations within their services. The key findings from this survey showed that many customers were highly satisfied with the level of engagement they got from these chat assistants and that the number of users who were embracing the use of these assistants was fast growing!
To quickly build a chat assistant, developers and organizations leverage SaaS products running on the cloud such as Dialogflow from Google, Watson Assistant from IBM, Azure Bot Service from Microsoft, and also Lex from Amazon to design the chat flow and then integrate the natural language processing enabled chat-bots offered from these services into their own service.
This article would be beneficial to developers interested in building conversational chat assistants using Dialogflow as it focuses on the Dialogflow itself as a Service and how chat assistants can be built using the Dialogflow console.
Note: Although the custom webhooks built within this article are well explained, a fair understanding of the JavaScript language is required as the webhooks were written using JavaScript.
Dialogflow
Dialogflow is a platform that simplifies the process of creating and designing a natural language processing conversational chat assistant which can accept voice or text data when being used either from the Dialogflow console or from an integrated web application.
To understand how Dialogflow simplifies the creation of a conversational chat assistant, we will use it to build a customer care agent for a food delivery service and see how the built chat assistant can be used to handle food orders and other requests of the service users.
Before we begin building, we need to understand some of the key terminologies used on Dialogflow. One of Dialogflow’s aim is to abstract away the complexities of building a Natural Language Processing application and provide a console where users can visually create, design, and train an AI-powered chatbot.
Dialog Flow Terminologies
Here is a list of the Dialogflow terminologies we will consider in this article in the following order:
- Agent
An agent on Dialogflow represents the chatbot created by a user to interact with other end-users and perform data processing operations on the information it receives. Other components come together to form an agent and each time one of these components is updated, the agent is immediately re-trained for the changes to take effect.
User’s who want to create a full-fledged conversational chatbot within the quickest time possible can select an agent from the prebuilt agents which can be likened to a template which contains the basic intents and responses needed for a conversational assistant.
Note: A conversational assistant on Dialogflow will now be referred to as an “agent” while someone else asides the author of the assistant who interacts with it would be referred to as an “end-user”.
* Intent
Similar to its literal meaning, the intent is the user’s end goal in each sentence when interacting with an agent. For a single agent, multiple intents can be created to handle each sentence within a conversation and they are connected together using Contexts.
From the intent, an agent is able to understand the end-goal of a sentence. For example, an agent created to process food orders from customers would be to recognize the end-goal of a customer to place an order for a meal or get recommendations on the available meals from a menu using the created intents.
* Entity
Entities are a means by which Dialogflow processes and extracts specific data from an end-user’s input. An example of this is a Car entity added to an intent. Names of vehicles would be extracted from each sentence input as the Car entity.
By default, an agent has some System entities which have predefined upon its creation. Dialogflow also has the option to define custom entities and add values recognizable within this entity.
* Training Phrase
The training phrases is a major way in which an agent is able to recognize the intent of an end-user interacting with the agent. Having a large number of training phrases within an intent increases the accuracy of the agent to recognize an intent, in fact Dialogflow’s documentation on training phases recommends that “at least 10-20” training phrases be added to a created intent.
To make training phrases more reusable, dialogflow gives the ability to annotate specific words within the training phrase. When a word within a phrase is annotated, dialogflow would recognize it as a placeholder for values that would be provided in an end-user’s input.
* Context
Contexts are string names and they are used to control the flow of a conversation with an agent. On each intent, we can add multiple input contexts and also multiple output contexts. When the end-user makes a sentence that is recognized by an intent the output contexts become active and one of them is used to match the next intent.
To understand contexts better, we can illustrate context as the security entry and exit door, while the intent as the building. The input context is used when coming into the building and it accepts visitors that have been listed in the intent while the exit door is what connects the visitors to another building which is another intent.
* Knowledge base
A knowledge base represents a large pool of information where an agent can fetch data when responding to an intent. This could be a document in any format such as txt, pdf, csv among other supported document types. In machine learning, a knowledge base could be referred to as a training dataset.
An example scenario where an agent might refer to a knowledge base would be where an agent is being used to find out more details about a service or business. In this scenario, an agent can refer to the service’s Frequently Asked Questions as its knowledge base.
* Fulfillment
Dialogflow’s Fulfillment enables an agent to give a more dynamic response to a recognized intent rather than a static created response. This could be by calling a defined service to perform an action such as creating or retrieving data from a database.
An intent’s fulfillment is achieved through the use of a webhook. Once enabled, a matched intent would make an API request to the webhook configured for the dialogflow agent.
Now, that we have an understanding of the terminologies used with Dialogflow, we can move ahead to use the Dialogflow console to create and train our first agent for a hypothetical food service.
Using The Dialogflow Console
Note: Using the Dialogflow console requires that a Google account and a project on the Google Cloud Platform is created. If unavailable, a user would be prompted to sign in and create a project on first use.
The Dialogflow console is where the agent is created, designed, and trained before integrating with other services. Dialogflow also provides REST API endpoints for users who do not want to make use of the console when building with Dialogflow.
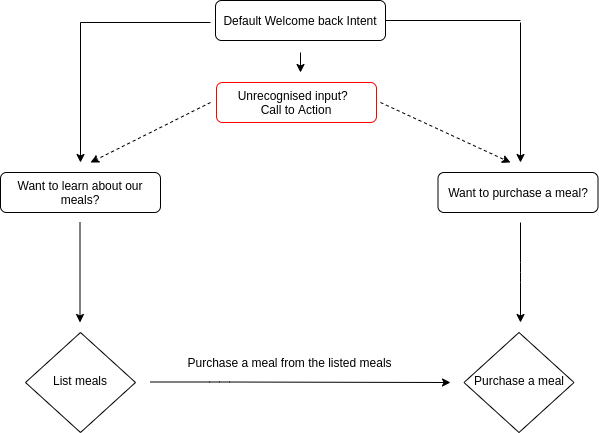
While we go through the console, we will gradually build out the agent which would act as a customer care agent for a food delivery service having the ability to list available meals, accept a new order and give information about a requested meal.
The agent we’ll be building will have the conversation flow shown in the flow chart diagram below where a user can purchase a meal or get the list of available meals and then purchase one of the meals shown.
Creating A New Agent
Within every newly created project, Dialogflow would prompt the first time user to create an agent which takes the following fields:
- A name to identify the agent.
- A language which the agent would respond in. If not provided the default of English is used.
- A project on the Google Cloud to associate the agent with.
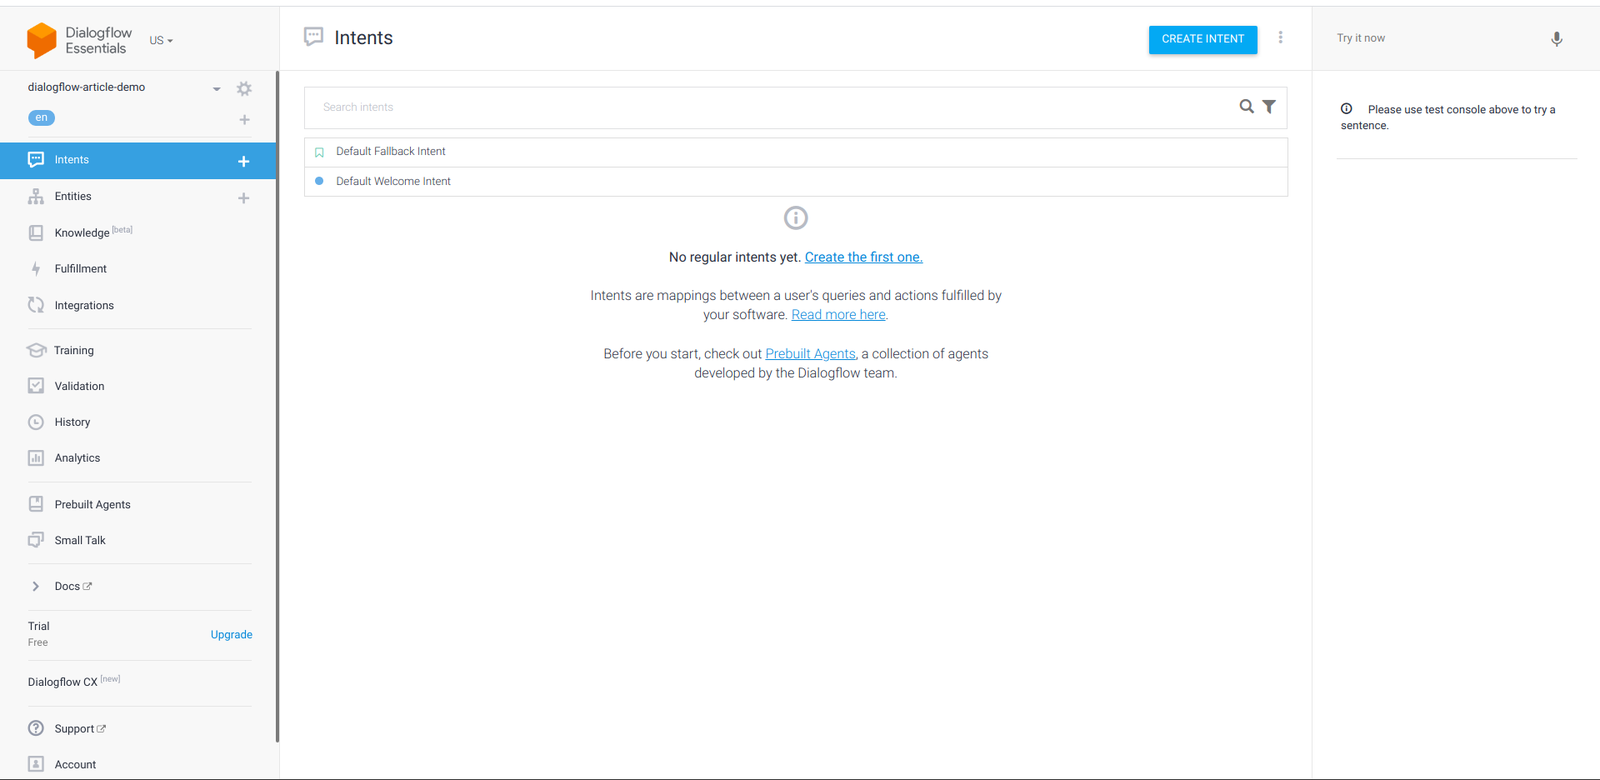
Immediately after we click on the create button after adding the values of the fields above, a new agent would be saved and the intents tab would be shown with the Default fallback and Default Welcome intent as the only two available intents which are created by default with every agent on Dialogflow.
Exploring the Default fallback intent, we can see it has no training phrase but has sentences such as “Sorry, could you say that again?”, “What was that?”, “Say that one more time?” as responses to indicate that the agent was not able to recognize a sentence which has been made by an end-user. During all conversations with the agent, these responses are only used when the agent cannot recognize a sentence typed or spoken by a user.
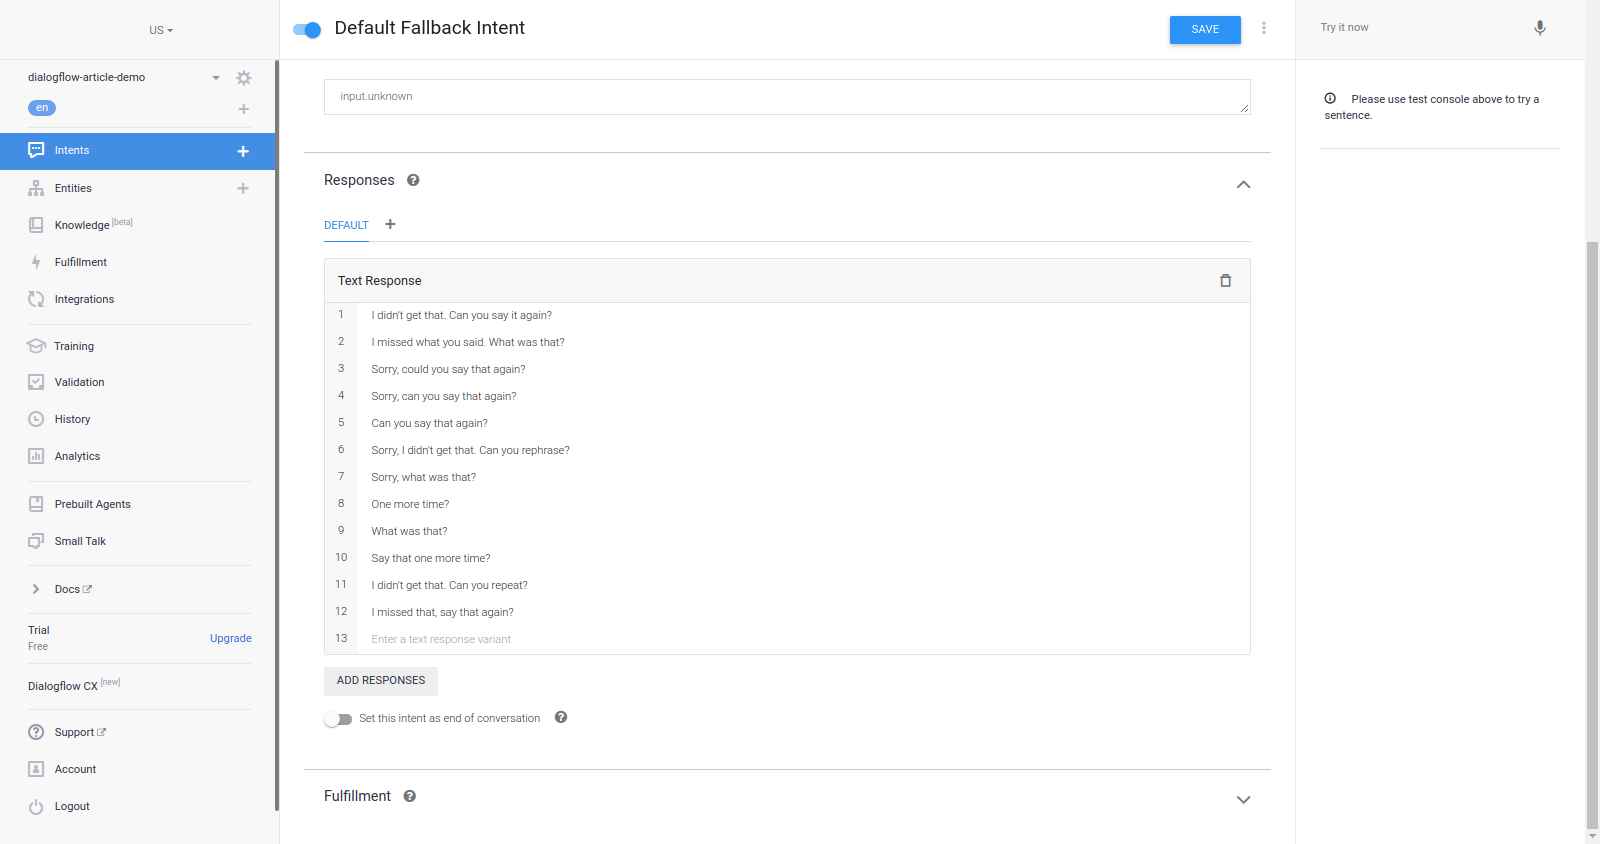
While the sentences above are sufficient for indicating that agent does not understand the last typed sentence, we would like to aid the end-user by giving them some more information to hint the user on what the agent can recognize. To do this, we replace all the listed sentences above with the following ones and click the Save button for the agent to be retrained.
I didn't get that. I am Zara and I can assist you in purchasing or learning more about the meals from Dialogflow-food-delivery service. What would you like me to do?

I missed what you said. I'm Zara here and I can assist you in purchasing or learning more about the meals from Dialogflow-food-delivery service. What would you like me to do?

Sorry, I didn't get that. Can you rephrase it?  I'm Zara by the way and I can assist you in purchasing or learning more about the meals from Dialogflow-food-delivery service.

Hey, I missed that I'm Zara and I can assist you in purchasing or learning more about the meals from Dialogflow-food-delivery service.  What would you like me to do?
From each of the four sentences above, we see can observe that the agent could not recognize what the last sentence made was and also a piece of information on what the agent can do thus hinting the user on what to type next in order to continue the conversation.
Moving next to the Default Welcome Intent, the first section on the intent page is the Context section and expanding it we can see both the input and output contexts are blank. From the conversation flow of the agent shown previously, we want an end-user to either place a meal order or request a list of all available meals. This would require the two following new output contexts they would each become active when this intent is matched;
awaiting_order_request
This would be used to match the intent handling order requests when an end-user wants to place an order for a meal.awaiting_info_request
This would be used to match the intent that retrieves data of all the meals when an end-user wants to know the available meals.
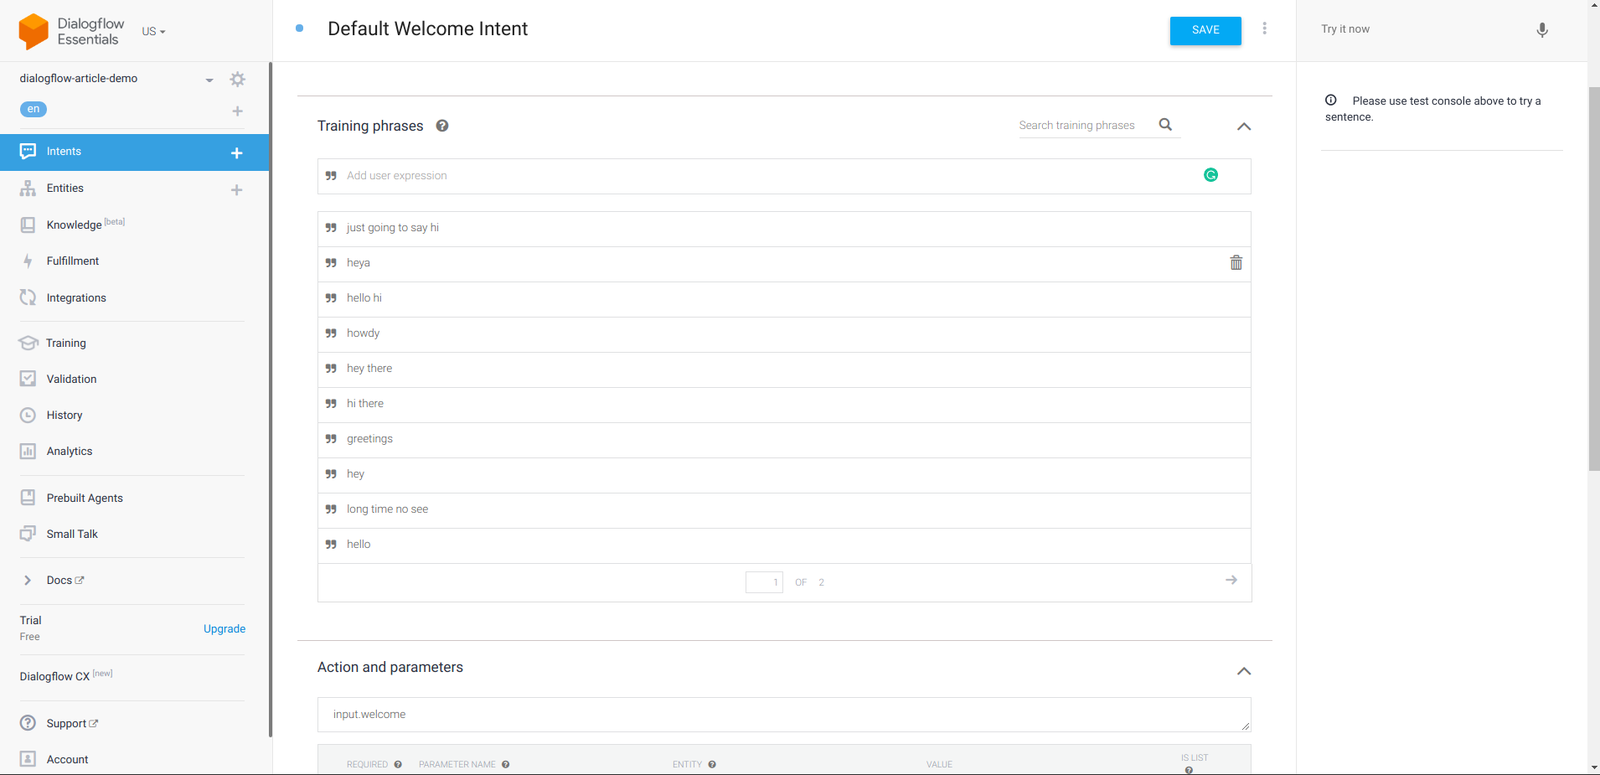
After the context section is the intent’s Events and we can see it has the Welcome event type added to the list of events indicating that this intent will be used first when the agent is loaded.
Coming next are the Training Phrases for the intent. Due to being created by default, it already has 16 phrases that an end-user would likely type or say when they interact with the agent for the first time.
When an end-user types or makes a sentence similar to those listed in the training phrases above, the agent would respond using a picked response from the Responses list section shown below:
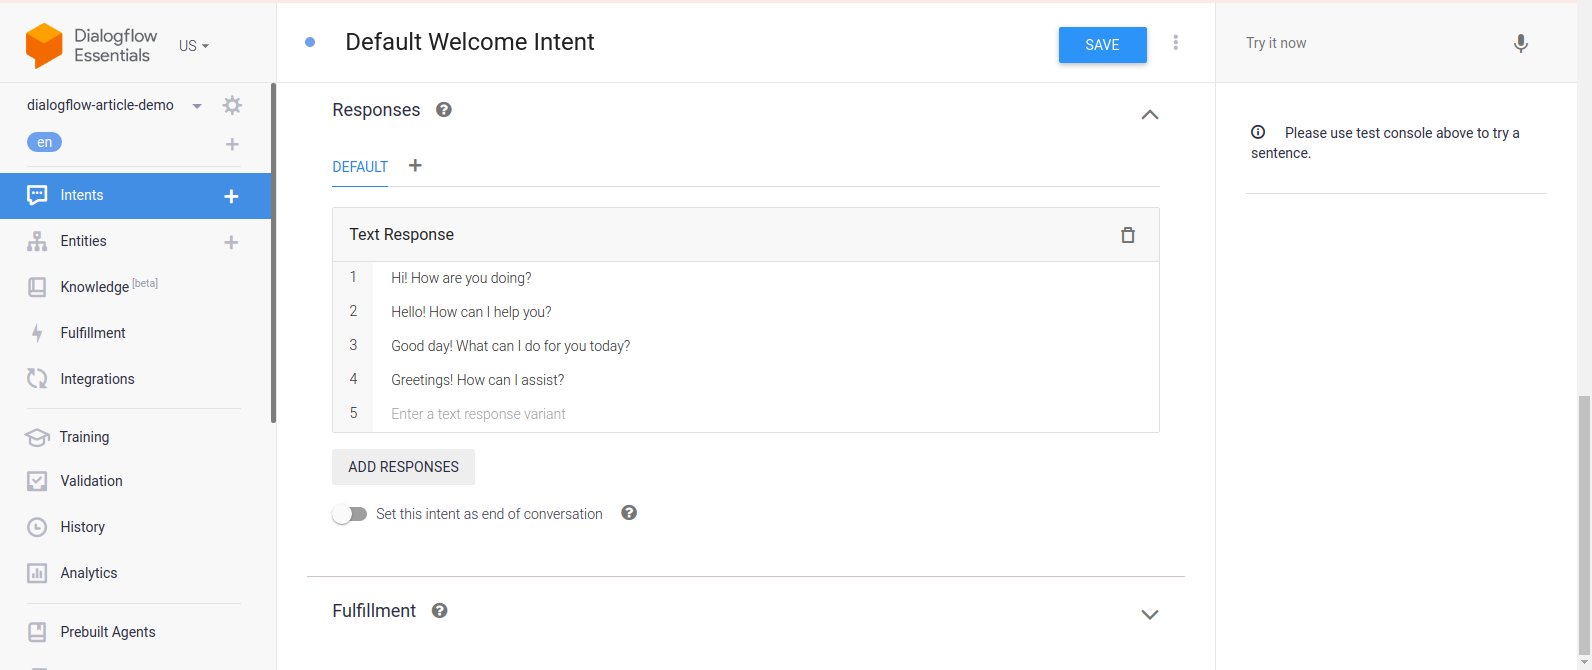
Each of the responses above is automatically generated for every agent on Dialogflow. Although they are grammatically correct, we would not use them for our food agent. Being a default intent that welcomes an end-user to our agent, a response from the agent should tell what organization it belongs to and also list its functionalities in a single sentence.
We would delete all the responses above and replace them with the ones below to better help inform an end-user on what to do next with the agent.
1.  Hello there, I am Zara and I am here to assist you to purchase or learn about the meals from the Dialogflow-food-delivery service. What would you like me to do?

2. Hi, I am Zara and I can assist you in purchasing or learning more about the meals from the Dialogflow-food-delivery service. What would you like me to do?
From the two responses above, we can see it tells an end-user what the name of the bot is, the two things the agent can do, and lastly, it pokes the end-user to take further action. Taking further action further from this intent means we need to connect the Default Welcome Intent to another. This is possible on Dialogflow using context.
When we add and save those two phrases above, dialogflow would immediately re-train the agent so I can respond using any one of them.
Next, we move on to create two more intents to handle the functionalities which we have added in the two responses above. One to purchase a food item and the second to get more information about meals from our food service.
Creating List-Meals Intent:
Clicking the + ( add ) icon from the left navigation menu would navigate to the page for creating new intents and we name this intent list-available-meals.
From there we add an output context with the name awaiting-order-request. This output context would be used to link this intent to the next one where they order a meal as we expect an end-user to place an order for a meal after getting the list of meals available.
Moving on to the Training Phrases section on the intent page, we will add the following phrases provided by the end-user in order to find out which meals are available.
Hey, I would like to know the meals available.
What items are on your menu?
Are there any available meals?
I would like to know more about the meals you offer.
Next, we would add just the single fallback response below to the Responses section;
Hi there, the list of our meals is currently unavailable. Please check back in a few minutes as the items on the list are regularly updated.From the response above we can observe that it indicates that the meal’s list is unavailable or an error has occurred somewhere. This is because it is a fallback response and would only be used when an error occurs in fetching the meals. The main response would come as a fulfillment using the webhooks option which we will set up next.
The last section in this intent page is the Fulfillment section and it is used to provide data to the agent to be used as a response from an externally deployed API or source. To use it we would enable the Webhook call option in the Fulfillment section and set up the fulfillment for this agent from the fulfillment tab.
Managing Fulfillment:
From the Fulfillment tab on the console, a developer has the option of using a webhook which gives the ability to use any deployed API through its endpoint or use the Inline Code editor to create a serverless application to be deployed as a cloud function on the Google Cloud. If you would like to know more about serverless applications, this article provides an excellent guide on getting started with serverless applications.
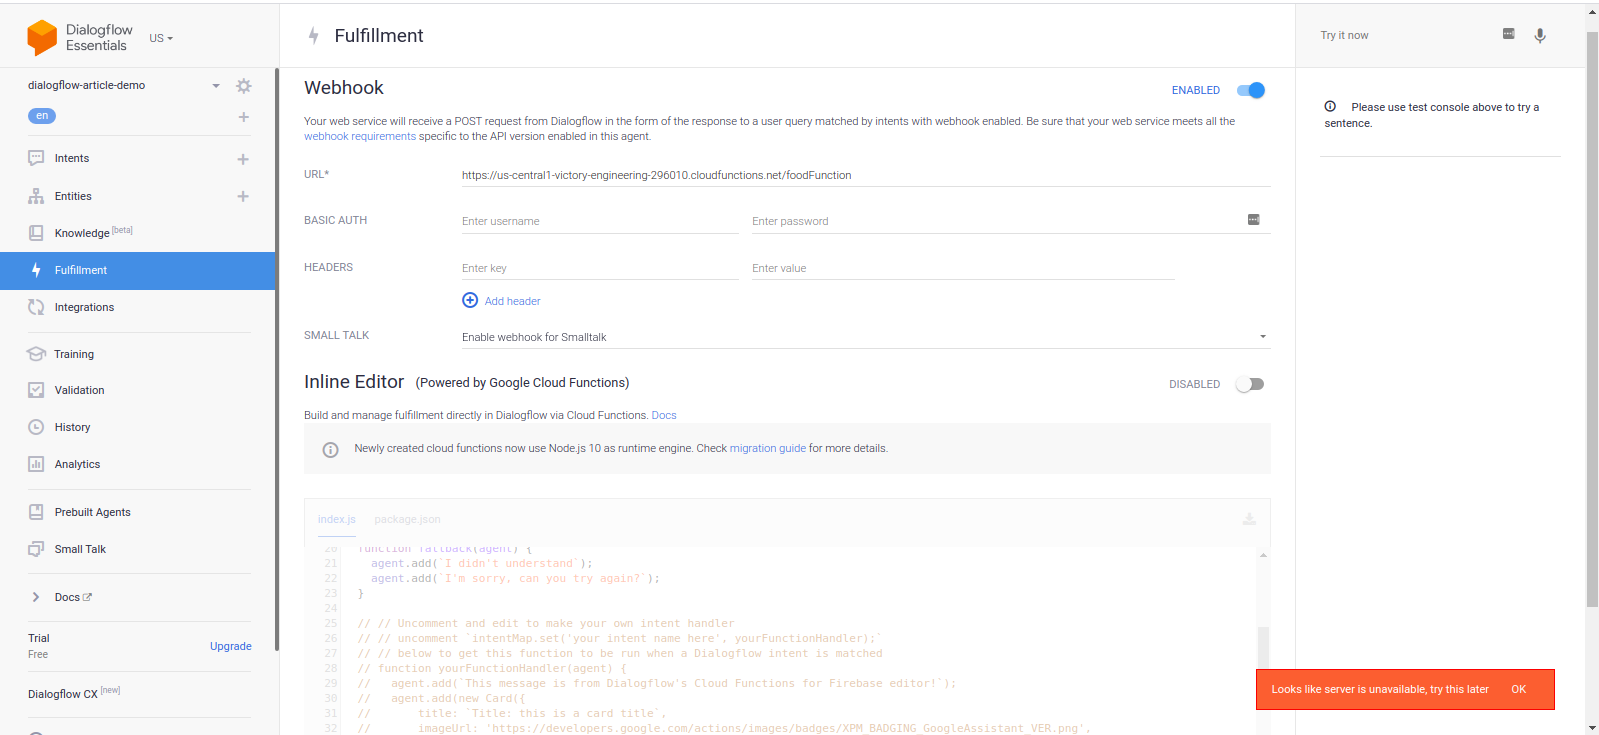
Each time an end-user interacts with the agent and the intent is matched, a POST request would be made to the endpoint. Among the various object fields in the request body, only one is of concern to us, i.e. the queryResult object as shown below:
{
  "queryResult": {
    "queryText": "End-user expression",
    "parameters": {
      "param-name": "param-value"
    },
  },
}
While there are other fields in the queryResult such as a context, the parameters object is more important to us as it holds the parameter extracted from the user’s text. This parameter would be the meal a user is requesting for and we would use it to query the food delivery service database.
When we are done setting up the fulfillment, our agent would have the following structure and flow of data to it:
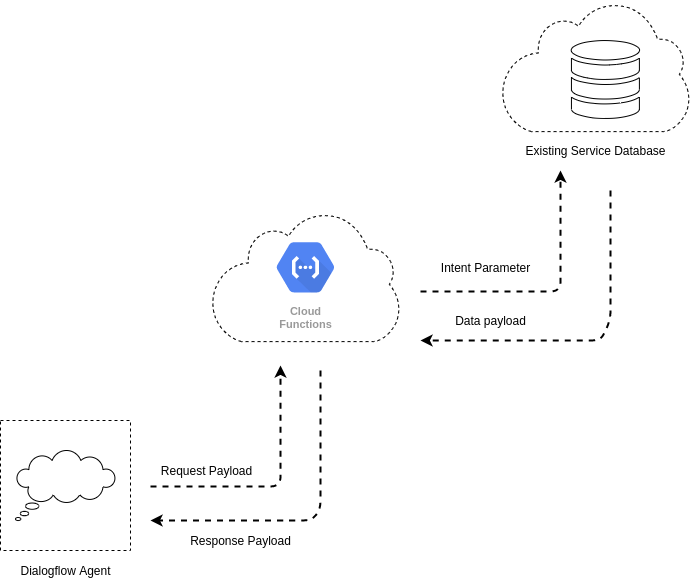
From the diagram above, we can observe that the cloud function acts as a middleman in the entire structure. The Dialogflow agent sends the parameter extracted from an end user’s text to the cloud function in a request payload and the cloud function, in turn, queries the database for the document using the received name and sends back the queried data in a response payload to the agent.
To start an implementation of the design system above, we would begin with creating the cloud function locally in a development machine then connect it to our dialogflow agent using the custom webhook option. After it has been tested, we can switch to using the inline editor in the fulfillment tab to create and deploy a cloud function to work with it. We begin this process by running the following commands from the command line:
# Create a new project and ( && ) move into it.
mkdir dialogflow-food-agent-server && cd dialogflow-food-agent-server

# Create A New Node Project
yarn init -y

# Install Needed Packages
yarn add mongodb @google-cloud/functions-framework dotenv
After installing the needed packages, we modify the generated package.json file to include two new objects which enable us to run a cloud function locally using the Functions Framework.
// package.json
{
  "main": "index.js",
  "scripts": {
    "start": "functions-framework --target=foodFunction --port=8000"
  },
}
The start command in the scripts above tells the functions Framework to run the foodFunction in the index.js file and also makes it listen and serve connections through our localhost on port 8000.
Next is the content of the index.js file which holds the function; we’ll make use of the code below since it connects to a MongoDB database and queries the data using the parameter passed in by the Dialogflow agent.
require("dotenv").config();

exports.foodFunction = async (req, res) => {
  const { MongoClient } = require("mongodb");
  const CONNECTION_URI = process.env.MONGODB_URI;

  // initate a connection to the deployed mongodb cluster
  const client = new MongoClient(CONNECTION_URI, {
    useNewUrlParser: true,
  });

  client.connect((err) => {
    if (err) {
      res
        .status(500)
        .send({ status: "MONGODB CONNECTION REFUSED", error: err });
    }
    const collection = client.db(process.env.DATABASE_NAME).collection("Meals");
    const result = [];
    const data = collection.find({});
    const meals = [
      {
        text: {
          text: [
            `We currently have the following 20 meals on our menu list. Which would you like to request for?`,
          ],
        },
      },
    ];
    result.push(
      data.forEach((item) => {
        const { name, description, price, image_uri } = item;
        const card = {
          card: {
            title: `${name} at $${price}`,
            subtitle: description,
            imageUri: image_uri,
          },
        };
        meals.push(card);
      })
    );

    Promise.all(result)
      .then((_) => {
        const response = {
          fulfillmentMessages: meals,
        };
        res.status(200).json(response);
      })
      .catch((e) => res.status(400).send({ error: e }));
    client.close();
  });
};
From the code snippet above we can see that our cloud function is pulling data from a MongoDB database, but let’s gradually step through the operations involved in pulling and returning this data.
- First, the cloud function initiates a connection to a MongoDB Atlas cluster, then it opens the collection storing the meal category documents within the database being used for the food-service on the cluster.
- Next, using the parameter passed into the request from the user’s input, we run a find method on the collection to get which then returns a cursor which we further iterate upon to get all the MongoDB documents within the collection containing the data.
- We model the data returned from MongoDB into Dialogflow’s Rich response message object structure which displays each of the meal items to the end-user as a card with an image, title, and a description.
- Finally, we send back the entire data to the agent after the iteration in a JSON body and end the function’s execution with a
200status code.
Note: The Dialogflow agent would wait for a response after a request has been sent within a frame of 5 seconds. This waiting period is when the loading indicator is shown on the console and after it elapses without getting a response from the webhook, the agent would default to using one of the responses added in the intent page and return a DEADLINE EXCEEDED error. This limitation is worth taking note of when designing the operations to be executed from a webhook. The API error retries section within the Dialogflow best practices contains steps on how to implement a retry system.
Now, the last thing needed is a .env file created in the project directory with the following fields to store the environment variables used in the index.js.
#.env
MONGODB_URI = "MONGODB CONNECTION STRING"
DATABASE_NAME = ""
At this point, we can start the function locally by running yarn start from the command line in the project’s directory. For now, we still cannot make use of the running function as Dialogflow only supports secure connections with an SSL certificate, and where Ngrok comes into the picture.
Using Ngrok, we can create a tunnel to expose the localhost port running the cloud function to the internet with an SSL certificate attached to the secured connection using the command below from a new terminal;
ngrok http -bind-tls=true 8000This would start the tunnel and generate a forwarding URL which would be used as an endpoint to the function running on a local machine.
Note: The extra -bind-tls=true argument is what instructs Ngrok to create a secured tunnel rather than the unsecured connection which it creates by default.
Now, we can copy the URL string opposite the forwarding text in the terminal and paste in the URL input field which is found in the Webhook section, and then save it.
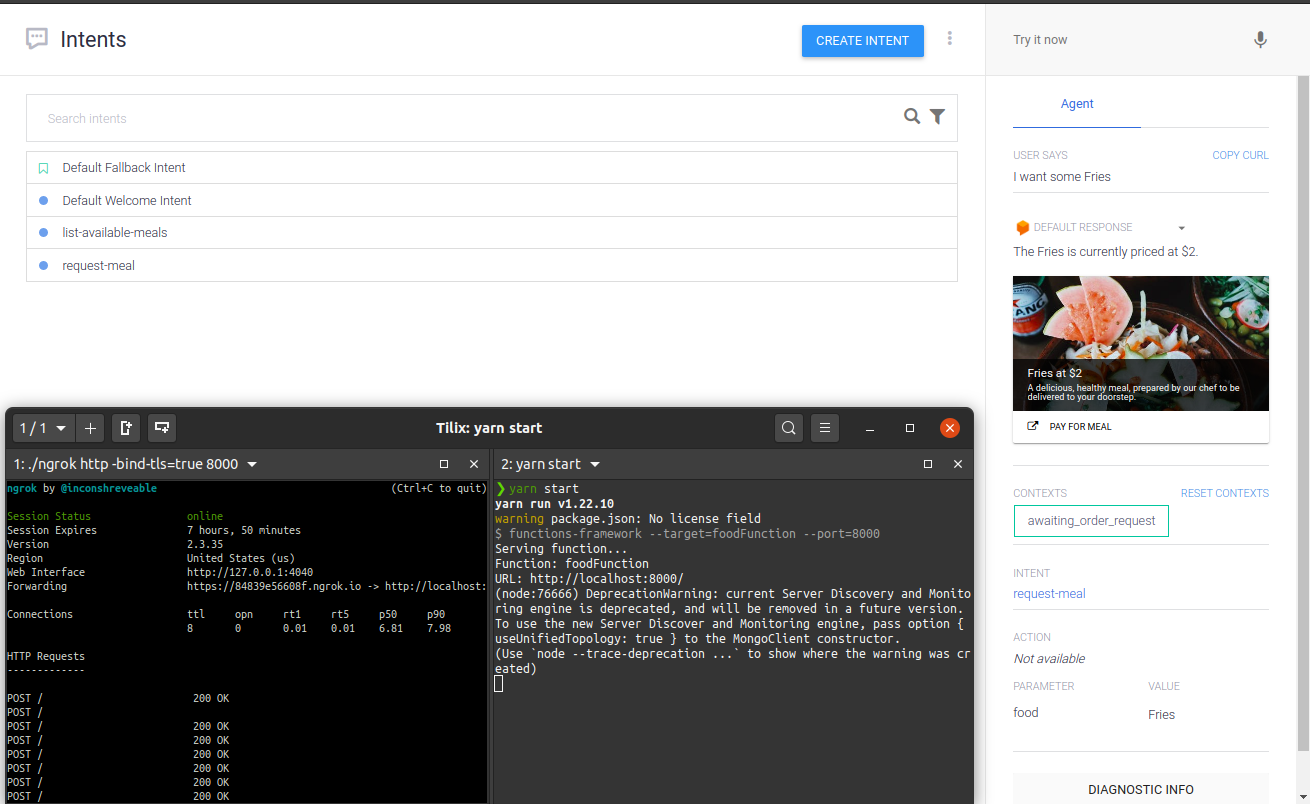
To test all that has been done so far, we would make a sentence to the Dialogflow agent requesting the list of meals available using the Input field at the top right section in the Dialogflow console and watch how it waits for and uses a response sent from the running function.
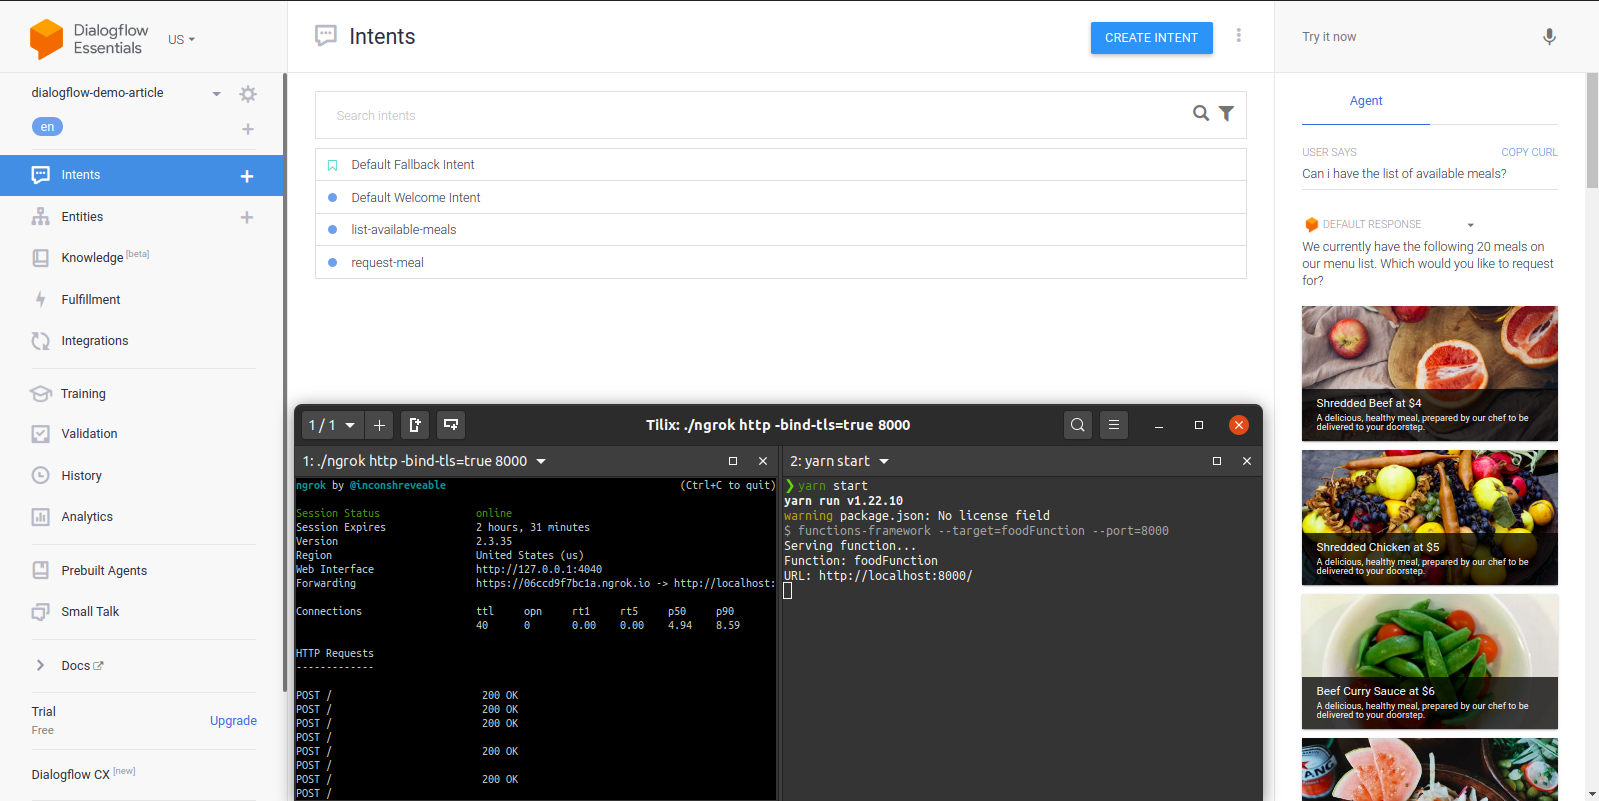
Starting from the center placed terminal in the image above, we can the series of POST requests made to the function running locally and on the right-hand side the data response from the function formatted into cards.
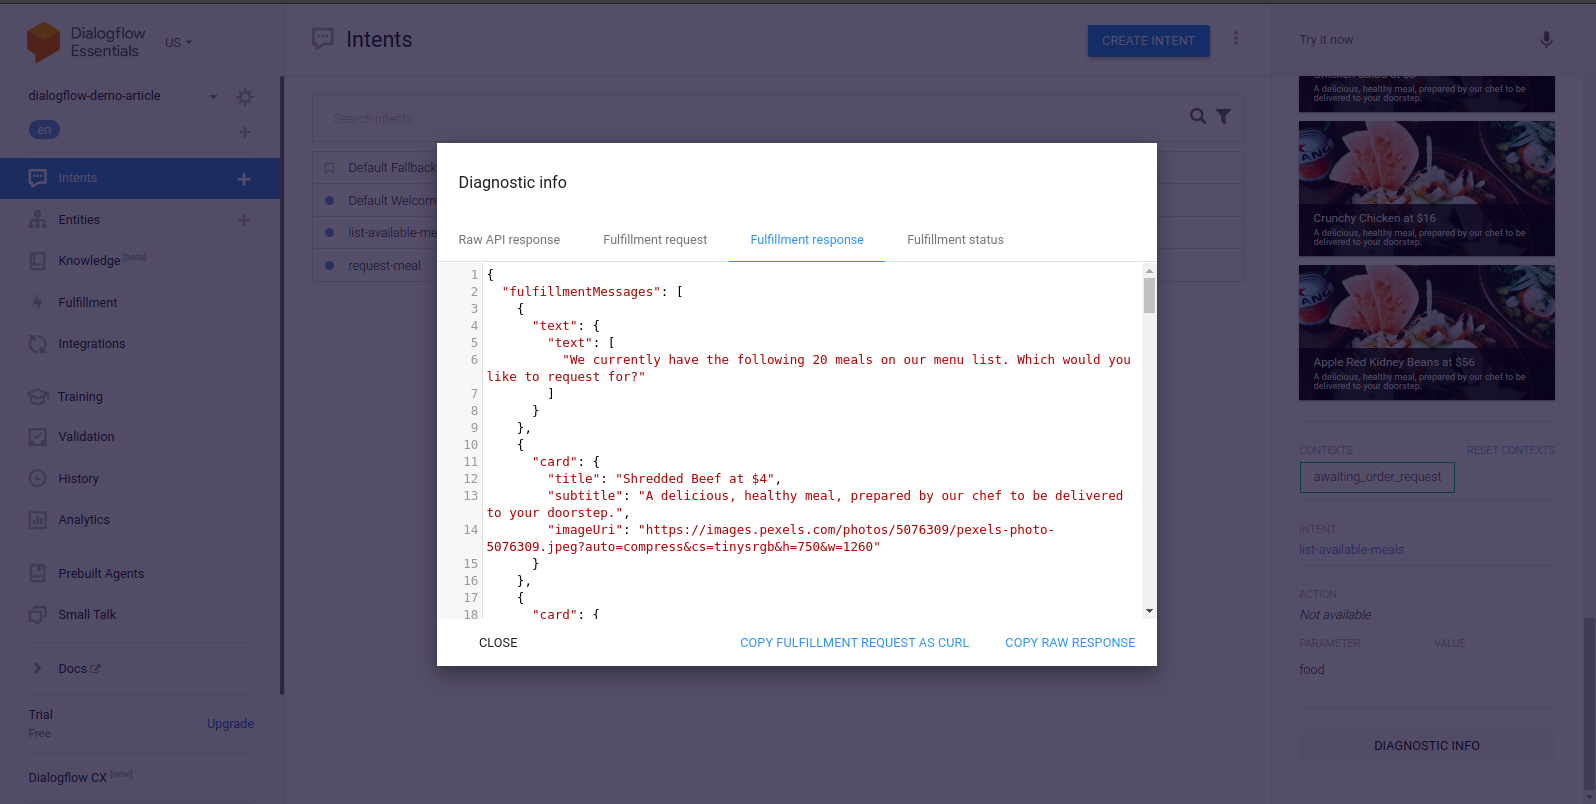
If for any reason a webhook request becomes unsuccessful, Dialogflow would resolve the error by using one of the listed responses. However, we can find out why the request failed by using the Diagnostic Info tool updated in each conversation. Within it are the Raw API response, Fulfillment request, Fulfillment response, and Fulfillment status tabs containing JSON formatted data. Selecting the Fulfillment response tab we can see the response from the webhook which is the cloud function running on our local machine.
At this point, we expect a user to continue the conversation with an order of one of the listed meals. We create the last intent for this demo next to handle meal orders.
Creating Request-Meal Intent:
Following the same steps used while creating the first intent, we create a new intent using the console and name it request-meal and add an input context of awaiting_order_request to connect this intent from either the Default Welcome intent or the list-available meals intent.
Within the training phrase section, we make use of the following phrases,
Hi there, I'm famished, can I get some food?

Yo, I want to place an order for some food.

I need to get some food now.

Dude, I would like to purchase $40 worth of food.

Hey, can I get 2 plates of food?
Reading through the phrases above, we can observe they all indicate one thing — the user wants food. In all of the phrases listed above, the name or type of food is not specified but rather they are all specified as food. This is because we want the food to be dynamic value, if we were to list all the food names we certainly would need to have a very large list of training phrases. This also applies to the amount and price of the food being ordered, they would be annotated and the agent would be able to recognize them as a placeholder for the actual values within an input.
To make a value within a phrase dynamic, dialogflow provides entities. Entities represent common types of data, and in this intent, we use entities to match several food types, various price amounts, and quantity from an end user’s sentence to request.
From the training phrases above, dialogflow would recognize $40 as @sys.unit-currency which is under the amounts-with-units category of the system entities list and 2 as @number under the number category of the system entities list. However, food is not a not a recognized system entity. In a case such as this, dialogflow gives developers the option to create a custom entity to be used.
Managing Entities
Double-clicking on food would pop up the entities dropdown menu, at the bottom of the items in the dropdown we would find the Create new entity button, and clicking it would navigate to the Entities tab on the dialogflow console, where we can manage all entities for the agent.
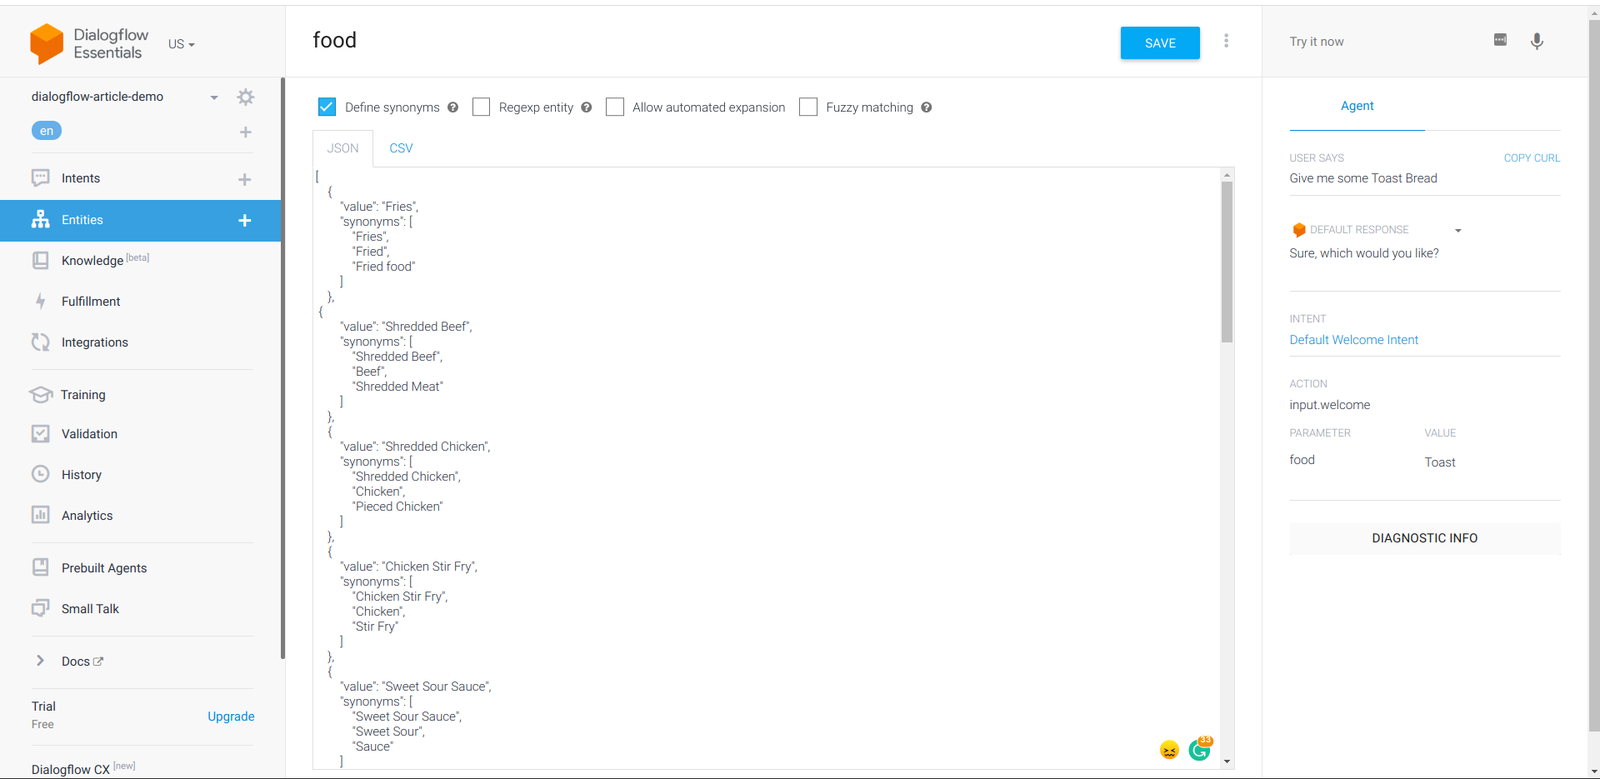
When at the entities tab, we name this new entity as food then at the options dropdown located at the top navigation bar beside the Save button we have the option to switch the entities input to a raw edit mode. Doing this would enable us to add several entity values in either a json or csv format rather than having to add the entities value one after the other.
After the edit mode has been changed, we would copy the sample JSON data below into the editor box.
// foods.json

[
    {
        "value": "Fries",
        "synonyms": [
            "Fries",
            "Fried",
            "Fried food"
        ]
    },
 {
        "value": "Shredded Beef",
        "synonyms": [
            "Shredded Beef",
            "Beef",
            "Shredded Meat"
        ]
    },
    {
        "value": "Shredded Chicken",
        "synonyms": [
            "Shredded Chicken",
            "Chicken",
            "Pieced Chicken"
        ]
    },

    {
        "value": "Sweet Sour Sauce",
        "synonyms": [
            "Sweet Sour Sauce",
            "Sweet Sour",
            "Sauce"
        ]
    },
    {
        "value": "Spring Onion",
        "synonyms": [
            "Spring Onion",
            "Onion",
            "Spring"
        ]
    },
    {
        "value": "Toast",
        "synonyms": [
            "Toast",
            "Toast Bread",
            "Toast Meal"
        ]
    },
    {
        "value": "Sandwich",
        "synonyms": [
            "Sandwich",
            "Sandwich Bread",
            "Sandwich Meal"
        ]
    },
    {
        "value": "Eggs Sausage Wrap",
        "synonyms": [
            "Eggs Sausage Wrap",
            "Eggs Sausage",
            "Sausage Wrap",
            "Eggs"
        ]
    },
    {
        "value": "Pancakes",
        "synonyms": [
            "Pancakes",
            "Eggs Pancakes",
            "Sausage Pancakes"
        ]
    },
    {
        "value": "Cashew Nuts",
        "synonyms": [
            "Cashew Nuts",
            "Nuts",
            "Sausage Cashew"
        ]
    },
    {
        "value": "Sweet Veggies",
        "synonyms": [
            "Sweet Veggies",
            "Veggies",
            "Sweet Vegetables"
        ]
    },
    {
        "value": "Chicken Salad",
        "synonyms": [
            "Chicken Salad",
            "Salad",
            "Sweet Chicken Salad"
        ]
    },
    {
        "value": "Crunchy Chicken",
        "synonyms": [
            "Crunchy Chicken",
            "Chicken",
            "Crunchy Chickens"
        ]
    },
    {
        "value": "Apple Red Kidney Beans",
        "synonyms": [
            "Apple Red Kidney Beans",
            "Sweet Apple Red Kidney Beans",
            "Apple Beans Combination"
        ]
    },
]
From the JSON formatted data above, we have 15 meal examples. Each object in the array has a “value” key which is the name of the meal and a “synonyms” key containing an array of names very similar to the object’s value.
After pasting the json data above, we also check the Fuzzy Matching checkbox as it enables the agent to recognize the annotated value in the intent even when incompletely or slightly misspelled from the end user’s text.
After saving the entity values above, the agent would immediately be re-trained using the new values added here and once the training is completed, we can test by typing a text in the input field at the right section.
Responses within this intent would be gotten from our previously created function using the intent’s fulfillment webhook, however, we add the following response to serve as a fallback to be used whenever the webhook is not executed successfully.
I currently can't find your requested meal. Would you like to place an order for another meal?We would also modify the code of the existing cloud function to fetch a single requested as it now handles requests from two intents.
require("dotenv").config();

exports.foodFunction = async (req, res) => {
  const { MongoClient } = require("mongodb");
  const CONNECTION_URI = process.env.MONGODB_URI;

  const client = new MongoClient(CONNECTION_URI, {
    useNewUrlParser: true,
  });

  // initate a connection to the deployed mongodb cluster
  client.connect((err) => {
    if (err) {
      res
        .status(500)
        .send({ status: "MONGODB CONNECTION REFUSED", error: err });
    }

    const collection = client.db(process.env.DATABASE_NAME).collection("Meals");
    const { displayName } = req.body.queryResult.intent;
    const result = [];

    switch (displayName) {
      case "list-available-meals":
        const data = collection.find({});
        const meals = [
          {
            text: {
              text: [
                `We currently have the following 20 meals on our menu list. Which would you like to request for?`,
              ],
            },
          },
        ];
        result.push(
          data.forEach((item) => {
            const {
              name,
              description,
              price,
              availableUnits,
              image_uri,
            } = item;
            const card = {
              card: {
                title: `${name} at $${price}`,
                subtitle: description,
                imageUri: image_uri,
              },
            };
            meals.push(card);
          })
        );
        return Promise.all(result)
          .then((_) => {
            const response = {
              fulfillmentMessages: meals,
            };
            res.status(200).json(response);
          })
          .catch((e) => res.status(400).send({ error: e }));

      case "request-meal":
        const { food } = req.body.queryResult.parameters;

        collection.findOne({ name: food }, (err, data) => {
          if (err) {
            res.status(400).send({ error: err });
          }
          const { name, price, description, image_uri } = data;
          const singleCard = [
            {
              text: {
                text: [`The ${name} is currently priced at $${price}.`],
              },
            },
            {
              card: {
                title: `${name} at $${price}`,
                subtitle: description,
                imageUri: image_uri,
                buttons: [
                  {
                    text: "Pay For Meal",
                    postback: "htts://google.com",
                  },
                ],
              },
            },
          ];
          res.status(200).json(singleCard);

      default:
        break;
    }

    client.close();
  });
};
From the highlighted parts above, we can see the following new use cases that the function has now been modified to handle:
- Multiple intents
the cloud function now uses a switch statement with the intent’s name being used as cases. In each request payload made to a webhook, Dialogflow includes details about the intent making the request; this is where the intent name is being pulled from to match the cases within the switch statement. - Fetch a single meal
the Meals collection is now queried using the value extracted as a parameter from the user’s input. - A call-to-action button is now being added to the card which a user can use to pay for the requested meal and clicking it opens a tab in the browser. In a functioning chat assistant, this button’s
postbackURL should point to a checkout page probably using a configured third-party service such as Stripe checkout.
To test this function again, we restart the function for the new changes in the index.js file to take effect and run the function again from the terminal by running yarn start.
Note: You don’t have to restart the terminal running the Ngrok tunnel for the new changes to take place. Ngrok would still forward requests to the updated function when the webhook is called.
Making a test sentence to the agent from the dialogflow console to order a specific meal, we can see the request-meal case within the cloud function being used and a single card getting returned as a response to be displayed.
At this point, we can be assured that the cloud function works as expected. We can now move forward to deploy the local function to the Google Cloud Functions using the following command;
gcloud functions deploy "foodFunction" --runtime nodejs10 --trigger-http --entry-point=foodFunction --set-env-vars=[MONGODB_URI="MONGODB_CONNECTION_URL", DATABASE_NAME="DATABASE_NAME"] --allow-unauthenticatedUsing the command above deploys the function to the Google Cloud with the flags explained below attached to it and logs out a generated URL endpoint of deployed cloud function to the terminal.
NAME
This is the name given to a cloud function when deploying it and is it required. In our use case, the name of the cloud function when deployed would befoodFunction.trigger-http
This selects HTTP as the function’s trigger type. Cloud functions with an HTTP trigger would be invoked using their generated URL endpoint. The generated URLs are secured and use thehttpsprotocol.entry-point
This the specific exported module to be deployed from the file where the functions were written.set-env-vars
These are the environment variables available to the cloud function at runtime. In our cloud function, we only access ourMONGODB_URIandDATABASE_NAMEvalues from the environment variables.
The MongoDB connection string is gotten from a created MongoDB cluster on Atlas. If you need some help on creating a cluster, the MongoDB Getting started section provides great help.
* allow-authenticated
This allows the function to be invoked outside the Google Cloud through the Internet using its generated endpoint without checking if the caller is authenticated.
Dialogflow Integrations
Dialogflow gives developers the feature to integrate a built agent into several conversational platforms including social media platforms such as Facebook Messenger, Slack, and Telegram. Asides from the two integration platforms which we used for our built agent, the Dialogflow documentation lists the available types of integrations and platforms within each integration type.
Integrating With Google Actions
Being a product from Google’s ecosystem, agents on Dialogflow integrate seamlessly with Google Assistant in very few steps. From the Integrations tab, Google Assistant is displayed as the primary integration option of a dialogflow agent. Clicking the Google Assistant option would open the Assistant modal from which we click on the test app option. From there the Actions console would be opened with the agent from Dialogflow launched in a test mode for testing using either the voice or text input option.

Integrating a dialogflow agent with the Google Assistant is a huge way to make the agent accessible to millions of Google Users from their Smartphones, Watches, Laptops, and several other connected devices. To publish the agent to the Google Assistant, the developers docs provides a detailed explanation of the process involved in the deployment.
Integrating With A Web Demo
The Web Demo which is located in the Text-based sections of the Integrations Tab in the Dialogflow console allows for the use of the built agent in a web application by using it in an iframe window. Selecting the web Demo option would generate a URL to a page with a chat window that simulates a real-world chat application.
Note: Dialogflow’s web demo only supports text responses and does not support the display of Rich messages and images. This worth noting when using a webhook that responds with data in the Rich response format.
Conclusion
From several surveys, we can see the effect of chat assistants on customer satisfaction when incorporated by organizations into their services. These positive metrics are expected to grow up in the next coming years thus placing greater importance on the use of these chat assistants.
In this article, we have learned about Dialogflow and how it is providing a platform for organizations and developers to build Natural Language processing conversational chat assistants for use in their services. We also moved further to learn about its terminologies and how these terminologies apply when building a chat assistant by building a demo chat assistant using the Dialogflow console.
If a chat assistant is being built to be used at a production level, it is highly recommended that the developer(s) go through the Dialogflow best practices section of the documentation as it contains standard design guidelines and solutions to common pitfalls encountered while building a chat assistant.
The source code to the JavaScript webhook built within this article has been pushed to GitHub and can be accessed from this repository.
References
- Dialogflow
- https://ngrok.com/
- https://www.mongodb.com/
- Cloud Functions documentation
- Building Serverless Front-End Applications Using Google Cloud Platform by Nwani Victory
- Actions console
Further Reading
- The Safest Way To Hide Your API Keys When Using React
- An Alternative Voice UI To Voice Assistants
- How To Hack Your Google Lighthouse Scores In 2024
- Better Context Menus With Safe Triangles


