Building A Stocks Price Notifier App Using React, Apollo GraphQL And Hasura
The concept of getting notified when the event of your choice has occurred has become popular compared to being glued onto the continuous stream of data to find that particular occurrence yourself. People prefer to get relevant emails/messages when their preferred event has occurred as opposed to being hooked on the screen to wait for that event to happen. The events-based terminology is also quite common in the world of software.
How awesome would that be if you could get the updates of the price of your favorite stock on your phone?
In this article, we’re going to build a Stocks Price Notifier application by using React, Apollo GraphQL, and Hasura GraphQL engine. We’re going to start the project from a create-react-app boilerplate code and would build everything ground up. We’ll learn how to set up the database tables, and events on the Hasura console. We’ll also learn how to wire up Hasura’s events to get stock price updates using web-push notifications.
Here’s a quick glance at what we would be building:

Let’s get going!
An Overview Of What This Project Is About
The stocks data (including metrics such as high, low, open, close, volume) would be stored in a Hasura-backed Postgres database. The user would be able to subscribe to a particular stock based on some value or he can opt to get notified every hour. The user will get a web-push notification once his subscription criteria are fulfilled.
This looks like a lot of stuff and there would obviously be some open questions on how we’ll be building out these pieces.
Here’s a plan on how we would accomplish this project in four steps:
- Fetching the stocks data using a NodeJs script
We’ll start by fetching the stock data using a simple NodeJs script from one of the providers of stocks API — Alpha Vantage. This script will fetch the data for a particular stock in intervals of 5mins. The response of the API includes high, low, open, close and volume. This data will be then be inserted in the Postgres database that is integrated with the Hasura back-end. - Setting up The Hasura GraphQL engine
We’ll then set-up some tables on the Postgres database to record data points. Hasura automatically generates the GraphQL schemas, queries, and mutations for these tables. - Front-end using React and Apollo Client
The next step is to integrate the GraphQL layer using the Apollo client and Apollo Provider (the GraphQL endpoint provided by Hasura). The data-points will be shown as charts on the front-end. We’ll also build the subscription options and will fire corresponding mutations on the GraphQL layer. - Setting up Event/Scheduled triggers
Hasura provides an excellent tooling around triggers. We’ll be adding event & scheduled triggers on the stocks data table. These triggers will be set if the user is interested in getting a notification when the stock prices reach a particular value (event trigger). The user can also opt for getting a notification of a particular stock every hour (scheduled trigger).
Now that the plan is ready, let’s put it into action!
Here’s the GitHub repository for this project. If you get lost anywhere in the code below, refer to this repository and get back to speed!
Fetching The Stocks Data Using A NodeJs Script
This is not that complicated as it sounds! We’ll have to write a function that fetches data using the Alpha Vantage endpoint and this fetch call should be fired in an interval of 5 mins (You guessed it right, we’ll have to put this function call in setInterval).
If you’re still wondering what Alpha Vantage is and just want to get this out of your head before hopping onto the coding part, then here it is:
"Alpha Vantage Inc. is a leading provider of free APIs for realtime and historical data on stocks, forex (FX), and digital/cryptocurrencies."
We would be using this endpoint to get the required metrics of a particular stock. This API expects an API key as one of the parameters. You can get your free API key from here. We’re now good to get onto the interesting bit — let’s start writing some code!
Installing Dependencies
Create a stocks-app directory and create a server directory inside it. Initialize it as a node project using npm init and then install these dependencies:
npm i isomorphic-fetch pg nodemon --saveThese are the only three dependencies that we’d need to write this script of fetching the stock prices and storing them in the Postgres database.
Here’s a brief explanation of these dependencies:
isomorphic-fetch
It makes it easy to usefetchisomorphically (in the same form) on both the client and the server.pg
It is a non-blocking PostgreSQL client for NodeJs.nodemon
It automatically restarts the server on any file changes in the directory.
Setting up the configuration
Add a config.js file at the root level. Add the below snippet of code in that file for now:
const config = {
  user: '<DATABASE_USER>',
  password: '<DATABASE_PASSWORD>',
  host: '<DATABASE_HOST>',
  port: '<DATABASE_PORT>',
  database: '<DATABASE_NAME>',
  ssl: '<IS_SSL>',
  apiHost: 'https://www.alphavantage.co/',
};

module.exports = config;
The user, password, host, port, database, ssl are related to the Postgres configuration. We’ll come back to edit this while we set up the Hasura engine part!
Initializing The Postgres Connection Pool For Querying The Database
A connection pool is a common term in computer science and you’ll often hear this term while dealing with databases.
While querying data in databases, you’ll have to first establish a connection to the database. This connection takes in the database credentials and gives you a hook to query any of the tables in the database.
Note: Establishing database connections is costly and also wastes significant resources. A connection pool caches the database connections and re-uses them on succeeding queries. If all the open connections are in use, then a new connection is established and is then added to the pool.
Now that it is clear what the connection pool is and what is it used for, let’s start by creating an instance of the pg connection pool for this application:
Add pool.js file at the root level and create a pool instance as:
const { Pool } = require('pg');
const config = require('./config');

const pool = new Pool({
  user: config.user,
  password: config.password,
  host: config.host,
  port: config.port,
  database: config.database,
  ssl: config.ssl,
});

module.exports = pool;
The above lines of code create an instance of Pool with the configuration options as set in the config file. We’re yet to complete the config file but there won’t be any changes related to the configuration options.
We’ve now set the ground and are ready to start making some API calls to the Alpha Vantage endpoint.
Let’s get onto the interesting bit!
Fetching The Stocks Data
In this section, we’ll be fetching the stock data from the Alpha Vantage endpoint. Here’s the index.js file:
const fetch = require('isomorphic-fetch');
const getConfig = require('./config');
const { insertStocksData } = require('./queries');

const symbols = [
  'NFLX',
  'MSFT',
  'AMZN',
  'W',
  'FB'
];

(function getStocksData () {

  const apiConfig = getConfig('apiHostOptions');
  const { host, timeSeriesFunction, interval, key } = apiConfig;

  symbols.forEach((symbol) => {
    fetch(`${host}query/?function=${timeSeriesFunction}&symbol=${symbol}&interval=${interval}&apikey=${key}`)
    .then((res) => res.json())
    .then((data) => {
      const timeSeries = data['Time Series (5min)'];
      Object.keys(timeSeries).map((key) => {
        const dataPoint = timeSeries[key];
        const payload = [
          symbol,
          dataPoint['2. high'],
          dataPoint['3. low'],
          dataPoint['1. open'],
          dataPoint['4. close'],
          dataPoint['5. volume'],
          key,
        ];
        insertStocksData(payload);
      });
    });
  })
})()
For the purpose of this project, we’re going to query prices only for these stocks — NFLX (Netflix), MSFT (Microsoft), AMZN (Amazon), W (Wayfair), FB (Facebook).
Refer this file for the config options. The IIFE getStocksData function is not doing much! It loops through these symbols and queries the Alpha Vantage endpoint ${host}query/?function=${timeSeriesFunction}&symbol=${symbol}&interval=${interval}&apikey=${key} to get the metrics for these stocks.
The insertStocksData function puts these data points in the Postgres database. Here’s the insertStocksData function:
const insertStocksData = async (payload) => {
  const query = 'INSERT INTO stock_data (symbol, high, low, open, close, volume, time) VALUES ($1, $2, $3, $4, $5, $6, $7)';
  pool.query(query, payload, (err, result) => {
    console.log('result here', err);
  });
};
This is it! We have fetched data points of the stock from the Alpha Vantage API and have written a function to put these in the Postgres database in the stock_data table. There is just one missing piece to make all this work! We’ve to populate the correct values in the config file. We’ll get these values after setting up the Hasura engine. Let’s get to that right away!
Please refer to the server directory for the complete code on fetching data points from Alpha Vantage endpoint and populating that to the Hasura Postgres database.
If this approach of setting up connections, configuration options, and inserting data using the raw query looks a bit difficult, please don’t worry about that! We’re going to learn how to do all this the easy way with a GraphQL mutation once the Hasura engine is set up!
Setting Up The Hasura GraphQL Engine
It is really simple to set up the Hasura engine and get up and running with the GraphQL schemas, queries, mutations, subscriptions, event triggers, and much more!
Click on Try Hasura and enter the project name:
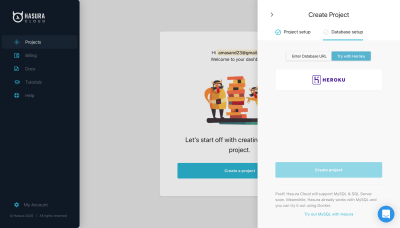
I’m using the Postgres database hosted on Heroku. Create a database on Heroku and link it to this project. You should then be all set to experience the power of query-rich Hasura console.
Please copy the Postgres DB URL that you’ll get after creating the project. We’ll have to put this in the config file.
Click on Launch Console and you’ll be redirected to this view:
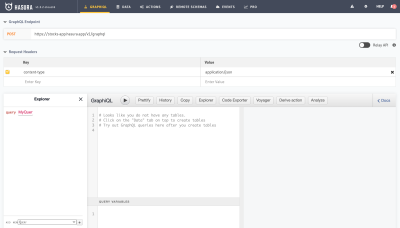
Let’s start building the table schema that we’d need for this project.
Creating Tables Schema On The Postgres Database
Please go to the Data tab and click on Add Table! Let’s start creating some of the tables:
symbol table
This table would be used for storing the information of the symbols. For now, I’ve kept two fields here — id and company. The field id is a primary key and company is of type varchar. Let’s add some of the symbols in this table:
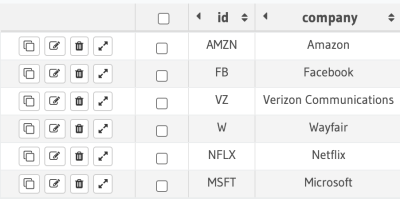
symbol table. (Large preview)stock_data table
The stock_data table stores id, symbol, time and the metrics such as high, low, open, close, volume. The NodeJs script that we wrote earlier in this section will be used to populate this particular table.
Here’s how the table looks like:

stock_data table. (Large preview)Neat! Let’s get to the other table in the database schema!
user_subscription table
The user_subscription table stores the subscription object against the user Id. This subscription object is used for sending web-push notifications to the users. We’ll learn later in the article how to generate this subscription object.
There are two fields in this table — id is the primary key of type uuid and subscription field is of type jsonb.
events table
This is the important one and is used for storing the notification event options. When a user opts-in for the price updates of a particular stock, we store that event information in this table. This table contains these columns:
id: is a primary key with the auto-increment property.symbol: is a text field.user_id: is of typeuuid.trigger_type: is used for storing the event trigger type —time/event.trigger_value: is used for storing the trigger value. For example, if a user has opted in for price-based event trigger — he wants updates if the price of the stock has reached 1000, then thetrigger_valuewould be 1000 and thetrigger_typewould beevent.
These are all the tables that we’d need for this project. We also have to set up relations among these tables to have a smooth data flow and connections. Let’s do that!
Setting up relations among tables
The events table is used for sending web-push notifications based on the event value. So, it makes sense to connect this table with the user_subscription table to be able to send push notifications on the subscriptions stored in this table.
events.user_id → user_subscription.idThe stock_data table is related to the symbols table as:
stock_data.symbol → symbol.idWe also have to construct some relations on the symbol table as:
stock_data.symbol  → symbol.id
events.symbol  → symbol.id
We’ve now created the required tables and also established the relations among them! Let’s switch to the GRAPHIQL tab on the console to see the magic!
Hasura has already set up the GraphQL queries based on these tables:

It is plainly simple to query on these tables and you can also apply any of these filters/properties (distinct_on, limit, offset, order_by, where) to get the desired data.
This all looks good but we have still not connected our server-side code to the Hasura console. Let’s complete that bit!
Connecting The NodeJs Script To The Postgres Database
Please put the required options in the config.js file in the server directory as:
const config = {
  databaseOptions: {
    user: '<DATABASE_USER>',
    password: '<DATABASE_PASSWORD>',
    host: '<DATABASE_HOST>',
    port: '<DATABASE_PORT>',
    database: '<DATABASE_NAME>',
    ssl: true,
  },
  apiHostOptions: {
    host: 'https://www.alphavantage.co/',
    key: '<API_KEY>',
    timeSeriesFunction: 'TIME_SERIES_INTRADAY',
    interval: '5min'
  },
  graphqlURL: '<GRAPHQL_URL>'
};

const getConfig = (key) => {
  return config[key];
};

module.exports = getConfig;
Please put these options from the database string that was generated when we created the Postgres database on Heroku.
The apiHostOptions consists of the API related options such as host, key, timeSeriesFunction and interval.
You’ll get the graphqlURL field in the GRAPHIQL tab on the Hasura console.
The getConfig function is used for returning the requested value from the config object. We’ve already used this in index.js in the server directory.
It’s time to run the server and populate some data in the database. I’ve added one script in package.json as:
"scripts": {
    "start": "nodemon index.js"
}
Run npm start on the terminal and the data points of the symbols array in index.js should be populated in the tables.
Refactoring The Raw Query In The NodeJs Script To GraphQL Mutation
Now that the Hasura engine is set up, let’s see how easy can it be to call a mutation on the stock_data table.
The function insertStocksData in queries.js uses a raw query:
const query = 'INSERT INTO stock_data (symbol, high, low, open, close, volume, time) VALUES ($1, $2, $3, $4, $5, $6, $7)';Let’s refactor this query and use mutation powered by the Hasura engine. Here’s the refactored queries.js in the server directory:
const { createApolloFetch } = require('apollo-fetch');
const getConfig = require('./config');

const GRAPHQL_URL = getConfig('graphqlURL');
const fetch = createApolloFetch({
  uri: GRAPHQL_URL,
});

const insertStocksData = async (payload) => {
  const insertStockMutation = await fetch({
    query: `mutation insertStockData($objects: [stock_data_insert_input!]!) {
      insert_stock_data (objects: $objects) {
        returning {
          id
        }
      }
    }`,
    variables: {
      objects: payload,
    },
  });
  console.log('insertStockMutation', insertStockMutation);
};

module.exports = {
  insertStocksData
}
Please note: We’ve to add graphqlURL in the config.js file.
The apollo-fetch module returns a fetch function that can be used to query/mutate the date on the GraphQL endpoint. Easy enough, right?
The only change that we’ve to do in index.js is to return the stocks object in the format as required by the insertStocksData function. Please check out index2.js and queries2.js for the complete code with this approach.
Now that we’ve accomplished the data-side of the project, let’s move onto the front-end bit and build some interesting components!
Note: We don’t have to keep the database configuration options with this approach!
Front-End Using React And Apollo Client
The front-end project is in the same repository and is created using the create-react-app package. The service worker generated using this package supports assets caching but it doesn’t allow more customizations to be added to the service worker file. There are already some open issues to add support for custom service worker options. There are ways to get away with this problem and add support for a custom service worker.
Let’s start by looking at the structure for the front-end project:
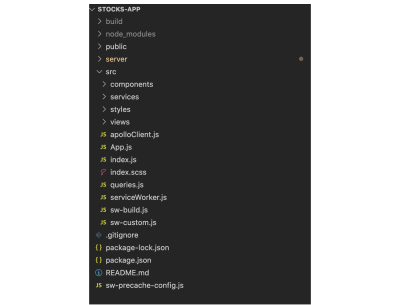
Please check the src directory! Don’t worry about the service worker related files for now. We’ll learn more about these files later in this section. The rest of the project structure looks simple. The components folder will have the components (Loader, Chart); the services folder contains some of the helper functions/services used for transforming objects in the required structure; styles as the name suggests contains the sass files used for styling the project; views is the main directory and it contains the view layer components.
We’d need just two view components for this project — The Symbol List and the Symbol Timeseries. We’ll build the time-series using the Chart component from the highcharts library. Let’s start adding code in these files to build up the pieces on the front-end!
Installing Dependencies
Here’s the list of dependencies that we’ll need:
apollo-boost
Apollo boost is a zero-config way to start using Apollo Client. It comes bundled with the default configuration options.reactstrapandbootstrap
The components are built using these two packages.graphqlandgraphql-type-jsongraphqlis a required dependency for usingapollo-boostandgraphql-type-jsonis used for supporting thejsondatatype being used in the GraphQL schema.highchartsandhighcharts-react-official
And these two packages will be used for building the chart:node-sass
This is added for supporting sass files for styling.uuid
This package is used for generating strong random values.
All of these dependencies will make sense once we start using them in the project. Let’s get onto the next bit!
Setting Up Apollo Client
Create a apolloClient.js inside the src folder as:
import ApolloClient from 'apollo-boost';

const apolloClient = new ApolloClient({
  uri: '<HASURA_CONSOLE_URL>'
});

export default apolloClient;
The above code instantiates ApolloClient and it takes in uri in the config options. The uri is the URL of your Hasura console. You’ll get this uri field on the GRAPHIQL tab in the GraphQL Endpoint section.
The above code looks simple but it takes care of the main part of the project! It connects the GraphQL schema built on Hasura with the current project.
We also have to pass this apollo client object to ApolloProvider and wrap the root component inside ApolloProvider. This will enable all the nested components inside the main component to use client prop and fire queries on this client object.
Let’s modify the index.js file as:
const Wrapper = () => {
/* some service worker logic - ignore for now */
  const [insertSubscription] = useMutation(subscriptionMutation);
  useEffect(() => {
    serviceWorker.register(insertSubscription);
  }, [])
  /* ignore the above snippet */
  return <App />;
}

ReactDOM.render(
  <ApolloProvider client={apolloClient}>
    <Wrapper />
  </ApolloProvider>,
  document.getElementById('root')
);
Please ignore the insertSubscription related code. We’ll understand that in detail later. The rest of the code should be simple to get around. The render function takes in the root component and the elementId as parameters. Notice client (ApolloClient instance) is being passed as a prop to ApolloProvider. You can check the complete index.js file here.
Setting Up The Custom Service Worker
A Service worker is a JavaScript file that has the capability to intercept network requests. It is used for querying the cache to check if the requested asset is already present in the cache instead of making a ride to the server. Service workers are also used for sending web-push notifications to the subscribed devices.
We’ve to send web-push notifications for the stock price updates to the subscribed users. Let’s set the ground and build this service worker file!
The insertSubscription related snipped in the index.js file is doing the work of registering service worker and putting the subscription object in the database using subscriptionMutation.
Please refer queries.js for all the queries and mutations being used in the project.
serviceWorker.register(insertSubscription); invokes the register function written in the serviceWorker.js file. Here it is:
export const register = (insertSubscription) => {
  if ('serviceWorker' in navigator) {
    const swUrl = `${process.env.PUBLIC_URL}/serviceWorker.js`
    navigator.serviceWorker.register(swUrl)
      .then(() => {
        console.log('Service Worker registered');
        return navigator.serviceWorker.ready;
      })
      .then((serviceWorkerRegistration) => {
        getSubscription(serviceWorkerRegistration, insertSubscription);
        Notification.requestPermission();
      })
  }
}
The above function first checks if serviceWorker is supported by the browser and then registers the service worker file hosted on the URL swUrl. We’ll check this file in a moment!
The getSubscription function does the work of getting the subscription object using the subscribe method on the pushManager object. This subscription object is then stored in the user_subscription table against a userId. Please note that the userId is being generated using the uuid function. Let’s check out the getSubscription function:
const getSubscription = (serviceWorkerRegistration, insertSubscription) => {
  serviceWorkerRegistration.pushManager.getSubscription()
    .then ((subscription) => {
      const userId = uuidv4();
      if (!subscription) {
        const applicationServerKey = urlB64ToUint8Array('<APPLICATION_SERVER_KEY>')
        serviceWorkerRegistration.pushManager.subscribe({
          userVisibleOnly: true,
          applicationServerKey
        }).then (subscription => {
          insertSubscription({
            variables: {
              userId,
              subscription
            }
          });
          localStorage.setItem('serviceWorkerRegistration', JSON.stringify({
            userId,
            subscription
          }));
        })
      }
    })
}
You can check serviceWorker.js file for the complete code!

Notification.requestPermission() invoked this popup that asks the user for the permission for sending notifications. Once the user clicks on Allow, a subscription object is generated by the push service. We’re storing that object in the localStorage as:
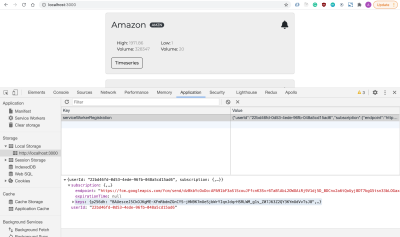
The field endpoint in the above object is used for identifying the device and the server uses this endpoint to send web push notifications to the user.
We have done the work of initializing and registering the service worker. We also have the subscription object of the user! This is working all good because of the serviceWorker.js file present in the public folder. Let’s now set up the service worker to get things ready!
This is a bit difficult topic but let’s get it right! As mentioned earlier, the create-react-app utility doesn’t support customizations by default for the service worker. We can achieve customer service worker implementation using workbox-build module.
We also have to make sure that the default behavior of pre-caching files is intact. We’ll modify the part where the service worker gets build in the project. And, workbox-build helps in achieving exactly that! Neat stuff! Let’s keep it simple and list down all that we have to do to make the custom service worker work:
- Handle the pre-caching of assets using
workboxBuild. - Create a service worker template for caching assets.
- Create
sw-precache-config.jsfile to provide custom configuration options. - Add the build service worker script in the build step in
package.json.
Don’t worry if all this sounds confusing! The article doesn’t focus on explaining the semantics behind each of these points. We’ve to focus on the implementation part for now! I’ll try to cover the reasoning behind doing all the work to make a custom service worker in another article.
Let’s create two files sw-build.js and sw-custom.js in the src directory. Please refer to the links to these files and add the code to your project.
Let’s now create sw-precache-config.js file at the root level and add the following code in that file:
module.exports = {
  staticFileGlobs: [
    'build/static/css/**.css',
    'build/static/js/**.js',
    'build/index.html'
  ],
  swFilePath: './build/serviceWorker.js',
  stripPrefix: 'build/',
  handleFetch: false,
  runtimeCaching: [{
    urlPattern: /this\\.is\\.a\\.regex/,
    handler: 'networkFirst'
  }]
}
Let’s also modify the package.json file to make room for building the custom service worker file:
Add these statements in the scripts section:
"build-sw": "node ./src/sw-build.js",
"clean-cra-sw": "rm -f build/precache-manifest.*.js && rm -f build/service-worker.js",
And modify the build script as:
"build": "react-scripts build && npm run build-sw && npm run clean-cra-sw",The setup is finally done! We now have to add a custom service worker file inside the public folder:
function showNotification (event) {
  const eventData = event.data.json();
  const { title, body } = eventData
  self.registration.showNotification(title, { body });
}

self.addEventListener('push', (event) => {
  event.waitUntil(showNotification(event));
})
We’ve just added one push listener to listen to push-notifications being sent by the server. The function showNotification is used for displaying web push notifications to the user.
This is it! We’re done with all the hard work of setting up a custom service worker to handle web push notifications. We’ll see these notifications in action once we build the user interfaces!
We’re getting closer to building the main code pieces. Let’s now start with the first view!
Symbol List View
The App component being used in the previous section looks like this:
import React from 'react';
import SymbolList from './views/symbolList';

const App = () => {
  return <SymbolList />;
};

export default App;
It is a simple component that returns SymbolList view and SymbolList does all the heavy-lifting of displaying symbols in a neatly tied user interface.
Let’s look at symbolList.js inside the views folder:
Please refer to the file here!
The component returns the results of the renderSymbols function. And, this data is being fetched from the database using the useQuery hook as:
const { loading, error, data } = useQuery(symbolsQuery, {variables: { userId }});The symbolsQuery is defined as:
export const symbolsQuery = gql`
  query getSymbols($userId: uuid) {
    symbol {
      id
      company
      symbol_events(where: {user_id: {_eq: $userId}}) {
        id
        symbol
        trigger_type
        trigger_value
        user_id
      }
      stock_symbol_aggregate {
        aggregate {
          max {
            high
            volume
          }
          min {
            low
            volume
          }
        }
      }
    }
  }
`;
It takes in userId and fetches the subscribed events of that particular user to display the correct state of the notification icon (bell icon that is being displayed along with the title). The query also fetches the max and min values of the stock. Notice the use of aggregate in the above query. Hasura’s Aggregation queries do the work behind the scenes to fetch the aggregate values like count, sum, avg, max, min, etc.
Based on the response from the above GraphQL call, here’s the list of cards that are displayed on the front-end:

The card HTML structure looks something like this:
<div key={id}>
  <div className="card-container">
    <Card>
      <CardBody>
        <CardTitle className="card-title">
          <span className="company-name">{company}  </span>
            <Badge color="dark" pill>{id}</Badge>
            <div className={classNames({'bell': true, 'disabled': isSubscribed})} id={`subscribePopover-${id}`}>
              <FontAwesomeIcon icon={faBell} title="Subscribe" />
            </div>
        </CardTitle>
        <div className="metrics">
          <div className="metrics-row">
            <span className="metrics-row--label">High:</span>
            <span className="metrics-row--value">{max.high}</span>
            <span className="metrics-row--label">{' '}(Volume: </span>
            <span className="metrics-row--value">{max.volume}</span>)
          </div>
          <div className="metrics-row">
            <span className="metrics-row--label">Low: </span>
            <span className="metrics-row--value">{min.low}</span>
            <span className="metrics-row--label">{' '}(Volume: </span>
            <span className="metrics-row--value">{min.volume}</span>)
          </div>
        </div>
        <Button className="timeseries-btn" outline onClick={() => toggleTimeseries(id)}>Timeseries</Button>{' '}
      </CardBody>
    </Card>
    <Popover
      className="popover-custom"
      placement="bottom"
      target={`subscribePopover-${id}`}
      isOpen={isSubscribePopoverOpen === id}
      toggle={() => setSubscribeValues(id, symbolTriggerData)}
    >
      <PopoverHeader>
        Notification Options
        <span className="popover-close">
          <FontAwesomeIcon
            icon={faTimes}
            onClick={() => handlePopoverToggle(null)}
          />
        </span>
      </PopoverHeader>
      {renderSubscribeOptions(id, isSubscribed, symbolTriggerData)}
    </Popover>
  </div>
  <Collapse isOpen={expandedStockId === id}>
    {
      isOpen(id) ? <StockTimeseries symbol={id}/> : null
    }
  </Collapse>
</div>
We’re using the Card component of ReactStrap to render these cards. The Popover component is used for displaying the subscription-based options:

When the user clicks on the bell icon for a particular stock, he can opt-in to get notified every hour or when the price of the stock has reached the entered value. We’ll see this in action in the Events/Time Triggers section.
Note: We’ll get to the StockTimeseries component in the next section!
Please refer to symbolList.js for the complete code related to the stocks list component.
Stock Timeseries View
The StockTimeseries component uses the query stocksDataQuery:
export const stocksDataQuery = gql`
  query getStocksData($symbol: String) {
    stock_data(order_by: {time: desc}, where: {symbol: {_eq: $symbol}}, limit: 25) {
      high
      low
      open
      close
      volume
      time
    }
  }
`;
The above query fetches the recent 25 data points of the selected stock. For example, here is the chart for the Facebook stock open metric:
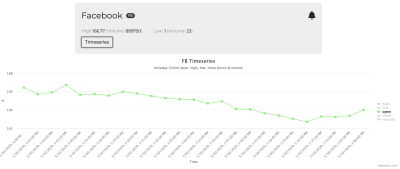
This is a straightforward component where we pass in some chart options to [HighchartsReact] component. Here are the chart options:
const chartOptions = {
  title: {
    text: `${symbol} Timeseries`
  },
  subtitle: {
    text: 'Intraday (5min) open, high, low, close prices & volume'
  },
  yAxis: {
    title: {
      text: '#'
    }
  },
  xAxis: {
    title: {
      text: 'Time'
    },
    categories: getDataPoints('time')
  },
  legend: {
    layout: 'vertical',
    align: 'right',
    verticalAlign: 'middle'
  },
  series: [
    {
      name: 'high',
      data: getDataPoints('high')
    }, {
      name: 'low',
      data: getDataPoints('low')
    }, {
      name: 'open',
      data: getDataPoints('open')
    },
    {
      name: 'close',
      data: getDataPoints('close')
    },
    {
      name: 'volume',
      data: getDataPoints('volume')
    }
  ]
}
The X-Axis shows the time and the Y-Axis shows the metric value at that time. The function getDataPoints is used for generating a series of points for each of the series.
const getDataPoints = (type) => {
  const values = [];
  data.stock_data.map((dataPoint) => {
    let value = dataPoint[type];
    if (type === 'time') {
      value = new Date(dataPoint['time']).toLocaleString('en-US');
    }
    values.push(value);
  });
  return values;
}
Simple! That’s how the Chart component is generated! Please refer to Chart.js and stockTimeseries.js files for the complete code on stock time-series.
You should now be ready with the data and the user interfaces part of the project. Let’s now move onto the interesting part — setting up event/time triggers based on the user’s input.
Setting Up Event/Scheduled Triggers
In this section, we’ll learn how to set up triggers on the Hasura console and how to send web push notifications to the selected users. Let’s get started!
Events Triggers On Hasura Console
Let’s create an event trigger stock_value on the table stock_data and insert as the trigger operation. The webhook will run every time there is an insert in the stock_data table.
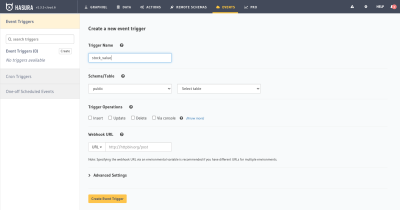
We’re going to create a glitch project for the webhook URL. Let me put down a bit about webhooks to make easy clear to understand:
Webhooks are used for sending data from one application to another on the occurrence of a particular event. When an event is triggered, an HTTP POST call is made to the webhook URL with the event data as the payload.
In this case, when there is an insert operation on the stock_data table, an HTTP post call will be made to the configured webhook URL (post call in the glitch project).
Glitch Project For Sending Web-Push Notifications
We’ve to get the webhook URL to put in the above event trigger interface. Go to glitch.com and create a new project. In this project, we’ll set up an express listener and there will be an HTTP post listener. The HTTP POST payload will have all the details of the stock datapoint including open, close, high, low, volume, time. We’ll have to fetch the list of users subscribed to this stock with the value equal to the close metric.
These users will then be notified of the stock price via web-push notifications.
That’s all we’ve to do to achieve the desired target of notifying users when the stock price reaches the expected value!
Let’s break this down into smaller steps and implement them!
Installing Dependencies
We would need the following dependencies:
express: is used for creating an express server.apollo-fetch: is used for creating a fetch function for getting data from the GraphQL endpoint.web-push: is used for sending web push notifications.
Please write this script in package.json to run index.js on npm start command:
"scripts": {
  "start": "node index.js"
}
Setting Up Express Server
Let’s create an index.js file as:
const express = require('express');
const bodyParser = require('body-parser');

const app = express();
app.use(bodyParser.json());

const handleStockValueTrigger = (eventData, res) => {
  /* Code for handling this trigger */
}

app.post('/', (req, res) => {
  const { body } = req
  const eventType = body.trigger.name
  const eventData = body.event

  switch (eventType) {
    case 'stock-value-trigger':
      return handleStockValueTrigger(eventData, res);
  }

});

app.get('/', function (req, res) {
  res.send('Hello World - For Event Triggers, try a POST request?');
});

var server = app.listen(process.env.PORT, function () {
    console.log(`server listening on port ${process.env.PORT}`);
});
In the above code, we’ve created post and get listeners on the route /. get is simple to get around! We’re mainly interested in the post call. If the eventType is stock-value-trigger, we’ll have to handle this trigger by notifying the subscribed users. Let’s add that bit and complete this function!
Fetching Subscribed Users
const fetch = createApolloFetch({
  uri: process.env.GRAPHQL_URL
});

const getSubscribedUsers = (symbol, triggerValue) => {
  return fetch({
    query: `query getSubscribedUsers($symbol: String, $triggerValue: numeric) {
      events(where: {symbol: {_eq: $symbol}, trigger_type: {_eq: "event"}, trigger_value: {_gte: $triggerValue}}) {
        user_id
        user_subscription {
          subscription
        }
      }
    }`,
    variables: {
      symbol,
      triggerValue
    }
  }).then(response => response.data.events)
}


const handleStockValueTrigger = async (eventData, res) => {
  const symbol = eventData.data.new.symbol;
  const triggerValue = eventData.data.new.close;
  const subscribedUsers = await getSubscribedUsers(symbol, triggerValue);
  const webpushPayload = {
    title: `${symbol} - Stock Update`,
    body: `The price of this stock is ${triggerValue}`
  }
  subscribedUsers.map((data) => {
    sendWebpush(data.user_subscription.subscription, JSON.stringify(webpushPayload));
  })
  res.json(eventData.toString());
}
In the above handleStockValueTrigger function, we’re first fetching the subscribed users using the getSubscribedUsers function. We’re then sending web-push notifications to each of these users. The function sendWebpush is used for sending the notification. We’ll look at the web-push implementation in a moment.
The function getSubscribedUsers uses the query:
query getSubscribedUsers($symbol: String, $triggerValue: numeric) {
  events(where: {symbol: {_eq: $symbol}, trigger_type: {_eq: "event"}, trigger_value: {_gte: $triggerValue}}) {
    user_id
    user_subscription {
      subscription
    }
  }
}
This query takes in the stock symbol and the value and fetches the user details including user-id and user_subscription that matches these conditions:
symbolequal to the one being passed in the payload.trigger_typeis equal toevent.trigger_valueis greater than or equal to the one being passed to this function (closein this case).
Once we get the list of users, the only thing that remains is sending web-push notifications to them! Let’s do that right away!
Sending Web-Push Notifications To The Subscribed Users
We’ve to first get the public and the private VAPID keys to send web-push notifications. Please store these keys in the .env file and set these details in index.js as:
webPush.setVapidDetails(
  'mailto:<YOUR_MAIL_ID>',
  process.env.PUBLIC_VAPID_KEY,
  process.env.PRIVATE_VAPID_KEY
);

const sendWebpush = (subscription, webpushPayload) => {
  webPush.sendNotification(subscription, webpushPayload).catch(err => console.log('error while sending webpush', err))
}
The sendNotification function is used for sending the web-push on the subscription endpoint provided as the first parameter.
That’s all is required to successfully send web-push notifications to the subscribed users. Here’s the complete code defined in index.js:
const express = require('express');
const bodyParser = require('body-parser');
const { createApolloFetch } = require('apollo-fetch');
const webPush = require('web-push');

webPush.setVapidDetails(
  'mailto:<YOUR_MAIL_ID>',
  process.env.PUBLIC_VAPID_KEY,
  process.env.PRIVATE_VAPID_KEY
);

const app = express();
app.use(bodyParser.json());

const fetch = createApolloFetch({
  uri: process.env.GRAPHQL_URL
});

const getSubscribedUsers = (symbol, triggerValue) => {
  return fetch({
    query: `query getSubscribedUsers($symbol: String, $triggerValue: numeric) {
      events(where: {symbol: {_eq: $symbol}, trigger_type: {_eq: "event"}, trigger_value: {_gte: $triggerValue}}) {
        user_id
        user_subscription {
          subscription
        }
      }
    }`,
    variables: {
      symbol,
      triggerValue
    }
  }).then(response => response.data.events)
}

const sendWebpush = (subscription, webpushPayload) => {
  webPush.sendNotification(subscription, webpushPayload).catch(err => console.log('error while sending webpush', err))
}

const handleStockValueTrigger = async (eventData, res) => {
  const symbol = eventData.data.new.symbol;
  const triggerValue = eventData.data.new.close;
  const subscribedUsers = await getSubscribedUsers(symbol, triggerValue);
  const webpushPayload = {
    title: `${symbol} - Stock Update`,
    body: `The price of this stock is ${triggerValue}`
  }
  subscribedUsers.map((data) => {
    sendWebpush(data.user_subscription.subscription, JSON.stringify(webpushPayload));
  })
  res.json(eventData.toString());
}

app.post('/', (req, res) => {
  const { body } = req
  const eventType = body.trigger.name
  const eventData = body.event

  switch (eventType) {
    case 'stock-value-trigger':
      return handleStockValueTrigger(eventData, res);
  }

});

app.get('/', function (req, res) {
  res.send('Hello World - For Event Triggers, try a POST request?');
});

var server = app.listen(process.env.PORT, function () {
    console.log("server listening");
});
Let’s test out this flow by subscribing to stock with some value and manually inserting that value in the table (for testing)!
I subscribed to AMZN with value as 2000 and then inserted a data point in the table with this value. Here’s how the stocks notifier app notified me right after the insertion:
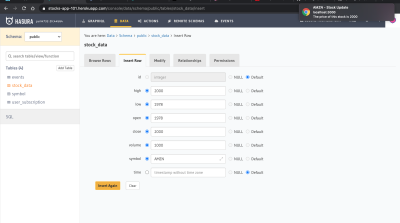
Neat! You can also check the event invocation log here:
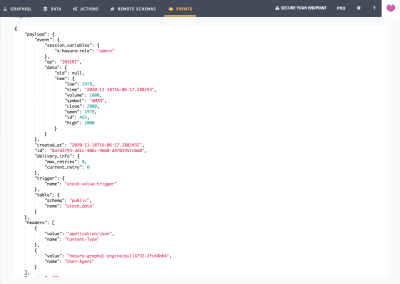
The webhook is doing the work as expected! We’re all set for the event triggers now!
Scheduled/Cron Triggers
We can achieve a time-based trigger for notifying the subscriber users every hour using the Cron event trigger as:
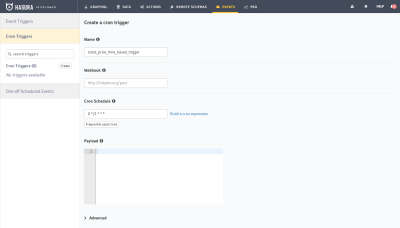
We can use the same webhook URL and handle the subscribed users based on the trigger event type as stock_price_time_based_trigger. The implementation is similar to the event-based trigger.
Conclusion
In this article, we built a stock price notifier application. We learned how to fetch prices using the Alpha Vantage APIs and store the data points in the Hasura backed Postgres database. We also learned how to set up the Hasura GraphQL engine and create event-based and scheduled triggers. We built a glitch project for sending web-push notifications to the subscribed users.
Further Reading
- Build A Static RSS Reader To Fight Your Inner FOMO
- The Forensics Of React Server Components (RSCs)
- How To Work With GraphQL In WordPress In 2024
- Full Stack GraphQL With Next.js, Neo4j AuraDB And Vercel


 Agent Ready is the new Headless
 SurveyJS: White-Label Survey Solution for Your JS App


