Integrating A Dialogflow Agent Into A React Application

Email Newsletter
Weekly tips on front-end & UX.
Trusted by 182,000+ folks.
 Custom Web Forms for Angular, React, & Vue. Your backend.
 Celebrating 10 million developers


Dialogflow is a platform that simplifies the process of creating and designing a natural language processing conversational chat assistant which can process voice or text input when being used either from the Dialogflow console or from an integrated web application.
Although the integrated Dialogflow Agent is briefly explained in this article, it is expected that you have an understanding of Node.js and Dialogflow. If you are learning about Dialogflow for the first time, this article gives a clear explanation of what Dialogflow is and its concepts.
This article is a guide on how a built a Dialogflow agent with voice and chat support that can be integrated into a web application with the help of an Express.js back-end application as a link between a React.js Web application and the Agent on Dialogflow itself. By the end of the article, you should able to connect your own Dialogflow agent to your preferred web application.
To make this guide easy to follow through, you can skip to whichever part of the tutorial interests you most or follow them in the following order as they appear:
- Setting Up A Dialogflow Agent
- Integrating A Dialogflow Agent
- Setting Up A Node Express Application
- Integrating Into A Web Application
- Conclusion
- References
1. Setting Up A Dialogflow Agent
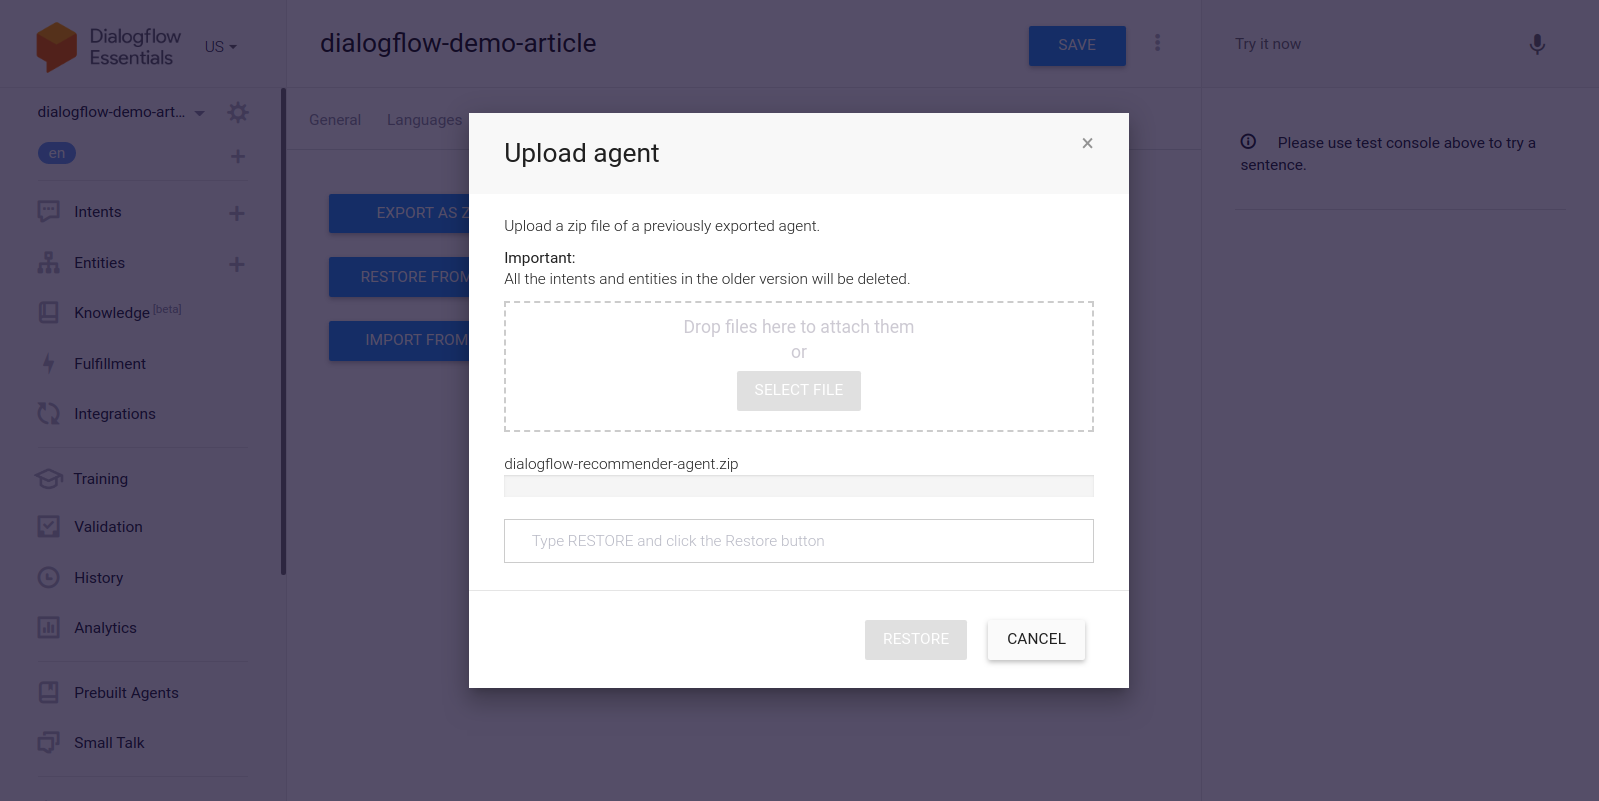
As explained in this article, a chat assistant on Dialogflow is called an Agent and it comprises of smaller components such as intents, fulfillment, knowledge base and much more. Dialogflow provides a console for users to create, train, and design the conversation flow of an Agent. In our use case, we will restore an agent that was exported into a ZIP folder after being trained, using the agent Export and Import feature.
Before we perform the import, we need to create a new agent that will be merged with the agent about to be restored. To create a new Agent from the console, a unique name is needed and also, a project on the Google Cloud to link the agent with. If there is no existing project on the Google Cloud to link with, a new one can be created here.
An agent has been previously created and trained to recommend wine products to a user based on their budget. This agent has been exported into a ZIP; you can download the folder here and restore it into our newly created agent from the Export and Import tab found in the agent Settings page.
The imported agent has been previously trained to recommend a wine product to the user based on the user’s budget for purchasing a bottle of wine.
Going through the imported agent, we will see it has three created intents from the intents page. One being a fallback intent, used when the Agent does not recognize input from a user, the other is a Welcome intent used when a conversation with the Agent is started, and the last intent is used to recommend a wine to the user based on the amount parameter within the sentence. Of concern to us is the get-wine-recommendation intent
This intent has a single input context of wine-recommendation coming from the Default Welcome intent to link the conversation to this intent.
“A Context is a system within an Agent used to control the flow of a conversation from one intent to the other.”
Below the contexts are the Training phrases, which are sentences used to train an agent on what type of statements to expect from a user. Through a large variety of training phrases within an intent, an agent is able to recognize a user’s sentence and the intent it falls into.
The training phrases within our agents get-wine-recommendation intent (as shown below) indicates the wine choice and the price category:
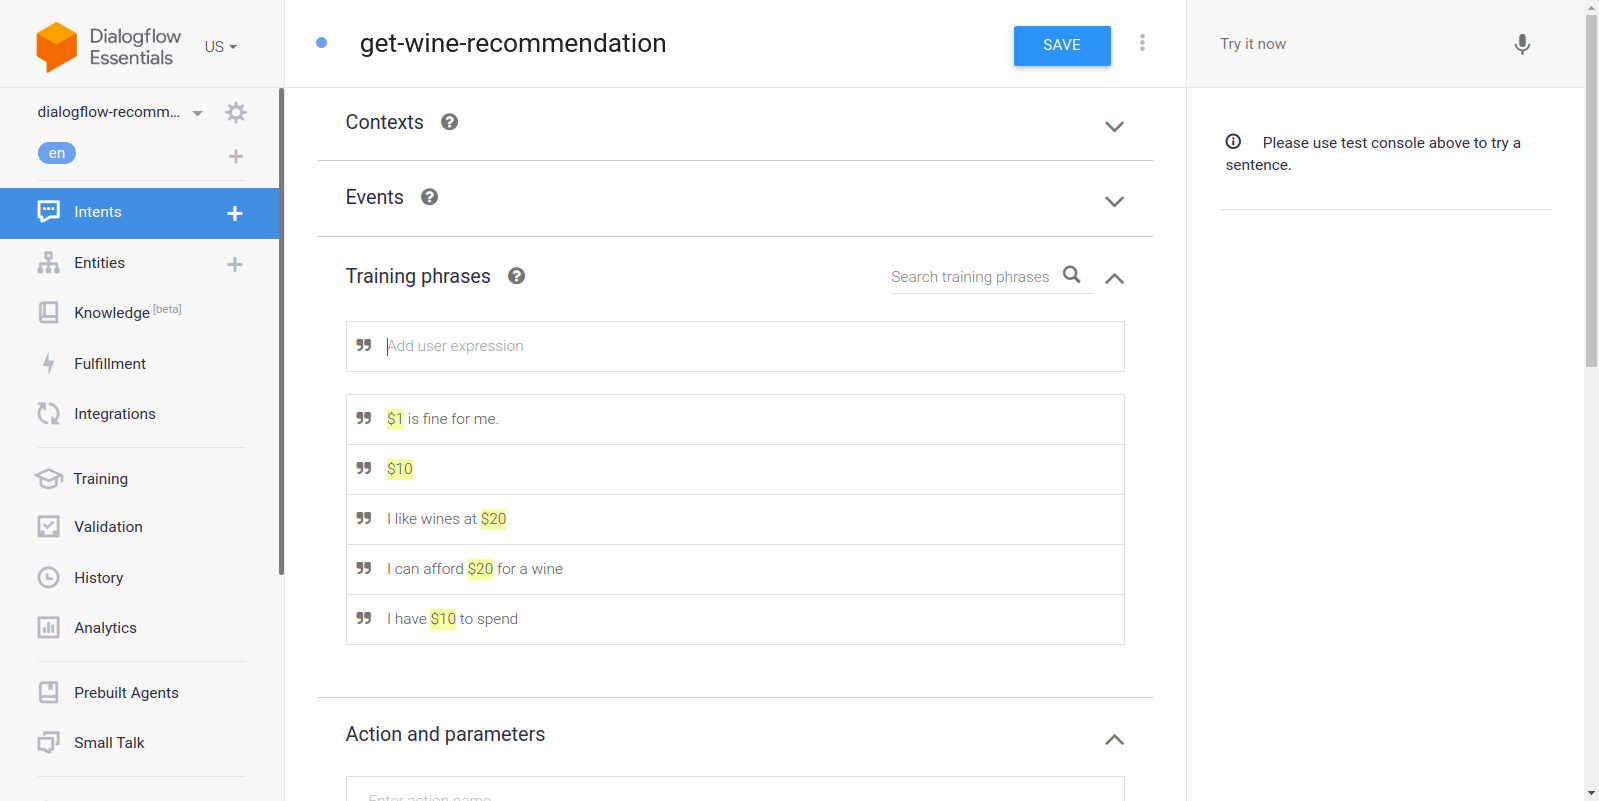
Looking at the image above, we can see the available training phrases listed out, and the currency figure is highlighted in yellow color for each of them. This highlighting is known as an annotation on Dialogflow and it is automatically done to extract the recognized data types known as an entity from a user’s sentence.
After this intent has been matched in a conversation with the agent, an HTTP request will be made to an external service to get the recommended wine based on the price extracted as a parameter from a user’s sentence, through the use of the enabled webhook found within the Fulfillment section at the bottom of this intent page.
We can test the agent using the Dialogflow emulator located in the right section of the Dialogflow console. To test, we start the conversation with a “Hi” message and follow up with the desired amount of wine. The webhook will immediately be called and a rich response similar to the one below will be shown by the agent.
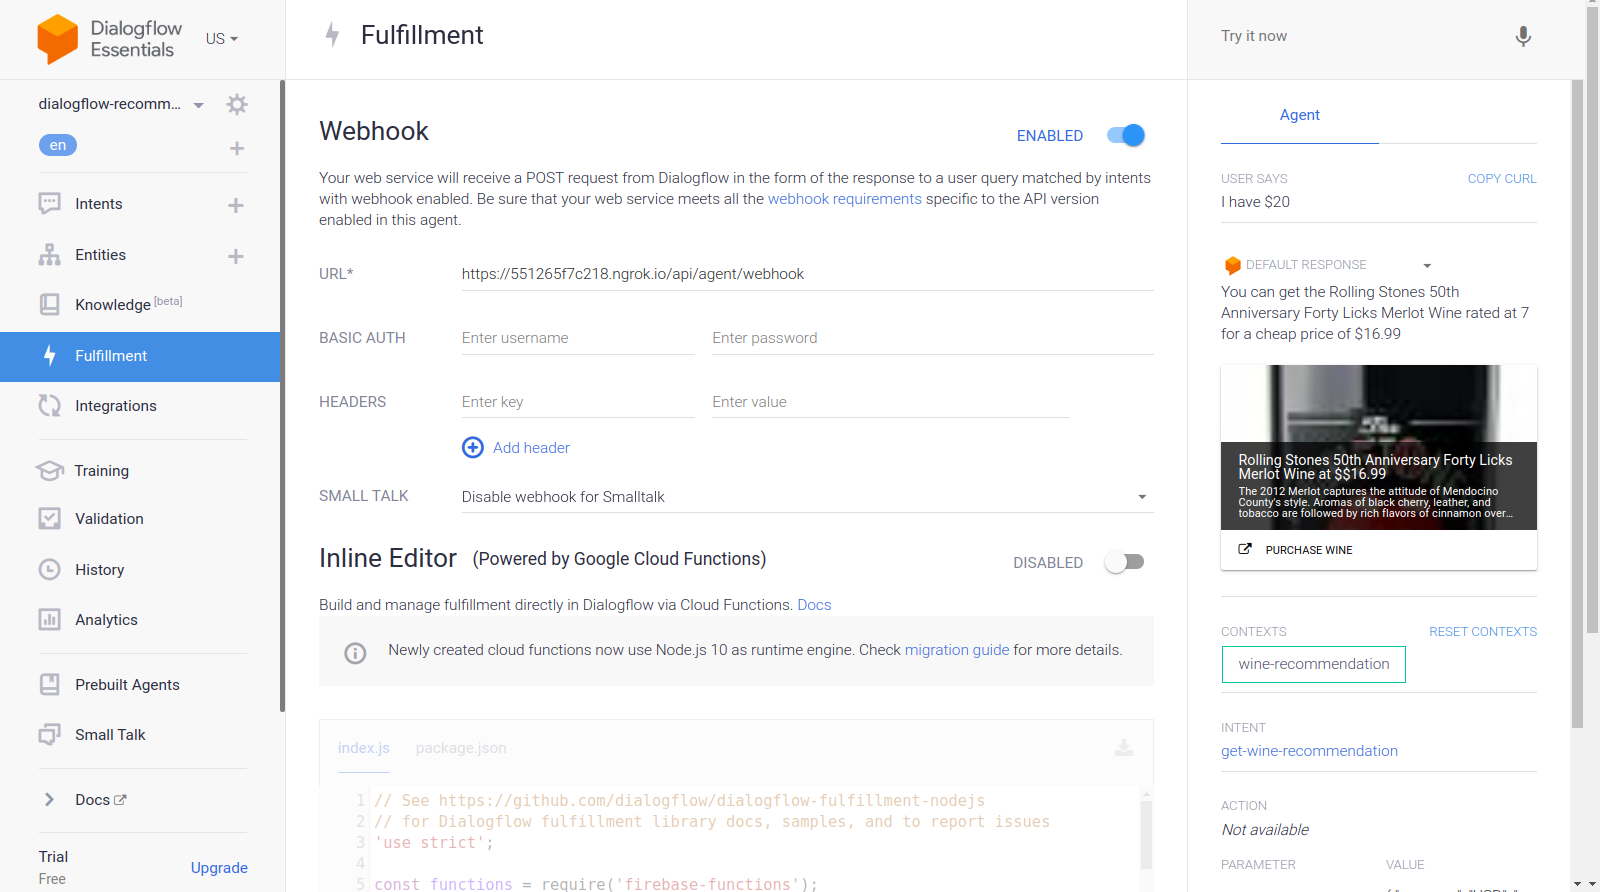
From the image above we can see the webhook URL generated using Ngrok and the agent’s response on the right-hand side showing a wine within the $20 price range typed in by the user.
At this point, the Dialogflow agent has been fully setup. We can now get started with integrating this agent into a web application to enable other users to access and interact with the agent without access to our Dialogflow console.
Integrating A Dialogflow Agent
While there are other means of connecting to a Dialogflow Agent such as making HTTP requests to its REST endpoints, the recommended way to connect to Dialogflow is through the use of its official client library available in several programming languages. For JavaScript, the @google-cloud/dialogflow package is available for installation from NPM.
Internally the @google-cloud/dialogflow package uses gRPC for its network connections and this makes the package unsupported within a browser environment except when patched using webpack, the recommended way to use this package is from a Node environment. We can do this by setting up an Express.js back-end application to use this package then serve data to the web application through its API endpoints and this is what we will do next.
Setting Up A Node Express Application
To set up an express application we create a new project directory then grab the needed dependencies using yarn from an opened command line terminal.
# create a new directory and ( && ) move into directory
mkdir dialogflow-server && cd dialogflow-server

# create a new Node project
yarn init -y

# Install needed packages
yarn add express cors dotenv uuid
With the needed dependencies installed, we can proceed to set up a very lean Express.js server that handles connections on a specified port with CORS support enabled for the web app.
// index.js
const express =  require("express")
const dotenv =  require("dotenv")
const cors =  require("cors")

dotenv.config();

const app = express();
const PORT = process.env.PORT || 5000;

app.use(cors());

app.listen(PORT, () => console.log(`🔥  server running on port ${PORT}`));
When executed, the code in the snippet above starts an HTTP server that listens for connections on a specified PORT Express.js. It also has Cross-origin resource sharing (CORS) enabled on all requests using the cors package as an Express middleware. For now, this server only listens for connections, it cannot respond to a request because it has no created route, so let’s create this.
We now need to add two new routes: one for sending text data while the other for sending a recorded voice input. They will both accept a POST request and send the data contained in the request body to the Dialogflow agent later on.
const express = require("express")

const app = express()

app.post("/text-input", (req, res) => {
  res.status(200).send({ data : "TEXT ENDPOINT CONNECTION SUCCESSFUL" })
});

app.post("/voice-input", (req, res) => {
  res.status(200).send({ data : "VOICE ENDPOINT CONNECTION SUCCESSFUL" })
});

module.exports = app
Above we created a separate router instance for the two created POST routes which for now, only respond with a 200 status code and a hardcoded dummy response. When we are done authenticating with Dialogflow, we can come back to implement an actual connection to Dialogflow within these endpoints.
For the last step in our backend application setup, we mount the previously created router instance created into the Express application using app.use and a base path for the route.
// agentRoutes.js

const express =  require("express")
const dotenv =  require("dotenv")
const cors =  require("cors")

const Routes =  require("./routes")

dotenv.config();
const app = express();
const PORT = process.env.PORT || 5000;

app.use(cors());

app.use("/api/agent", Routes);

app.listen(PORT, () => console.log(`🔥  server running on port ${PORT}`));
Above, we have added a base path to the two routes two we can test any of them via a POST request using cURL from a command line as it’s done below with an empty request body;
curl -X https://localhost:5000/api/agent/text-responseAfter successful completion of the request above, we can expect to see a response containing object data being printed out to the console.
Now we are left with making an actual connection with Dialogflow which includes handling authentication, sending, and receiving data from the Agent on Dialogflow using the @google-cloud/dialogflow package.
Authenticating With Dialogflow
Every Dialogflow agent created is linked to a project on the Google Cloud. To connect externally to the Dialogflow agent, we authenticate with the project on the Google cloud and use Dialogflow as one of the project’s resources. Out of the six available ways to connect to a project on the google-cloud, using the Service accounts option is the most convenient when connecting to a particular service on the google cloud through its client library.
Note: For production-ready applications, the use of short-lived API keys are recommended over Service Account keys in order to reduce the risk of a service account key getting into the wrong hands.
What Are Service Accounts?
Service accounts are a special type of account on the Google Cloud, created for non-human interaction, mostly through external APIs. In our application, the service account will be accessed through a generated key by the Dialogflow client library to authenticate with the Google Cloud.
The cloud documentation on creating and managing service accounts provides an excellent guide to create a service account. When creating the service account, the Dialogflow API Admin role should be assigned to the created service account as shown in the last step. This role gives the service account administrative control over the linked Dialogflow agent.
To use the service account, we need to create a Service Account Key. The following steps below outline how to create one in JSON format:
- Click on the newly created Service Account to navigate to the Service account page.
- Scroll to the Keys section and click the Add Key dropdown and click on the Create new key option which opens a modal.
- Select a JSON file format and click the Create button at the bottom right of the modal.
Note: It is recommended to keep a service account key private and not commit it to any version control system as it contains highly sensitive data about a project on the Google Cloud. This can be done by adding the file to the .gitignore file.
With a service account created and a service account key available within our project’s directory, we can use the Dialogflow client library to send and receive data from the Dialogflow agent.
// agentRoute.js
require("dotenv").config();

const express = require("express")
const Dialogflow = require("@google-cloud/dialogflow")
const { v4 as uuid } = require("uuid")
const Path = require("path")

const app = express();

app.post("/text-input", async (req, res) => {
  const { message } = req.body;

  // Create a new session
   const sessionClient = new Dialogflow.SessionsClient({
    keyFilename: Path.join(__dirname, "./key.json"),
  });

  const sessionPath = sessionClient.projectAgentSessionPath(
    process.env.PROJECT_ID,
    uuid()
  );

  // The dialogflow request object
  const request = {
    session: sessionPath,
    queryInput: {
      text: {
        // The query to send to the dialogflow agent
        text: message,
      },
    },
  };

  // Sends data from the agent as a response
  try {
    const responses = await sessionClient.detectIntent(request);
    res.status(200).send({ data: responses });
  } catch (e) {
    console.log(e);
    res.status(422).send({ e });
  }
});

module.exports = app;
The entire route above sends data to the Dialogflow agent and receives a response through the following steps.
- First
It authenticates with the Google cloud then it creates a session with Dialogflow using the projectID of Google cloud project linked to the Dialogflow agent and also a random ID to identify the session created. In our application, we are creating a UUID identifier on each session created using the JavaScript UUID package. This is very useful when logging or tracing all conversations handled by a Dialogflow agent. - Second
We create a request object data following the specified format in the Dialogflow documentation. This request object contains the created session and the message data gotten from the request body which is to be passed to the Dialogflow agent. - Third
Using thedetectIntentmethod from the Dialogflow session, we send the request object asynchronously and await the Agent’s response using ES6 async / await syntax in a try-catch block should thedetectIntentmethod return an exception, we can catch the error and return it, rather than crashing the entire application. A sample of the response object returned from the Agent is provided in the Dialogflow documentation and can be inspected to know how to extract the data from the object.
We can make use of Postman to test the Dialogflow connection implemented above in the dialogflow-response route. Postman is a collaboration platform for API development with features to test APIs built in either development or production stages.
Note: If not already installed, the Postman desktop application is not needed to test an API. Starting from September 2020, Postman’s web client moved into a Generally Available (GA) state and can be used directly from a browser.
Using the Postman Web Client, we can either create a new workspace or use an existing one to create a POST request to our API endpoint at https://localhost:5000/api/agent/text-input and add data with a key of message and value of “Hi There” into the query parameters.
At the click of the Send button, a POST request will be made to the running Express server — with a response similar to the one shown in the image below:
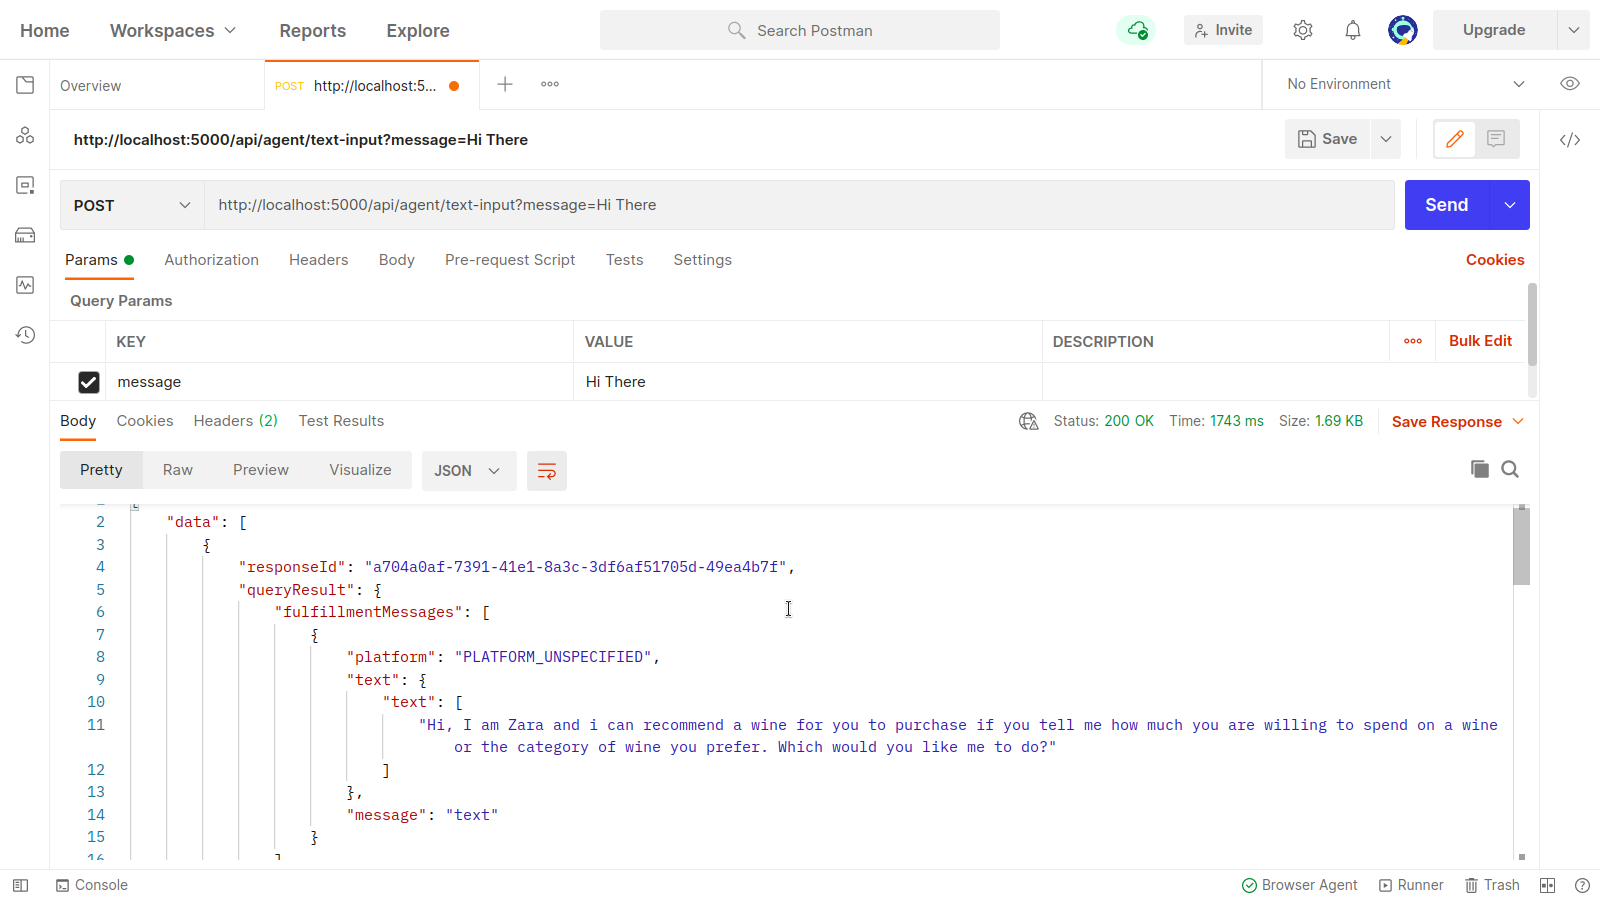
Within the image above, we can see the prettified response data from the Dialogflow agent through the Express server. The data returned is formatted according to the sample response definition given in the Dialogflow Webhook documentation.
Handling Voice Inputs
By default, all Dialogflow agents are enabled to process both text and audio data and also return a response in either text or audio format. However, working with audio input or output data can be a bit more complex than text data.
To handle and process voice inputs, we will begin the implementation for the /voice-input endpoint that we have previously created in order to receive audio files and send them to Dialogflow in exchange for a response from the Agent:
// agentRoutes.js
import { pipeline, Transform } from "stream";
import busboy from "connect-busboy";
import util from "promisfy"
import Dialogflow from "@google-cloud/dialogflow"

const app = express();

app.use(
  busboy({
    immediate: true,
  })
);

app.post("/voice-input", (req, res) => {
  const sessionClient = new Dialogflow.SessionsClient({
    keyFilename: Path.join(__dirname, "./recommender-key.json"),
  });
  const sessionPath = sessionClient.projectAgentSessionPath(
    process.env.PROJECT_ID,
    uuid()
  );

  // transform into a promise
  const pump = util.promisify(pipeline);

  const audioRequest = {
    session: sessionPath,
    queryInput: {
      audioConfig: {
        audioEncoding: "AUDIO_ENCODING_OGG_OPUS",
        sampleRateHertz: "16000",
        languageCode: "en-US",
      },
      singleUtterance: true,
    },
  };

  const streamData = null;
  const detectStream = sessionClient
    .streamingDetectIntent()
    .on("error", (error) => console.log(error))
    .on("data", (data) => {
      streamData = data.queryResult
    })
    .on("end", (data) => {
      res.status(200).send({ data : streamData.fulfillmentText }}
    })

  detectStream.write(audioRequest);

  try {
    req.busboy.on("file", (_, file, filename) => {
      pump(
        file,
        new Transform({
          objectMode: true,
          transform: (obj, _, next) => {
            next(null, { inputAudio: obj });
          },
        }),
        detectStream
      );
    });
  } catch (e) {
    console.log(`error  : ${e}`);
  }
});
At a high overview, the /voice-input route above receives a user’s voice input as a file containing the message being spoken to the chat assistant and sends it to the Dialogflow agent. To understand this process better, we can break it down into the following smaller steps:
- First, we add and use connect-busboy as an Express middleware for parsing form data being sent in the request from the web application. After which we authenticate with Dialogflow using the Service Key and create a session, the same way we did in the previous route.
Then using the promisify method from the built-in Node.js util module, we get and save a promise equivalent of the Stream pipeline method to be used later to pipe multiple streams and also perform a clean up after the streams are completed. - Next, We create a request object containing the Dialogflow authentication session and a configuration for the audio file about to be sent to Dialogflow. The nested audio configuration object enables the Dialogflow agent to perform a Speech-To-Text conversion on the sent audio file.
- Next, using the created session and the request object, we detect a user’s intent from the audio file using
detectStreamingIntentmethod which opens up a new data stream from the Dialogflow agent to the backend application. Data will send back in small bits through this stream and using the data “event” from the readable stream we store the data instreamDatavariable for later use. After the stream is closed the “end” event is fired and we send the response from the Dialogflow agent stored in thestreamDatavariable to the Web Application. - Lastly using the file stream event from connect-busboy, we receive the stream of the audio file sent in the request body and we further pass it into the promise equivalent of Pipeline which we created previously. The function of this is to pipe the audio file stream coming in from request to the Dialogflow stream, we pipe the audio file stream to the stream opened by the
detectStreamingIntentmethod above.
To test and confirm that the steps above are working as laid out, we can make a test request containing an audio file in the request body to the /voice-input endpoint using Postman.
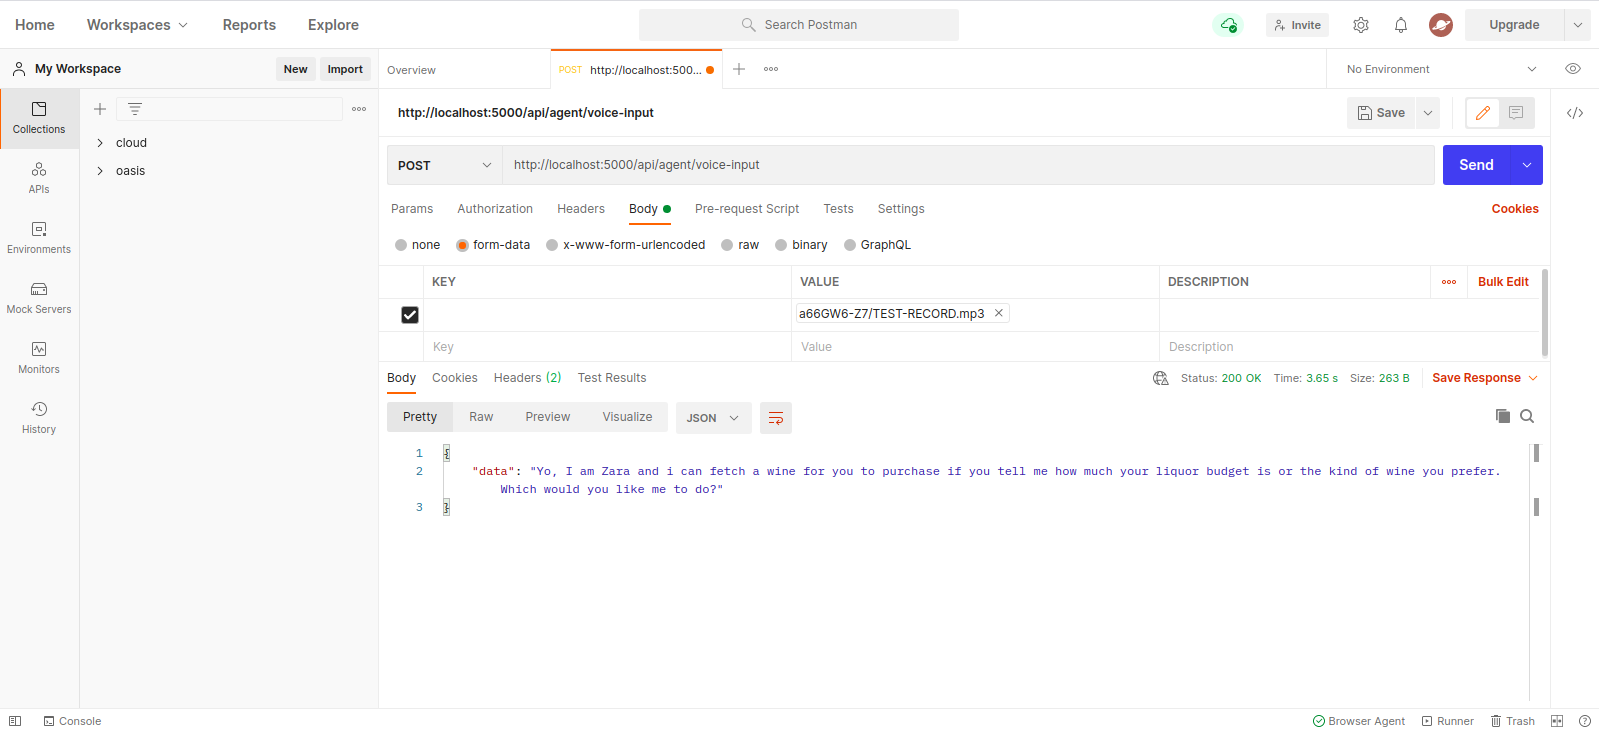
The Postman result above shows the response gotten after making a POST request with the form-data of a recorded voice note message saying “Hi” included in the request’s body.
At this point, we now have a functional Express.js application that sends and receives data from Dialogflow, the two parts of this article are done. Where are now left with integrating this Agent into a web application by consuming the APIs created here from a Reactjs application.
Integrating Into A Web Application
To consume our built REST API we will expand this existing React.js application which already has a home page showing a list of wines fetched from an API and support for decorators using the babel proposal decorators plugin. We will refactor it a little by introducing Mobx for state management and also a new feature to recommend a wine from a chat component using the added REST API endpoints from the Express.js application.
To get started, we begin to manage the application’s state using MobX as we create a Mobx store with a few observable values and some methods as actions.
// store.js

import Axios from "axios";
import { action, observable, makeObservable, configure } from "mobx";

const ENDPOINT = process.env.REACT_APP_DATA_API_URL;

class ApplicationStore {
  constructor() {
    makeObservable(this);
  }

  @observable
  isChatWindowOpen = false;

  @observable
  isLoadingChatMessages = false;

  @observable
  agentMessages = [];

  @action
  setChatWindow = (state) => {
    this.isChatWindowOpen = state;
  };

  @action
  handleConversation = (message) => {
     this.isLoadingChatMessages = true;
     this.agentMessages.push({ userMessage: message });

     Axios.post(`${ENDPOINT}/dialogflow-response`, {
      message: message || "Hi",
     })
      .then((res) => {
        this.agentMessages.push(res.data.data[0].queryResult);
        this.isLoadingChatMessages = false;
      })
      .catch((e) => {
        this.isLoadingChatMessages = false;
        console.log(e);
      });
  };
}

export const store = new ApplicationStore();
Above we created a store for the chat component feature within the application having the following values:
isChatWindowOpen
The value stored here controls the visibility of the chat component where the messages of Dialogflow are shown.isLoadingChatMessages
This is used to show a loading indicator when a request to fetch a response from the Dialogflow agent is made.agentMessages
This array stores all responses coming from the requests made to get a response from the Dialogflow agent. The data in the array is later displayed in the component.handleConversation
This method decorated as an action adds data into theagentMessagesarray. First, it adds the user’s message passed in as an argument then makes a request using Axios to the backend application to get a response from Dialogflow. After the request is resolved, it adds the response from the request into theagentMessagesarray.
Note: In the absence of the decorators support in an Application, MobX provides makeObservable which can be used in the constructor of the target store class. See an example here.
With the store setup, we need to wrap the entire application tree with the MobX Provider higher-order component starting from the root component in the index.js file.
import React from "react";
import { Provider } from "mobx-react";

import { store } from "./state/";
import Home from "./pages/home";

function App() {
  return (
    <Provider ApplicationStore={store}>
      <div className="App">
        <Home />
      </div>
    </Provider>
  );
}

export default App;
Above we wrap the root App component with MobX Provider and we pass in the previously created store as one of the Provider’s values. Now we can proceed to read from the store within components connected to the store.
Creating A Chat Interface
To display the messages sent or received from the API requests, we need a new component with some chat interface showing the messages listed out. To do this, we create a new component to display some hard-coded messages first then later we display messages in an ordered list.
// ./chatComponent.js

import React, { useState } from "react";
import { FiSend, FiX } from "react-icons/fi";
import "../styles/chat-window.css";

const center = {
  display: "flex",
  jusitfyContent: "center",
  alignItems: "center",
};

const ChatComponent = (props) => {
  const { closeChatwindow, isOpen } = props;
  const [Message, setMessage] = useState("");

  return (
   <div className="chat-container">
      <div className="chat-head">
        <div style={{ ...center }}>
          <h5> Zara </h5>
        </div>
        <div style={{ ...center }} className="hover">
          <FiX onClick={() => closeChatwindow()} />
        </div>
      </div>
      <div className="chat-body">
        <ul className="chat-window">
          <li>
            <div className="chat-card">
              <p>Hi there, welcome to our Agent</p>
            </div>
          </li>
        </ul>
        <hr style={{ background: "#fff" }} />
        <form onSubmit={(e) => {}} className="input-container">
          <input
            className="input"
            type="text"
            onChange={(e) => setMessage(e.target.value)}
            value={Message}
            placeholder="Begin a conversation with our agent"
          />
          <div className="send-btn-ctn">
            <div className="hover" onClick={() => {}}>
              <FiSend style={{ transform: "rotate(50deg)" }} />
            </div>
          </div>
        </form>
      </div>
    </div>
  );
};

export default ChatComponent
The component above has the basic HTML markup needed for a chat application. It has a header showing the Agent’s name and an icon for closing the chat window, a message bubble containing a hardcoded text in a list tag, and lastly an input field having an onChange event handler attached to the input field to store the text typed into the component’s local state using React’s useState.
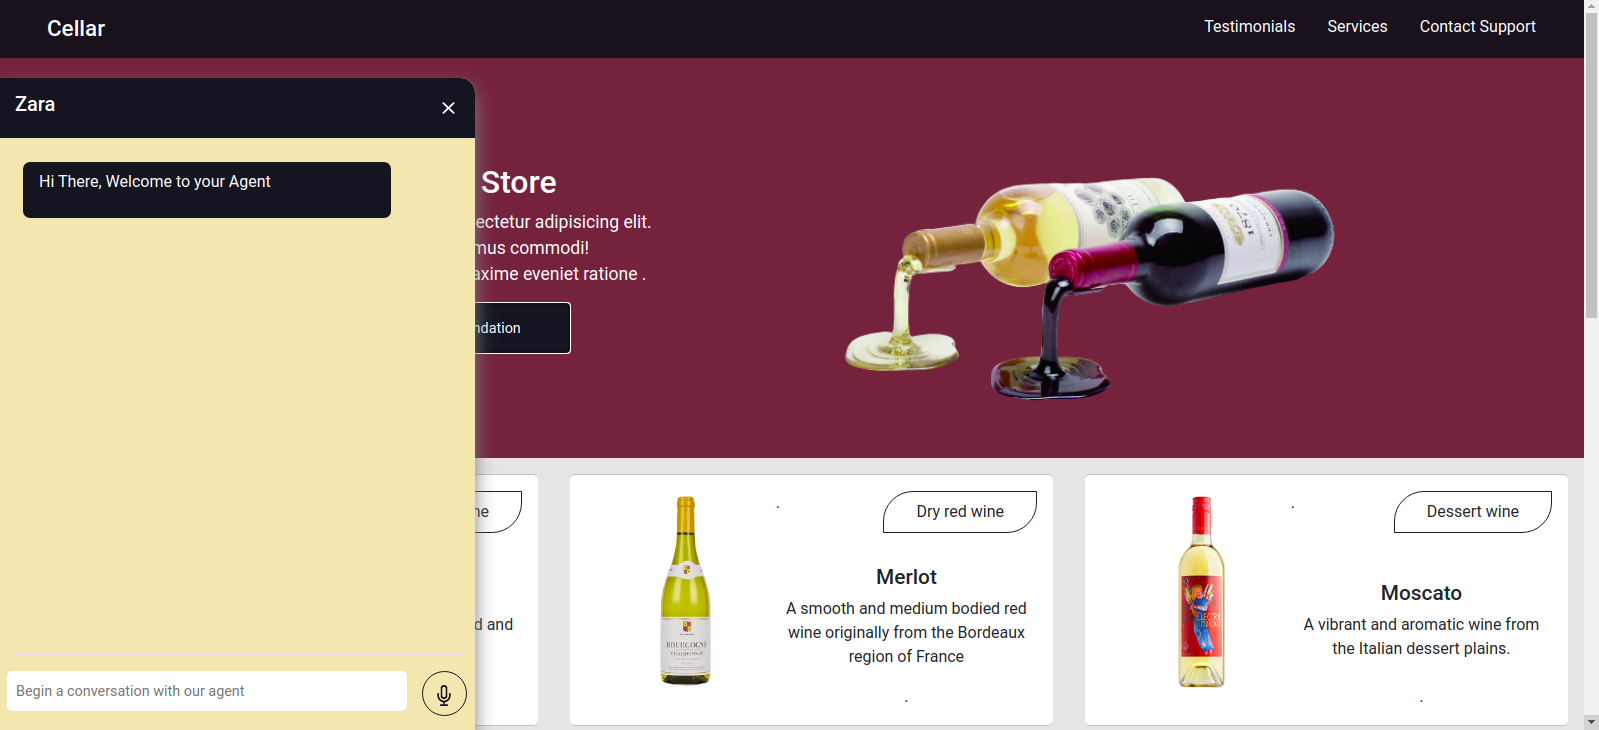
From the image above, the chat component works as it should, showing a styled chat window having a single chat message and the input field at the bottom. We however want the message shown to be actual responses gotten from the API request and not hardcoded text.
We move forward to refactor the Chat component, this time connecting and making use of values in the MobX store within the component.
// ./components/chatComponent.js

import React, { useState, useEffect } from "react";
import { FiSend, FiX } from "react-icons/fi";
import { observer, inject } from "mobx-react";
import { toJS } from "mobx";
import "../styles/chat-window.css";

const center = {
  display: "flex",
  jusitfyContent: "center",
  alignItems: "center",
};

const ChatComponent = (props) => {
  const { closeChatwindow, isOpen } = props;
  const [Message, setMessage] = useState("");

  const {
    handleConversation,
    agentMessages,
    isLoadingChatMessages,
  } = props.ApplicationStore;

  useEffect(() => {
    handleConversation();
    return () => handleConversation()
  }, []);

  const data = toJS(agentMessages);

  return (
        <div className="chat-container">
          <div className="chat-head">
            <div style={{ ...center }}>
              <h5> Zara {isLoadingChatMessages && "is typing ..."} </h5>
            </div>
            <div style={{ ...center }} className="hover">
              <FiX onClick={(_) => closeChatwindow()} />
            </div>
          </div>
          <div className="chat-body">
            <ul className="chat-window">
              {data.map(({ fulfillmentText, userMessage }) => (
                <li>
                  {userMessage && (
                    <div
                      style={{
                        display: "flex",
                        justifyContent: "space-between",
                      }}
                    >
                      <p style={{ opacity: 0 }}> . </p>
                      <div
                        key={userMessage}
                        style={{
                          background: "red",
                          color: "white",
                        }}
                        className="chat-card"
                      >
                        <p>{userMessage}</p>
                      </div>
                    </div>
                  )}
                  {fulfillmentText && (
                    <div
                      style={{
                        display: "flex",
                        justifyContent: "space-between",
                      }}
                    >
                      <div key={fulfillmentText} className="chat-card">
                        <p>{fulfillmentText}</p>
                      </div>
                      <p style={{ opacity: 0 }}> . </p>
                    </div>
                  )}
                </li>
              ))}
            </ul>
            <hr style={{ background: "#fff" }} />
            <form
              onSubmit={(e) => {
                e.preventDefault();
                handleConversation(Message);
              }}
              className="input-container"
            >
              <input
                className="input"
                type="text"
                onChange={(e) => setMessage(e.target.value)}
                value={Message}
                placeholder="Begin a conversation with our agent"
              />
              <div className="send-btn-ctn">
                <div
                  className="hover"
                  onClick={() => handleConversation(Message)}
                >
                  <FiSend style={{ transform: "rotate(50deg)" }} />
                </div>
              </div>
            </form>
          </div>
        </div>
     );
};

export default inject("ApplicationStore")(observer(ChatComponent));
From the highlighted parts of the code above, we can see that the entire chat component has now been modified to perform the following new operations;
- It has access to the MobX store values after injecting the
ApplicationStorevalue. The component has also been made an observer of these store values so it re-renders when one of the values changes. - We start the conversation with the Agent immediately after the chat component is opened by invoking the
handleConversationmethod within auseEffecthook to make a request immediately the component is rendered. - We are now making use of the
isLoadingMessagesvalue within the Chat component header. When a request to get a response from the Agent is in flight, we set theisLoadingMessagesvalue totrueand update the header to Zara is typing… - The
agentMessagesarray within the store gets updated to a proxy by MobX after its values are set. From this component, we convert that proxy back to an array using thetoJSutility from MobX and store the values in a variable within the component. That array is further iterated upon to populate the chat bubbles with the values within the array using a map function.
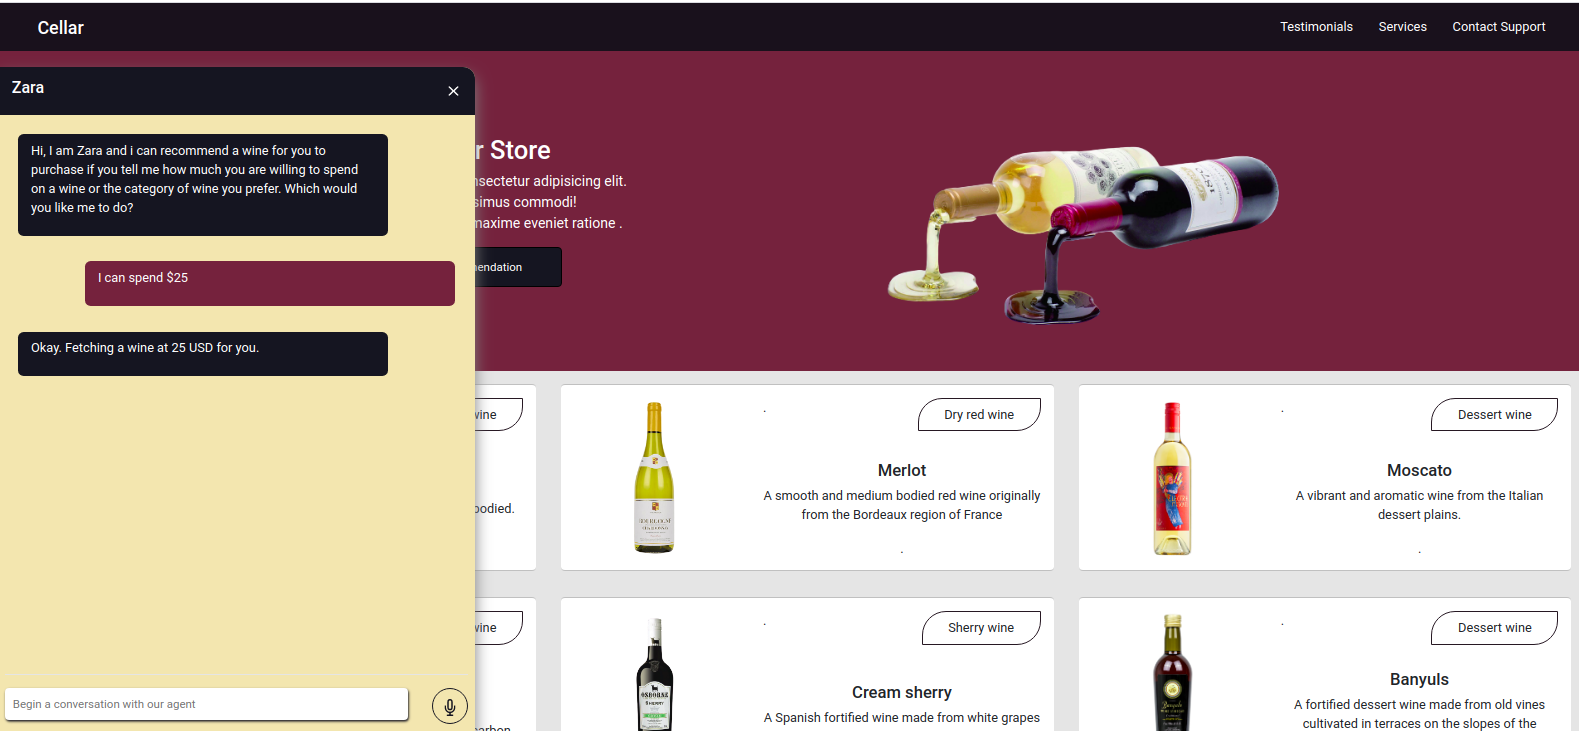
Now using the chat component we can type in a sentence and wait for a response to be displayed in the agent.
Recording User Voice Input
By default, all Dialogflow agents can accept either voice or text-based input in any specified language from a user. However, it requires a few adjustments from a web application to gain access to a user’s microphone and record a voice input.
To achieve this, we modify the MobX store to use the HTML MediaStream Recording API to record a user’s voice within two new methods in the MobX store.
// store.js

import Axios from "axios";
import { action, observable, makeObservable } from "mobx";

class ApplicationStore {
  constructor() {
    makeObservable(this);
  }

  @observable
  isRecording = false;

  recorder = null;
  recordedBits = [];

  @action
  startAudioConversation = () => {
    navigator.mediaDevices
      .getUserMedia({
        audio: true,
      })
      .then((stream) => {
        this.isRecording = true;
        this.recorder = new MediaRecorder(stream);
        this.recorder.start(50);

        this.recorder.ondataavailable = (e) => {
           this.recordedBits.push(e.data);
        };
      })
      .catch((e) => console.log(`error recording : ${e}`));
  };
};
At the click of the record icon from the chat component, the startAudioConversation method in the MobX store above is invoked to set the method the observable isRecording property is to true , for the chat component to provide visual feedback to show a recording is in progress.
Using the browser’s navigator interface, the Media Device object is accessed to request the user’s device microphone. After permission is granted to the getUserMedia request, it resolves its promise with a MediaStream data which we further pass to the MediaRecorder constructor to create a recorder using the media tracks in the stream returned from the user’s device microphone. We then store the Media recorder instance in the store’s recorder property as we will access it from another method later on.
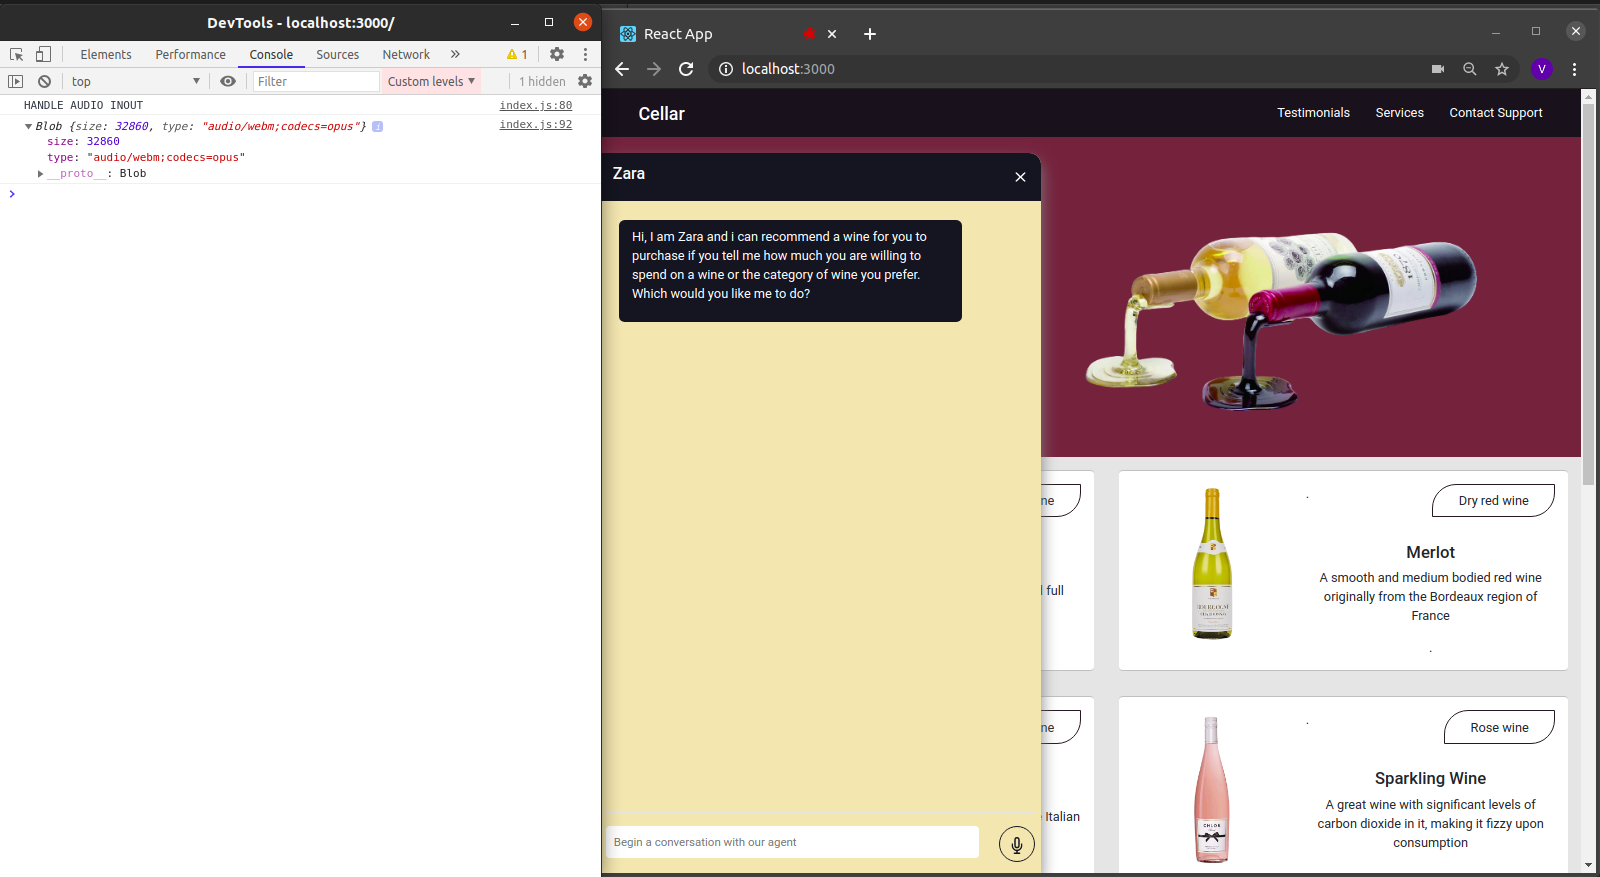
Next, we call the start method on the recorder instance, and after the recording session is ended, the ondataavailable function is fired with an event argument containing the recorded stream in a Blob which we store in the recordedBits array property.
Logging out the data in the event argument passed into the fired ondataavailable event, we can see the Blob and its properties in the browser console.
Now that we can start a MediaRecorder stream, we need to be able to stop the MediaRecorder stream when a user is done recording their voice input and send the generated audio file to the Express.js application.
The new method added to the store below stops the stream and makes a POST request containing the recorded voice input.
//store.js

import Axios from "axios";
import { action, observable, makeObservable, configure } from "mobx";

const ENDPOINT = process.env.REACT_APP_DATA_API_URL;

class ApplicationStore {
  constructor() {
    makeObservable(this);
  }

  @observable
  isRecording = false;

  recorder = null;
  recordedBits = [];

  @action
  closeStream = () => {
    this.isRecording = false;
    this.recorder.stop();

    this.recorder.onstop = () => {
      if (this.recorder.state === "inactive") {
        const recordBlob = new Blob(this.recordedBits, {
          type: "audio/mp3",
        });

        const inputFile = new File([recordBlob], "input.mp3", {
          type: "audio/mp3",
        });
        const formData = new FormData();
        formData.append("voiceInput", inputFile);

        Axios.post(`${ENDPOINT}/api/agent/voice-input`, formData, {
          headers: {
            "Content-Type": "multipart/formdata",
          },
        })
          .then((data) => {})
          .catch((e) => console.log(`error uploading audio file : ${e}`));
      }
    };
  };
}

export const store = new ApplicationStore();
The method above executes the MediaRecorder’s stop method to stop an active stream. Within the onstop event fired after the MediaRecorder is stopped, we create a new Blob with a music type and append it into a created FormData.
As the last step., we make POST request with the created Blob added to the request body and a Content-Type: multipart/formdata added to the request’s headers so the file can be parsed by the connect-busboy middleware from the backend-service application.
With the recording being performed from the MobX store, all we need to add to the chat-component is a button to execute the MobX actions to start and stop the recording of the user’s voice and also a text to show when a recording session is active.
import React from 'react'

const ChatComponent = ({ ApplicationStore }) => {
  const {
     startAudiConversation,
     isRecording,
     handleConversation,
     endAudioConversation,
     isLoadingChatMessages
    } = ApplicationStore

  const [ Message, setMessage ] = useState("")

    return (
        <div>
           <div className="chat-head">
            <div style={{ ...center }}>
              <h5> Zara {} {isRecording && "is listening ..."} </h5>
            </div>
            <div style={{ ...center }} className="hover">
              <FiX onClick={(_) => closeChatwindow()} />
            </div>
          </div>

          <form
              onSubmit={(e) => {
                  e.preventDefault();
                  handleConversation(Message);
                }}
                className="input-container"
              >
                <input
                  className="input"
                  type="text"
                  onChange={(e) => setMessage(e.target.value)}
                  value={Message}
                  placeholder="Begin a conversation with our agent"
                />
                <div className="send-btn-ctn">
                  {Message.length > 0 ? (
                    <div
                      className="hover"
                      onClick={() => handleConversation(Message)}
                    >
                      <FiSend style={{ transform: "rotate(50deg)" }} />
                    </div>
                  ) : (
                    <div
                      className="hover"
                      onClick={() =>  handleAudioInput()}
                    >
                      <FiMic />
                    </div>
                  )}
                </div>
              </form>
        </div>
    )
}

export default ChatComponent
From the highlighted part in the chat component header above, we use the ES6 ternary operators to switch the text to “Zara is listening ….” whenever a voice input is being recorded and sent to the backend application. This gives the user feedback on what is being done.
Also, besides the text input, we added a microphone icon to inform the user of the text and voice input options available when using the chat assistant. If a user decides to use the text input, we switch the microphone button to a Send button by counting the length of the text stored and using a ternary operator to make the switch.
We can test the newly connected chat assistant a couple of times by using both voice and text inputs and watch it respond exactly like it would when using the Dialogflow console!
Conclusion
In the coming years, the use of language processing chat assistants in public services will have become mainstream. This article has provided a basic guide on how one of these chat assistants built with Dialogflow can be integrated into your own web application through the use of a backend application.
The built application has been deployed using Netlify and can be found here. Feel free to explore the Github repository of the backend express application here. They both contain a detailed README to guide you on the files within the two projects.
References
- Dialogflow Documentation
- Building A Conversational N.L.P Enabled Chatbot Using Google’s Dialogflow by Nwani Victory
- MobX
- https://web.postman.com
- Dialogflow API: Node.js Client
- Using the MediaStream Recording API
Further Reading
- How To Build Server-Side Rendered (SSR) Svelte Apps With SvelteKit
- A Guide To Redux Toolkit With TypeScript
- Generating Unique Random Numbers In JavaScript Using Sets
- Should Chatbots Replace Forms On Mobile?


