Things To Expect From A Smashing Workshop: Form Design Masterclass

Email Newsletter
Weekly tips on front-end & UX.
Trusted by 182,000+ folks.
It took me around six months on and off to write the content for the workshop. After a lot of deliberation, I decided to structure it like I do in my book, Form Design Patterns.
It was a 4-day workshop split into two 45-minute segments, with 15-minute breaks followed by a 30-minute Q&A with optional homework between days. Each day we set out to solve one big problem. This provided a way to approach the problem like we do in real life: by analyzing and discussing the options before arriving at a good solution.
Overall, it was a fun experience. I learned a lot and had a great time teaching and chatting with everyone. I’m already looking forward to the next one which is tentatively planned for late 2021.
Some Of The Highlights Of Each Day
Here’s a quick rundown of each day including some of the highlights.
Day 1: Nailing The Basics Of Form Design
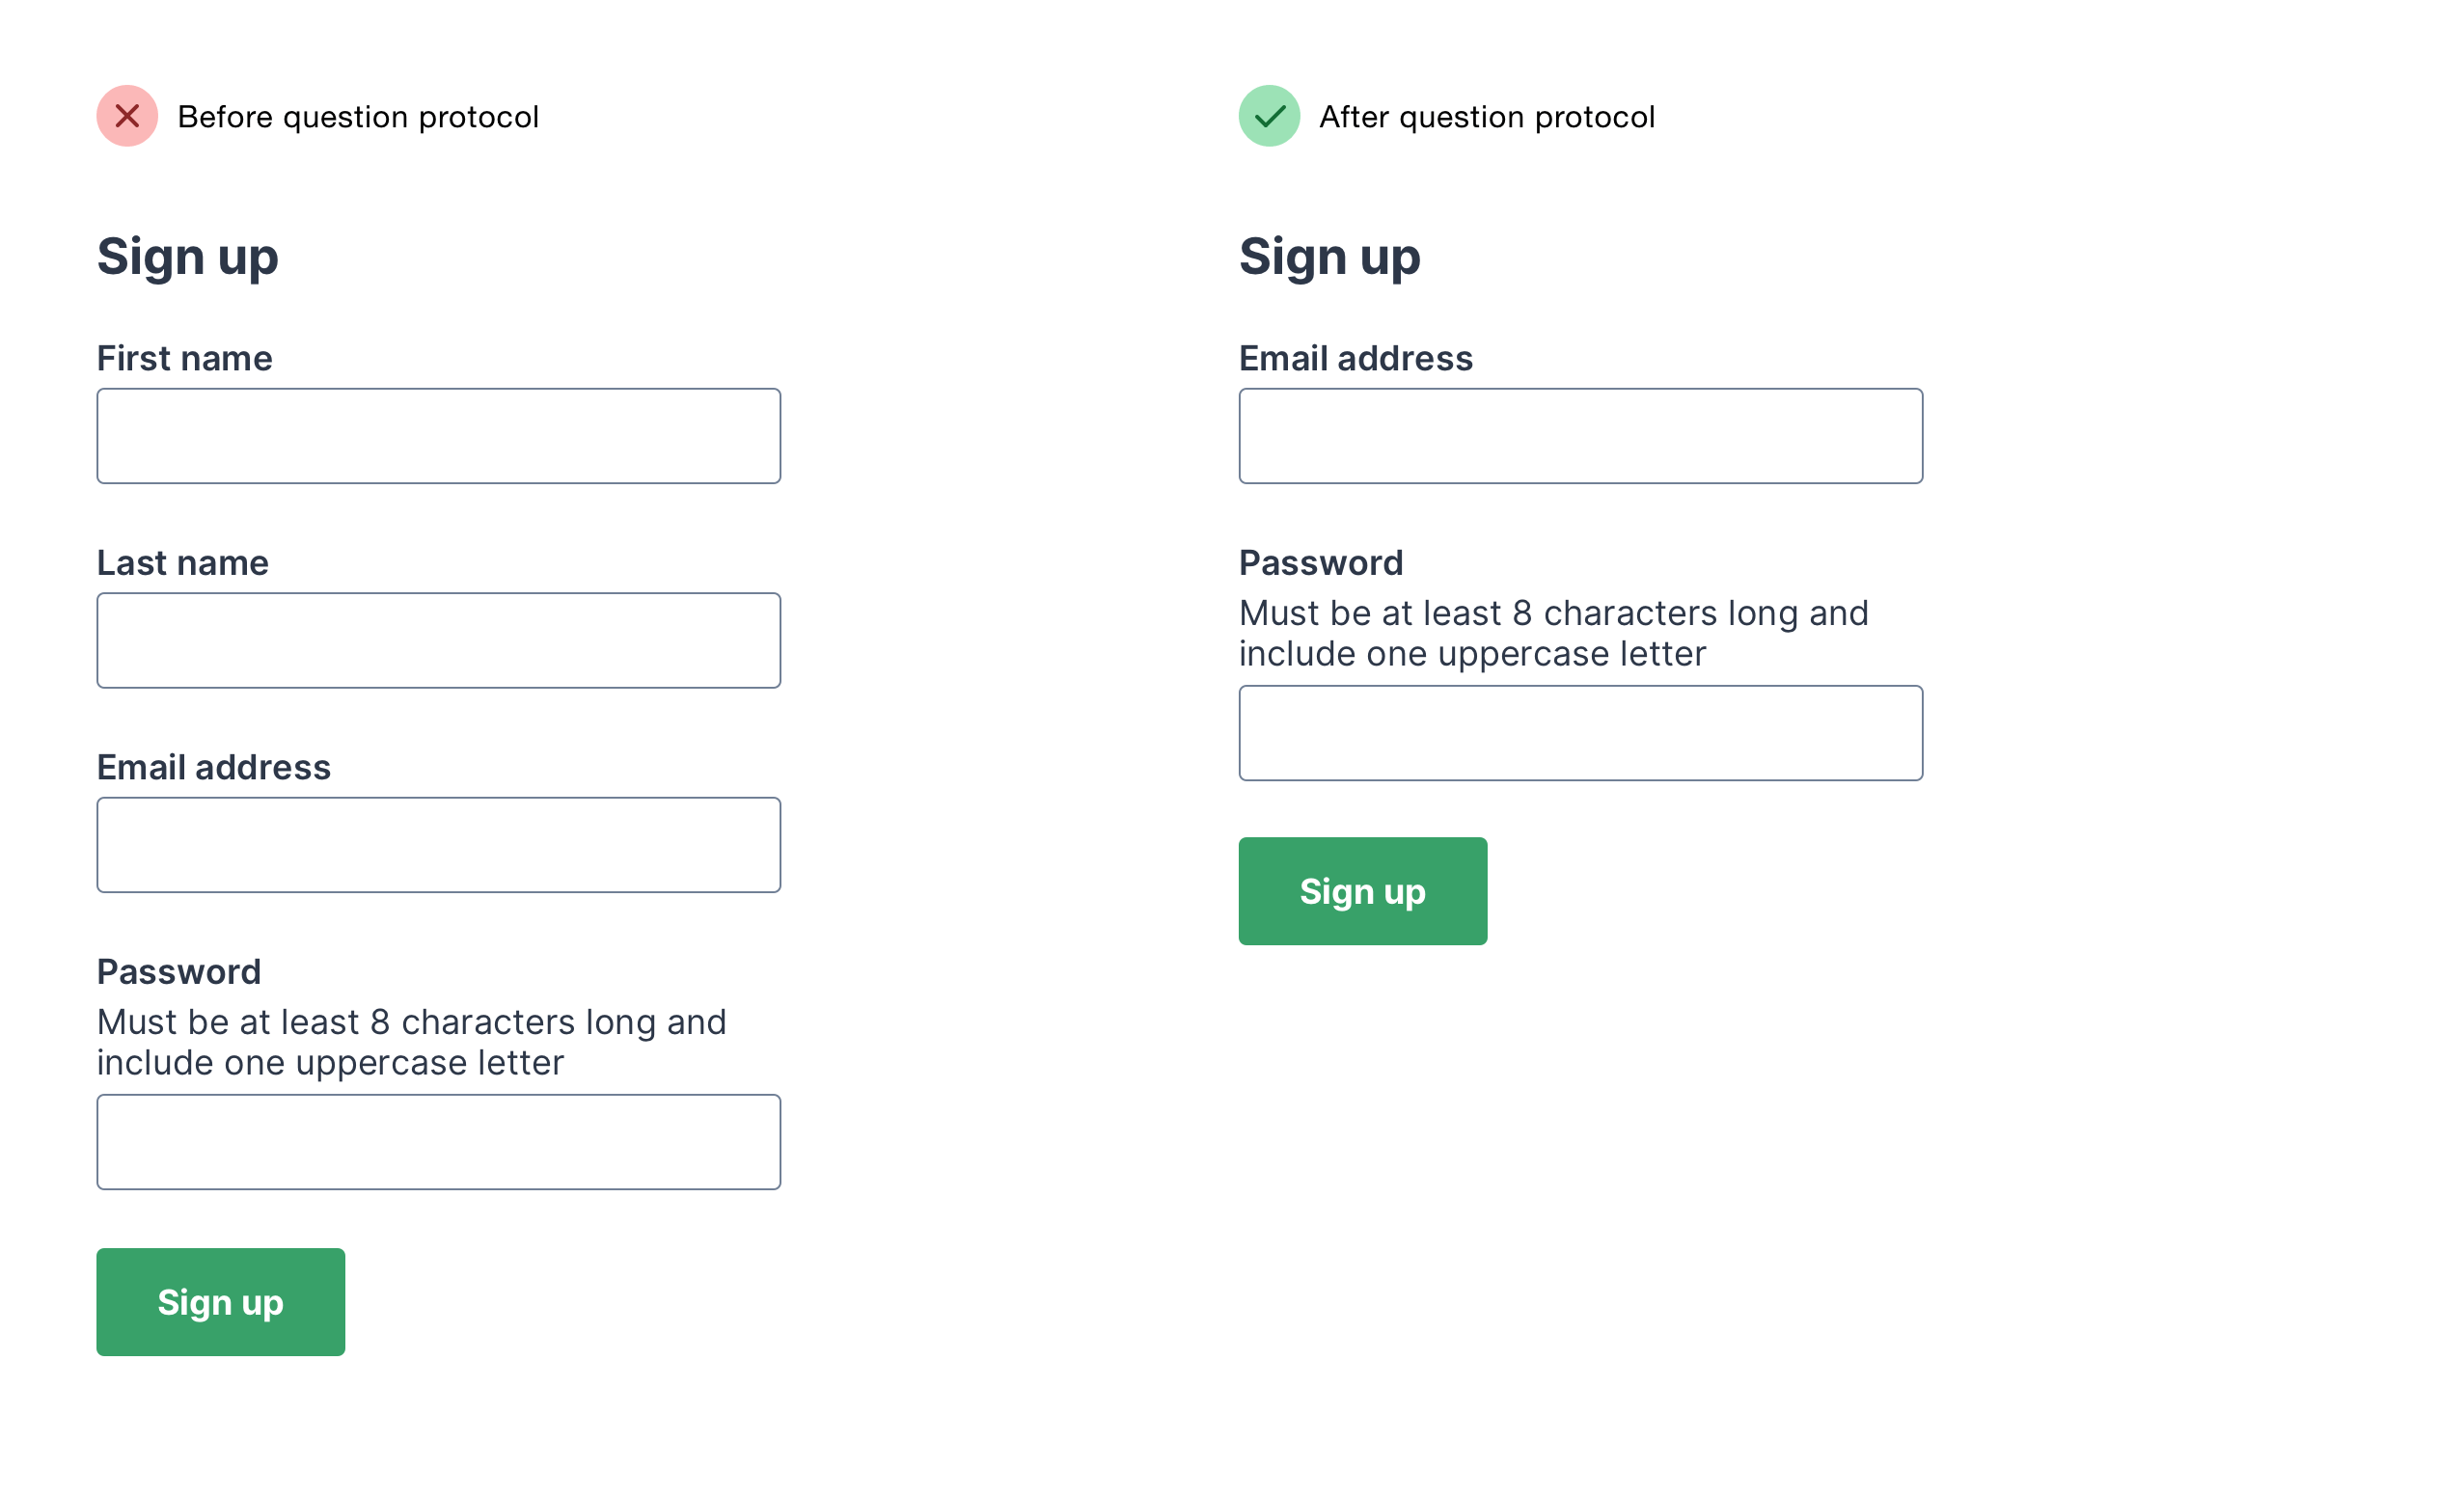
On the first day, we designed a simple registration form from scratch. This provided a perfect way to nail the basics of form design. It covered things like label positioning, form styling and input types. At the end of day 1, we had ourselves a registration form that covered the basics and made the form as simple as possible for users.
My highlight of this session was the question protocol exercise. Instead of focusing on how to artificially save space on forms (by using things like float labels, tooltips, left-aligned labels and placeholder text), we used a spreadsheet to help know why every question is being asked and the best way to elicit the answer.
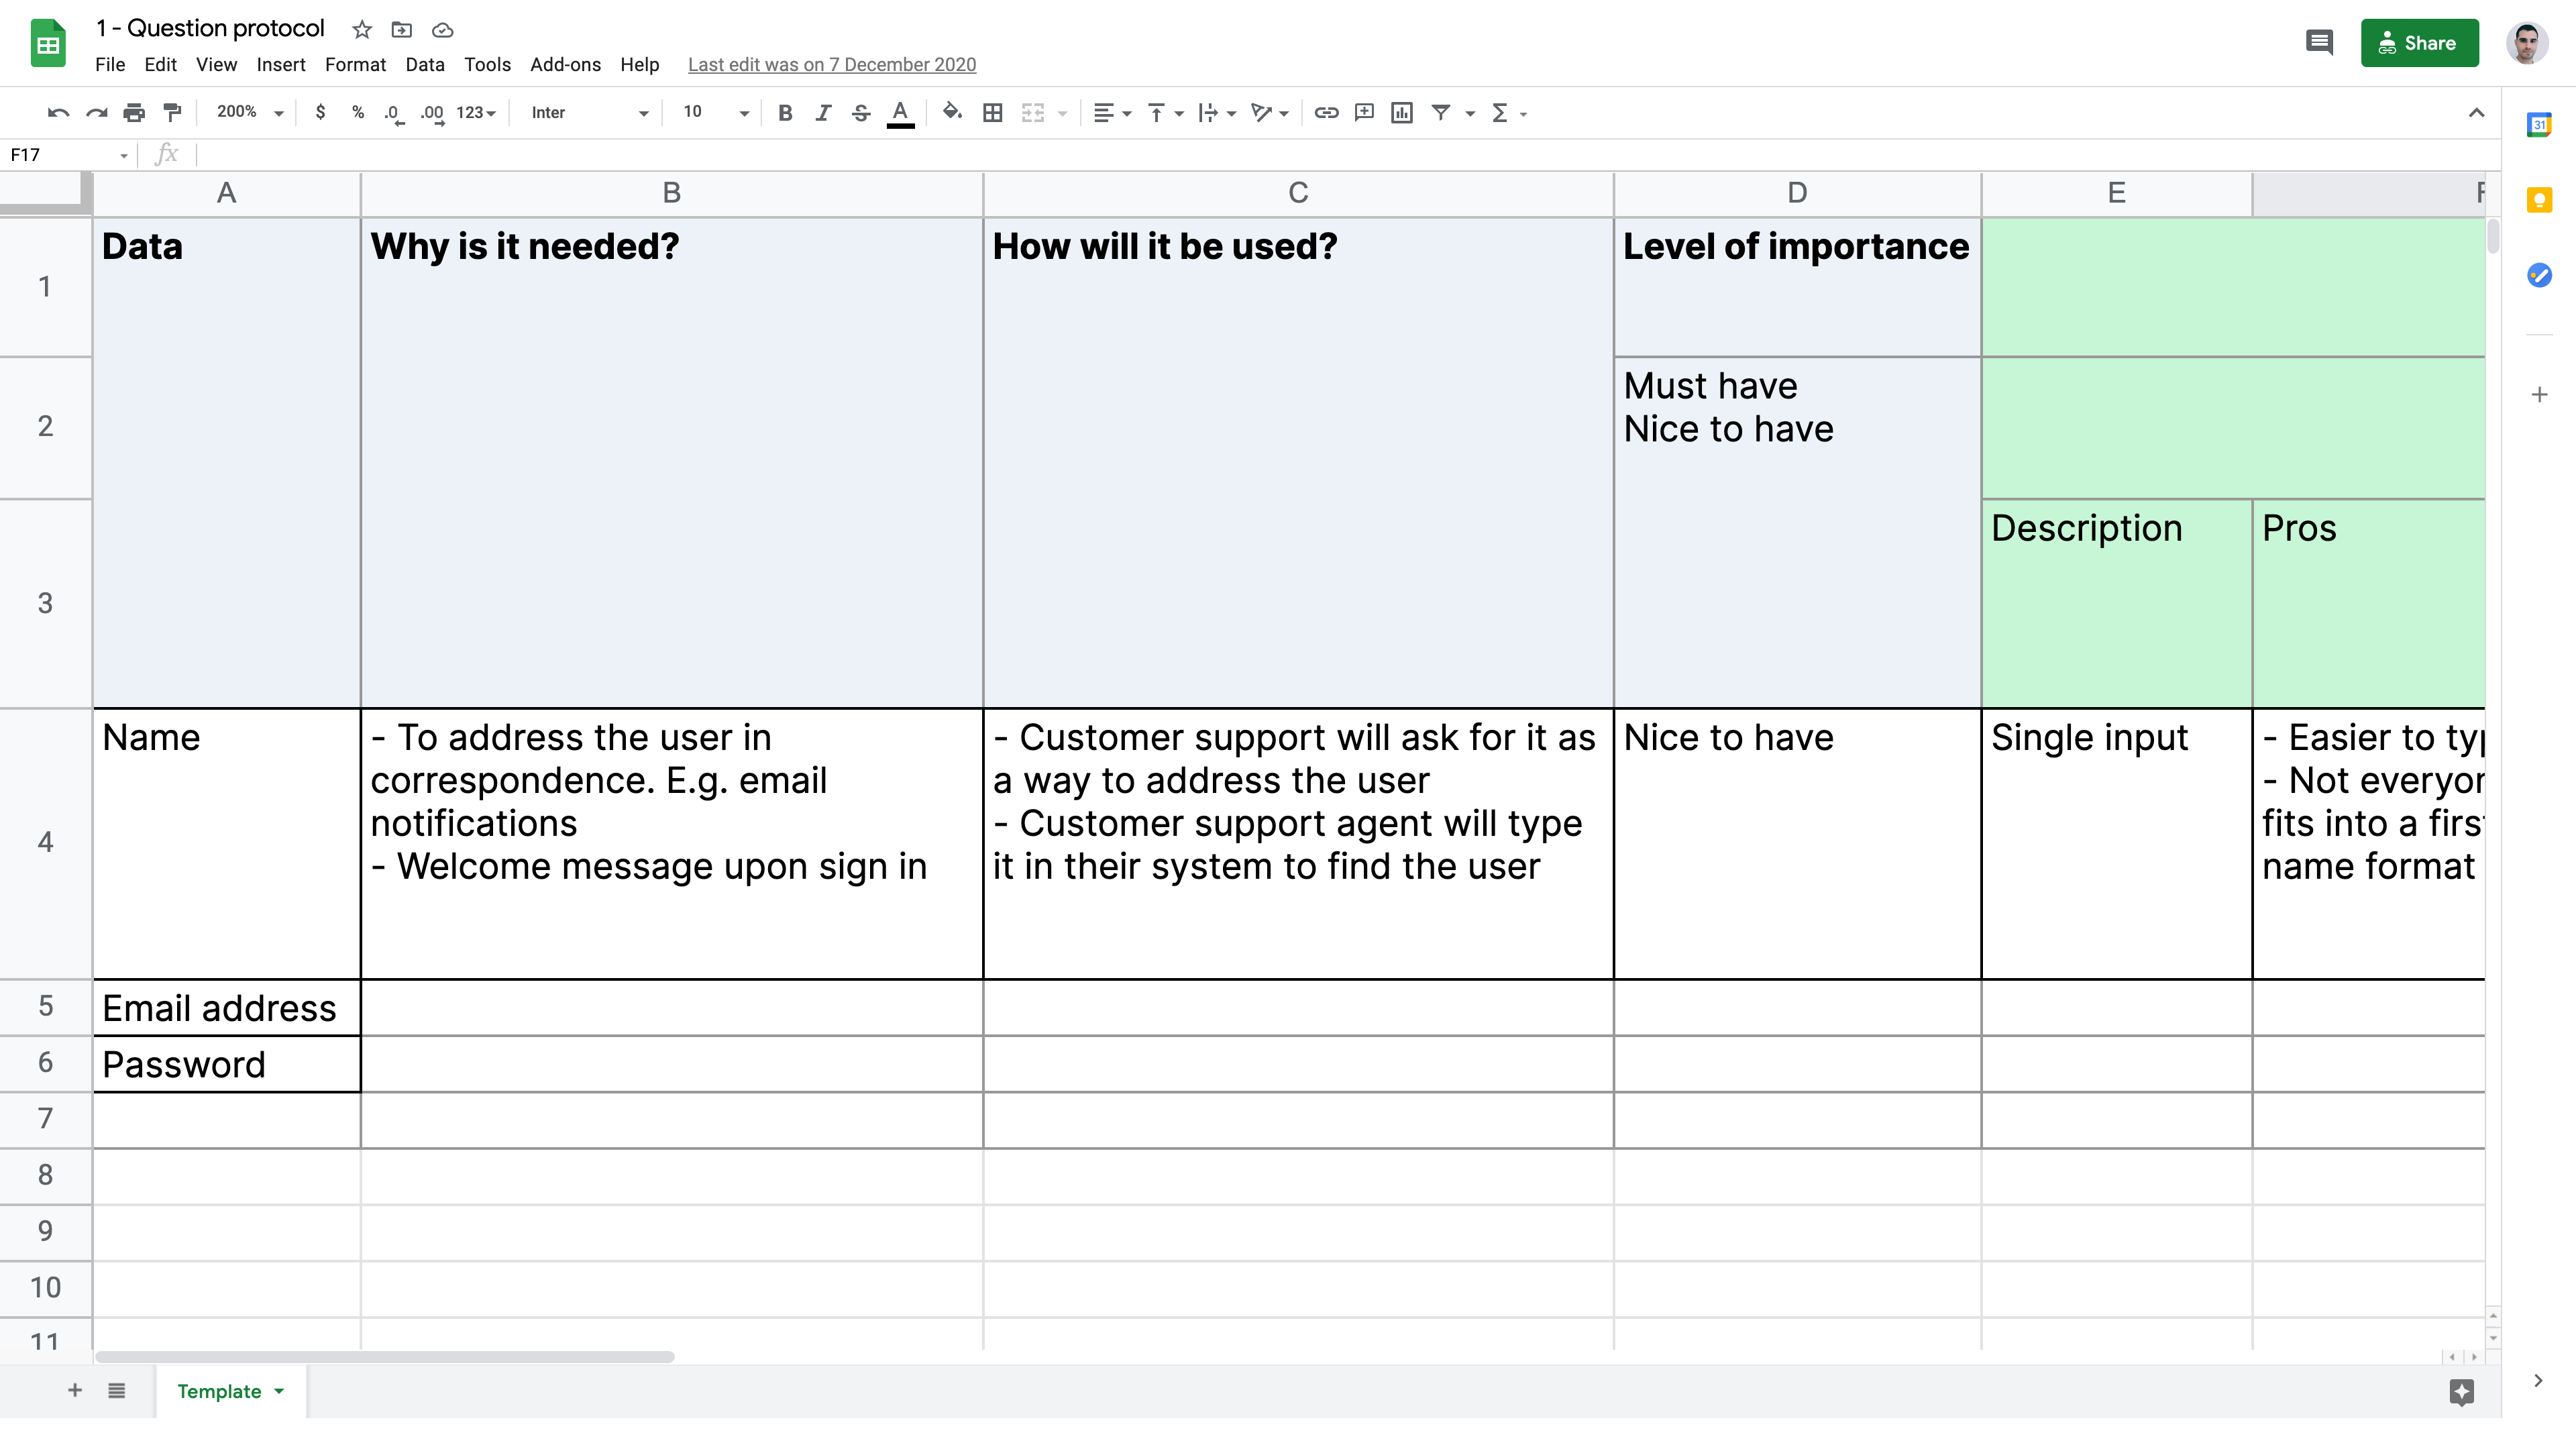
For our registration form, this meant a thorough analysis of asking for someone’s name, email address and password. And by the end of the exercise we had halved the number of form fields and had clear justification for the ones that remained.
Day 2: Form Validation And Writing Good Error Messages
On the second day, we took our well-designed registration form and looked at how to help users recover from errors in two ways:
- We decided when to validate forms and how to display error messages;
- We learnt how to write clear, concise, consistent and specific error messages that help users get back on track quickly.
My highlight of this session was the exercise to redesign the error messages on Smashing Magazine’s very own membership sign up form.
Sophy Colbert, a content designer who attended the workshop, volunteered to share her new error messages explaining her rationale for each one.

Both the messages and the rationale were superb, and I think the group got a lot out of it as they could get an insight into Sophy’s content designer mindset.
Day 3: Redesigning A Real World Checkout Form
On day 3, we redesigned the ASOS checkout flow from scratch. This included guest checkout (first time experience) and checking out as someone with an account (repeat-use experience). We covered a lot of ground such as whether to use tabs, accordions or radio buttons. And we also looked at single page checkouts versus multi-page checkouts.
My highlight of this session was that the process of redesigning several interactions, exposed new content design and service design challenges. For example, we converted the tabs that ask the user to specify whether they have an account or not:
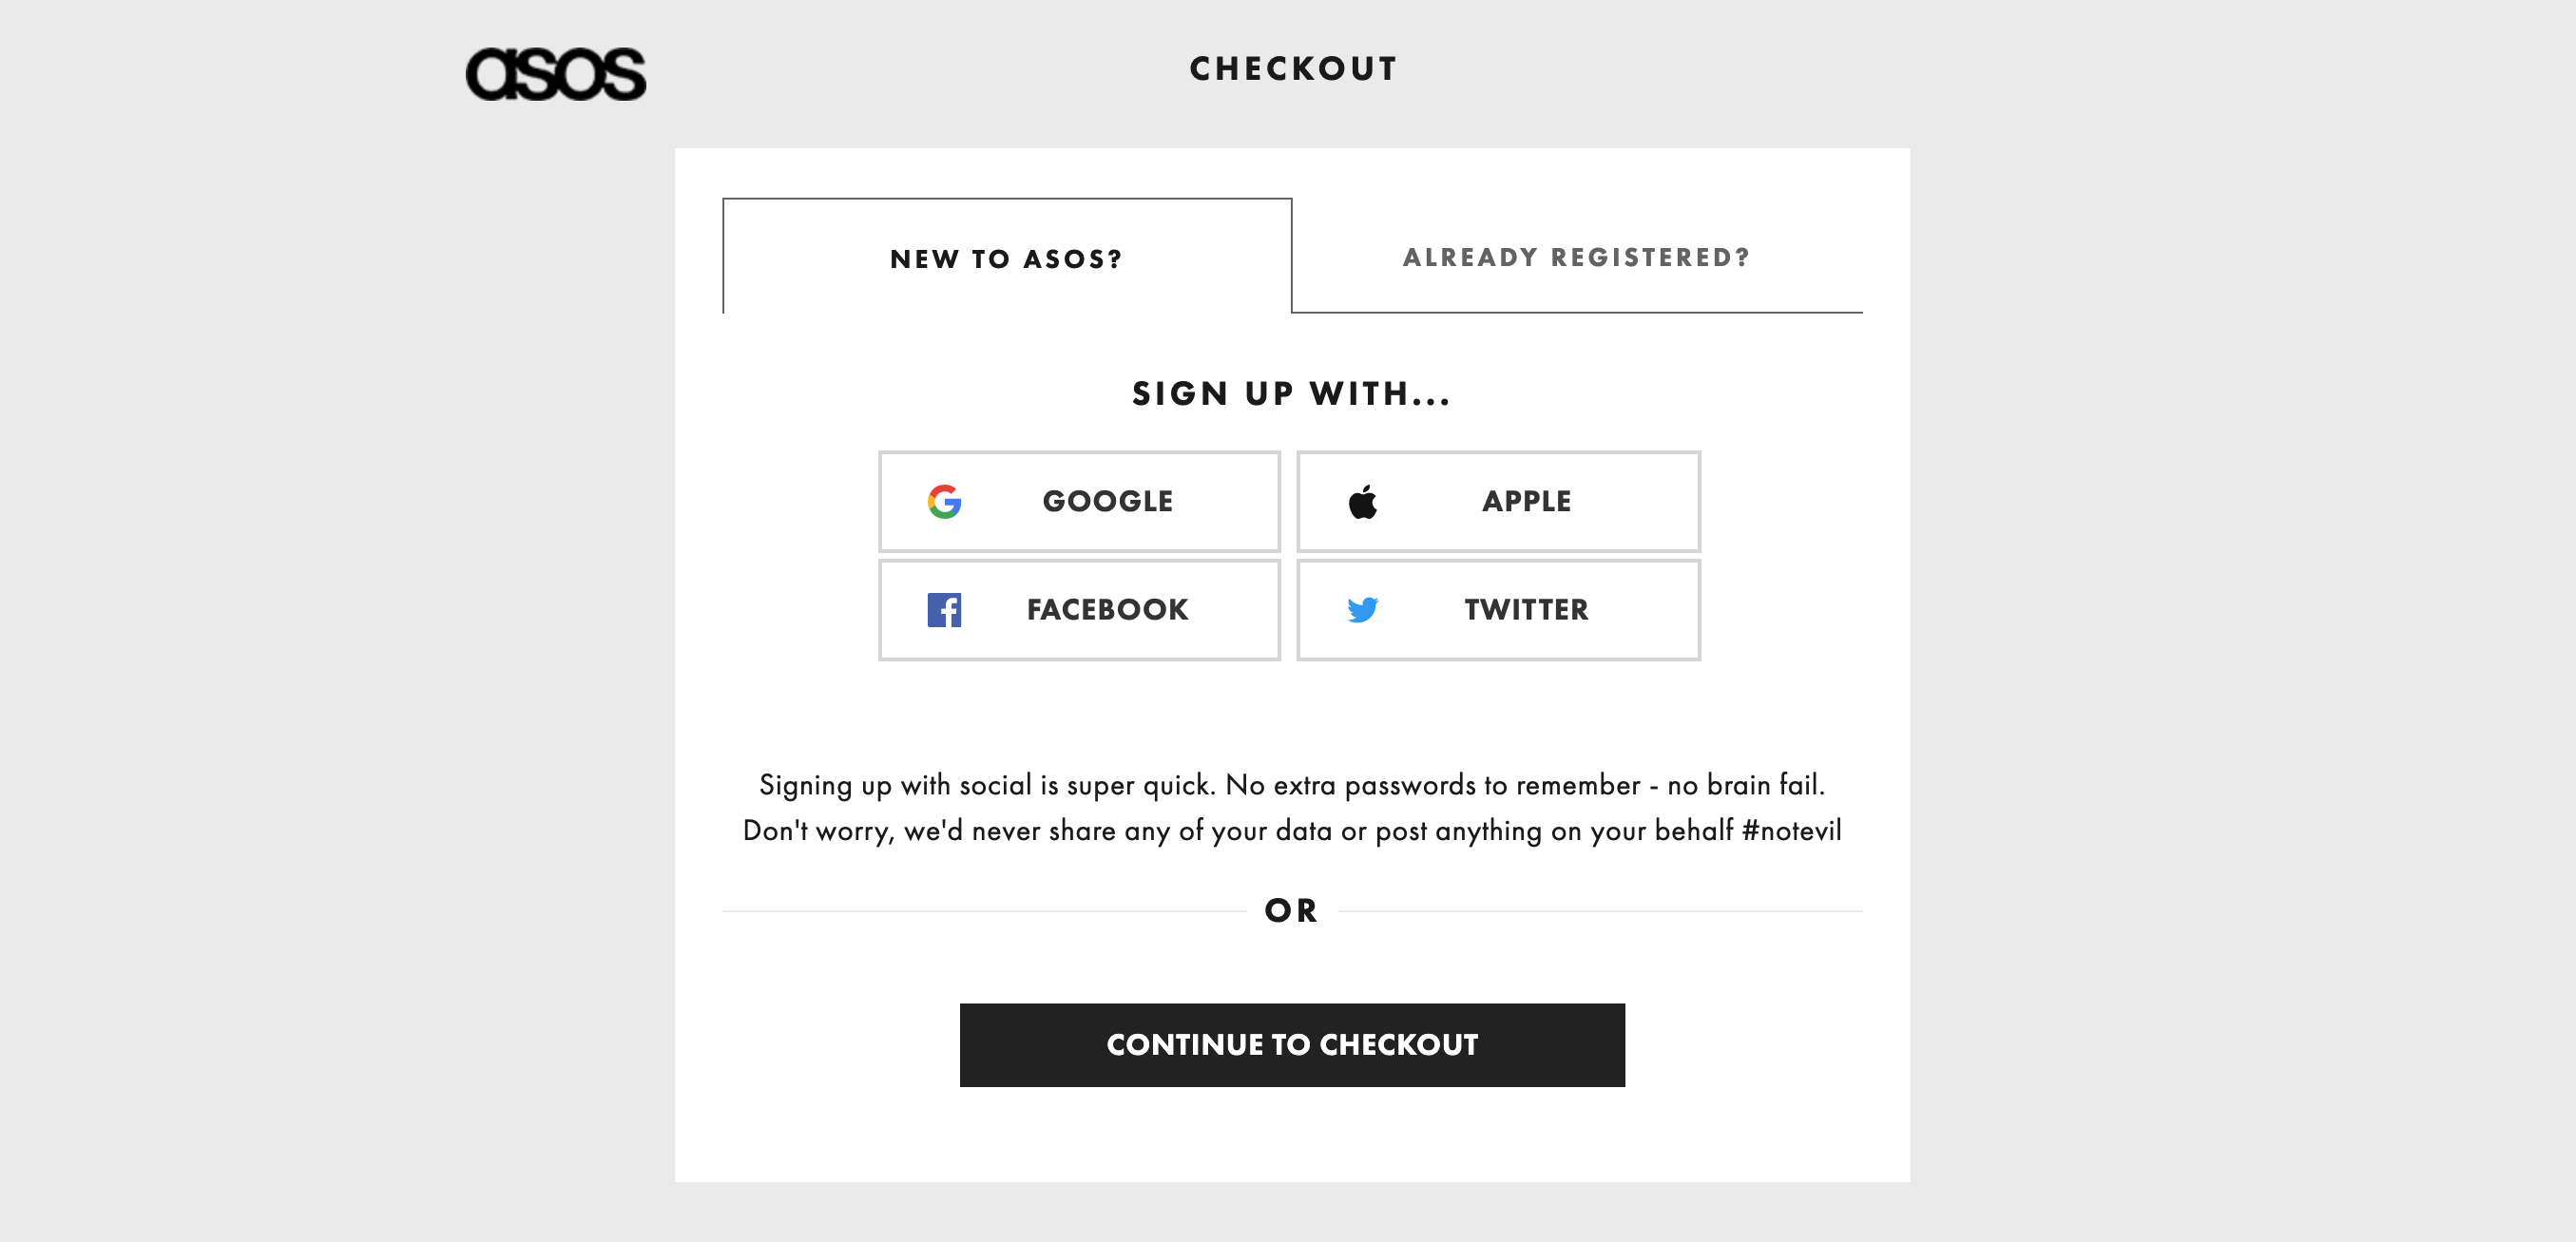
And we redesigned them into a form with radio buttons:
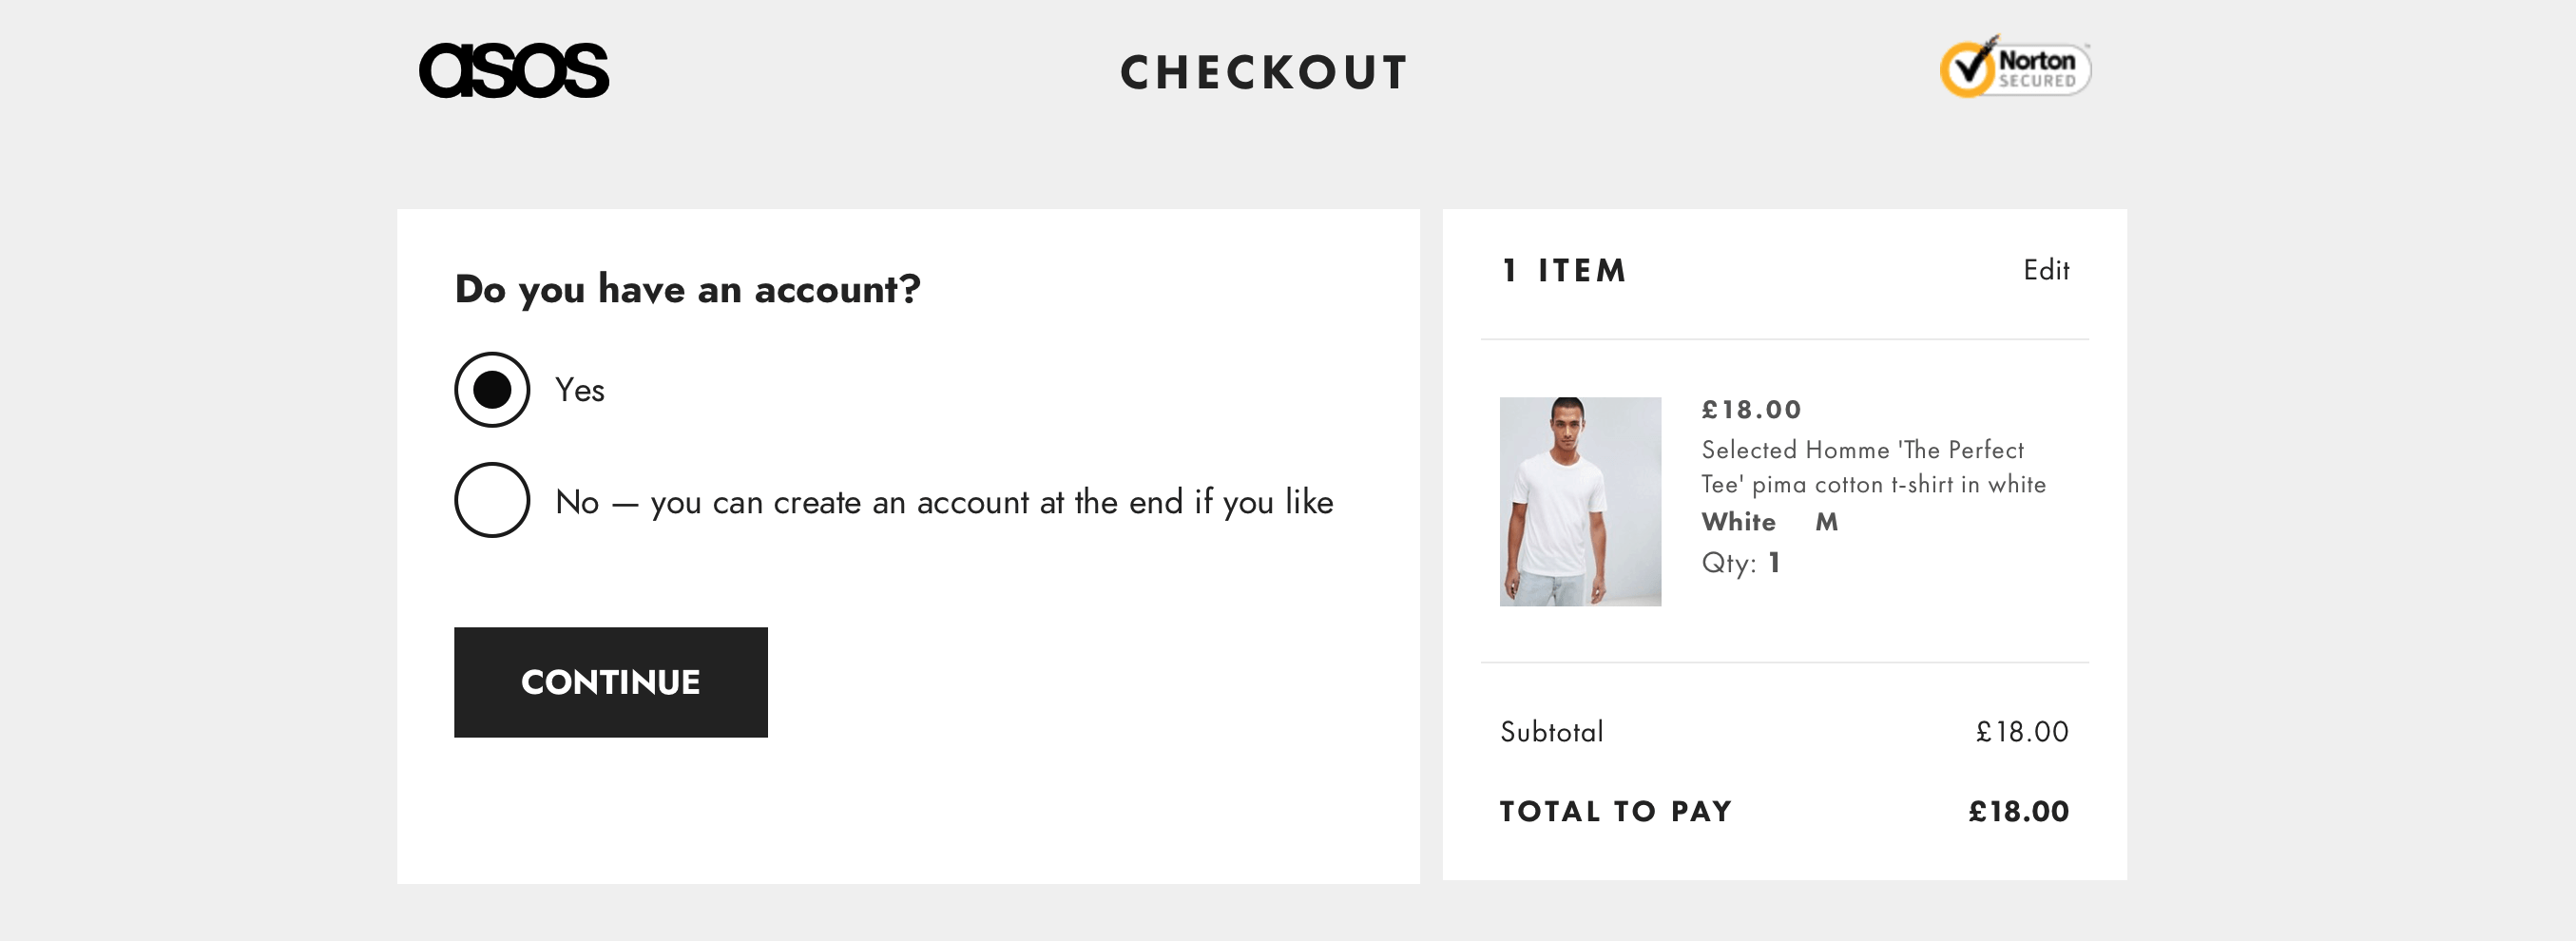
And this exposed the problem that in real life, choices are rarely binary. So I asked the group what the missing option was and they rightly said: ‘What if the user can’t remember?’
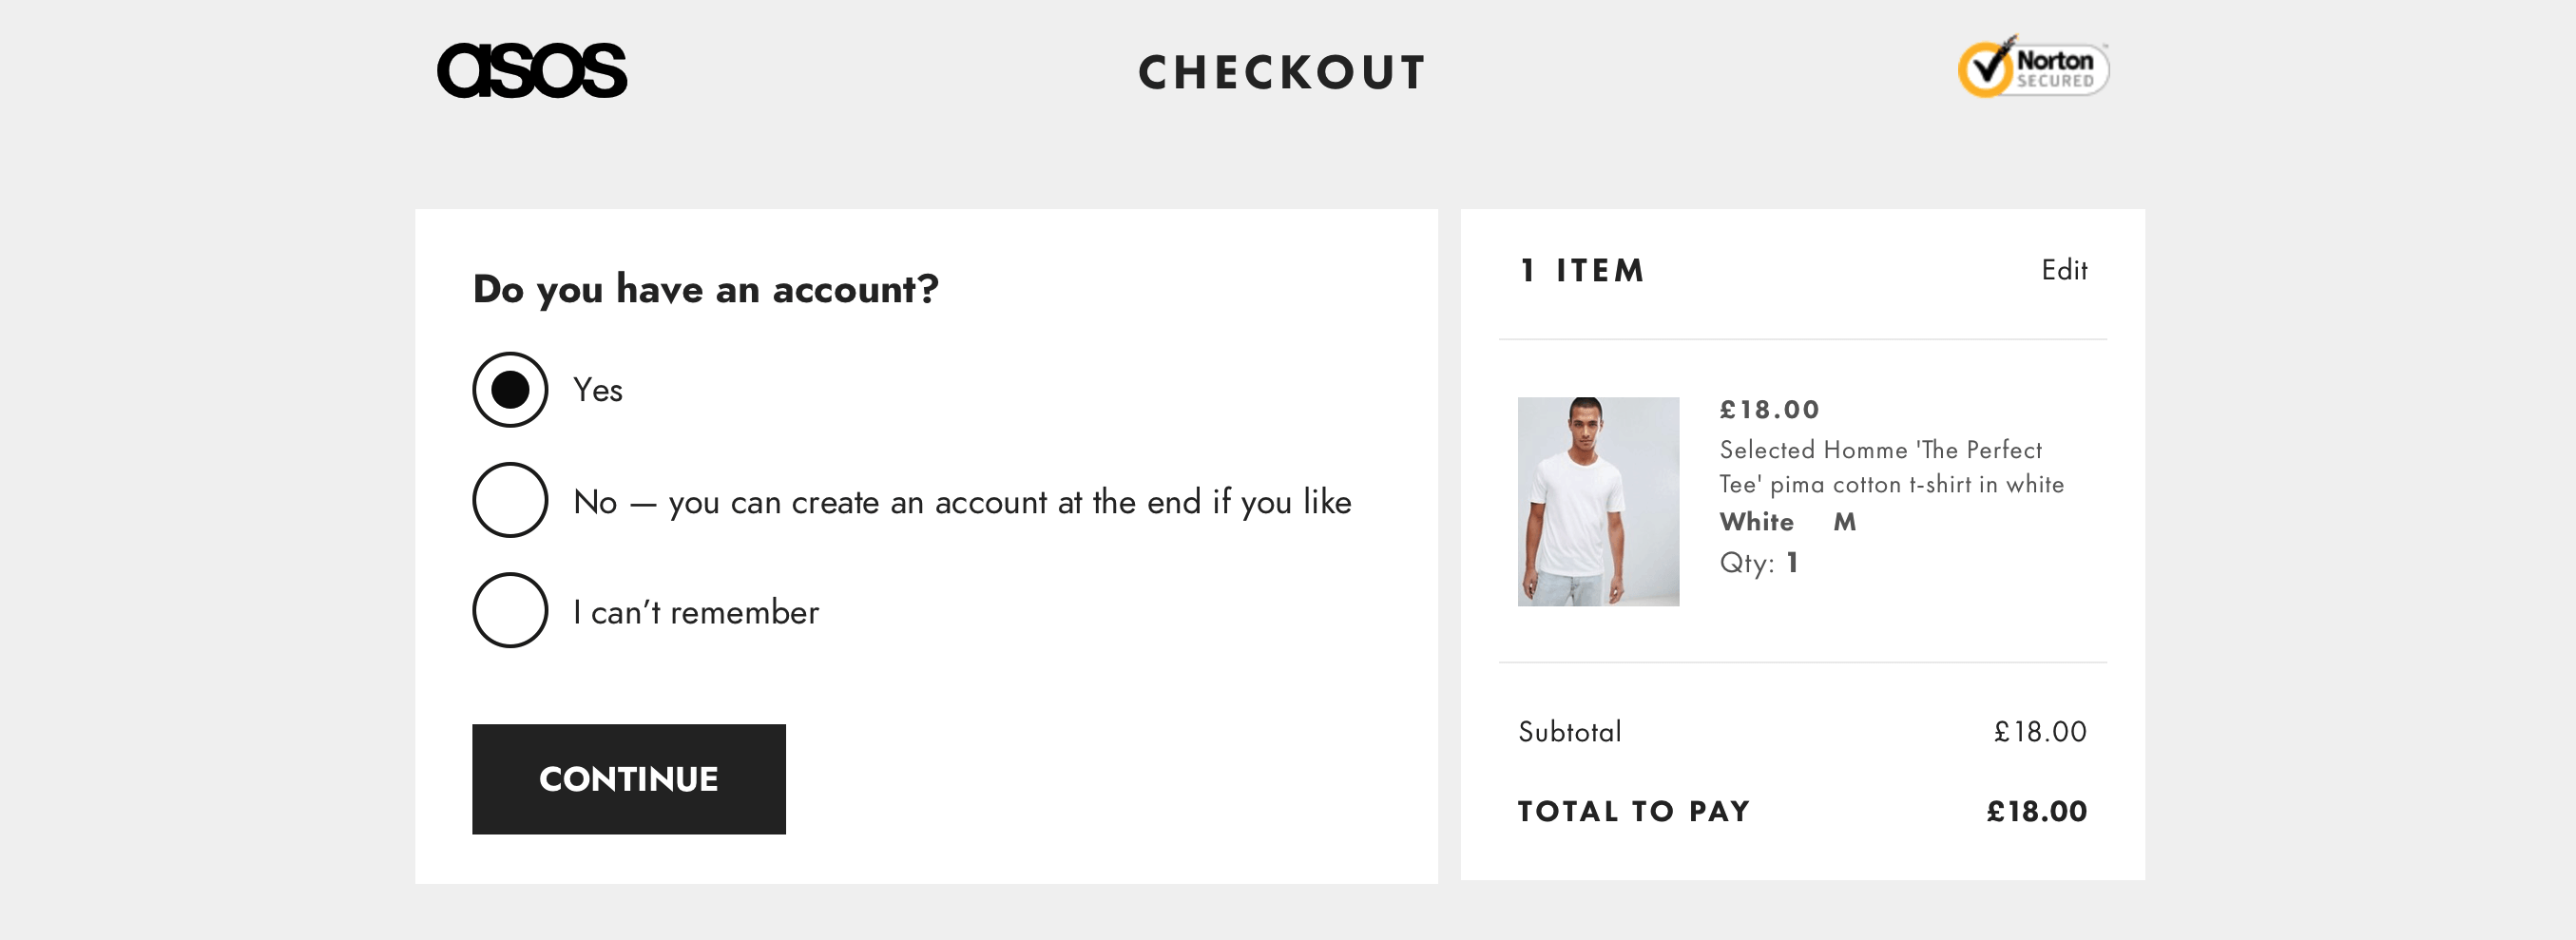
So even though we originally looked at this primarily as an interaction design problem, it became an issue of content and service design.
All of these problems nicely encapsulated one of the form UX rules: ‘Make friends with other departments’. As designers, we have to work effectively with stakeholders across the organisation to make sure we avoid as much complexity as possible. And this again is where the question protocol really shines.
Day 4: Using Shorthand Syntax And Designing Long And Complex Forms
Day 4 was split into two parts which I’ll discuss in reverse order.
In the second part, we looked at various patterns that help users fill out long and complex forms — the kind of forms that take days, weeks or even months to complete. I was really looking forward to running this because the design challenges around this are interesting and not well trodden.
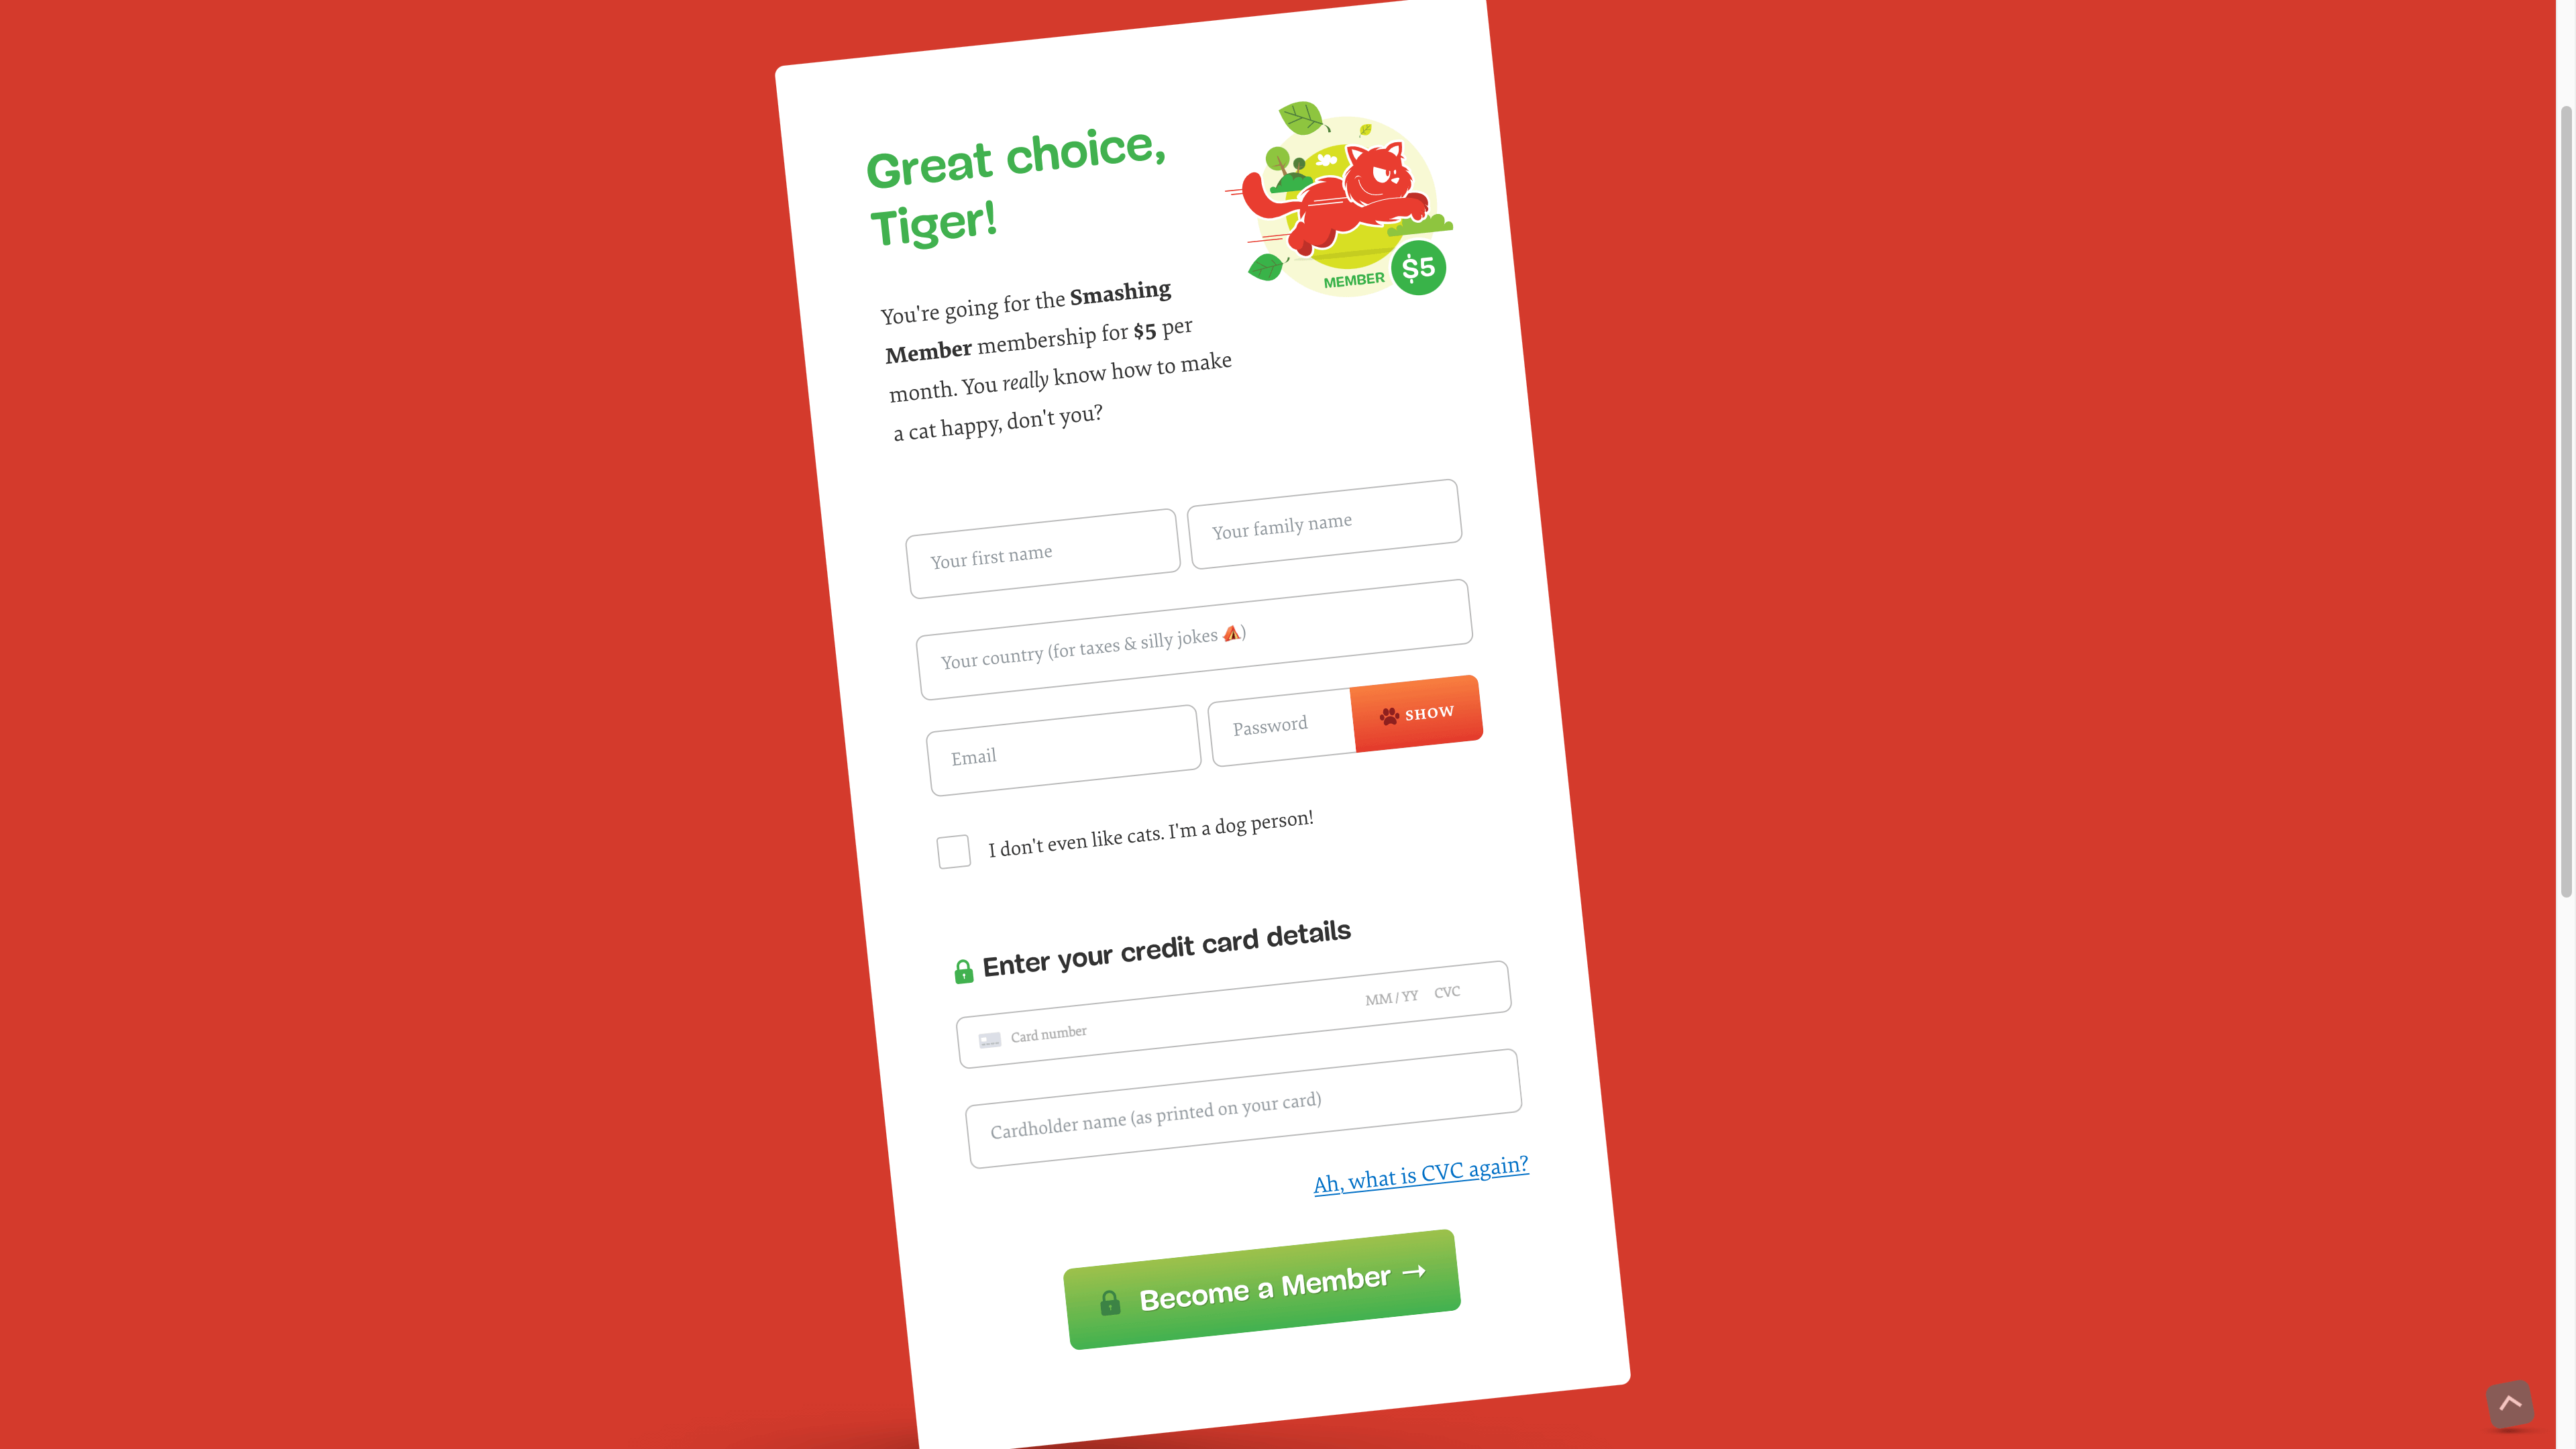
In the first part, we redesigned Smashing Magazine’s registration form using shorthand syntax.
My highlight of this session was that Vitaly, Mr. Smashing Magazine himself, came along to be our business stakeholder. The group asked him questions to work out why the form was designed the way it was and asking why certain questions were asked.
Here are a few examples:
- Sophy O asked why the country field is being asked for. Vitaly said that it depends on what the user is doing. If the user is buying a book, we need to know where it’s going. And the taxes on the book are based on the destination country. This resulted in either removing the field and asking for this information when someone buys the book — or just being clearer in hint text about why we’re asking for this information.
- Milos Lazarevic questioned the need for the ‘Do you like cats?’ checkbox. And Dana Cottreau and Jaclyn Ziegler enjoyed the playfulness of the checkbox. But I would weigh up the joy it brings some people against the risk of alienating people who are, for example, less digitally savvy or are simply in a rush to access the content.
- Emma Stotz questioned the use of live validation given all the usability issues that pop up around that. And Vitaly was keen to explore instantly validating the fields on submit instead.
My Overall Impression
For me, the workshop went very well overall and I was chuffed with the way things went and the feedback I received from the attendees. Everyone was so friendly, and tolerant of a couple of technical difficulties I had on the first day (thanks again, everyone!). Running the workshop remotely over Zoom has its problems (we won’t talk about how I accidentally left the meeting in a panic by accident on day 1), but actually I found the remote aspect useful on the whole.
For example, all being connected to Zoom, meant it was seamless for attendees to ask questions while sharing their screen to bring the problems to life.
I also really enjoyed meeting people across the world, something that would have been difficult with in-person workshops I think. Also, during the break, I got to quickly dash to put my kids to bed, so I imagine that also worked well for the attendees, too.
But there’s one thing I wish I knew earlier. I was worried, that with such a large group of people (81 to be exact), letting people talk freely would end up in a chaos. As a result, on day 1, I read out and answered group’s questions from the shared Google Doc during the Q&A. This meant that other people’s voices weren’t heard and there was more of a barrier between me and the group.
This is something I rectified for day 2 and it really made a difference. It was nice to hear people’s voices and thoughts in their own words and it created more of an open dialogue where other people started to answer other people’s questions which I loved.
I remember Alex Price jumping in once to talk about his experience in dealing with a complicated form that needed to be completed by different people.
What I’ll Change For Next Time
While my overall impression of the workshop was very positive, there were some things I’d look to improve for next time.
1. Show The Basics, Not Learn The Basics
Day 1 covered a lot of the basics before going into greater detail on the following days, but it bothered me a bit to teach some of these things as I thought many attendees knew a lot of this stuff already. So next time I’d like to acknowledge that some people have come with a lot of knowledge and set the scene as ‘this is how I teach the basics’ as opposed to ‘this is how to learn the basics’ — thanks to Caroline Jarrett for this tip.
Also, I’ll probably ask the group if there’s any form design approach that they’ve struggled to convince teammates about as that’s certainly something I’ve struggled with before.
2. Split People Up In Bigger Groups
One of the exercises involved people splitting up into groups of 2 using the Zoom breakout rooms, but because people came to this workshop from all over the world, some of the people listening were not able to take part in the exercises.
For example, some people really needed to take a lunch break because their time zone was ahead of mine. This meant one or two people who did want to participate found themselves in a group on their own. Next time, I’d put people into groups of say 4 and make sure the exercises still work.
3. Add More Group Exercises
Despite the issue I just mentioned, the group exercises worked well. People enjoyed them, and it sparked some really interesting ideas from the participants. Some people messaged me after saying that they wished there were more group exercises, so I’ll aim to do just that.
A Poster Of All The Rules
As we moved through the workshop, we ticked off over 40 rules and principles of form design which brought a nice additional structure to the sessions.
A few of the attendees asked me if I had a poster of all the rules and I didn’t — so now I’ve made one.
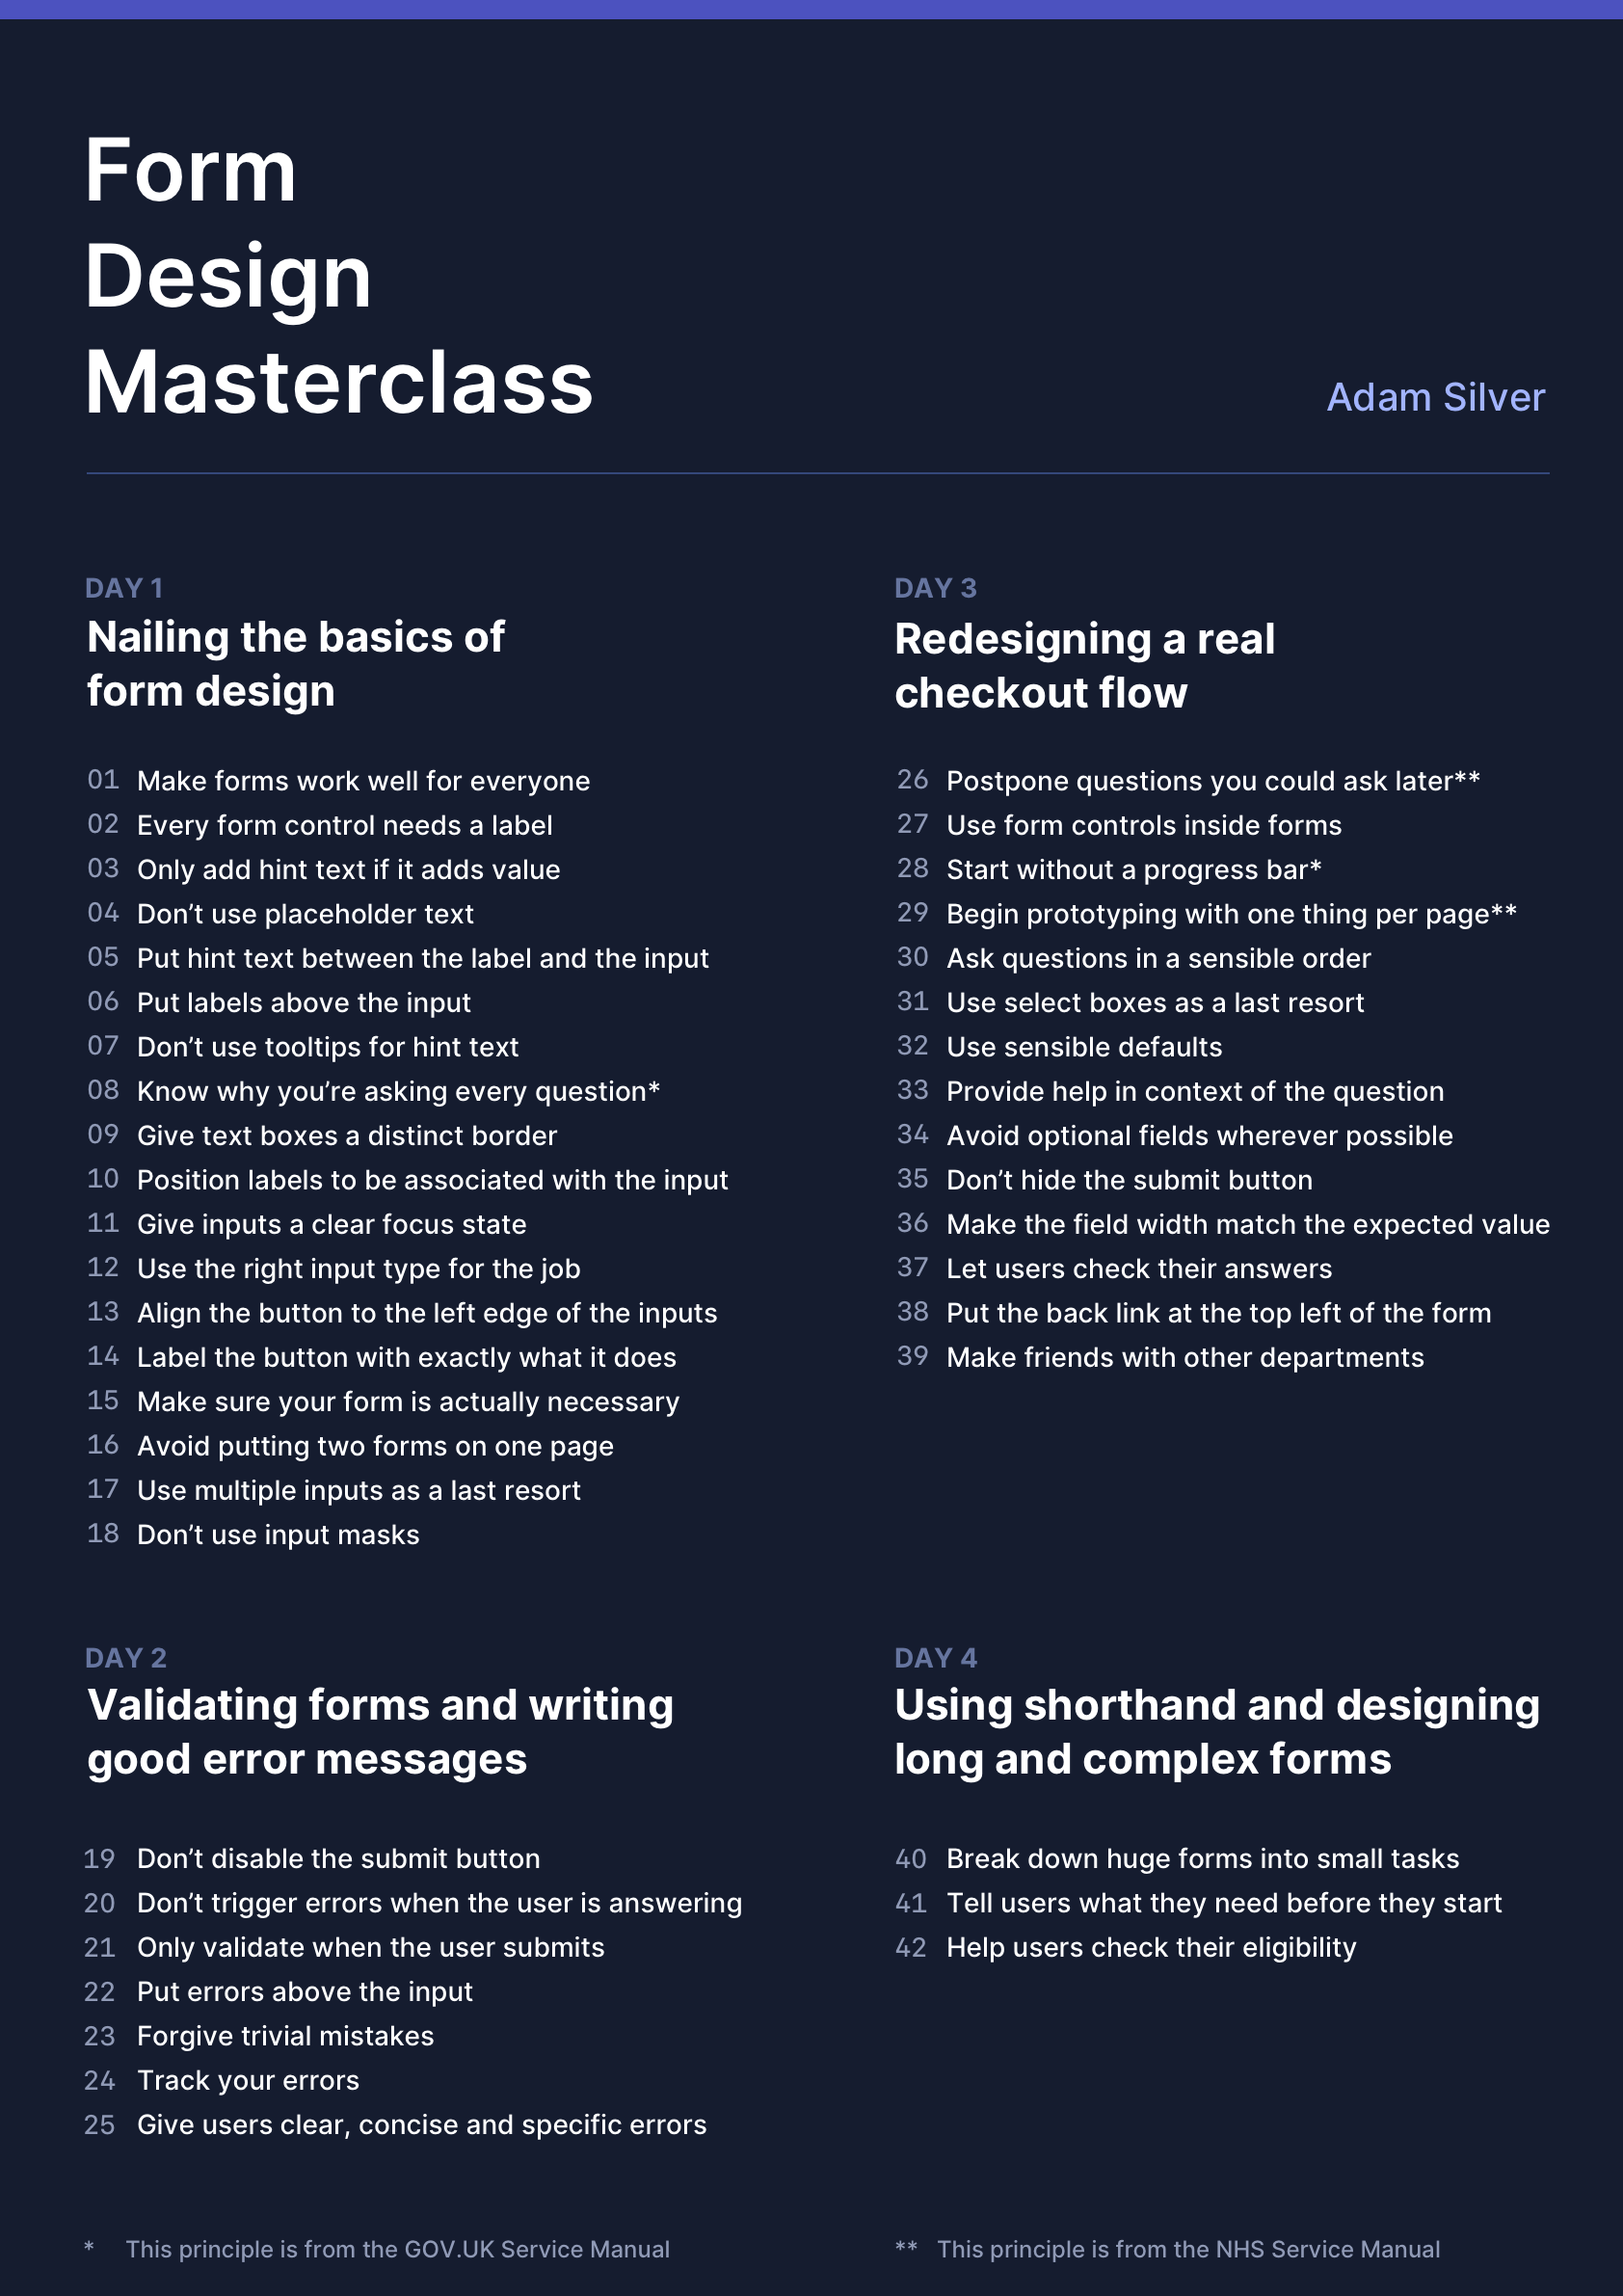
Form Design Masterclass Poster (Plain Text Version)
For your convience, here’s a simple text version of the poster — feel free to adjust it and customize it to your needs.
Day 1: Nailing The Basics Of Form Design
- Make forms work well for everyone
- Every form control needs a label
- Only add hint text if it adds value
- Don’t use placeholder text
- Put hint text between the label and the input
- Put labels above the input
- Don’t use tooltips for hint text
- Know why you’re asking every question*
- Give text boxes a distinct border
- Position labels to be associated with the input
- Give inputs a clear focus state
- Use the right input type for the job
- Align the button to the left edge of the inputs
- Label the button with exactly what it does
- Make sure your form is actually necessary
- Avoid putting two forms on one page
- Use multiple inputs as a last resort
- Don’t use input masks
Day 2: Validating Forms And Writing Good Error Messages
- Don’t disable the submit button
- Don’t trigger errors when the user is answering
- Only validate when the user submits
- Put errors above the input
- Forgive trivial mistakes
- Track your errors
- Give users clear, concise and specific errors
Day 3: Redesigning A Real Checkout Flow
- Postpone questions you could ask later**
- Use form controls inside forms
- Start without a progress bar*
- Begin prototyping with one thing per page**
- Ask questions in a sensible order
- Use select boxes as a last resort
- Use sensible defaults
- Provide help in context of the question
- Avoid optional fields wherever possible
- Don’t hide the submit button
- Make the field width match the expected value
- Let users check their answers
- Put the back link at the top left of the form
- Make friends with other departments
Day 4: Using Shorthand And Designing Long And Complex Forms
- Break down huge forms into small tasks
- Tell users what they need before they start
- Help users check their eligibility
* This principle is from the GOV.UK Service Manual
** This principle is from the NHS Service Manual.
Thanks again to everyone who came for all their contributions. I’m looking forward to the next one.
Thanks to Caroline Jarrett for not only reviewing every detail of my workshop but for also editing this article.
Editor’s Note: You can also check a detailed overview of How We Run Smashing Online Workshops, and if you are interested in attending one, we have plenty of online workshops on front-end & UX coming up soon. We’d love to see you there!
Further Reading
- New Smashing Front-End & UX Workshops
- Useful Email Newsletters For Designers
- The Timeless Power Of Spreadsheets
- Sticky Headers And Full-Height Elements: A Tricky Combination