Get Started With React By Building A Whac-A-Mole Game

Email Newsletter
Weekly tips on front-end & UX.
Trusted by 182,000+ folks.
 Celebrating 10 million developers
 Custom Web Forms for Angular, React, & Vue. Your backend.


I’ve been working with React since ~v0.12 was released. (2014! Wow, where did the time go?) It’s changed a lot. I recall certain “Aha” moments along the way. One thing that’s remained is the mindset for using it. We think about things in a different way as opposed to working with the DOM direct.
For me, my learning style is to get something up and running as fast as I can. Then I explore deeper areas of the docs and everything included whenever necessary. Learn by doing, having fun, and pushing things!
Aim
The aim here is to show you enough React to cover some of those “Aha” moments. Leaving you curious enough to dig into things yourself and create your own apps. I recommend checking out the docs for anything you want to dig into. I won’t be duplicating them.
Please note that you can find all examples in CodePen, but you can also jump to my Github repo for a fully working game.
First App
You can bootstrap a React app in various ways. Below is an example:
import React from 'https://cdn.skypack.dev/react'
import { render } from 'https://cdn.skypack.dev/react-dom'

const App = () => <h1>{`Time: ${Date.now()}`}</h1>

render(<App/>, document.getElementById('app')
See the Pen Your First React App by @jh3y.
This is pretty much all you need to create your first React app (besides the HTML) to get started. But, we could make this smaller, like so:
render(<h1>{`Time: ${Date.now()}`}</h1>, document.getElementById('app'))
In the first version, App is a component, but this example tells React DOM to render an element instead of a component. Elements are the HTML elements we see in both examples. What makes a component, is a function returning those elements
Before we get started with components, what’s the deal with this “HTML in JS”?
JSX
That “HTML in JS” is JSX. You can read all about JSX in the React documentation. The gist? A syntax extension to JavaScript that allows us to write HTML in JavaScript. It’s like a templating language with full access to JavaScript powers. It’s actually an abstraction on an underlying API. Why do we use it? For most, it’s easier to follow and comprehend than the equal.
React.createElement('h1', null, `Time: ${Date.now()}`)The thing to take on board with JSX is that this is how you put things in the DOM 99% of the time with React. And it’s also how we bind event handling a lot of the time. That other 1% is a little out of scope for this article. But, sometimes we want to render elements outside the realms of our React application. We can do this using React DOM’s Portal. We can also get direct access to the DOM within the component lifecycle (coming up).
Attributes in JSX are camelCase. For example, onclick becomes onClick. There are some special cases such as class which becomes className. Also, attributes such as style now accept an Object instead of a string.
<div className="awesome-class" style={{ color: 'red' }}>Cool</div>
Note: You can check out all the differences in attributes here.
Rendering
How do we get our JSX into the DOM? We need to inject it. In most cases, our apps have a single point of entry. And if we are using React, we use React DOM to insert an element/component at that point. You could use JSX without React though. As we mentioned, it’s a syntax extension. You could change how JSX gets interpreted by Babel and have it pump out something different.
Everything within becomes managed by React. This can yield certain performance benefits when we are modifying the DOM a lot. This is because React makes use of a Virtual DOM. Making DOM updates isn’t slow by any means. But, it’s the impact it has within the browser that can impact performance. Each time we update the DOM, browsers need to calculate the rendering changes that need to take place. That can be expensive. Using the Virtual DOM, these DOM updates get kept in memory and synced with the browser DOM in batches when required.
There’s nothing to stop us from having many apps on a page or having only part of a page managed by React.
See the Pen Two Apps by @jh3y.
Take this example. The same app is rendered twice between some regular HTML. Our React app renders the current time using Date.now.
const App = () => <h1>{`Time: ${Date.now()}`}</h1>
For this example, we’re rendering the app twice between some regular HTML. We should see the title “Many React Apps” followed by some text, then the first rendering of our app appears followed by some text, and then the second rendering of our app.
For a deeper dive into rendering, check out the docs.
Components && Props
This is one of the biggest parts of React to grok. Components are reusable blocks of UI. But underneath, it’s all functions. Components are functions whose arguments we refer to as props. And we can use those “props” to determine what a component should render. Props are “read-only” and you can pass anything in a prop. Even other components. Anything within the tags of a component we access via a special prop, children.
Components are functions that return elements. If we don’t want to show anything, return null.
We can write components in a variety of ways. But, it’s all the same result.
Use a function:
function App() {
  return <h1>{`Time: ${Date.now()}`}</h1>
}
Use a class:
class App extends React.Component {
  render() {
    return <h1>{`Time: ${Date.now()}`}</h1>
  }
}
Before the release of hooks(coming up), we used class-based components a lot. We needed them for state and accessing the component API. But, with hooks, the use of class-based components has petered out a bit. In general, we always opt for function-based components now. This has various benefits. For one, it requires less code to achieve the same result. Hooks also make it easier to share and reuse logic between components. Also, classes can be confusing. They need the developer to have an understanding of bindings and context.
We’ll be using function-based and you’ll notice we used a different style for our App component.
const App = () => <h1>{`Time: ${Date.now()}`}</h1>
That’s valid. The main thing is that our component returns what we want to render. In this case, a single element that is a h1 displaying the current time. If we don’t need to write return, etc. then don’t. But, it’s all preference. And different projects may adopt different styles.
What if we updated our multi-app example to accept props and we extract the h1 as a component?
const Message = ({ message }) => <h1>{message}</h1>
const App = ({ message }) => <Message message={message} />
render(<App message={`Time: ${Date.now()}`}/>, document.getElementById('app'))
See the Pen Our First Component Extraction by @jh3y.
That works and now we can change the message prop on App and we’d get different messages rendered. We could’ve made the component Time. But, creating a Message component implies many opportunities to reuse our component. This is the biggest thing about React. It’s about making decisions around architecture/design.
What if we forget to pass the prop to our component? We could provide a default value. Some ways we could do that.
const Message = ({message = "You forgot me!"}) => <h1>{message}</h1>
Or by specifying defaultProps on our component. We can also provide propTypes which is something I’d recommend having a look at. It provides a way to type check props on our components.
Message.defaultProps = {
  message: "You forgot me!"
}
We can access props in different ways. We’ve used ES6 conveniences to destructure props. But, our Message component could also look like this and work the same.
const Message = (props) => <h1>{props.message}</h1>
Props are an object passed to the component. We can read them any way we like.
Our App component could even be this:
const App = (props) => <Message {...props}/>
It would yield the same result. We refer to this as “Prop spreading”. It’s better to be explicit with what we pass through though.
We could also pass the message as a child.
const Message = ({ children }) => <h1>{children}</h1>
const App = ({ message }) => <Message>{message}</Message>
Then we refer to the message via the special children prop.
How about taking it further and doing something like have our App pass a message to a component that is also a prop.
const Time = ({ children }) => <h1>{`Time: ${children}`}</h1>

const App = ({ message, messageRenderer: Renderer }) => <Renderer>{message}</Renderer>

render(<App message={`${Date.now()}`} messageRenderer={Time} />, document.getElementById('app'))
See the Pen Passing Components as Props by @jh3y.
In this example, we create two apps and one renders the time and another a message. Note how we rename the messageRenderer prop to Renderer in the destructure? React won’t see anything starting with a lowercase letter as a component. That’s because anything starting in lowercase is seen as an element. It would render it as <messageRenderer>. We’ll rarely use this pattern but it’s a way to show how anything can be a prop and you can do what you want with it.
One thing to make clear is that anything passed as a prop needs processing by the component. For example, want to pass styles to a component, you need to read them and apply them to whatever is being rendered.
Don’t be afraid to experiment with different things. Try different patterns and practice. The skill of determining what should be a component comes through practice. In some cases, it’s obvious, and in others, you might realize it later and refactor.
A common example would be the layout for an application. Think at a high level what that might look like. A layout with children that comprises of a header, footer, some main content. How might that look? It could look like this.
const Layout = ({ children }) => (
  <div className="layout">
    <Header/>
    <main>{children}</main>
    <Footer/>
  </div>
)
It’s all about building blocks. Think of it like LEGO for apps.
In fact, one thing I’d advocate is getting familiar with Storybook as soon as possible (I’ll create content on this if people would like to see it). Component-driven development isn’t unique to React, we see it in other frameworks too. Shifting your mindset to think this way will help a lot.
Making Changes
Up until now, we’ve only dealt with static rendering. Nothing changes. The biggest thing to take on board for learning React is how React works. We need to understand that components can have state. And we must understand and respect that state drives everything. Our elements react to state changes. And React will only re-render where necessary.
Data flow is unidirectional too. Like a waterfall, state changes flow down the UI hierarchy. Components don’t care about where the data comes from. For example, a component may want to pass state to a child through props. And that change may trigger an update to the child component. Or, components may choose to manage their own internal state which isn’t shared.
These are all design decisions that get easier the more you work with React. The main thing to remember is how unidirectional this flow is. To trigger changes higher up, it either needs to happen via events or some other means passed by props.
Let’s create an example.
import React, { useEffect, useRef, useState } from 'https://cdn.skypack.dev/react'
import { render } from 'https://cdn.skypack.dev/react-dom'

const Time = () => {
  const [time, setTime] = useState(Date.now())
  const timer = useRef(null)
  useEffect(() => {
    timer.current = setInterval(() => setTime(Date.now()), 1000)
    return () => clearInterval(timer.current)
  }, [])
  return <h1>{`Time: ${time}`}</h1>
}

const App = () => <Time/>

render(<App/>, document.getElementById('app'))
See the Pen An Updating Timer by @jh3y.
There is a fair bit to digest there. But, here we introduce the use of “Hooks”. We are using “useEffect”, “useRef”, and “useState”. These are utility functions that give us access to the component API.
If you check the example, the time is updating every second or 1000ms. And that’s driven by the fact we update the time which is a piece of state. We are doing this within a setInterval. Note how we don’t change time directly. State variables are treated as immutable. We do it through the setTime method we receive from invoking useState. Every time the state updates, our component re-renders if that state is part of the render. useState always returns a state variable and a way to update that piece of state. The argument passed is the initial value for that piece of state.
We use useEffect to hook into the component lifecycle for events such as state changes. Components mount when they’re inserted into the DOM. And they get unmounted when they’re removed from the DOM. To hook into these lifecycle stages, we use effects. And we can return a function within that effect that will fire when the component gets unmounted. The second parameter of useEffect determines when the effect should run. We refer to it as the dependency array. Any listed items that change will trigger the effect to run. No second parameter means the effect will run on every render. And an empty array means the effect will only run on the first render. This array will usually contain state variables or props.
We are using an effect to both set up and tear down our timer when the component mounts and unmounts.
We use a ref to reference that timer. A ref provides a way to keep a reference to things that don’t trigger rendering. We don’t need to use state for the timer. It doesn’t affect rendering. But, we need to keep a reference to it so we can clear it on unmount.
Want to dig into hooks a bit before moving on? I wrote an article before about them – “React Hooks in 5 Minutes”. And there’s also great info in the React docs.
Our Time component has its own internal state that triggers renders. But, what if we wanted to change the interval length? We could manage that from above in our App component.
const App = () => {
  const [interval, updateInterval] = useState(1000)
  return (
    <Fragment>
      <Time interval={interval} />
      <h2>{`Interval: ${interval}`}</h2>
      <input type="range" min="1" value={interval} max="10000" onChange={e => updateInterval(e.target.value)}/>
    </Fragment>
  )
}
Our new interval value is being stored in the state of App. And it dictates the rate at which the Time component updates.
The Fragment component is a special component we have access to through React. In React, a component must return a single child or null. We can’t return adjacent elements. But, sometimes we don’t want to wrap our content in a div. Fragments allow us to avoid wrapper elements whilst keeping React happy.
You’ll also notice our first event bind happening there. We use onChange as an attribute of the input to update the interval.
The updated interval is then passed to Time and the change of interval triggers our effect to run. This is because the second parameter of our useEffect hook now contains interval.
const Time = ({ interval }) => {
  const [time, setTime] = useState(Date.now())
  const timer = useRef(null)
  useEffect(() => {
    timer.current = setInterval(() => setTime(Date.now()), interval)
    return () => clearInterval(timer.current)
  }, [interval])
  return <h1>{`Time: ${time}`}</h1>
}
Have a play with the demo and see the changes!
See the Pen Managed Interval by @jh3y.
I recommend visiting the React documentation if you want to dig into some of these concepts more. But, we’ve seen enough React to get started making something fun! Let’s do it!
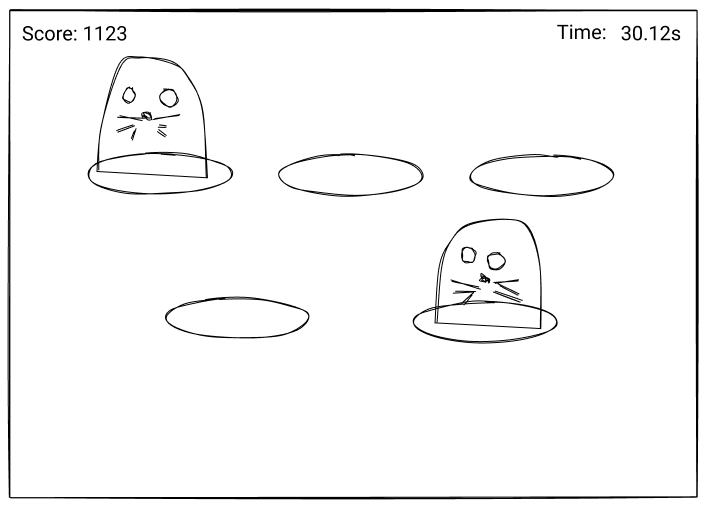
Whac-A-Mole React Game
Are you ready? We’ll be creating our very own “Whac-A-Mole” with React! This well-known game is basic in theory but throws up some interesting challenges to build. The important part here is how we’re using React. I’ll gloss over applying styles and making it pretty — that’s your job! Although, I’m happy to take any questions on that.
Also, this game will not be “polished”. But, it works. You can go and make it your own! Add your own features, and so on.
Design
Let’s start by thinking about what we’ve got to make, i.e. what components we may need, and so on:
- Start/Stop Game
- Timer
- Keeping Score
- Layout
- Mole Component
Starting Point
We’ve learned how to make a component and we can roughly gauge what we need.
import React, { Fragment } from 'https://cdn.skypack.dev/react'
import { render } from 'https://cdn.skypack.dev/react-dom'

const Moles = ({ children }) => <div>{children}</div>
const Mole = () => <button>Mole</button>
const Timer = () => <div>Time: 00:00</div>
const Score = () => <div>Score: 0</div>

const Game = () => (
  <Fragment>
    <h1>Whac-A-Mole</h1>
    <button>Start/Stop</button>
    <Score/>
    <Timer/>
    <Moles>
      <Mole/>
      <Mole/>
      <Mole/>
      <Mole/>
      <Mole/>
    </Moles>
  </Fragment>
)

render(<Game/>, document.getElementById('app'))
Starting/Stopping
Before we do anything, we need to be able to start and stop the game. Starting the game will trigger elements like the timer and moles to come to life. This is where we can introduce conditional rendering.
const Game = () => {
  const [playing, setPlaying] = useState(false)
  return (
    <Fragment>
      {!playing && <h1>Whac-A-Mole</h1>}
      <button onClick={() => setPlaying(!playing)}>
        {playing ? 'Stop' : 'Start'}
      </button>
      {playing && (
        <Fragment>
          <Score />
          <Timer />
          <Moles>
            <Mole />
            <Mole />
            <Mole />
            <Mole />
            <Mole />
          </Moles>
        </Fragment>
      )}
    </Fragment>
  )
}
We have a state variable of playing and we use that to render elements that we need. In JSX, we can use a condition with && to render something if the condition is true. Here we say to render the board and its content if we are playing. This also affects the button text where we can use a ternary.
See the Pen 1. Toggle Play State by @jh3y.
Timer
Let’s get the timer running. By default, we’re going to set a time limit of 30000ms, And we can declare this as a constant outside of our React components.
const TIME_LIMIT = 30000
Declaring constants in one place is a good habit to pick up. Anything that can be used to configure your app can be co-located in one place.
Our Timer component only cares about three things:
- The time it’s counting down;
- At what interval it’s going to update;
- What it does when it ends.
A first attempt might look like this:
const Timer = ({ time, interval = 1000, onEnd }) => {
  const [internalTime, setInternalTime] = useState(time)
  const timerRef = useRef(time)
  useEffect(() => {
    if (internalTime === 0 && onEnd) onEnd()
  }, [internalTime, onEnd])
  useEffect(() => {
    timerRef.current = setInterval(
      () => setInternalTime(internalTime - interval),
      interval
    )
    return () => {
      clearInterval(timerRef.current)
    }
  }, [])
  return <span>{`Time: ${internalTime}`}</span>
}
But, it only updates once?
See the Pen 2. Attempted Timer by @jh3y.
We’re using the same interval technique we did before. But, the issue is we’re using state in our interval callback. And this is our first “gotcha”. Because we have an empty dependency array for our effect, it only runs once. The closure for setInterval uses the value of internalTime from the first render. This is an interesting problem and makes us think about how we approach things.
Note: I highly recommend reading this article by Dan Abramov that digs into timers and how to get around this problem. It’s a worthwhile read and provides a deeper understanding. One issue is that empty dependency arrays can often introduce bugs in our React code. There’s also an eslint plugin I’d recommend using to help point these out. The React docs also highlight the potential risks of using the empty dependency array.
One way to fix our Timer would be to update the dependency array for the effect. This would mean that our timerRef would get updated every interval. However, it introduces the issue of drifting accuracy.
useEffect(() => {
  timerRef.current = setInterval(
 () => setInternalTime(internalTime - interval),
    interval
 )
  return () => {
 clearInterval(timerRef.current)
  }
}, [internalTime, interval])
If you check this demo, it has the same Timer twice with different intervals and logs the drift to the developer console. A smaller interval or longer time equals a bigger drift.
See the Pen 3. Checking Timer Drift by @jh3y.
We can use a ref to solve our problem. We can use it to track the internalTime and avoid running the effect every interval.
const timeRef = useRef(time)
useEffect(() => {
  timerRef.current = setInterval(
    () => setInternalTime((timeRef.current -= interval)),
    interval
  )
  return () => {
    clearInterval(timerRef.current)
  }
}, [interval])
And this reduces the drift significantly with smaller intervals too. Timers are sort of an edge case. But, it’s a great example to think about how we use hooks in React. It’s an example that’s stuck with me and helped me understand the “Why?”.
Update the render to divide the time by 1000 and append an s and we have a seconds timer.
See the Pen [4. Rudimentary Timer](https://codepen.io/smashingmag/pen/oNZXEVp) by @jh3y.
This timer is still rudimentary. It will drift over time. For our game, it’ll be fine. If you want to dig into accurate counters, this is a great video on creating accurate timers with JavaScript.
Scoring
Let’s make it possible to update the score. How do we score? By whacking a mole! In our case, that means clicking a button. For now, let’s give each mole a score of 100, and we can pass an onWhack callback to our Moles.
const MOLE_SCORE = 100

const Mole = ({ onWhack }) => (
  <button onClick={() => onWhack(MOLE_SCORE)}>Mole</button>
)

const Score = ({ value }) => <div>{`Score: ${value}`}</div>

const Game = () => {
  const [playing, setPlaying] = useState(false)
  const [score, setScore] = useState(0)

  const onWhack = points => setScore(score + points)

  return (
    <Fragment>
      {!playing && <h1>Whac-A-Mole</h1>}
      <button onClick={() => setPlaying(!playing)}>{playing ? 'Stop' : 'Start'}</button>
      {playing &&
        <Fragment>
          <Score value={score} />
          <Timer
            time={TIME_LIMIT}
            onEnd={() => setPlaying(false)}
          />
          <Moles>
            <Mole onWhack={onWhack} />
            <Mole onWhack={onWhack} />
            <Mole onWhack={onWhack} />
            <Mole onWhack={onWhack} />
            <Mole onWhack={onWhack} />
          </Moles>
        </Fragment>
      }
    </Fragment>
  )
}
Note how the onWhack callback gets passed to each Mole, and that the callback updates our score state. These updates will trigger a render.
This is a good time to install the React Developer Tools extension in your browser. There is a neat feature that will highlight component renders in the DOM. Open the “Components” tab in Dev Tools and hit the Settings cog. Select “Highlight updates when components render”:
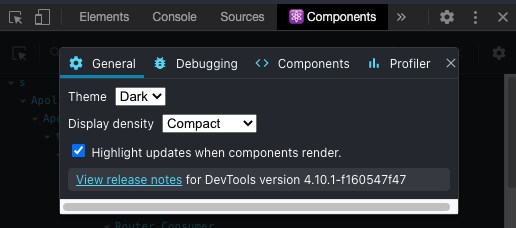
Open the demo at this link and set the extension to highlight renders. Next, you’ll see that the timer renders as time changes, but when we whack a mole, all components re-render.
Loops In JSX
You might be thinking that the way we’re rendering our Moles is inefficient. And you’d be right to think that! There’s an opportunity for us here to render these in a loop.
With JSX, we tend to use Array.map 99% of the time to render a collection of things. For example:
const USERS = [
  { id: 1, name: 'Sally' },
  { id: 2, name: 'Jack' },
]
const App = () => (
  <ul>
    {USERS.map(({ id, name }) => <li key={id}>{name}</li>)}
  </ul>
)
The alternative would be to generate the content in a for loop and then render the return from a function.
return (
  <ul>{getLoopContent(DATA)}</ul>
)
What’s that key attribute for? That helps React determine what changes need to render. If you can use a unique identifier, then do so! As a last resort, use the index of the item in a collection. (Read the docs on lists for more.)
For our example, we don’t have any data to work with. If you need to generate a collection of things, then here’s a trick you can use:
new Array(NUMBER_OF_THINGS).fill().map()
This could work for you in some scenarios.
return (
  <Fragment>
    <h1>Whac-A-Mole</h1>
    <button onClick={() => setPlaying(!playing)}>{playing ? 'Stop' : 'Start'}</button>
    {playing &&
      <Board>
        <Score value={score} />
        <Timer time={TIME_LIMIT} onEnd={() => console.info('Ended')}/>
        {new Array(5).fill().map((_, id) =>
          <Mole key={id} onWhack={onWhack} />
        )}
      </Board>
    }
  </Fragment>
)
Or, if you want a persistent collection, you could use something like uuid:
import { v4 as uuid } from 'https://cdn.skypack.dev/uuid'
const MOLE_COLLECTION = new Array(5).fill().map(() => uuid())

// In our JSX
{MOLE_COLLECTION.map((id) =>

)}
Ending Game
We can only end our game with the Start button. When we do end it, the score remains when we start again. The onEnd for our Timer also does nothing yet.
See the Pen [6. Looping Moles](https://codepen.io/smashingmag/pen/BaWNYEE) by @jh3y.
What we need is a third state where we aren’t playing but we have finished. In more complex applications, I’d recommend reaching for XState or using reducers. But, for our app, we can introduce a new state variable: finished. When the state is !playing and finished, we can display the score, reset the timer, and give the option to restart.
We need to put our logic caps on now. If we end the game, then instead of toggling playing, we need to also toggle finished. We could create an endGame and startGame function.
const endGame = () => {
  setPlaying(false)
  setFinished(true)
}

const startGame = () => {
  setScore(0)
  setPlaying(true)
  setFinished(false)
}
When we start a game, we reset the score and put the game into the playing state. This triggers the playing UI to render. When we end the game, we set finished to true. (The reason we don’t reset the score is so we can show it as a result.)
And, when our Timer ends, it should invoke that same function.
<Timer time={TIME_LIMIT} onEnd={endGame} />
It can do that within an effect. If the internalTime hits 0, then unmount and invoke onEnd.
useEffect(() => {
  if (internalTime === 0 && onEnd) {
    onEnd()
  }
}, [internalTime, onEnd])
We can shuffle our UI rendering to render three states:
- Fresh
- Playing
- Finished
<Fragment>
  {!playing && !finished &&
    <Fragment>
      <h1>Whac-A-Mole</h1>
      <button onClick={startGame}>Start Game</button>
    </Fragment>
  }
  {playing &&
    <Fragment>
      <button
        className="end-game"
        onClick={endGame}
       >
        End Game
      </button>
      <Score value={score} />
      <Timer
        time={TIME_LIMIT}
        onEnd={endGame}
      />
      <Moles>
        {new Array(NUMBER_OF_MOLES).fill().map((_, index) => (
          <Mole key={index} onWhack={onWhack} />
        ))}
      </Moles>
    </Fragment>
  }
  {finished &&
    <Fragment>
      <Score value={score} />
      <button onClick={startGame}>Play Again</button>
    </Fragment>
  }
</Fragment>
And now we have a functioning game minus moving moles:
See the Pen [7. Ending a Game](https://codepen.io/smashingmag/pen/abJOqrw) by @jh3y.
Note how we’ve reused the Score component.
Was there an opportunity there to not repeat Score? Could you put it in its own conditional? Or does it need to appear there in the DOM. This will come down to your design.
Might you end up with a more generic component to cover it? These are the questions to keep asking. The goal is to keep a separation of concerns with your components. But, you also want to keep portability in mind.
Moles
Moles are the centerpiece of our game. They don’t care about the rest of the app. But, they’ll give you their score onWhack. This emphasizes portability.
We aren’t digging into styling in this “Guide”, but for our moles, we can create a container with overflow: hidden that our Mole (button) moves in and out of. The default position of our Mole will be out of view:
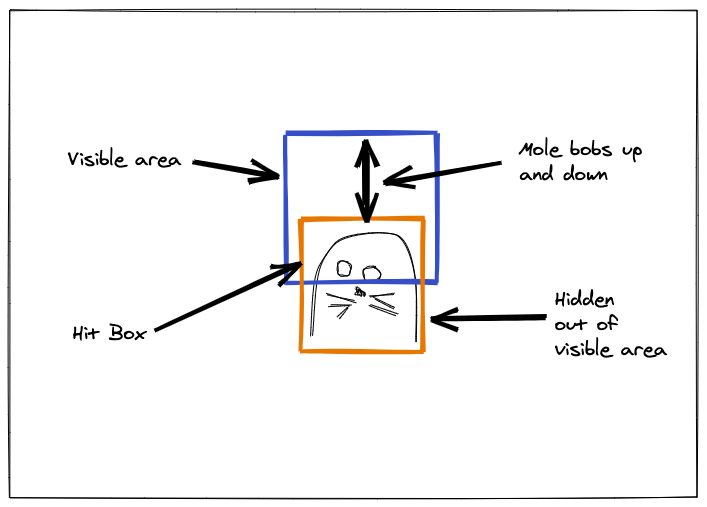
We’re going to bring in a third-party solution to make our moles bob up and down. This is an example of how to bring in third-party solutions that work with the DOM. In most cases, we use refs to grab DOM elements, and then we use our solution within an effect.
We’re going to use GreenSock(GSAP) to make our moles bob. We won’t dig into the GSAP APIs today, but if you have any questions about what they’re doing, please ask me!
Here’s an updated Mole with GSAP:
import gsap from 'https://cdn.skypack.dev/gsap'

const Mole = ({ onWhack }) => {
  const buttonRef = useRef(null)
  useEffect(() => {
    gsap.set(buttonRef.current, { yPercent: 100 })
    gsap.to(buttonRef.current, {
      yPercent: 0,
      yoyo: true,
      repeat: -1,
    })
  }, [])
  return (
    <div className="mole-hole">
      <button
        className="mole"
        ref={buttonRef}
        onClick={() => onWhack(MOLE_SCORE)}>
        Mole
      </button>
    </div>
  )
}
We’ve added a wrapper to the button which allows us to show/hide the Mole, and we’ve also given our button a ref. Using an effect, we can create a tween (GSAP animation) that moves the button up and down.
You’ll also notice that we’re using className which is the attribute equal to class in JSX to apply class names. Why don’t we use the className with GSAP? Because if we have many elements with that className, our effect will try to use them all. This is why useRef is a great choice to stick with.
See the Pen [8. Moving Moles](https://codepen.io/smashingmag/pen/QWpbQXW) by @jh3y.
Awesome, now we have bobbing Moles, and our game is complete from a functional sense. They all move exactly the same which isn’t ideal. They should operate at different speeds. The points scored should also reduce the longer it takes for a Mole to get whacked.
Our Mole’s internal logic can deal with how scoring and speeds get updated. Passing the initial speed, delay, and points in as props will make for a more flexible component.
<Mole key={index} onWhack={onWhack} points={MOLE_SCORE} delay={0} speed={2} />
Now, for a breakdown of our Mole logic.
Let’s start with how our points will reduce over time. This could be a good candidate for a ref. We have something that doesn’t affect render whose value could get lost in a closure. We create our animation in an effect and it’s never recreated. On each repeat of our animation, we want to decrease the points value by a multiplier. The points value can have a minimum value defined by a pointsMin prop.
const bobRef = useRef(null)
const pointsRef = useRef(points)

useEffect(() => {
  bobRef.current = gsap.to(buttonRef.current, {
    yPercent: -100,
    duration: speed,
    yoyo: true,
    repeat: -1,
    delay: delay,
    repeatDelay: delay,
    onRepeat: () => {
      pointsRef.current = Math.floor(
        Math.max(pointsRef.current * POINTS_MULTIPLIER, pointsMin)
      )
    },
  })
  return () => {
    bobRef.current.kill()
  }
}, [delay, pointsMin, speed])
We’re also creating a ref to keep a reference for our GSAP animation. We will use this when the Mole gets whacked. Note how we also return a function that kills the animation on unmount. If we don’t kill the animation on unmount, the repeat code will keep firing.
See the Pen [9. Score Reduction](https://codepen.io/smashingmag/pen/JjWdpQr) by @jh3y.
What will happen when a mole gets whacked? We need a new state for that.
const [whacked, setWhacked] = useState(false)
And instead of using the onWhack prop in the onClick of our button, we can create a new function whack. This will set whacked to true and call onWhack with the current pointsRef value.
const whack = () => {
 setWhacked(true)
 onWhack(pointsRef.current)
}

return (
 <div className="mole-hole">
    <button className="mole" ref={buttonRef} onClick={whack}>
      Mole
    </button>
  </div>
)
The last thing to do is respond to the whacked state in an effect with useEffect. Using the dependency array, we can make sure we only run the effect when whacked changes. If whacked is true, we reset the points, pause the animation, and animate the Mole underground. Once underground, we wait for a random delay before restarting the animation. The animation will start speedier using timescale and we set whacked back to false.
useEffect(() => {
  if (whacked) {
    pointsRef.current = points
    bobRef.current.pause()
    gsap.to(buttonRef.current, {
      yPercent: 100,
      duration: 0.1,
      onComplete: () => {
        gsap.delayedCall(gsap.utils.random(1, 3), () => {
          setWhacked(false)
          bobRef.current
            .restart()
            .timeScale(bobRef.current.timeScale() * TIME_MULTIPLIER)
        })
      },
    })
  }
}, [whacked])
That gives us:
See the Pen [10. React to Whacks](https://codepen.io/smashingmag/pen/MWpwQNy) by @jh3y.
The last thing to do is pass props to our Mole instances that will make them behave differently. But, how we generate these props could cause an issue.
<div className="moles">
  {new Array(MOLES).fill().map((_, id) => (
    <Mole
      key={id}
      onWhack={onWhack}
      speed={gsap.utils.random(0.5, 1)}
      delay={gsap.utils.random(0.5, 4)}
      points={MOLE_SCORE}
    />
  ))}
</div>
This would cause an issue because the props would change on every render as we generate the moles. A better solution could be to generate a new Mole array each time we start the game and iterate over that. This way, we can keep the game random without causing issues.
const generateMoles = () => new Array(MOLES).fill().map(() => ({
  speed: gsap.utils.random(0.5, 1),
  delay: gsap.utils.random(0.5, 4),
  points: MOLE_SCORE
}))
// Create state for moles
const [moles, setMoles] = useState(generateMoles())
// Update moles on game start
const startGame = () => {
  setScore(0)
  setMoles(generateMoles())
  setPlaying(true)
  setFinished(false)
}
// Destructure mole objects as props
<div className="moles">
  {moles.map(({speed, delay, points}, id) => (
    <Mole
      key={id}
      onWhack={onWhack}
      speed={speed}
      delay={delay}
      points={points}
    />
  ))}
</div>
And here’s the result! I’ve gone ahead and added some styling along with a few varieties of moles for our buttons.
See the Pen [11. Functioning Whac-a-Mole](https://codepen.io/smashingmag/pen/VwpLQod) by @jh3y.
We now have a fully working “Whac-a-Mole” game built in React. It took us less than 200 lines of code. At this stage, you can take it away and make it your own. Style it how you like, add new features, and so on. Or you can stick around and we can put together some extras!
Tracking The Highest Score
We have a working “Whac-A-Mole”, but how can we keep track of our highest achieved score? We could use an effect to write our score to localStorage every time the game ends. But, what if persisting things was a common need. We could create a custom hook called usePersistentState. This could be a wrapper around useState that reads/writes to localStorage.
  const usePersistentState = (key, initialValue) => {
  const [state, setState] = useState(
    window.localStorage.getItem(key)
      ? JSON.parse(window.localStorage.getItem(key))
      : initialValue
  )
  useEffect(() => {
    window.localStorage.setItem(key, state)
  }, [key, state])
  return [state, setState]
}
And then we can use that in our game:
const [highScore, setHighScore] = usePersistentState('whac-high-score', 0)
We use it exactly the same as useState. And we can hook into onWhack to set a new high score during the game when appropriate:
const endGame = points => {
  if (score > highScore) setHighScore(score) // play fanfare!
}
How might we be able to tell if our game result is a new high score? Another piece of state? Most likely.
See the Pen [12. Tracking High Score](https://codepen.io/smashingmag/pen/NWpqYKK) by @jh3y.
Whimsical Touches
At this stage, we’ve covered everything we need to. Even how to make your own custom hook. Feel free to go off and make this your own.
Sticking around? Let’s create another custom hook for adding audio to our game:
const useAudio = (src, volume = 1) => {
  const [audio, setAudio] = useState(null)
  useEffect(() => {
    const AUDIO = new Audio(src)
    AUDIO.volume = volume
    setAudio(AUDIO)
  }, [src])
  return {
    play: () => audio.play(),
    pause: () => audio.pause(),
    stop: () => {
      audio.pause()
      audio.currentTime = 0
    },
  }
}
This is a rudimentary hook implementation for playing audio. We provide an audio src and then we get back the API to play it. We can add noise when we “whac” a mole. Then the decision will be, is this part of Mole? Is it something we pass to Mole? Is it something we invoke in onWhack ?
These are the types of decisions that come up in component-driven development. We need to keep portability in mind. Also, what would happen if we wanted to mute the audio? How could we globally do that? It might make more sense as a first approach to control the audio within the Game component:
// Inside Game
const { play: playAudio } = useAudio('/audio/some-audio.mp3')
const onWhack = () => {
  playAudio()
  setScore(score + points)
}
It’s all about design and decisions. If we bring in lots of audio, renaming the play variable could get tedious. Returning an Array from our hook-like useState would allow us to name the variable whatever we want. But, it also might be hard to remember which index of the Array accounts for which API method.
See the Pen [13. Squeaky Moles](https://codepen.io/smashingmag/pen/eYvNMOB) by @jh3y.
That’s It!
More than enough to get you started on your React journey, and we got to make something interesting. We sure did cover a lot:
- Creating an app,
- JSX,
- Components and props,
- Creating timers,
- Using refs,
- Creating custom hooks.
We made a game! And now you can use your new skills to add new features or make it your own.
Where did I take it? At the time of writing, it’s at this stage so far:
See the Pen [Whac-a-Mole w/ React && GSAP](https://codepen.io/smashingmag/pen/JjWdLPO) by @jh3y.
Where To Go Next!
I hope building “Whac-a-Mole” has motivated you to start your React journey. Where next? Well, here are some links to resources to check out if you’re looking to dig in more — some of which are ones I found useful along the way.
- React Documentation
- “Making
setIntervalDeclarative With React Hooks,” Dan Abramov - “How To Fetch Data With React Hooks,” Robin Wieruch
- “When To
useMemoAnduseCallback,” Kent C Dodds - Read more React articles right here on Smashing Magazine
Further Reading
- The Safest Way To Hide Your API Keys When Using React
- How To Create A Custom React Hook To Fetch And Cache Data
- Comparing Styling Methods In Next.js
- Building A Video Streaming App With Nuxt.js, Node And Express


