How To Implement Authentication In Next.js With Auth0
“Authentication” is the action of validating that a user is who he or she claims to be. We usually do this by implementing a credentials system, like user/password, security questions, or even facial recognition.
“Authorization” determines what a user can (or can’t) do. If we need to handle authentication and authorization in our web application, we will need a security platform or module. We can develop our own platform, implement it, and maintain it. Or we can take the advantage of existing authentication and authorization platforms in the market that are offered as services.
When evaluating whether it’s better for us to create our own platform, or to use a third-party service, there are some things that we should consider:
- Designing and creating authentication services is not our core skill. There are people working specially focused on security topics that can create better and more secure platforms than us;
- We can save time relying on an existing authentication platform and spend it adding value to the products and services that we care about;
- We don’t store sensitive information in our databases. We separate it from all the data involved in our apps;
- The tools third-party services offer have improved usability and performance, which makes it easier for us to administrate the users of our application.
Considering these factors, we can say that relying on third-party authentication platforms can be easier, cheaper, and even more secure than creating our own security module.
In this article, we will see how to implement authentication and authorization in our Next.js applications using one of the existing products in the market: Auth0.
What Is Auth0?
It allows you to add security to apps developed using any programming language or technology.
“Auth0 is a flexible, drop-in solution to add authentication and authorization services to your applications.”
— Dan Arias, auth0.com
Auth0 has several interesting features, such as:
- Single Sign-On: Once you log into an application that uses Auth0, you won’t have to enter your credentials again when entering another one that also uses it. You will be automatically logged in to all of them;
- Social login: Authenticate using your preferred social network profile;
- Multi-Factor Authentication;
- Multiple standard protocols are allowed, such as OpenID Connect, JSON Web Token, or OAuth 2.0;
- Reporting and analytics tools.
There is a free plan that you can use to start securing your web applications, covering up to 7000 monthly active users. You will start paying when the amount of users increases.
Another cool thing about Auth0 is that we have a Next.js SDK available to use in our app. With this library, created especially for Next.js, we can easily connect to the Auth0 API.
Auth0 SDK For Next.js
As we mentioned before, Auth0 created (and maintains) a Next.js focused SDK, among other SDKs available to connect to the API using various programming languages. We just need to download the NPM package, configure some details about our Auth0 account and connection, and we are good to go.
This SDK gives us tools to implement authentication and authorization with both client-side and server-side methods, using API Routes on the backend and React Context with React Hooks on the frontend.
Let’s see how some of them work in an example Next.js application.
Example Next.js App Using Auth0
Let’s go back to our previous video platform example, and create a small app to show how to use Auth0 Next.js SDK. We will set up Auth0’s Universal Login. We will have some YouTube video URLs. They will be hidden under an authentication platform. Only registered users will be able to see the list of videos through our web application.
Note: This article focuses on the configuration and use of Auth0 in your Next.js application. We won’t get into details like CSS styling or database usage. If you want to see the complete code of the example app, you can go to this GitHub repository.
Create Auth0 Account And Configure App Details
First of all, we need to create an Auth0 account using the Sign Up page.

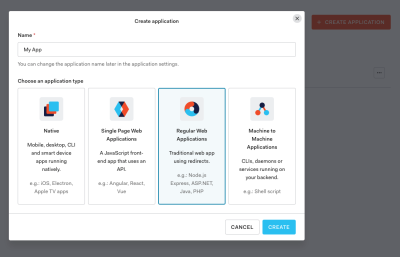
After that, let’s go to the Auth0 Dashboard. Go to Applications and create a new app of type [“Regular Web Applications”].

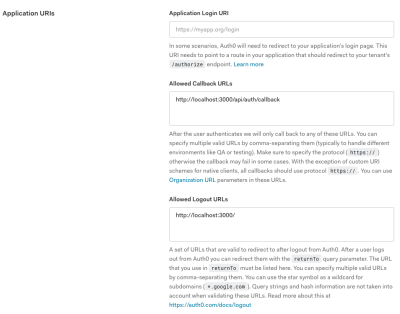
Now let’s go to the Settings tab of the application and, under the Application URIs section, configure the following details and save the changes:
- Allowed Callback URLs: add
https://localhost:3000/api/auth/callback - Allowed Logout URLs: add
https://localhost:3000/

By doing this, we are configuring the URL where we want to redirect the users after they login our site (Callback), and the URL where we redirect the users after they log out (Logout). We should add the production URLs when we deploy the final version of our app to the hosting server.
Auth0 Dashboard has many configurations and customizations we can apply to our projects. We can change the type of authentication we use, the login/sign-up page, the data we request for the users, enable/disable new registrations, configure users’ databases, and so on.
Create Next.js App
To create a brand new Next.js app, we will use create-next-app, which sets up everything automatically for you. To create the project, run:
npx create-next-app [name-of-the-app]
Or
yarn create next-app [name-of-the-app]
To start the develop server locally and see the site just created in your browser, go to the new folder that you created:
cd [name-of-the-app]And run:
npm run dev
Or
yarn dev
Install And Configure The Auth0 Next.js SDK
Let’s install the Auth0 Next.js SDK in our app:
npm install @auth0/nextjs-auth0
Or
yarn add @auth0/nextjs-auth0
Now, in our env.local file (or the environment variables menu of our hosting platform), let’s add these variables:
AUTH0_SECRET="[A 32 characters secret used to encrypt the cookies]"
AUTH0_BASE_URL="https://localhost:3000"
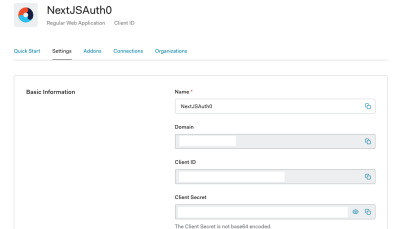
AUTH0_ISSUER_BASE_URL="https://[Your tenant domain. Can be found in the Auth0 dashboard under settings]"
AUTH0_CLIENT_ID="[Can be found in the Auth0 dashboard under settings]"
AUTH0_CLIENT_SECRET="[Can be found in the Auth0 dashboard under settings]"

If you want more configuration options, you can take a look at the docs.
Create The Dynamic API Route
Next.js offers a way to create serverless APIs: API Routes. With this feature, we can create code that will be executed in every user request to our routes. We can define fixed routes, like /api/index.js. But we can also have dynamic API routes, with params that we can use in our API routes code, like /api/blog/[postId].js.
Let’s create the file /pages/api/auth/[...auth0].js, which will be a dynamic API route. Inside of the file, let’s import the handleAuth method from the Auth0 SDK, and export the result:
import { handleAuth } from '@auth0/nextjs-auth0';

export default handleAuth();
This will create and handle the following routes:
/api/auth/login
To perform login or sign up with Auth0./api/auth/logout
To log the user out./api/auth/callback
To redirect the user after a successful login./api/auth/me
To get the user profile information.
And that would be the server-side part of our app. If we want to log in to our application or sign up for a new account, we should visit https://localhost:3000/api/auth/login. We should add a link to that route in our app. Same for logging out from our site: Add a link to https://localhost:3000/api/auth/logout.
Add The UserProvider Component
To handle user authentication state on the frontend of our web application we can use UserProvider React component, available on Auth0 Next.js SDK. the component uses React Context internally.
If you want to access the user authentication state on a Component, you should wrap it with a UserProvider component.
<UserProvider>
  <Component {...props} />
</UserProvider>
If we want to access all of the pages in our application, we should add the component to the pages/_app.js file. pages/_app.js overrides the React App component. It’s a feature that Next.js exposes to customize our application. You can read more about it here.
import React from 'react';
import { UserProvider } from '@auth0/nextjs-auth0';

export default function App({ Component, pageProps }) {
  return (
    <UserProvider>
      <Component {...pageProps} />
    </UserProvider>
  );
}
We have a React hook useUser that accesses to the authentication state exposed by UserProvider. We can use it, for instance, to create a kind of welcome page. Let’s change the code of the pages/index.js file:
import { useUser } from "@auth0/nextjs-auth0";

export default () => {
 const { user, error, isLoading } = useUser();

 if (isLoading) return <div>Loading...</div>;

 if (error) return <div>{error.message}</div>;

 if (user) {
   return (
     <div>
       <h2>{user.name}</h2>
       <p>{user.email}</p>
       <a href="/api/auth/logout">Logout</a>
     </div>
   );
 }
 return <a href="/api/auth/login">Login</a>;
};
The user object contains information related to the user’s identity. If the person visiting the page is not logged in (we don’t have a user object available), we will display a link to the login page. If the user is already authenticated, we will display user.name and user.email properties on the page, and a Logout link.
Let’s create a videos.js file, with a list of three YouTube video URLs that will only be visible for registered people. To only allow logged users to see this page, we will use withPageAuthRequired method from the SDK.
import { withPageAuthRequired } from "@auth0/nextjs-auth0";

export default () => {
 return (
   <div>
     <a href="https://www.youtube.com/watch?v=5qap5aO4i9A">LoFi Music</a>
     <a href="https://www.youtube.com/watch?v=fEvM-OUbaKs">Jazz Music</a>
     <a href="https://www.youtube.com/watch?v=XULUBg_ZcAU">Piano Music</a>
   </div>
 );
};

export const getServerSideProps = withPageAuthRequired();
Take into consideration that our web application allows any person to sign up for an account, using the Auth0 platform. The user can also re-use an existing Auth0 account, as we’re implementing Universal Login.
We can create our own registration page to request more details about the user or add payment information to bill them monthly for our service. We can also use the methods exposed in the SDK to handle authorization in an automatic way.
Conclusion
In this article, we saw how to secure our Next.js applications using Auth0, an authentication and authorization platform. We evaluate the benefits of using a third-party service for the authentication of our web applications compared to creating our own security platform. We created an example Next.js app and we secured it using Auth0 free plan and Auth0 Next.js SDK.
If you want to deploy an Auth0 example application to Vercel, you can do it here.
Further Reading And Resources
- Auth0 Next.js SDK GitHub repository, Auth0, GitHub
- “The Ultimate Guide To Next.js Authentication With Auth0,” Sandrino Di Mattia, Auth0 Blog
In our example app, we used server-side rendering, with API routes and a serverless approach. If you’re using Next.js for a static site, or a custom server to host your app, this article has some details about how to implement authentication. - “New Universal Login Experience,” Auth0 Universal Login, Auth0 Docs
- “Centralized Universal Login vs. Embedded Login,” Auth0 Universal Login, Auth0 Docs
Further Reading
- Full Stack GraphQL With Next.js, Neo4j AuraDB And Vercel
- Making Sense Of “Senseless” JavaScript Features
- Build A Static RSS Reader To Fight Your Inner FOMO
- Why Optimizing Your Lighthouse Score Is Not Enough For A Fast Website


 Agent Ready is the new Headless
 SurveyJS: White-Label Survey Solution for Your JS App


