A Guide To Undoing Mistakes With Git (Part 2)

Email Newsletter
Weekly tips on front-end & UX.
Trusted by 182,000+ folks.
 Celebrating 10 million developers

 Custom Web Forms for Angular, React, & Vue. Your backend.

In this second part of our series on “Undoing Mistakes with Git”, we’ll bravely look danger in the eye again: I’ve prepared four new doomsday scenarios — including, of course, some clever ways to save our necks! But before we dive in: take a look at the check out previous articles on Git for even more self-rescue methods that help you undo your mistakes with Git!
Let’s go!
Recovering A Deleted Branch Using The Reflog
Have you ever deleted a branch and, shortly after, realized that you shouldn’t have? In the unlikely event that you don’t know this feeling, I can tell you that it’s not a good one. A mixture of sadness and anger creeps up on you, while you think of all the hard work that went into that branch’s commits, all the valuable code that you’ve now lost.
Luckily, there’s a way to bring that branch back from the dead — with the help of a Git tool named “Reflog”. We had used this tool in the first part of our series, but here’s a little refresher: the Reflog is like a journal where Git notes every movement of the HEAD pointer in your local repository. In other, less nerdy words: any time you checkout, commit, merge, rebase, cherry-pick, and so on, a journal entry is created. This makes the Reflog a perfect safety net when things go wrong!
Let’s take a look at a concrete example:
$ git branch
* feature/login
master
We can see that we currently have our branch feature/login checked out. Let’s say that this is the branch we’re going to delete (inadvertently). Before we can do that, however, we need to switch to a different branch because we cannot delete our current HEAD branch!
$ git checkout master
$ git branch -d feature/login
Our valuable feature branch is now gone — and I’ll give you a minute to (a) understand the gravity of our mistake and (b) to mourn a little. After you’ve wiped away the tears, we need to find a way to bring back this branch! Let’s open the Reflog (simply by typing git reflog) and see what it has in store for us:
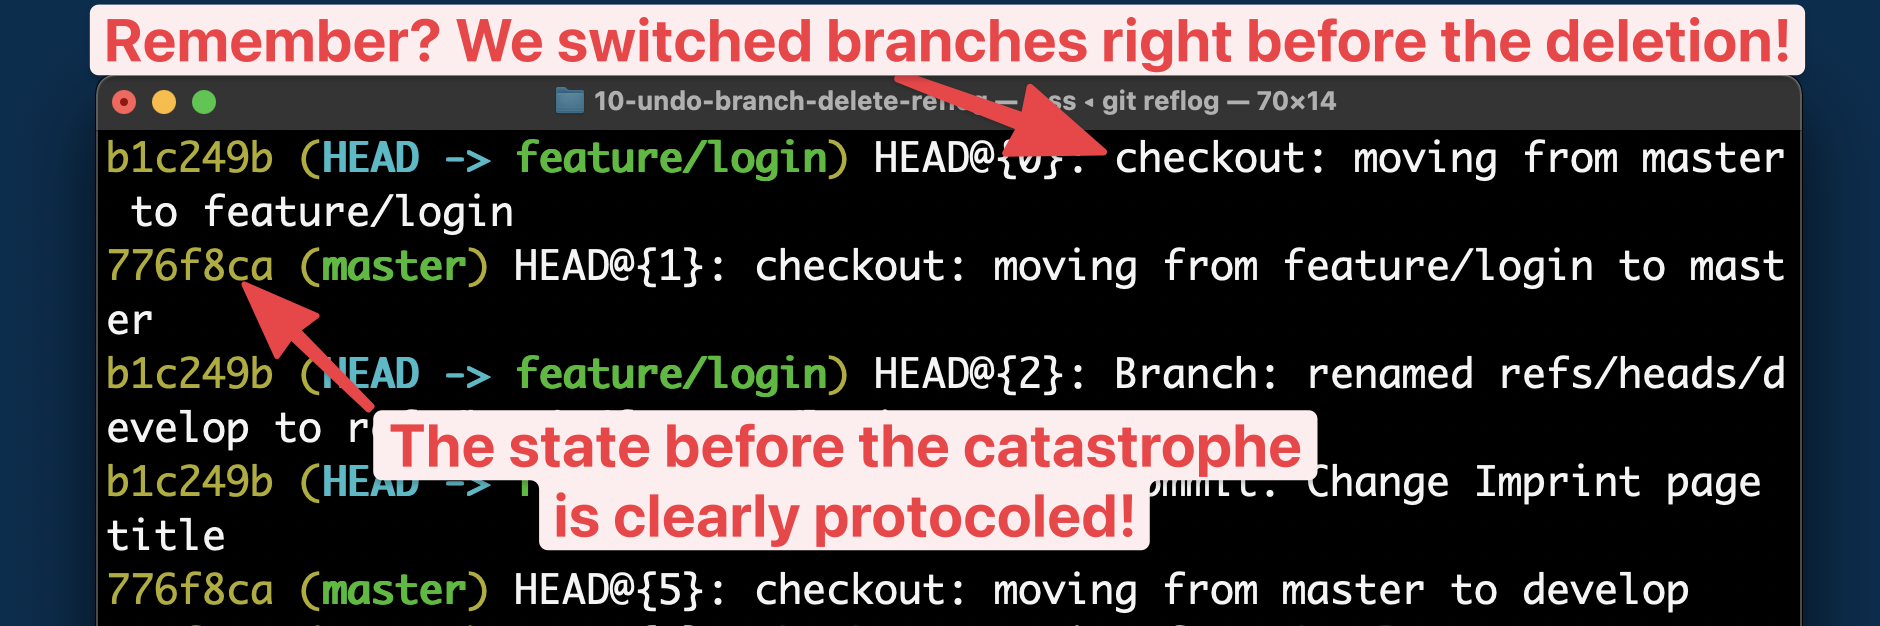
Here are some comments to help you make sense of the output:
- First of all, you need to know that the Reflog sorts its entries chronologically: the newest items are at the top of the list.
- The topmost (and therefore newest) item is the
git checkoutcommand that we performed before deleting the branch. It’s logged here in the Reflog because it’s one of these “HEAD pointer movements” that the Reflog so dutifully records. - To undo our grave mistake, we can simply return to the state before that — which is also cleanly and clearly recorded in the Reflog!
So let’s try this, by creating a new branch (with the name of our “lost” branch) that starts at this “before” state SHA-1 hash:
$ git branch feature/login 776f8ca
And voila! You’ll be delighted to see that we’ve now restored our seemingly lost branch! 🎉
If you’re using a Git desktop GUI like “Tower”, you can take a nice shortcut: simply hit CMD + Z on your keyboard to undo the last command — even if you’ve just violently deleted a branch!
Moving A Commit To A Different Branch
In many teams, there’s an agreement to not commit on long-running branches like main or develop: branches like these should only receive new commits through integrations (e.g. merges or rebases). And yet, of course, mistakes are inevitable: we sometimes forget and commit on these branches nonetheless! So how can we clean up the mess we made?
Luckily, these types of problems can be easily corrected. Let’s roll up our sleeves and get to work.
The first step is to switch to the correct destination branch and then move the commit overusing the cherry-pick command:
$ git checkout feature/login
$ git cherry-pick 776f8caf
You will now have the commit on the desired branch, where it should have been in the first place. Awesome!
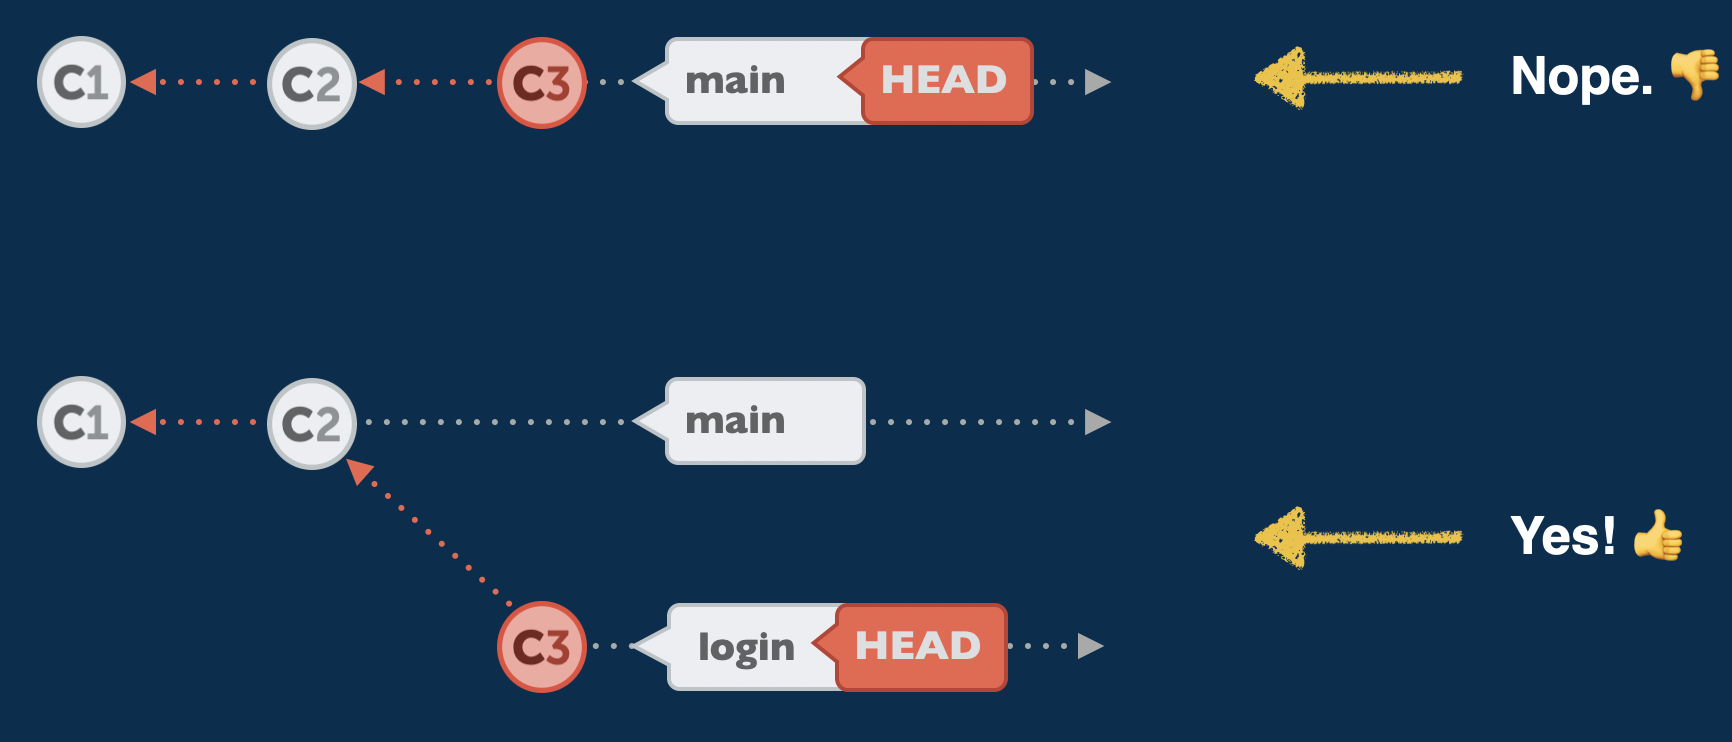
But there’s still one thing left to do: we need to clean up the branch where it accidentally landed at first! The cherry-pick command, so to speak, created a copy of the commit — but the original is still present on our long-running branch:
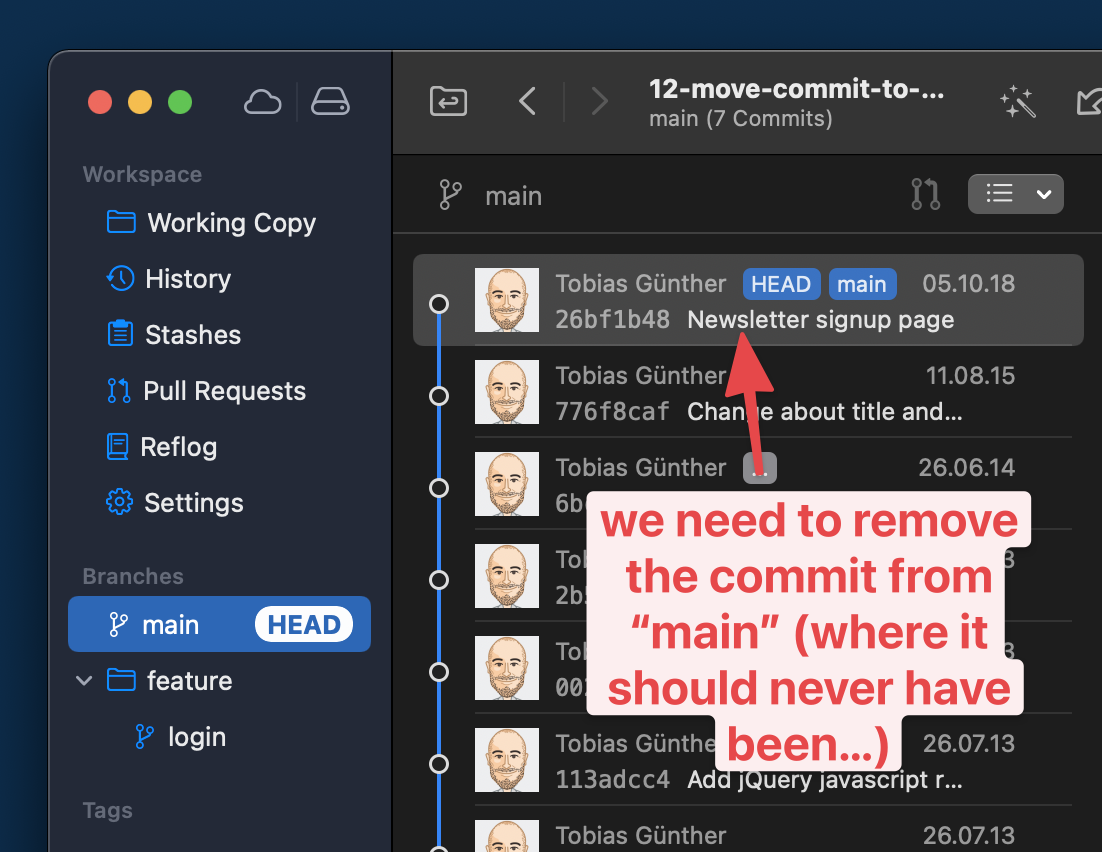
This means we have to switch back to our long-running branch and use git reset to remove it:
$ git checkout main
$ git reset --hard HEAD~1
As you can see, we’re using the git reset command here to erase the faulty commit. The HEAD~1 parameter tells Git to “go back 1 revision behind HEAD”, effectively erasing the topmost (and in our case: unwanted) commit from the history of that branch.
And voila: the commit is now where it should have been in the first place and our long-running branch is clean — as if our mistake had never happened!
Editing The Message Of An Old Commit
It’s all too easy to smuggle a typo into a commit message — and only discover it much later. In such a case, the good old --amend option of git commit cannot be used to fix this problem, because it only works for the very last commit. To correct any commit that is older than that, we have to resort to a Git tool called “Interactive Rebase”.
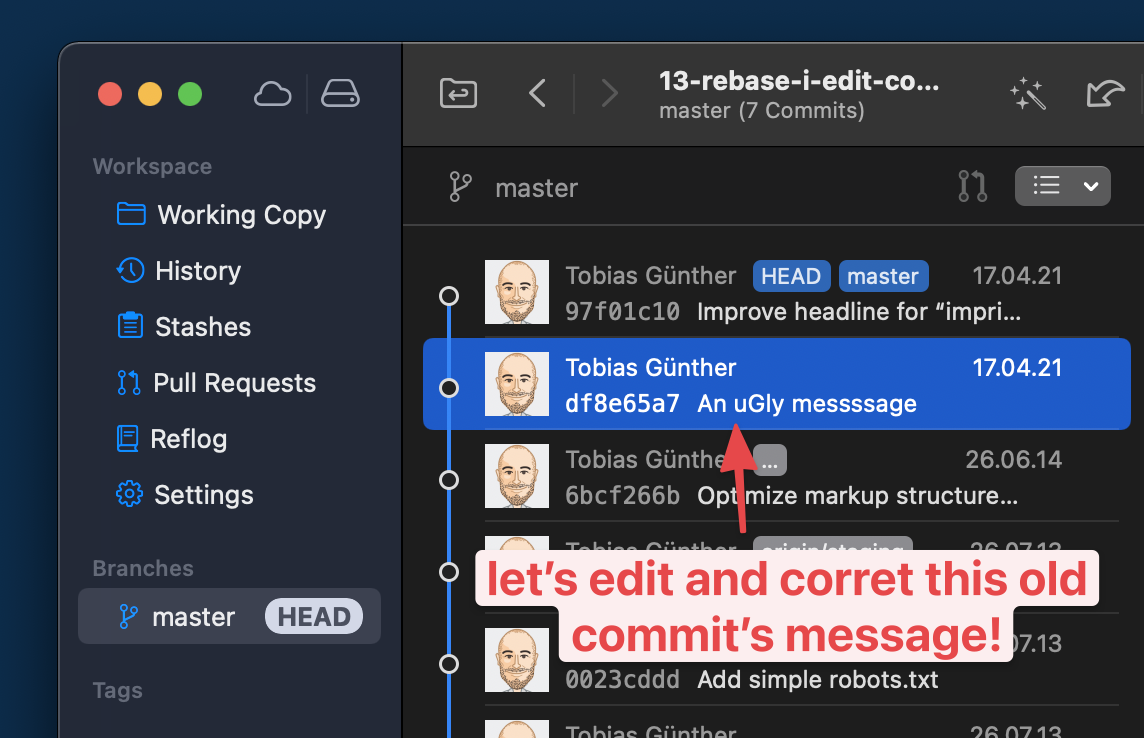
First, we have to tell Interactive Rebase which part of the commit history we want to edit. This is done by feeding it a commit hash: the parent commit of the one we want to manipulate.
$ git rebase -i 6bcf266b
An editor window will then open up. It contains a list of all commits after the one we provided as a basis for the Interactive Rebase in the command:
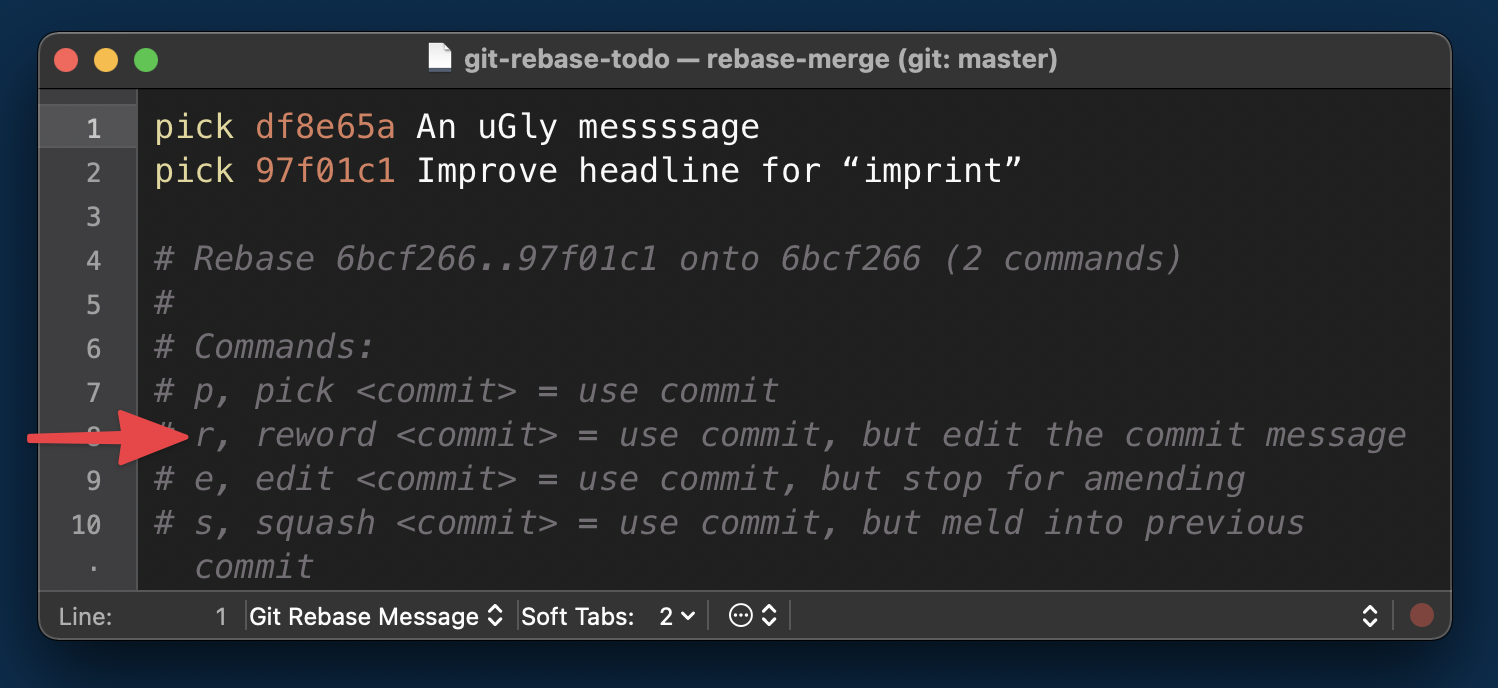
Here, it’s important that you don’t follow your first impulse: in this step, we do not edit the commit message, yet. Instead, we only tell Git what kind of manipulation we want to do with which commit(s). Quite conveniently, there’s a list of action keywords noted in the comments at the bottom of this window. For our case, we mark up line #1 with reword (thereby replacing the standard pick).
All that’s left to do in this step is to save and close the editor window. In return, a new editor window will open up that contains the current message of the commit we marked up. And now is finally the time to make our edits!
Here’s the whole process at a glance for you:
Correcting A Broken Commit (In A Very Elegant Way)
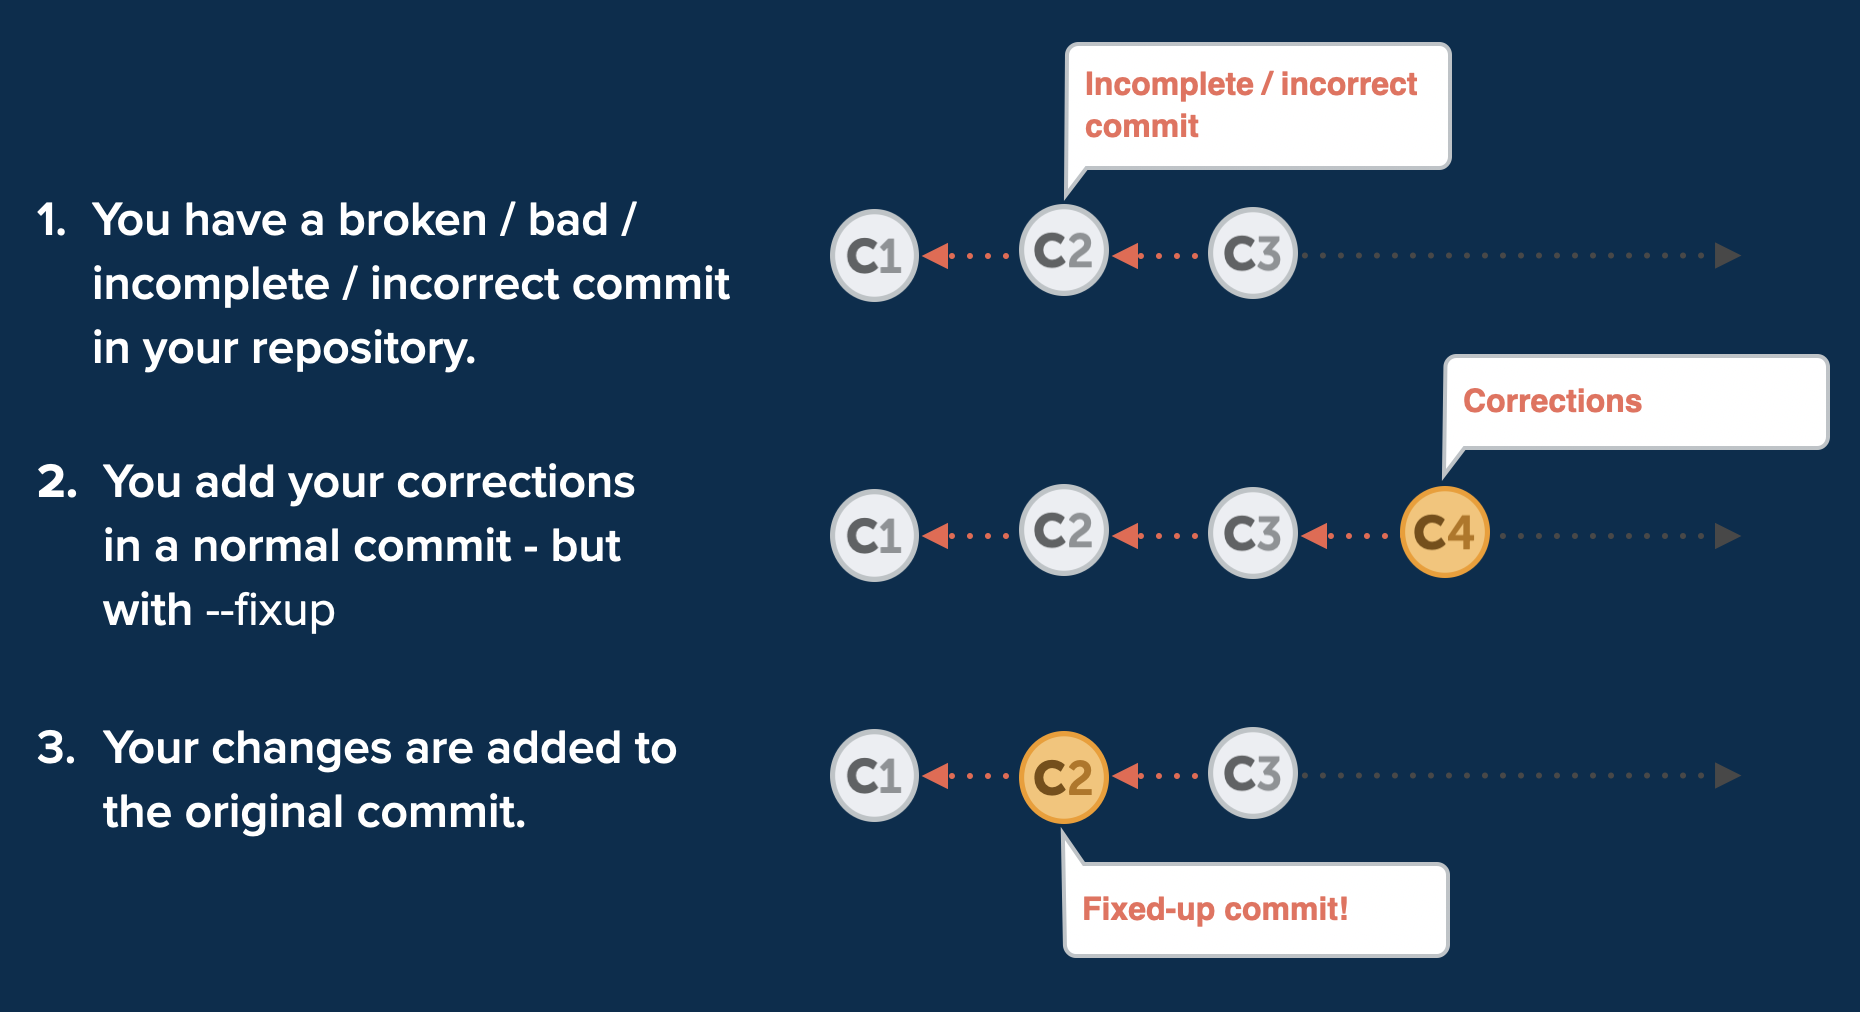
Finally, we’re going to take a look at fixup, the Swiss Army Knife of undoing tools. Put simply, it allows you to fix a broken/incomplete/incorrect commit after the fact. It’s truly a wonderful tool for two reasons:
- It doesn’t matter what the problem is.
You might have forgotten to add a file, should have deleted something, made an incorrect change, or simply a typo.fixupworks in all of these situations! - It is extremely elegant.
Our normal, instinctive reaction to a bug in a commit is to produce a new commit that fixes the problem. This way of working, however intuitive it may seem, makes your commit history look very chaotic, very soon. You have “original” commits and then these little “band-aid” commits that fix the things that went wrong in the original commits. Your history is littered with small, meaningless band-aid commits which makes it hard to understand what happened in your codebase.

This is where fixup comes in. It allows you to still make this correcting band-aid commit. But here comes the magic: it then applies it to the original, broken commit (repairing it that way) and then discards the ugly band-aid commit completely!
We can go through a practical example together! Let’s say that the selected commit here is broken.
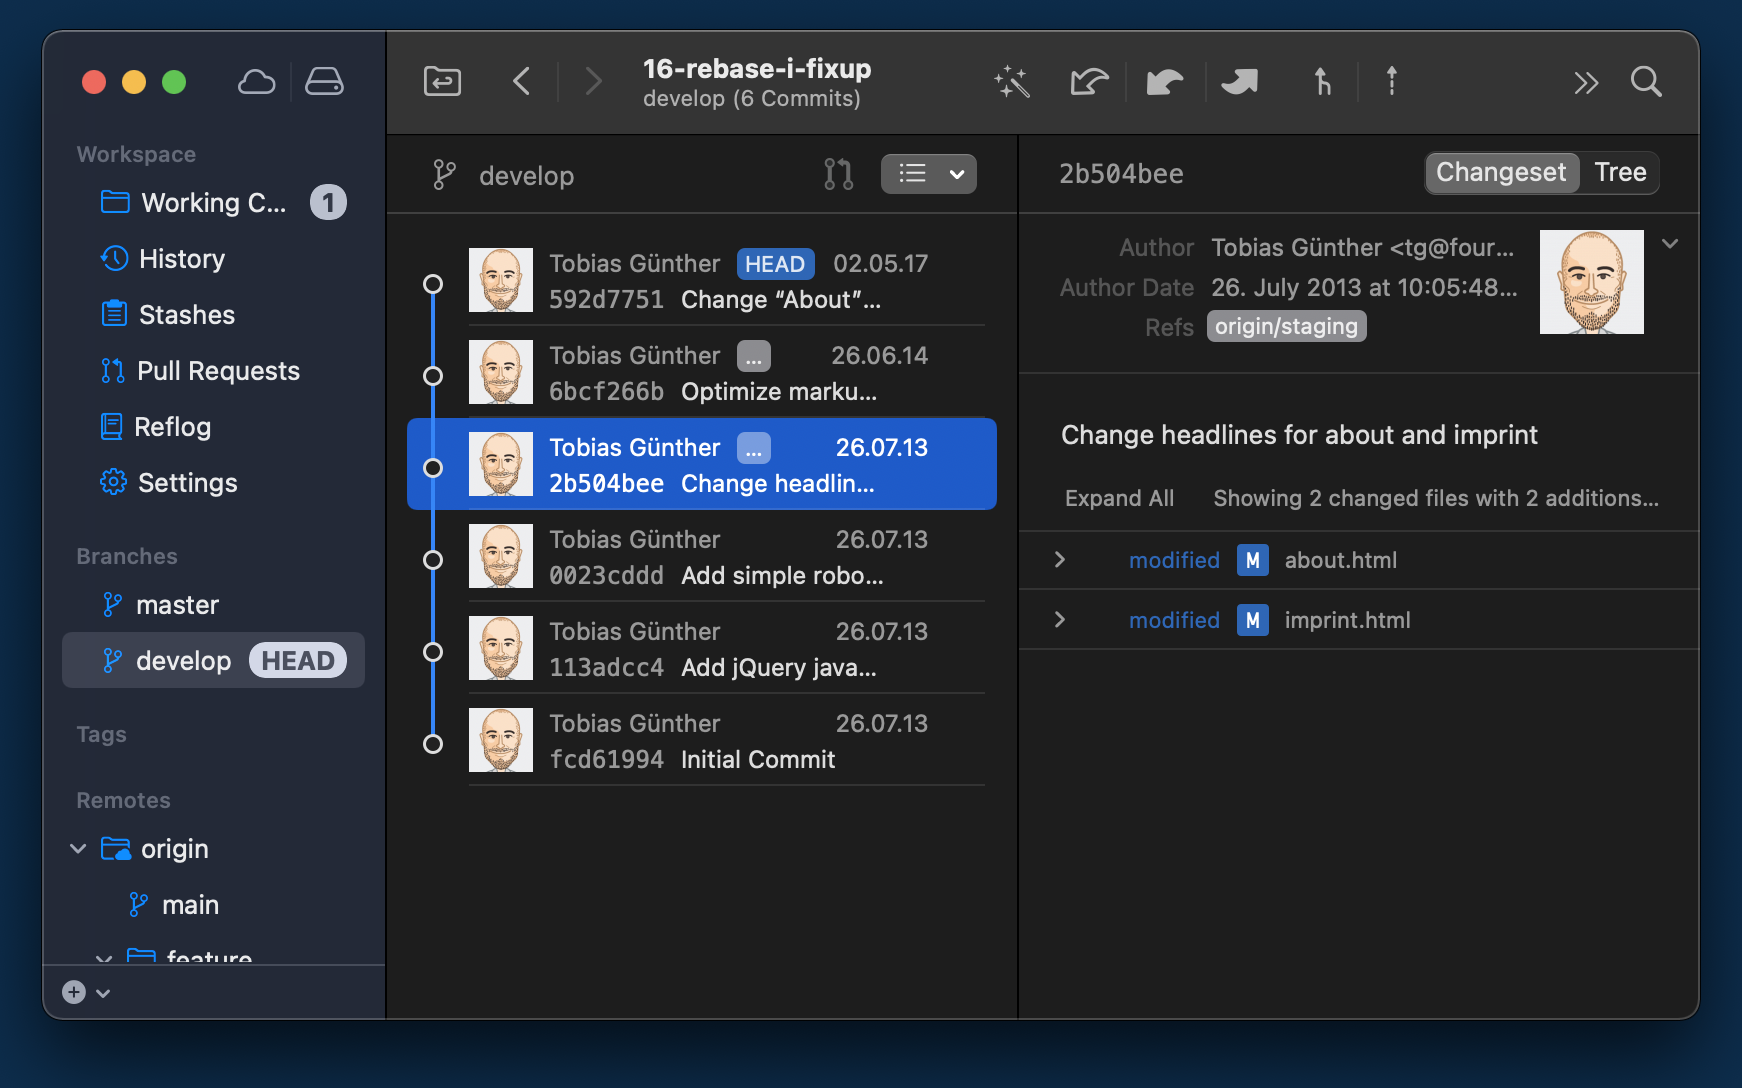
Let’s also say that I have prepared changes in a file named error.html that will solve the problem. Here’s the first step we need to make:
$ git add error.html
$ git commit --fixup 2b504bee
We’re creating a new commit, but we’re telling Git this is a special one: it’s a fix for an old commit with the specified SHA-1 hash (2b504bee in this case).
The second step, now, is to start an Interactive Rebase session — because fixup belongs to the big toolset of Interactive Rebase.
$ git rebase -i --autosquash 0023cddd
Two things are worth explaining about this command. First, why did I provide 0023cddd as the revision hash here? Because we need to start our Interactive Rebase session at the parent commit of our broken fellow.
Second, what is the --autosquash option for? It takes a lot of work off our shoulders! In the editor window that now opens, everything is already prepared for us:
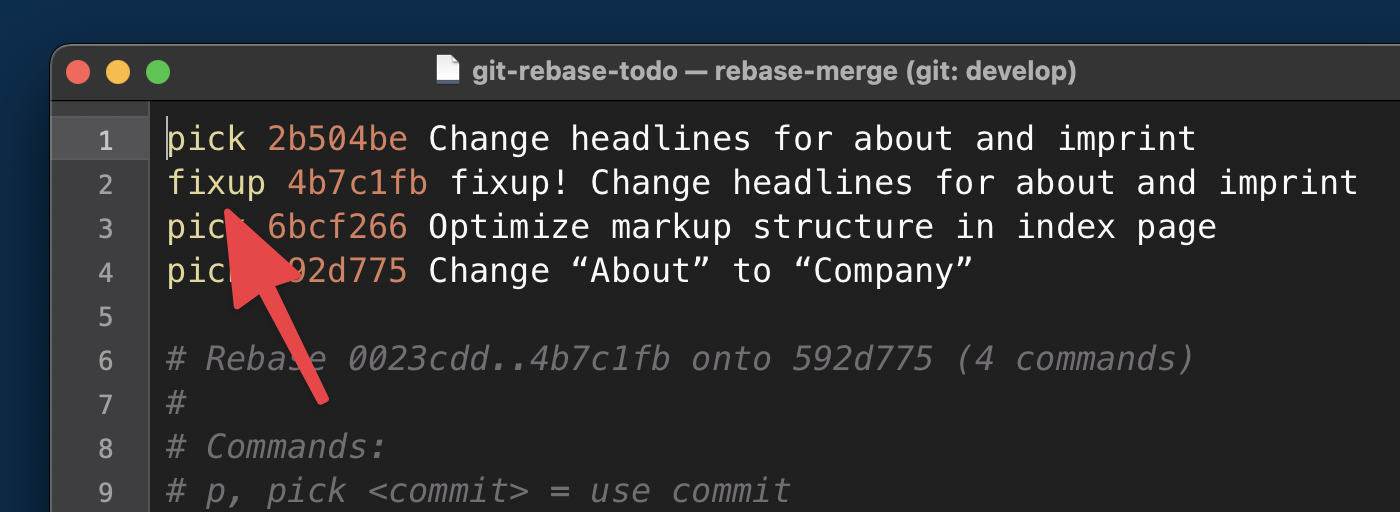
Thanks to the --autosquash option, Git has already done the heavy lifting for us:
- It marked our little band-aid commit with the
fixupaction keyword. That way, Git will combine it with the commit directly above and then discard it. - It also reordered the lines accordingly, moving our band-aid commit directly below the commit we want to fix (again:
fixupworks by combining the marked-up commit with the one above!).
In short: There’s nothing to do for us but close the window!
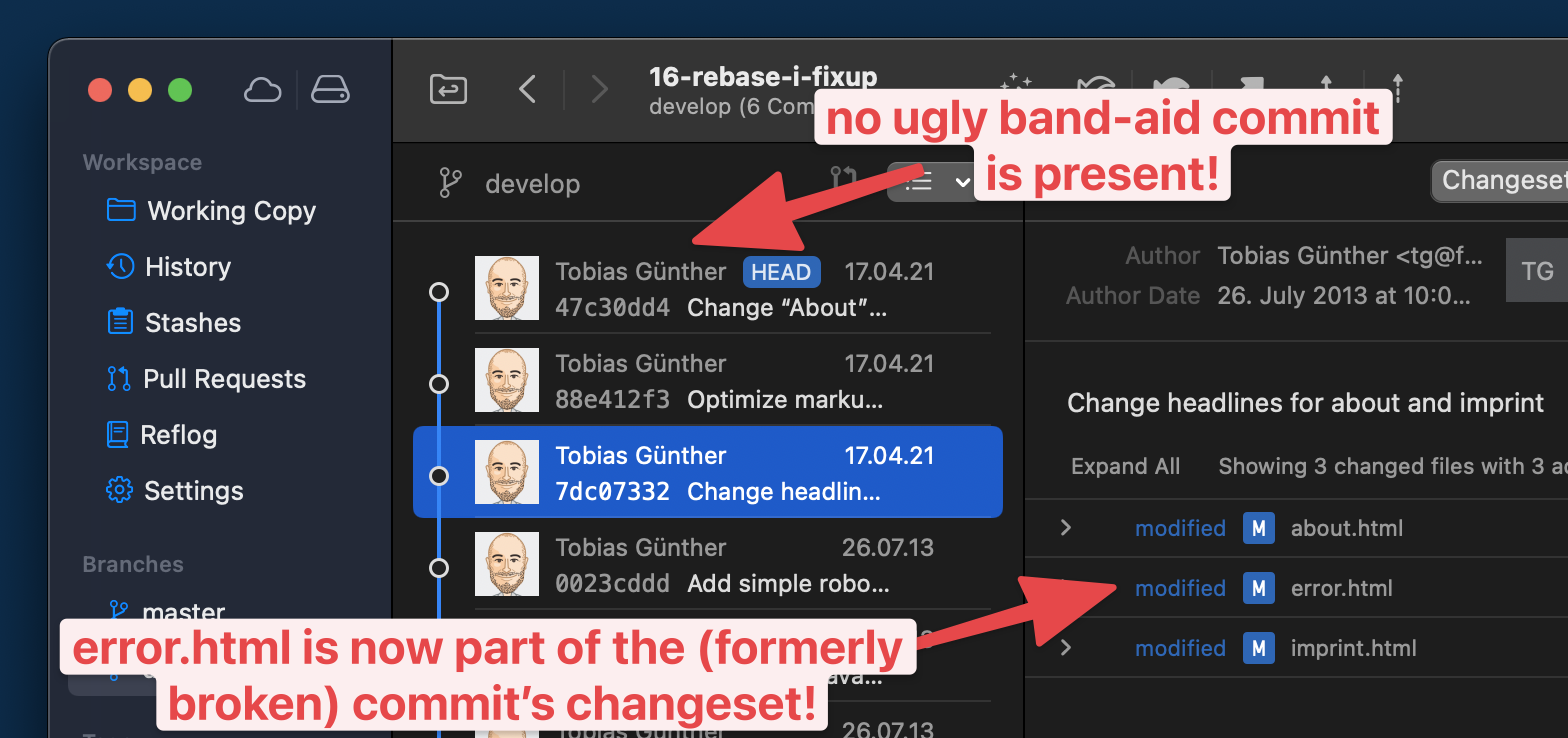
Let’s take a final look at the end result.
- The formerly broken commit is fixed: it now contains the changes we prepared in our band-aid commit.
- The ugly band-aid commit itself has been discarded: the commit history is clean and easy to read — as if no mistake had occurred at all.
Knowing How To Undo Mistakes Is A Superpower
Congratulations! You are now able to save your neck in many difficult situations! We cannot really avoid these situations: no matter how experienced we are as developers, mistakes are simply part of the job. But now that you know how to deal with them, you can face them with a laid-back heart rate. 💚
If you want to learn more about undoing mistakes with Git, I can recommend the free “First Aid Kit for Git”, a series of short videos about exactly this topic.
Have fun making mistakes — and, of course, undoing them with ease!
Further Reading
- 35 Beautiful Vintage and Retro Photoshop Tutorials
- 60 Rare and Unusual Vintage Signs
- Vintage and Retro Typography Showcase
- Rediscovering The Joy Of Design


