Creating A Multi-Author Blog With Next.js

Email Newsletter
Weekly tips on front-end & UX.
Trusted by 182,000+ folks.
 Celebrating 10 million developers

 Custom Web Forms for Angular, React, & Vue. Your backend.
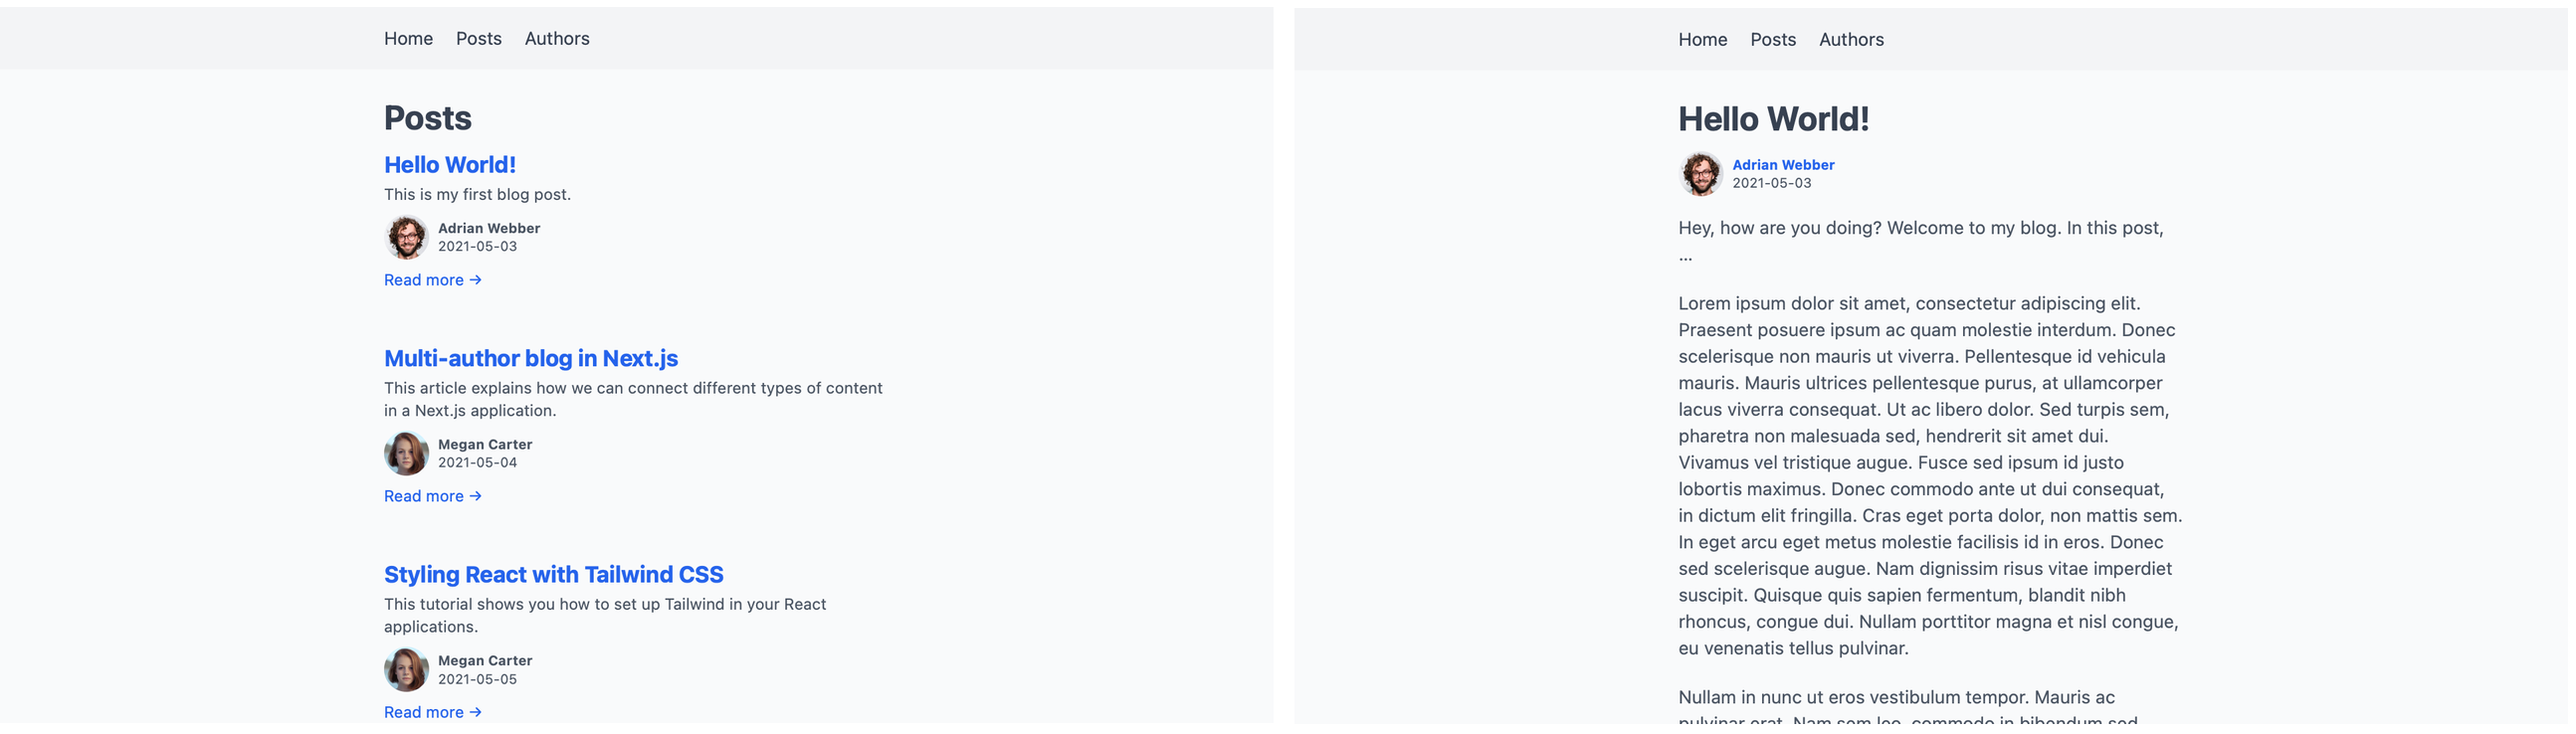
In this article, we are going to build a blog with Next.js that supports two or more authors. We will attribute each post to an author and show their name and picture with their posts. Each author also gets a profile page, which lists all posts they contributed. It will look something like this:
We are going to keep all information in files on the local filesystem. The two types of content, posts and authors, will use different types of files. The text-heavy posts will use Markdown, allowing for an easier editing process. Because the information on authors is lighter, we will keep that in JSON files. Helper functions will make reading different file types and combining their content easier.
Next.js lets us read data from different sources and of different types effortlessly. Thanks to its dynamic routing and next/link, we can quickly build and navigate to our site’s various pages. We also get image optimization for free with the next/image package.
By picking the “batteries included” Next.js, we can focus on our application itself. We don’t have to spend any time on the repetitive groundwork new projects often come with. Instead of building everything by hand, we can rely on the tested and proven framework. The large and active community behind Next.js makes it easy to get help if we run into issues along the way.
After reading this article, you will be able to add many kinds of content to a single Next.js project. You will also be able to create relationships between them. That allows you to link things like authors and posts, courses and lessons, or actors and movies.
This article assumes basic familiarity with Next.js. If you have not used it before, you might want to read up on how it handles pages and fetches data for them first.
We won’t cover styling in this article and focus on making it all work instead. You can get the result on GitHub. There is also a stylesheet you can drop into your project if you want to follow along with this article. To get the same frame, including the navigation, replace your pages/_app.js with this file.
Setup
We begin by setting up a new project using create-next-app and changing to its directory:
$ npx create-next-app multiauthor-blog
$ cd multiauthor-blog
We will need to read Markdown files later. To make this easier, we also add a few more dependencies before getting started.
multiauthor-blog$ yarn add gray-matter remark remark-html
Once the installation is complete, we can run the dev script to start our project:
multiauthor-blog$ yarn dev
We can now explore our site. In your browser, open https://localhost:3000. You should see the default page added by create-next-app.
In a bit, we’ll need a navigation to reach our pages. We can add them in pages/_app.js even before the pages exist.
import Link from 'next/link'

import '../styles/globals.css'

export default function App({ Component, pageProps }) {
  return (
    <>
      <header>
        <nav>
          <ul>
            <li>
              <Link href="/">
                <a>Home</a>
              </Link>
            </li>

            <li>
              <Link href="/posts">
                <a>Posts</a>
              </Link>
            </li>

            <li>
              <Link href="/authors">
                <a>Authors</a>
              </Link>
            </li>
          </ul>
        </nav>
      </header>

      <main>
        <Component {...pageProps} />
      </main>
    </>
  )
}
Throughout this article, we’ll add these missing pages the navigation points to. Let’s first add some posts so we have something to work with on a blog overview page.
Creating Posts
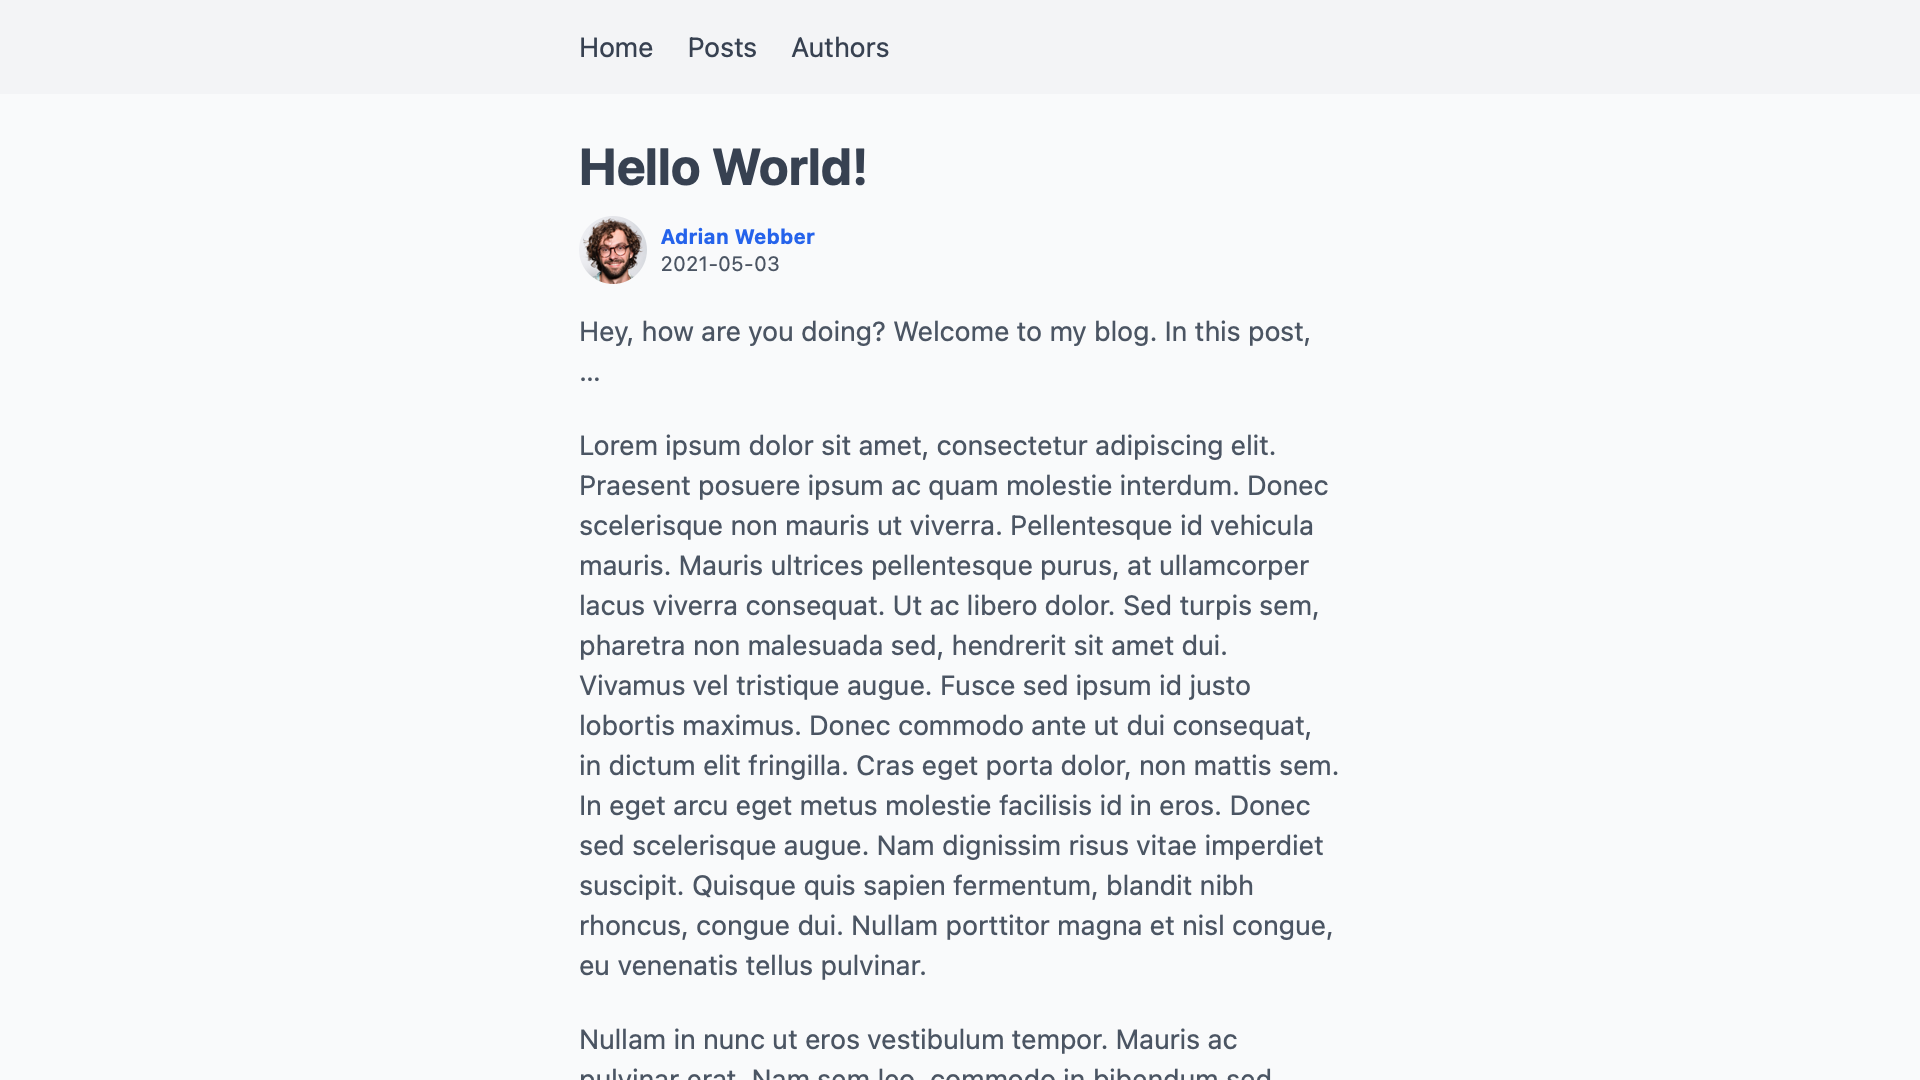
To keep our content separate from the code, we’ll put our posts in a directory called _posts/. To make writing and editing easier, we’ll create each post as a Markdown file. Each post’s filename will serve as the slug in our routes later. The file _posts/hello-world.md will be accessible under /posts/hello-world, for example.
Some information, like the full title and a short excerpt, goes in the frontmatter at the beginning of the file.
---
title: "Hello World!"
excerpt: "This is my first blog post."
createdAt: "2021-05-03"
---
Hey, how are you doing? Welcome to my blog. In this post, …
Add a few more files like this so the blog doesn’t start out empty:
multi-author-blog/
├─ _posts/
│  ├─ hello-world.md
│  ├─ multi-author-blog-in-nextjs.md
│  ├─ styling-react-with-tailwind.md
│  └─ ten-hidden-gems-in-javascript.md
└─ pages/
   └─ …
You can add your own or grab these sample posts from the GitHub repository.
Listing All Posts
Now that we have a few posts, we need a way to get them onto our blog. Let’s start by adding a page that lists them all, serving as the index of our blog.
In Next.js, a file created under pages/posts/index.js will be accessible as /posts on our site. The file must export a function that will serve as that page’s body. Its first version looks something like this:
export default function Posts() {
  return (
    <div className="posts">
      <h1>Posts</h1>

      {/* TODO: render posts */}
    </div>
  )
}
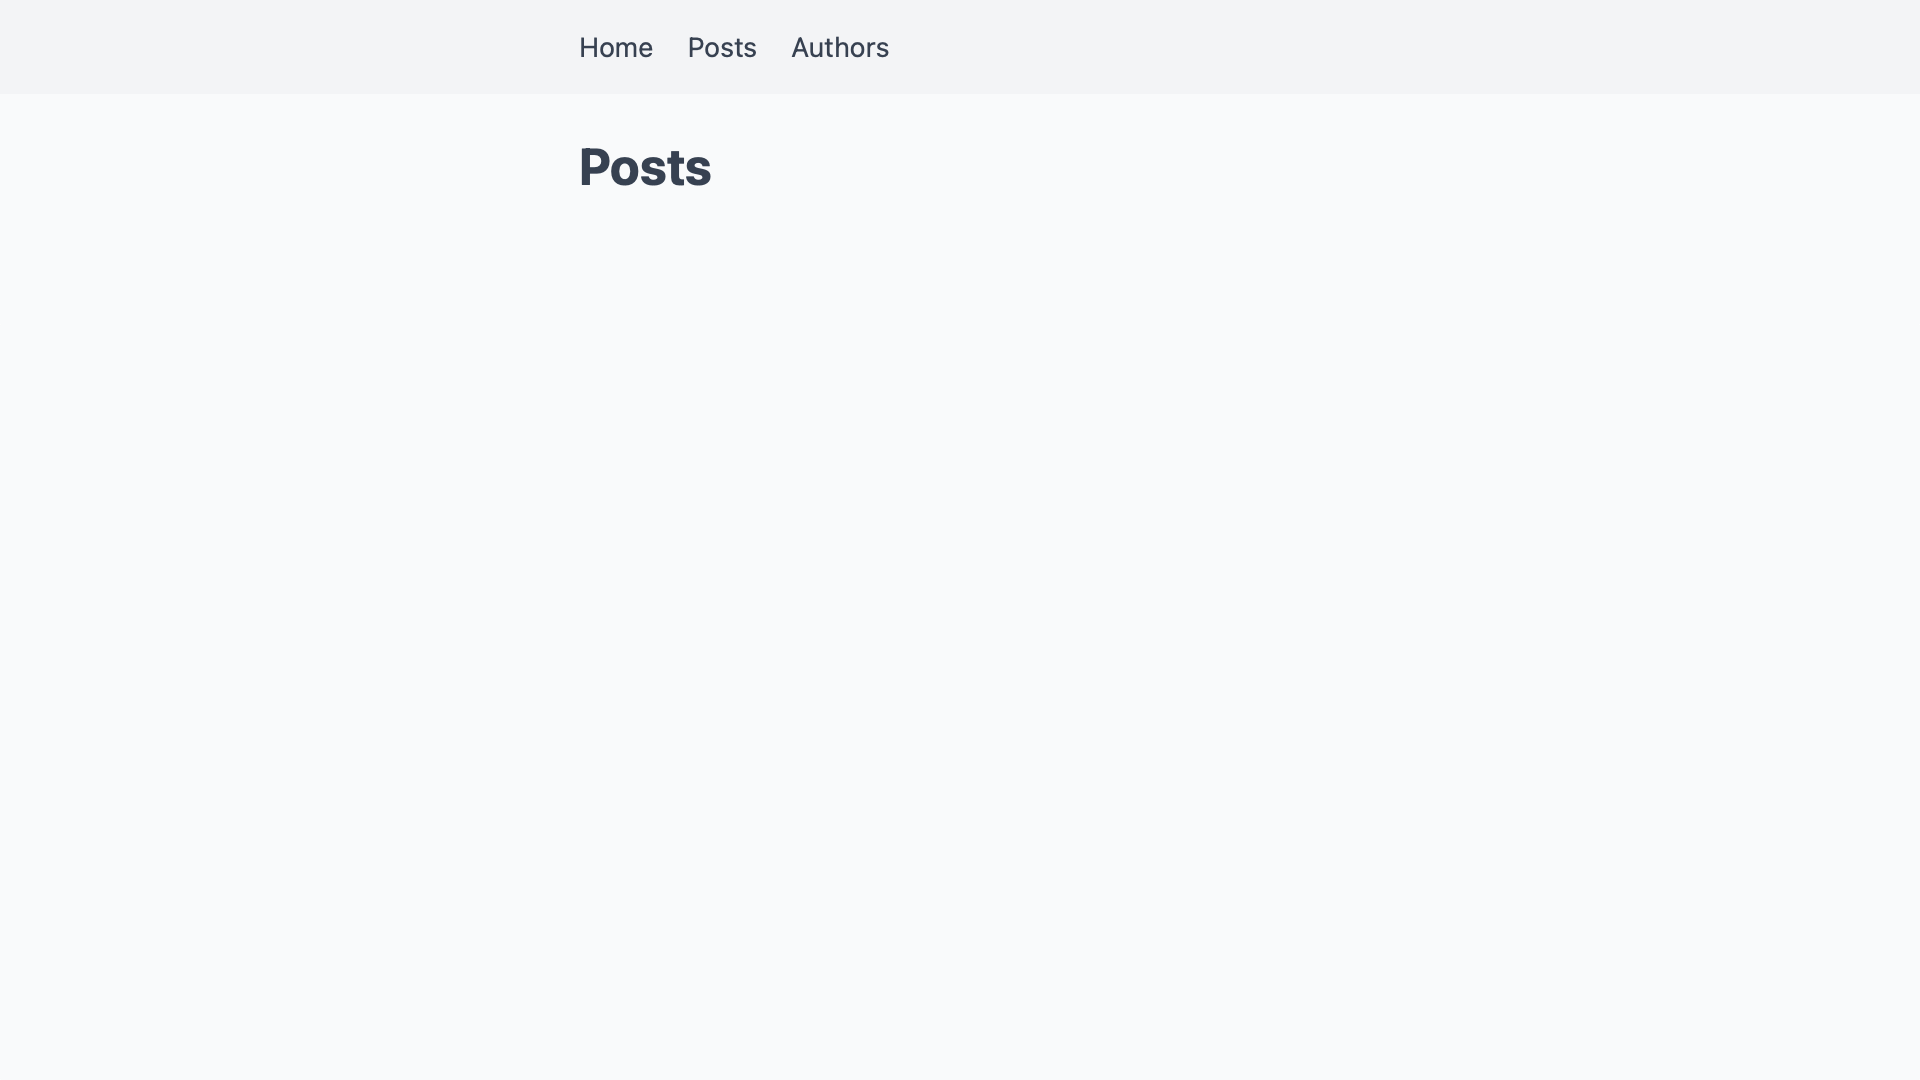
We don’t get very far because we don’t have a way to read the Markdown files yet. We can already navigate to https://localhost:3000/posts, but we only see the heading.
We now need a way to get our posts on there. Next.js uses a function called getStaticProps() to pass data to a page component. The function passes the props in the returned object to the component as props.
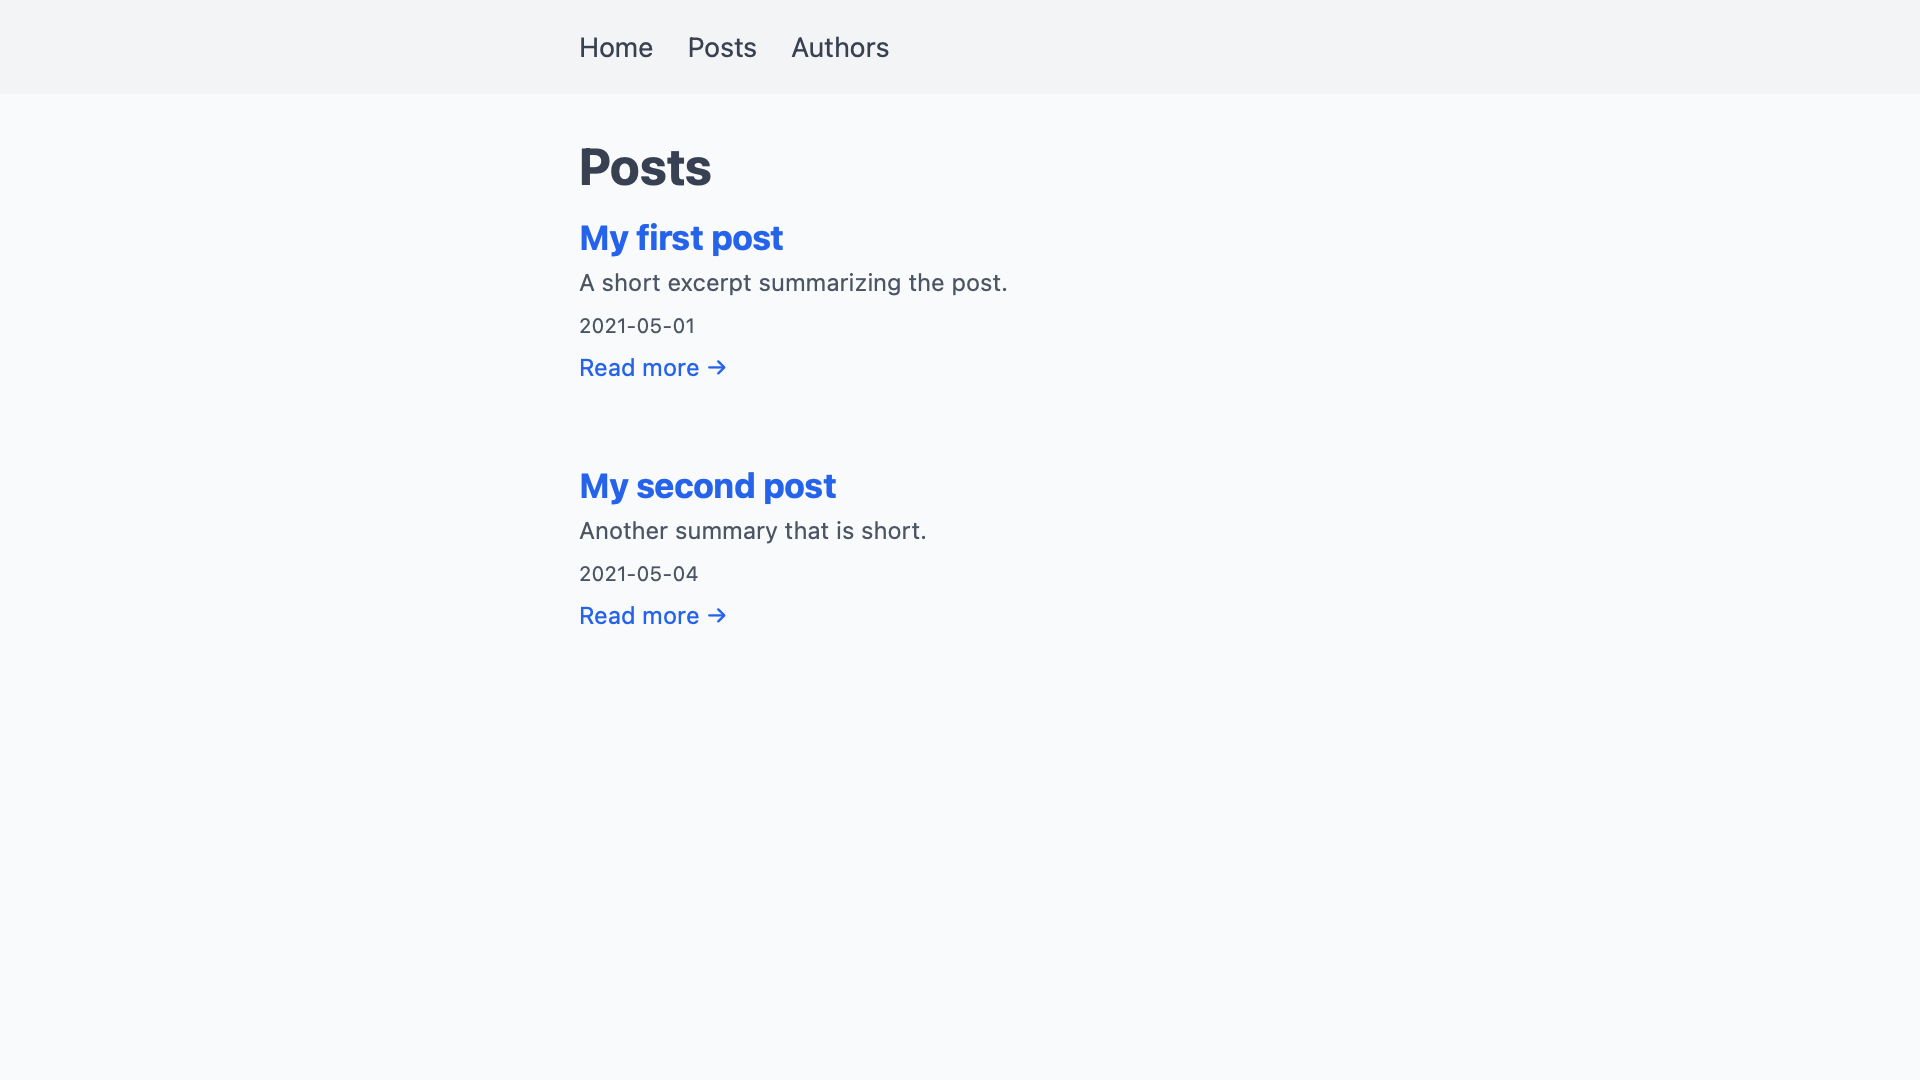
From getStaticProps(), we are going to pass the posts to the component as a prop called posts. We’ll hardcode two placeholder posts in this first step. By starting this way, we define what format we later want to receive the real posts in. If a helper function returns them in this format, we can switch over to it without changing the component.
The post overview won’t show the full text of the posts. For this page, the title, excerpt, permalink, and date of each post are enough.
 export default function Posts() { … }

+export function getStaticProps() {
+  return {
+    props: {
+      posts: [
+        {
+          title: "My first post",
+          createdAt: "2021-05-01",
+          excerpt: "A short excerpt summarizing the post.",
+          permalink: "/posts/my-first-post",
+          slug: "my-first-post",
+        }, {
+          title: "My second post",
+          createdAt: "2021-05-04",
+          excerpt: "Another summary that is short.",
+          permalink: "/posts/my-second-post",
+          slug: "my-second-post",
+        }
+      ]
+    }
+  }
+}
To check the connection, we can grab the posts from the props and show them in the Posts component. We’ll include the title, date of creation, excerpt, and a link to the post. For now, that link won’t lead anywhere yet.
+import Link from 'next/link'

-export default function Posts() {
+export default function Posts({ posts }) {
   return (
     <div className="posts">
       <h1>Posts</h1>

-      {/* TODO: render posts */}
+      {posts.map(post => {
+        const prettyDate = new Date(post.createdAt).toLocaleString('en-US', {
+          month: 'short',
+          day: '2-digit',
+          year: 'numeric',
+        })
+
+        return (
+          <article key={post.slug}>
+            <h2>
+              <Link href={post.permalink}>
+                <a>{post.title}</a>
+              </Link>
+            </h2>
+
+            <time dateTime={post.createdAt}>{prettyDate}</time>
+
+            <p>{post.excerpt}</p>
+
+            <Link href={post.permalink}>
+              <a>Read more →</a>
+            </Link>
+          </article>
+        )
+      })}
     </div>
   )
 }

 export function getStaticProps() { … }
After reloading the page in the browser, it now shows these two posts:
We don’t want to hardcode all our blog posts in getStaticProps() forever. After all, that is why we created all these files in the _posts/ directory earlier. We now need a way to read those files and pass their content to the page component.
There are a few ways we could do that. We could read the files right in getStaticProps(). Because this function runs on the server and not the client, we have access to native Node.js modules like fs in it. We could read, transform, and even manipulate local files in the same file we keep the page component.
To keep the file short and focused on one task, we’re going to move that functionality to a separate file instead. That way, the Posts component only needs to display the data, without also having to read that data itself. This adds some separation and organization to our project.
By convention, we are going to put functions reading data in a file called lib/api.js. That file will hold all functions that grab our content for the components that display it.
For the posts overview page, we want a function that reads, processes, and returns all posts. We’ll call it getAllPosts(). In it, we first use path.join() to build the path to the _posts/ directory. We then use fs.readdirSync() to read that directory, which gives us the names of all files in it. Mapping over these names, we then read each file in turn.
import fs from 'fs'
import path from 'path'

export function getAllPosts() {
  const postsDirectory = path.join(process.cwd(), '_posts')
  const filenames = fs.readdirSync(postsDirectory)

  return filenames.map(filename => {
    const file = fs.readFileSync(path.join(process.cwd(), '_posts', filename), 'utf8')

    // TODO: transform and return file
  })
}
After reading the file, we get its contents as a long string. To separate the frontmatter from the text of the post, we run that string through gray-matter. We’re also going to grab each post’s slug by removing the .md from the end of its filename. We need that slug to build the URL from which the post will be accessible later. Since we don’t need the Markdown body of the posts for this function, we can ignore the remaining content.
import fs from 'fs'
 import path from 'path'
+import matter from 'gray-matter'

 export function getAllPosts() {
   const postsDirectory = path.join(process.cwd(), '_posts')
   const filenames = fs.readdirSync(postsDirectory)

   return filenames.map(filename => {
     const file = fs.readFileSync(path.join(process.cwd(), '_posts', filename), 'utf8')

-    // TODO: transform and return file
+    // get frontmatter
+    const { data } = matter(file)
+
+    // get slug from filename
+    const slug = filename.replace(/\.md$/, '')
+
+    // return combined frontmatter and slug; build permalink
+    return {
+      ...data,
+      slug,
+      permalink: `/posts/${slug}`,
+    }
   })
 }
Note how we spread ...data into the returned object here. That lets us access values from its frontmatter as {post.title} instead of {post.data.title} later.
Back in our posts overview page, we can now replace the placeholder posts with this new function.
+import { getAllPosts } from '../../lib/api'

 export default function Posts({ posts }) { … }

 export function getStaticProps() {
   return {
     props: {
-      posts: [
-        {
-          title: "My first post",
-          createdAt: "2021-05-01",
-          excerpt: "A short excerpt summarizing the post.",
-          permalink: "/posts/my-first-post",
-          slug: "my-first-post",
-        }, {
-          title: "My second post",
-          createdAt: "2021-05-04",
-          excerpt: "Another summary that is short.",
-          permalink: "/posts/my-second-post",
-          slug: "my-second-post",
-        }
-      ]
+      posts: getAllPosts(),
     }
   }
 }
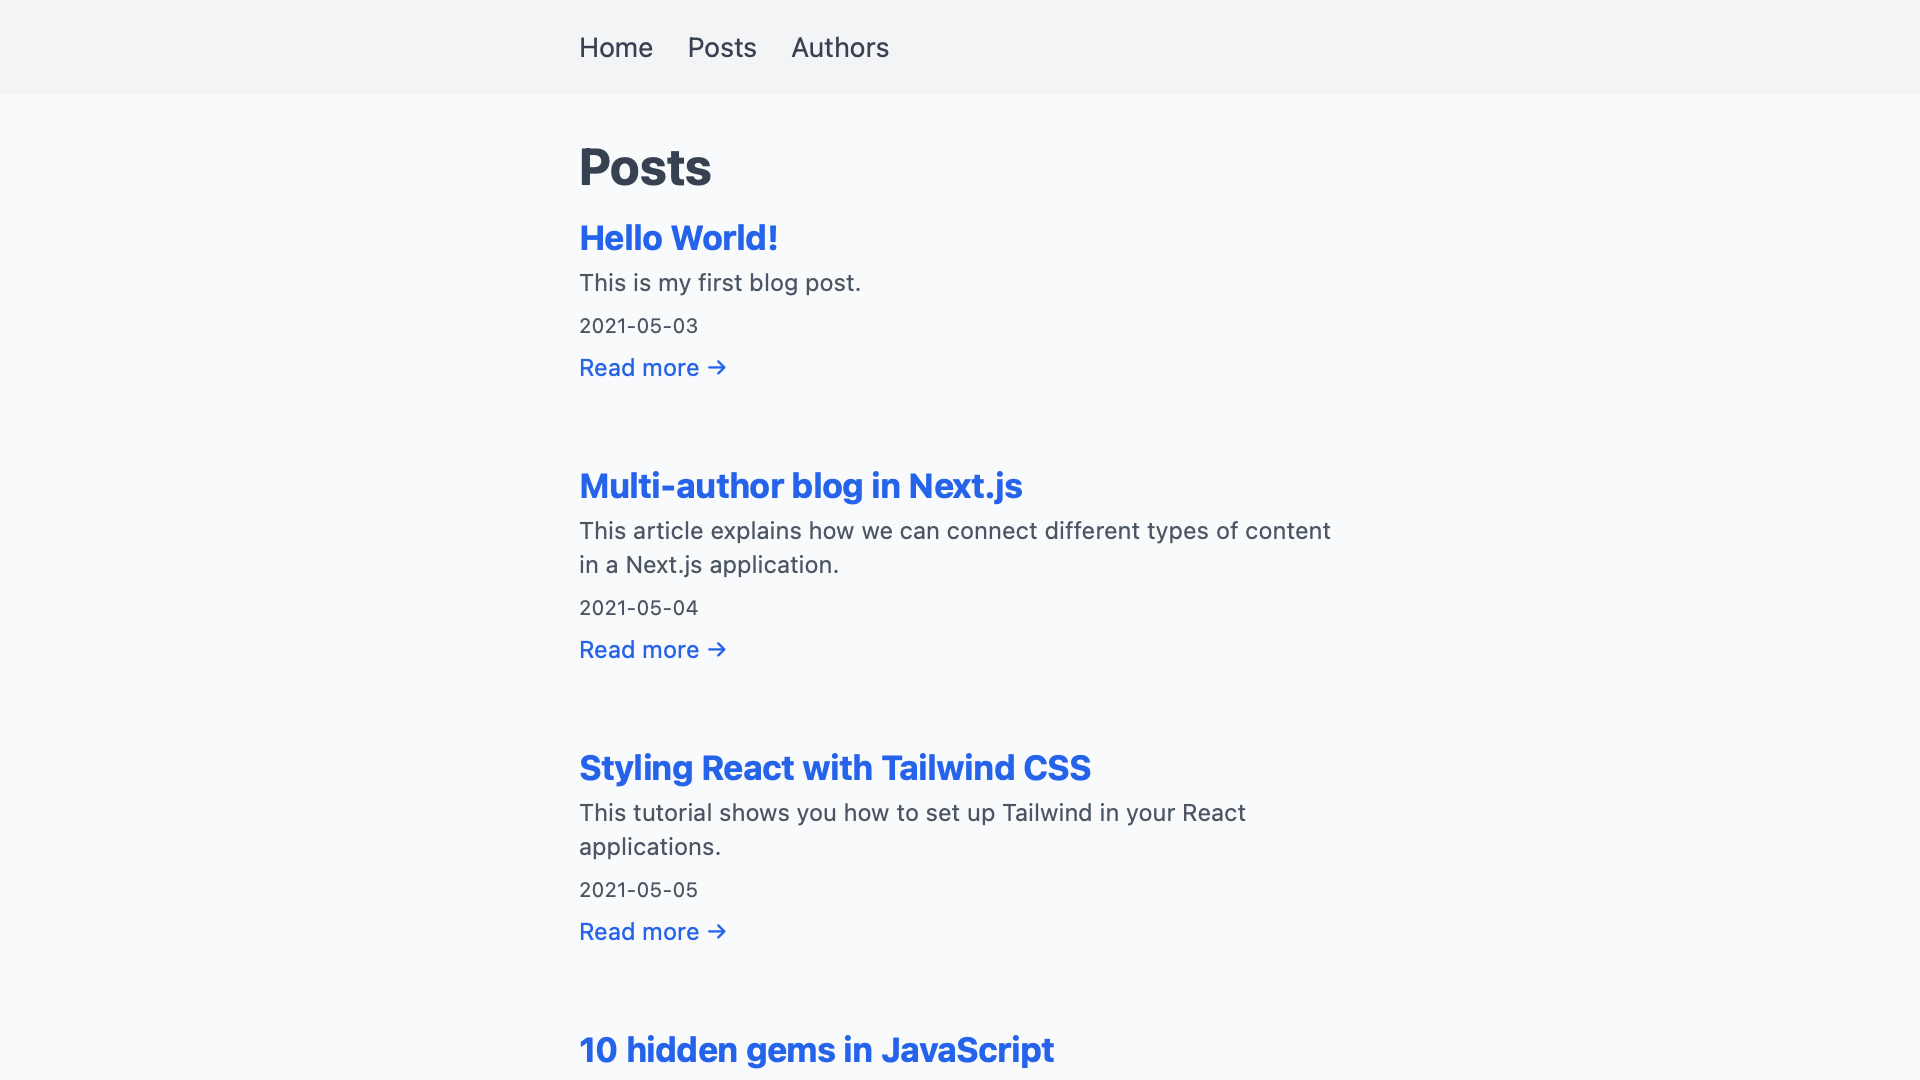
After reloading the browser, we now see our real posts instead of the placeholders we had before.
Adding Individual Post Pages
The links we added to each post don’t lead anywhere yet. There is no page that responds to URLs like /posts/hello-world yet. With dynamic routing, we can add a page that matches all paths like this.
A file created as pages/posts/[slug].js will match all URLs that look like /posts/abc. The value that appears instead of [slug] in the URL will be available to the page as a query parameter. We can use that in the corresponding page’s getStaticProps() as params.slug to call a helper function.
As a counterpart to getAllPosts(), we’ll call that helper function getPostBySlug(slug). Instead of all posts, it will return a single post that matches the slug we pass it. On a post’s page, we also need to show the underlying file’s Markdown content.
The page for individual posts looks like the one for the post overview. Instead of passing posts to the page in getStaticProps(), we only pass a single post. Let’s do the general setup first before we look at how to transform the post’s Markdown body to usable HTML. We’re going to skip the placeholder post here, using the helper function we’ll add in the next step immediately.
import { getPostBySlug } from '../../lib/api'

export default function Post({ post }) {
  const prettyDate = new Date(post.createdAt).toLocaleString('en-US', {
    month: 'short',
    day: '2-digit',
    year: 'numeric',
  })

  return (
    <div className="post">
      <h1>{post.title}</h1>

      <time dateTime={post.createdAt}>{prettyDate}</time>

      {/* TODO: render body */}
    </div>
  )
}

export function getStaticProps({ params }) {
  return {
    props: {
      post: getPostBySlug(params.slug),
    },
  }
}
We now have to add the function getPostBySlug(slug) to our helper file lib/api.js. It is like getAllPosts(), with a few notable differences. Because we can get the post’s filename from the slug, we don’t need to read the entire directory first. If the slug is 'hello-world', we are going to read a file called _posts/hello-world.md. If that file doesn’t exist, Next.js will show a 404 error page.
Another difference to getAllPosts() is that this time, we also need to read the post’s Markdown content. We can return it as render-ready HTML instead of raw Markdown by processing it with remark first.
 import fs from 'fs'
 import path from 'path'
 import matter from 'gray-matter'
+import remark from 'remark'
+import html from 'remark-html'

 export function getAllPosts() { … }

+export function getPostBySlug(slug) {
+  const file = fs.readFileSync(path.join(process.cwd(), '_posts', `${slug}.md`), 'utf8')
+
+  const {
+    content,
+    data,
+  } = matter(file)
+
+  const body = remark().use(html).processSync(content).toString()
+
+  return {
+    ...data,
+    body,
+  }
+}
In theory, we could use the function getAllPosts() inside getPostBySlug(slug). We’d first get all posts with it, which we could then search for one that matches the given slug. That would mean we would always need to read all posts before we could get a single one, which is unnecessary work. getAllPosts() also doesn’t return the posts’ Markdown content. We could update it to do that, in which case it would do more work than it currently needs to.
Because the two helper functions do different things, we are going to keep them separate. That way, we can focus the functions on exactly and only the job we need each of them to do.
Pages that use dynamic routing can provide a getStaticPaths() next to their getStaticProps(). This function tells Next.js what values of the dynamic path segments to build pages for. We can provide those by using getAllPosts() and returning a list of objects that define each post’s slug.
-import { getPostBySlug } from '../../lib/api'
+import { getAllPosts, getPostBySlug } from '../../lib/api'

 export default function Post({ post }) { … }

 export function getStaticProps({ params }) { … }

+export function getStaticPaths() {
+  return {
+    fallback: false,
+    paths: getAllPosts().map(post => ({
+      params: {
+        slug: post.slug,
+      },
+    })),
+  }
+}
Since we parse the Markdown content in getPostBySlug(slug), we can render it on the page now. We need to use dangerouslySetInnerHTML for this step so Next.js can render the HTML behind post.body. Despite its name, it is safe to use the property in this scenario. Because we have full control over our posts, it is unlikely they are going to inject unsafe scripts.
 import { getAllPosts, getPostBySlug } from '../../lib/api'

 export default function Post({ post }) {
  const prettyDate = new Date(post.createdAt).toLocaleString('en-US', {
    month: 'short',
    day: '2-digit',
    year: 'numeric',
  })

   return (
     <div className="post">
       <h1>{post.title}</h1>

       <time dateTime={post.createdAt}>{prettyDate}</time>

-      {/* TODO: render body */}
+      <div dangerouslySetInnerHTML={{ __html: post.body }} />
     </div>
   )
 }

 export function getStaticProps({ params }) { … }

 export function getStaticPaths() { … }
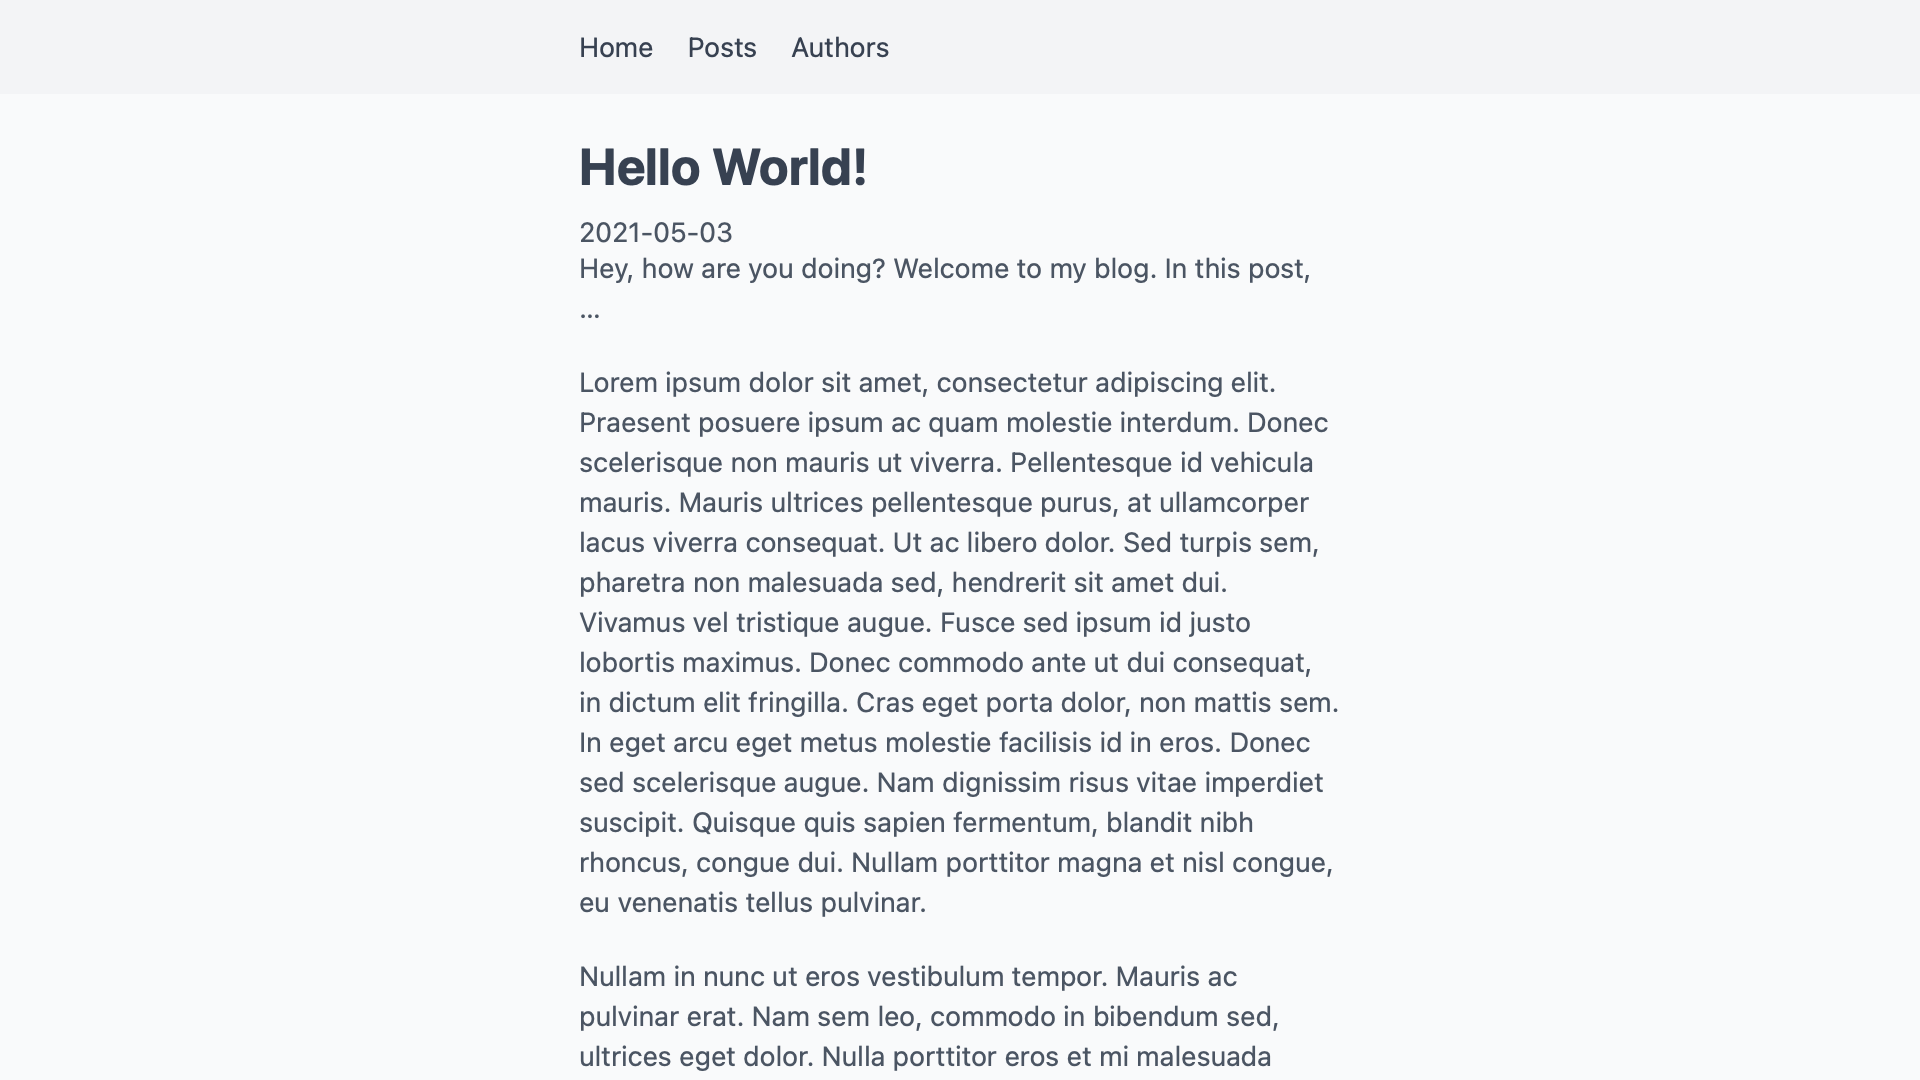
If we follow one of the links from the post overview, we now get to that post’s own page.
Adding Authors
Now that we have posts wired up, we need to repeat the same steps for our authors. This time, we’ll use JSON instead of Markdown to describe them. We can mix different types of files in the same project like this whenever it makes sense. The helper functions we use to read the files take care of any differences for us. Pages can use these functions without knowing what format we store our content in.
First, create a directory called _authors/ and add a few author files to it. As we did with posts, name the files by each author’s slug. We’ll use that to look up authors later. In each file, we specify an author’s full name in a JSON object.
{
  "name": "Adrian Webber"
}
For now, having two authors in our project is enough.
To give them some more personality, let’s also add a profile picture for each author. We’ll put those static files in the public/ directory. By naming the files by the same slug, we can connect them using the implied convention alone. We could add the path of the picture to each author’s JSON file to link the two. By naming all files by the slugs, we can manage this connection without having to write it out. The JSON objects only need to hold information we can’t build with code.
When you’re done, your project directory should look something like this.
multi-author-blog/
├─ _authors/
│  ├─ adrian-webber.json
│  └─ megan-carter.json
├─ _posts/
│  └─ …
├─ pages/
│  └─ …
└─ public/
   ├─ adrian-webber.jpg
   └─ megan-carter.jpg
Same as with the posts, we now need helper functions to read all authors and get individual authors. The new functions getAllAuthors() and getAuthorBySlug(slug) also go in lib/api.js. They do almost exactly the same as their post counterparts. Because we use JSON to describe authors, we don’t need to parse any Markdown with remark here. We also don’t need gray-matter to parse frontmatter. Instead, we can use JavaScript’s built-in JSON.parse() to read the text contents of our files into objects.
const contents = fs.readFileSync(somePath, 'utf8')
// ⇒ looks like an object, but is a string
//   e.g. '{ "name": "John Doe" }'

const json = JSON.parse(contents)
// ⇒ a real JavaScript object we can do things with
//   e.g. { name: "John Doe" }
With that knowledge, our helper functions look like this:
 export function getAllPosts() { … }

 export function getPostBySlug(slug) { … }

+export function getAllAuthors() {
+  const authorsDirectory = path.join(process.cwd(), '_authors')
+  const filenames = fs.readdirSync(authorsDirectory)
+
+  return filenames.map(filename => {
+    const file = fs.readFileSync(path.join(process.cwd(), '_authors', filename), 'utf8')
+
+    // get data
+    const data = JSON.parse(file)
+
+    // get slug from filename
+    const slug = filename.replace(/\.json/, '')
+
+    // return combined frontmatter and slug; build permalink
+    return {
+      ...data,
+      slug,
+      permalink: `/authors/${slug}`,
+      profilePictureUrl: `${slug}.jpg`,
+    }
+  })
+}
+
+export function getAuthorBySlug(slug) {
+  const file = fs.readFileSync(path.join(process.cwd(), '_authors', `${slug}.json`), 'utf8')
+
+  const data = JSON.parse(file)
+
+  return {
+    ...data,
+    permalink: `/authors/${slug}`,
+    profilePictureUrl: `/${slug}.jpg`,
+    slug,
+  }
+}
With a way to read authors into our application, we can now add a page that lists them all. Creating a new page under pages/authors/index.js gives us an /authors page on our site.
The helper functions take care of reading the files for us. This page component does not need to know authors are JSON files in the filesystem. It can use getAllAuthors() without knowing where or how it gets its data. The format does not matter as long as our helper functions return their data in a format we can work with. Abstractions like this let us mix different types of content across our application.
The index page for authors looks a lot like the one for posts. We get all authors in getStaticProps(), which passes them to the Authors component. That component maps over each author and lists some information about them. We don’t need to build any other links or URLs from the slug. The helper function already returns the authors in a usable format.
import Image from 'next/image'
import Link from 'next/link'

import { getAllAuthors } from '../../lib/api/authors'

export default function Authors({ authors }) {
  return (
    <div className="authors">
      <h1>Authors</h1>

      {authors.map(author => (
        <div key={author.slug}>
          <h2>
            <Link href={author.permalink}>
              <a>{author.name}</a>
            </Link>
          </h2>

          <Image alt={author.name} src={author.profilePictureUrl} height="40" width="40" />

          <Link href={author.permalink}>
            <a>Go to profile →</a>
          </Link>
        </div>
      ))}
    </div>
  )
}

export function getStaticProps() {
  return {
    props: {
      authors: getAllAuthors(),
    },
  }
}
If we visit /authors on our site, we see a list of all authors with their names and pictures.

The links to the authors’ profiles don’t lead anywhere yet. To add the profile pages, we create a file under pages/authors/[slug].js. Because authors don’t have any text content, all we can add for now are their names and profile pictures. We also need another getStaticPaths() to tell Next.js what slugs to build pages for.
import Image from 'next/image'

import { getAllAuthors, getAuthorBySlug } from '../../lib/api'

export default function Author({ author }) {
  return (
    <div className="author">
      <h1>{author.name}</h1>

      <Image alt={author.name} src={author.profilePictureUrl} height="80" width="80" />
    </div>
  )
}

export function getStaticProps({ params }) {
  return {
    props: {
      author: getAuthorBySlug(params.slug),
    },
  }
}

export function getStaticPaths() {
  return {
    fallback: false,
    paths: getAllAuthors().map(author => ({
      params: {
        slug: author.slug,
      },
    })),
  }
}
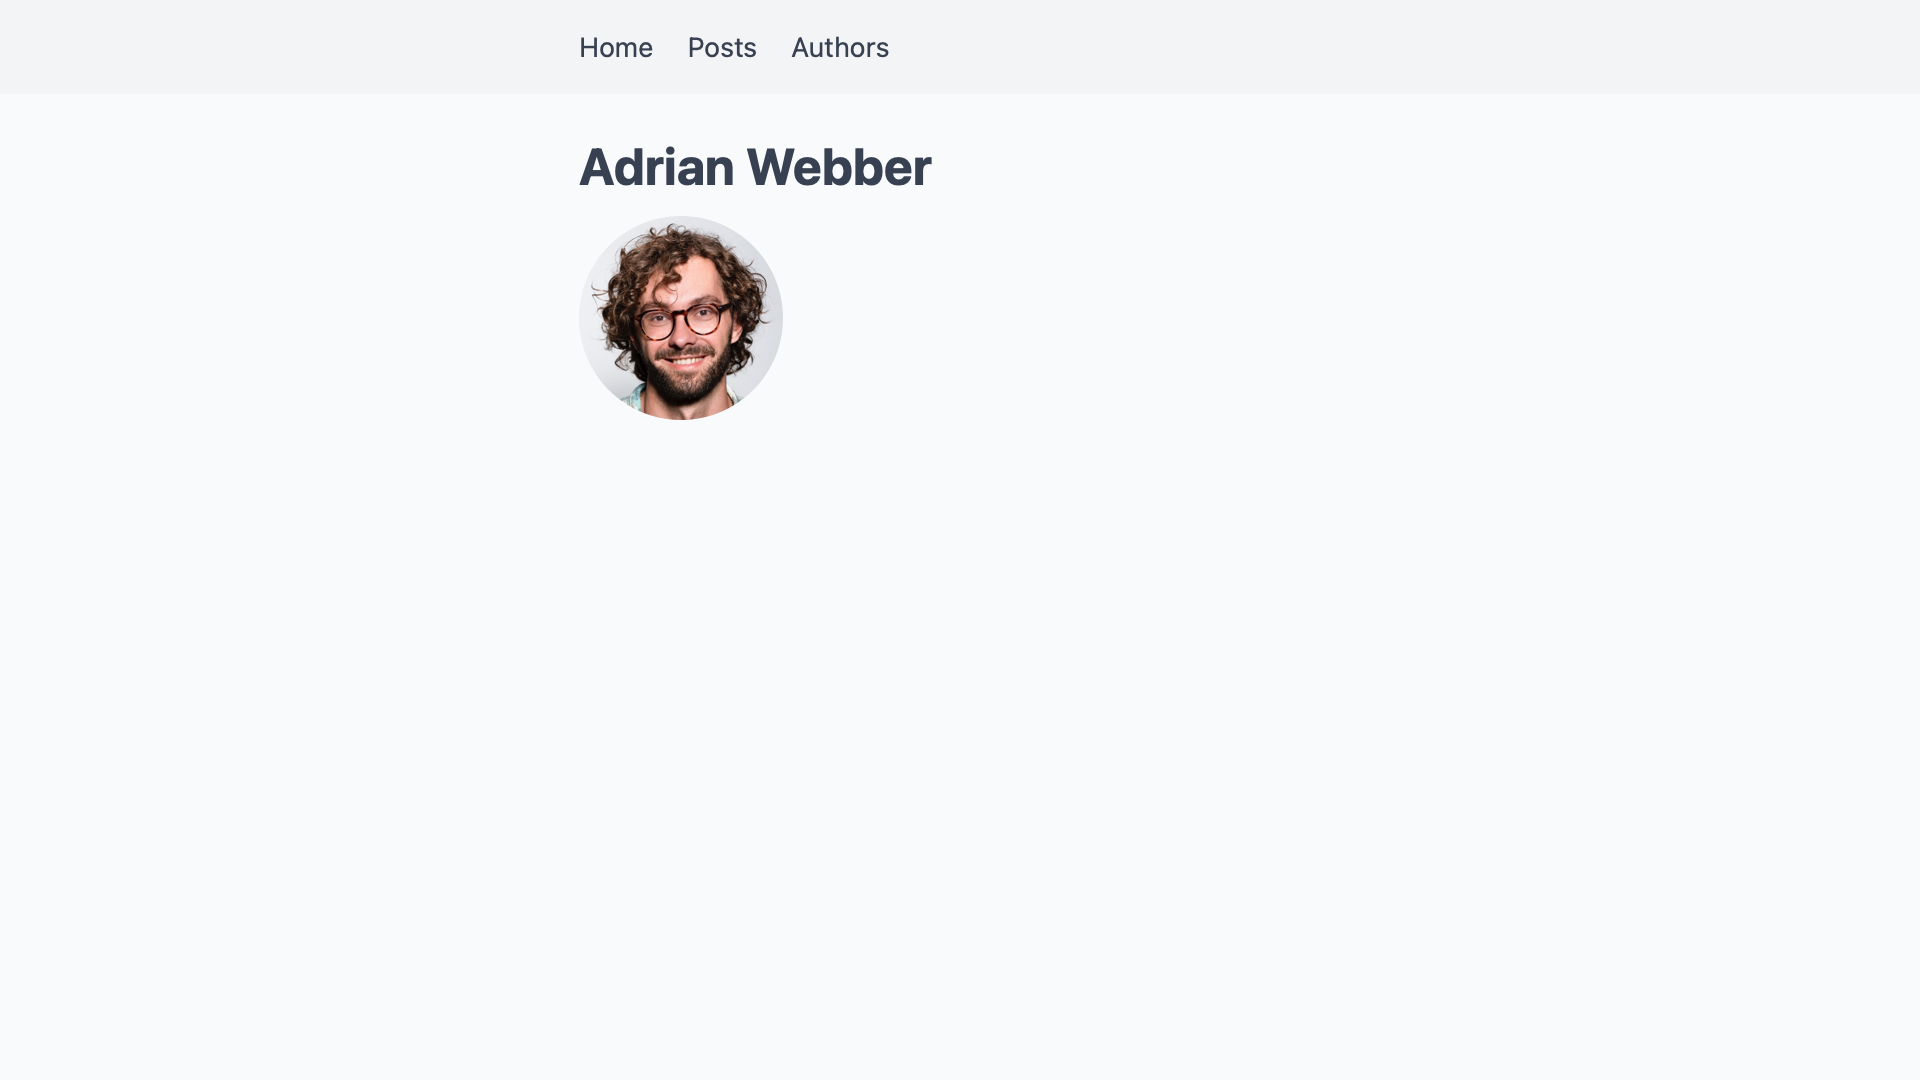
With this, we now have a basic author profile page that is very light on information.
At this point, authors and posts are not connected yet. We’ll build that bridge next so we can add a list of each authors’ posts to their profile pages.
Connecting Posts And Authors
To connect two pieces of content, we need to reference one in the other. Since we already identify posts and authors by their slugs, we’ll reference them with that. We could add authors to posts and posts to authors, but one direction is enough to link them. Since we want to attribute posts to authors, we are going to add the author’s slug to each post’s frontmatter.
 ---
 title: "Hello World!"
 excerpt: "This is my first blog post."
 createdAt: "2021-05-03"
+author: adrian-webber
 ---
 Hey, how are you doing? Welcome to my blog. In this post, …
If we keep it at that, running the post through gray-matter adds the author field to the post as a string:
const post = getPostBySlug("hello-world")
const author = post.author

console.log(author)
// "adrian-webber"
To get the object representing the author, we can use that slug and call getAuthorBySlug(slug) with it.
 const post = getPostBySlug("hello-world")
-const author = post.author
+const author = getAuthorBySlug(post.author)

 console.log(author)
 // {
 //   name: "Adrian Webber",
 //   slug: "adrian-webber",
 //   profilePictureUrl: "/adrian-webber.jpg",
 //   permalink: "/authors/adrian-webber"
 // }
To add the author to a single post’s page, we need to call getAuthorBySlug(slug) once in getStaticProps().
+import Image from 'next/image'
+import Link from 'next/link'

-import { getPostBySlug } from '../../lib/api'
+import { getAuthorBySlug, getPostBySlug } from '../../lib/api'

 export default function Post({ post }) {
   const prettyDate = new Date(post.createdAt).toLocaleString('en-US', {
     month: 'short',
     day: '2-digit',
     year: 'numeric',
   })

   return (
     <div className="post">
       <h1>{post.title}</h1>

       <time dateTime={post.createdAt}>{prettyDate}</time>

+      <div>
+        <Image alt={post.author.name} src={post.author.profilePictureUrl} height="40" width="40" />
+
+        <Link href={post.author.permalink}>
+          <a>
+            {post.author.name}
+          </a>
+        </Link>
+      </div>

       <div dangerouslySetInnerHTML={{ __html: post.body }}>
     </div>
   )
 }

 export function getStaticProps({ params }) {
+  const post = getPostBySlug(params.slug)

   return {
     props: {
-      post: getPostBySlug(params.slug),
+      post: {
+        ...post,
+        author: getAuthorBySlug(post.author),
+      },
     },
   }
 }
Note how we spread ...post into an object also called post in getStaticProps(). By placing author after that line, we end up replacing the string version of the author with its full object. That lets us access an author’s properties through post.author.name in the Post component.
With that change, we now get a link to the author’s profile page, complete with their name and picture, on a post’s page.
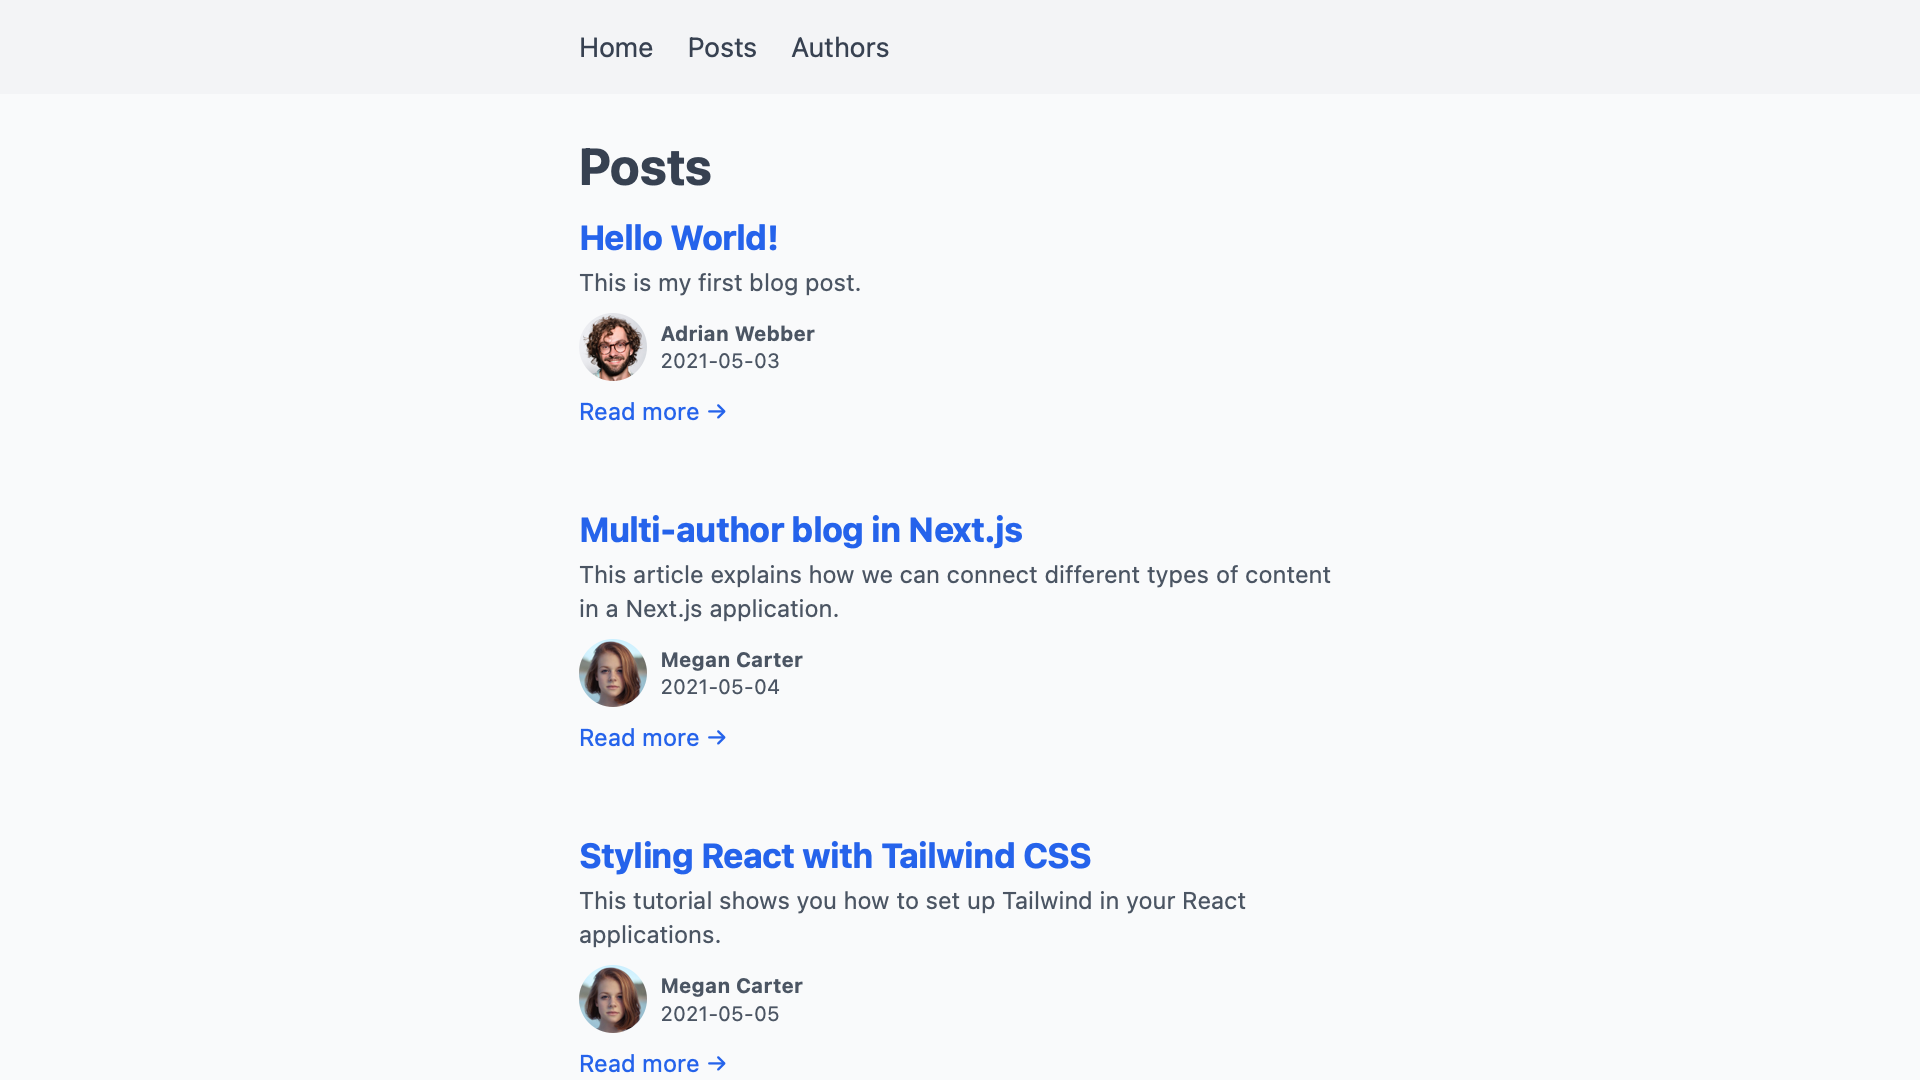
Adding authors to the post overview page requires a similar change. Instead of calling getAuthorBySlug(slug) once, we need to map over all posts and call it for each one of them.
+import Image from 'next/image'
+import Link from 'next/link'

-import { getAllPosts } from '../../lib/api'
+import { getAllPosts, getAuthorBySlug } from '../../lib/api'

 export default function Posts({ posts }) {
   return (
     <div className="posts">
       <h1>Posts</h1>

       {posts.map(post => {
         const prettyDate = new Date(post.createdAt).toLocaleString('en-US', {
           month: 'short',
           day: '2-digit',
           year: 'numeric',
         })

         return (
           <article key={post.slug}>
             <h2>
               <Link href={post.permalink}>
                 <a>{post.title}</a>
               </Link>
             </h2>

             <time dateTime={post.createdAt}>{prettyDate}</time>

+            <div>
+              <Image alt={post.author.name} src={post.author.profilePictureUrl} height="40" width="40" />
+
+              <span>{post.author.name}</span>
+            </div>

             <p>{post.excerpt}</p>

             <Link href={post.permalink}>
               <a>Read more →</a>
             </Link>
           </article>
         )
       })}
     </div>
   )
 }

 export function getStaticProps() {
   return {
     props: {
-      posts: getAllPosts(),
+      posts: getAllPosts().map(post => ({
+        ...post,
+        author: getAuthorBySlug(post.author),
+      })),
    }
  }
}
That adds the authors to each post in the post overview:
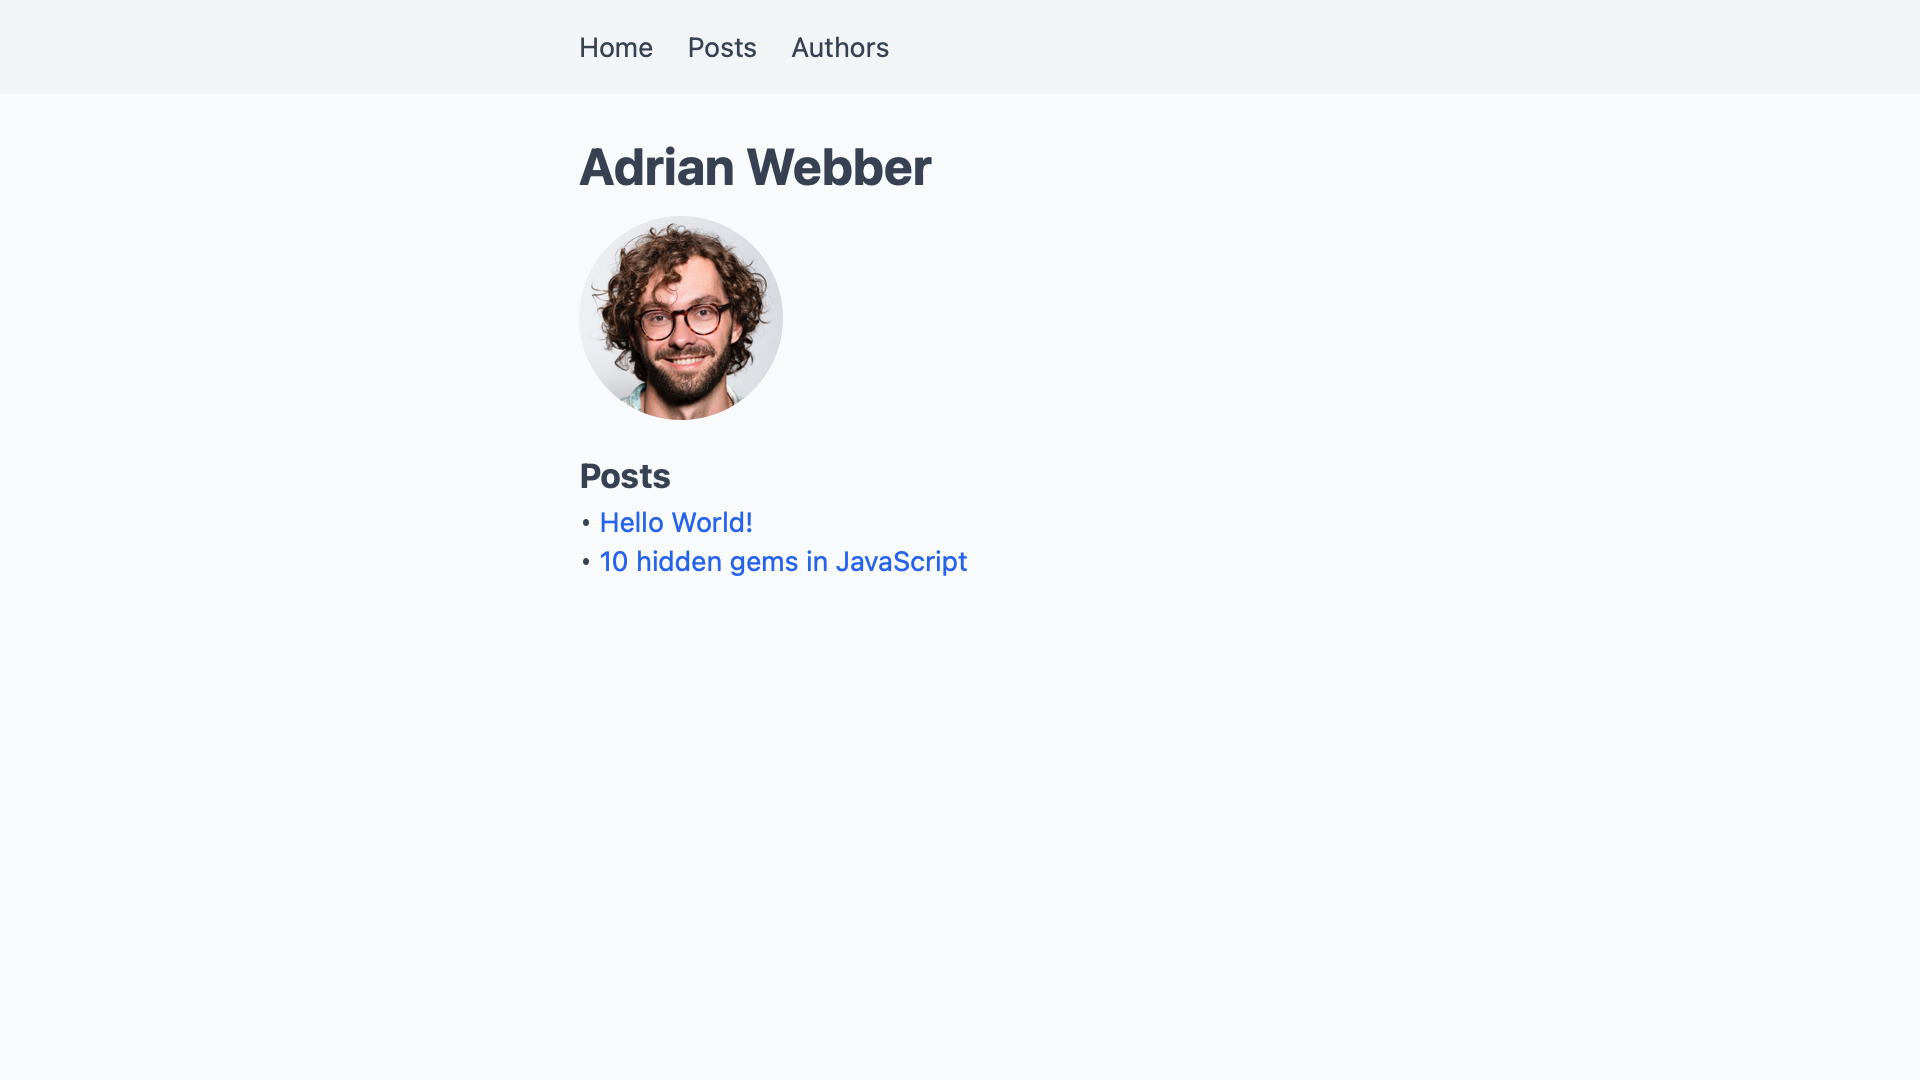
We don’t need to add a list of an author’s posts to their JSON file. On their profile pages, we first get all posts with getAllPosts(). We can then filter the full list for the ones attributed to this author.
import Image from 'next/image'
+import Link from 'next/link'

-import { getAllAuthors, getAuthorBySlug } from '../../lib/api'
+import { getAllAuthors, getAllPosts, getAuthorBySlug } from '../../lib/api'

 export default function Author({ author }) {
   return (
     <div className="author">
       <h1>{author.name}</h1>

       <Image alt={author.name} src={author.profilePictureUrl} height="40" width="40" />

+      <h2>Posts</h2>
+
+      <ul>
+        {author.posts.map(post => (
+          <li>
+            <Link href={post.permalink}>
+              <a>
+                {post.title}
+              </a>
+            </Link>
+          </li>
+        ))}
+      </ul>
     </div>
   )
 }

 export function getStaticProps({ params }) {
   const author = getAuthorBySlug(params.slug)

   return {
     props: {
-      author: getAuthorBySlug(params.slug),
+      author: {
+        ...author,
+        posts: getAllPosts().filter(post => post.author === author.slug),
+      },
     },
   }
 }

 export function getStaticPaths() { … }
This gives us a list of articles on every author’s profile page.

On the author overview page, we’ll only add how many posts they have written to not clutter the interface.
import Image from 'next/image'
import Link from 'next/link'

-import { getAllAuthors } from '../../lib/api'
+import { getAllAuthors, getAllPosts } from '../../lib/api'

 export default function Authors({ authors }) {
   return (
     <div className="authors">
       <h1>Authors</h1>

       {authors.map(author => (
         <div key={author.slug}>
           <h2>
             <Link href={author.permalink}>
               <a>
                 {author.name}
               </a>
             </Link>
           </h2>

           <Image alt={author.name} src={author.profilePictureUrl} height="40" width="40" />

+         <p>{author.posts.length} post(s)</p>

           <Link href={author.permalink}>
             <a>Go to profile →</a>
           </Link>
         </div>
       ))}
     </div>
   )
 }

 export function getStaticProps() {
   return {
     props: {
-      authors: getAllAuthors(),
+      authors: getAllAuthors().map(author => ({
+        ...author,
+        posts: getAllPosts().filter(post => post.author === author.slug),
+      })),
     }
   }
 }
With that, the Authors overview page shows how many posts each author has contributed.
And that’s it! Posts and authors are completely linked up now. We can get from a post to an author’s profile page, and from there to their other posts.
Summary And Outlook
In this article, we connected two related types of content through their unique slugs. Defining the relationship from post to author enabled a variety of scenarios. We can now show the author on each post and list their posts on their profile pages.
With this technique, we can add many other kinds of relationships. Each post might have a reviewer on top of an author. We can set that up by adding a reviewer field to a post’s frontmatter.
 ---
 title: "Hello World!"
 excerpt: "This is my first blog post."
 createdAt: "2021-05-03"
 author: adrian-webber
+reviewer: megan-carter
 ---
 Hey, how are you doing? Welcome to my blog. In this post, …
On the filesystem, the reviewer is another author from the _authors/ directory. We can use getAuthorBySlug(slug) to get their information as well.
 export function getStaticProps({ params }) {
   const post = getPostBySlug(params.slug)

   return {
     props: {
       post: {
         ...post,
         author: getAuthorBySlug(post.author),
+        reviewer: getAuthorBySlug(post.reviewer),
       },
     },
   }
 }
We could even support co-authors by naming two or more authors on a post instead of only a single person.
 ---
 title: "Hello World!"
 excerpt: "This is my first blog post."
 createdAt: "2021-05-03"
-author: adrian-webber
+authors:
+  - adrian-webber
+  - megan-carter
 ---
 Hey, how are you doing? Welcome to my blog. In this post, …
In this scenario, we could no longer look up a single author in a post’s getStaticProps(). Instead, we would map over this array of authors to get them all.
 export function getStaticProps({ params }) {
   const post = getPostBySlug(params.slug)

   return {
     props: {
       post: {
         ...post,
-        author: getAuthorBySlug(post.author),
+        authors: post.authors.map(getAuthorBySlug),
       },
     },
   }
 }
We can also produce other kinds of scenarios with this technique. It enables any kind of one-to-one, one-to-many, or even many-to-many relationship. If your project also features newsletters and case studies, you can add authors to each of them as well.
On a site all about the Marvel universe, we could connect characters and the movies they appear in. In sports, we could connect players and the teams they currently play for.
Because helper functions hide the data source, content could come from different systems. We could read articles from the filesystem, comments from an API, and merge them into our code. If some piece of content relates to another type of content, we can connect them with this pattern.
Other Resources
Next.js offers more background on the functions we used in their page on Data Fetching. It includes links to sample projects that fetch data from different types of sources.
If you want to take this starter project further, check out these articles:
- Building a CSS Tricks Website Clone with Strapi and Next.js
Replace the files on the local filesystem with a Strapi-powered backend. - Comparing Styling Methods in Next.js
Explore different ways of writing custom CSS to change this starter’s styling. - Markdown/MDX with Next.js
Add MDX to your project so you can use JSX and React components in your Markdown.
Further Reading
- How To Build Server-Side Rendered (SSR) Svelte Apps With SvelteKit
- Full Stack GraphQL With Next.js, Neo4j AuraDB And Vercel
- How To Monitor And Optimize Google Core Web Vitals
- The Fight For The Main Thread


