Image To Text Conversion With React And Tesseract.js (OCR)

Email Newsletter
Weekly tips on front-end & UX.
Trusted by 182,000+ folks.
 Celebrating 10 million developers


 Custom Web Forms for Angular, React, & Vue. Your backend.
Data is the backbone of every software application because the main purpose of an application is to solve human problems. To solve human problems, it is necessary to have some information about them.
Such information is represented as data, especially through computation. On the web, data is mostly collected in the form of texts, images, videos, and many more. Sometimes, images contain essential texts that are meant to be processed to achieve a certain purpose. These images were mostly processed manually because there was no way to process them programmatically.
The inability to extract text from images was a data processing limitation I experienced first-hand at my last company. We needed to process scanned gift cards and we had to do it manually since we couldn’t extract text from images.
There was a department called “Operations” within the company that was responsible for manual confirming gift cards and crediting users’ accounts. Although we had a website through which users connected with us, the processing of gift cards was carried out manually behind the scenes.
At the time, our website was built mainly with PHP (Laravel) for the backend and JavaScript (jQuery and Vue) for the frontend. Our technical stack was good enough to work with Tesseract.js provided the issue was considered important by the management.
I was willing to solve the problem but it was not necessary to solve the problem judging from the business’ or the management’s point of view. After leaving the company, I decided to do some research and try to find possible solutions. Eventually, I discovered OCR.
What Is OCR?
OCR stands for “Optical Character Recognition” or “Optical Character Reader”. It is used to extract texts from images.
The Evolution Of OCR can be traced to several inventions but Optophone, “Gismo” , CCD flatbed scanner, Newton MesssagePad and Tesseract are the major inventions that take character recognition to another level of usefulness.
So, why use OCR? Well, Optical Character Recognition solves a lot of problems, one of which triggered me to write this article. I realized the ability to extract texts from an image ensures a lot of possibilities such as:
- Regulation
Every organization needs to regulate users’ activities for some reasons. The regulation might be used to protect users’ rights and secure them from threats or scams.
Extracting texts from an image enables an organization to process textual information on an image for regulation, especially when the images are supplied by some of the users.
For example, Facebook-like regulation of the number of texts on images used for ads can be achieved with OCR. Also, hiding sensitive content on Twitter is also made possible by OCR. - Searchability
Searching is one of the most common activities, especially on the internet. Searching algorithms are mostly based on manipulating texts. With Optical Character Recognition, it is possible to recognize characters on images and use them to provide relevant image results to users. In short, images and videos are now searchable with the aid of OCR. - Accessibility
Having texts on images has always been a challenge for accessibility and it is the rule of thumb to have few texts on an image. With OCR, screen readers can have access to texts on images to provide some necessary experience to its users. - Data Processing Automation The processing of data is mostly automated for scale. Having texts on images is a limitation to data processing because the texts cannot be processed except manually. Optical Character Recognition (OCR) makes it possible to extract texts on images programmatically thereby, ensuring data processing automation especially when it has to do with the processing of texts on images.
- Digitization Of Printed Materials
Everything is going digital and there are still a lot of documents to be digitized. Cheques, certificates, and other physical documents can now be digitized with the use of Optical Character Recognition.
Finding out all the uses above deepened my interests, so I decided to go further by asking a question:
“How can I use OCR on the web, especially in a React application?”
That question led me to Tesseract.js.
What Is Tesseract.js?
Tesseract.js is a JavaScript library that compiles the original Tesseract from C to JavaScript WebAssembly thereby making OCR accessible in the browser. Tesseract.js engine was originally written in ASM.js and it was later ported to WebAssembly but ASM.js still serves as a backup in some cases when WebAssembly is not supported.
As stated on the website of Tesseract.js, it supports more than 100 languages, automatic text orientation and script detection, a simple interface for reading paragraphs, words and character bounding boxes.
Tesseract is an optical character recognition engine for various operating systems. It is free software, released under the Apache Licence. Hewlett-Packard developed Tesseract as proprietary software in the 1980s. It was released as open source in 2005 and its development has been sponsored by Google since 2006.
The latest version, version 4, of Tesseract was released in October 2018 and it contains a new OCR engine that uses a neural network system based on Long Short-Term Memory (LSTM) and it is meant to produce more accurate results.
Understanding Tesseract APIs
To really understand how Tesseract works, we need to break down some of its APIs and their components. According to the Tesseract.js documentation, there are two ways to approach using it. Below is the first approach an its break down:
Tesseract.recognize(
  image,language,
  {
    logger: m => console.log(m)
  }
)
.catch (err => {
  console.error(err);
})
.then(result => {
 console.log(result);
})
}
The recognize method takes image as its first argument, language (which can be multiple) as its second argument and { logger: m => console.log(me) } as its last argument. The image format supported by Tesseract are jpg, png, bmp and pbm which can only be supplied as elements (img, video or canvas), file object (<input>), blob object, path or URL to an image and base64 encoded image. (Read here for more information about all of the image formats Tesseract can handle.)
Language is supplied as a string such as eng. The + sign could be used to concatenate several languages as in eng+chi_tra. The language argument is used to determine the trained language data to be used in processing of images.
Note: You’ll find all of the available languages and their codes over here.
{ logger: m => console.log(m) } is very useful to get information about the progress of an image being processed. The logger property takes a function that will be called multiple times as Tesseract processes an image. The parameter to the logger function should be an object with workerId, jobId, status and progress as its properties:
{ workerId: ‘worker-200030’, jobId: ‘job-734747’, status: ‘recognizing text’, progress: ‘0.9’ }
progress is a number between 0 and 1, and it is in percentage to show the progress of an image recognition process.
Tesseract automatically generates the object as a parameter to the logger function but it can also be supplied manually. As a recognition process is taking place, the logger object properties are updated every time the function is called. So, it can be used to show a conversion progress bar, alter some part of an application, or used to achieve any desired outcome.
The result in the code above is the outcome of the image recognition process. Each of the properties of result has the property bbox as the x/y coordinates of their bounding box.
Here are the properties of the result object, their meanings or uses:
{
  text: "I am codingnninja from Nigeria..."
  hocr: "<div class='ocr_page' id= ..."
  tsv: "1 1 0 0 0 0 0 0 1486 ..."
  box: null
  unlv: null
  osd: null
  confidence: 90
  blocks: [{...}]
  psm: "SINGLE_BLOCK"
  oem: "DEFAULT"
  version: "4.0.0-825-g887c"
  paragraphs: [{...}]
  lines: (5) [{...}, ...]
  words: (47) [{...}, {...}, ...]
  symbols: (240) [{...}, {...}, ...]
}
text: All of the recognized text as a string.lines: An array of every recognized line by line of text.words: An array of every recognized word.symbols: An array of each of the characters recognized.paragraphs: An array of every recognized paragraph. We are going to discuss “confidence” later in this write-up.
Tesseract can also be used more imperatively as in:
import { createWorker } from 'tesseract.js';

  const worker = createWorker({
  logger: m => console.log(m)
  });

  (async () => {
  await worker.load();
  await worker.loadLanguage('eng');
  await worker.initialize('eng');
  const { data: { text } } = await     worker.recognize('https://tesseract.projectnaptha.com/img/eng_bw.png');
 console.log(text);
 await worker.terminate();
})();
This approach is related to the first approach but with different implementations.
createWorker(options) creates a web worker or node child process that creates a Tesseract worker. The worker helps set up the Tesseract OCR engine. The load() method loads the Tesseract core-scripts, loadLanguage() loads any language supplied to it as a string, initialize() makes sure Tesseract is fully ready for use and then the recognize method is used to process the image provided. The terminate() method stops the worker and cleans up everything.
Note: Please check Tesseract APIs documentation for more information.
Now, we have to build something to really see how effective Tesseract.js is.
What Are We Going To Build?
We are going to build a gift card PIN extractor because extracting PIN from a gift card was the issue that led to this writing adventure in the first place.
We will build a simple application that extracts the PIN from a scanned gift card. As I set out to build a simple gift card pin extractor, I will walk you through some of the challenges I faced along the line, the solutions I provided, and my conclusion based on my experience.
Below is the image we are going to use for testing because it has some realistic properties that are possible in the real world.
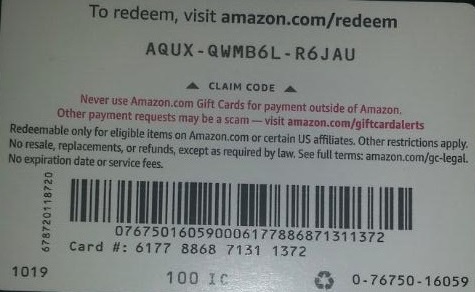
We will extract AQUX-QWMB6L-R6JAU from the card. So, let’s get started.
Installation Of React And Tesseract
There is a question to attend to before installing React and Tesseract.js and the question is, why using React with Tesseract? Practically, we can use Tesseract with Vanilla JavaScript, any JavaScript libraries or frameworks such React, Vue and Angular.
Using React in this case is a personal preference. Initially, I wanted to use Vue but I decided to go with React because I am more familiar with React than Vue.
Now, let’s continue with the installations.
To install React with create-react-app, you have to run the code below:
npx create-react-app image-to-text
cd image-to-text
yarn add Tesseract.js
or
npm install tesseract.js
I decided to go with yarn to install Tesseract.js because I was unable to install Tesseract with npm but yarn got the job done without stress. You can use npm but I recommend installing Tesseract with yarn judging from my experience.
Now, let’s start our development server by running the code below:
yarn start
or
npm start
After running yarn start or npm start, your default browser should open a webpage that looks like below:

You could also navigate to localhost:3000 in the browser provided the page is not launched automatically.
After installing React and Tesseract.js, what next?
Setting Up An Upload Form
In this case, we are going to adjust the home page (App.js) we just viewed in the browser to contain the form we need:
import { useState, useRef } from 'react';
import Tesseract from 'tesseract.js';
import './App.css';

function App() {
  const [imagePath, setImagePath] = useState("");
  const [text, setText] = useState("");

  const handleChange = (event) => {
    setImage(URL.createObjectURL(event.target.files[0]));
  }

  return (
    <div className="App">
      <main className="App-main">
        <h3>Actual image uploaded</h3>
        <img
           src={imagePath} className="App-logo" alt="logo"/>

          <h3>Extracted text</h3>
        <div className="text-box">
          <p> {text} </p>
        </div>
        <input type="file" onChange={handleChange} />
      </main>
    </div>
  );
}

export default App
The part of the code above that needs our attention at this point is the function handleChange.
const handleChange = (event) => {
    setImage(URL.createObjectURL(event.target.files[0]));
  }
In the function, URL.createObjectURL takes a selected file through event.target.files[0] and creates a reference URL that can be used with HTML tags such as img, audio and video. We used setImagePath to add the URL to the state. Now, the URL can now be accessed with imagePath.
<img src={imagePath} className="App-logo" alt="image"/>
We set the image’s src attribute to {imagePath} to preview it in the browser before processing it.
Converting Selected Images To Texts
As we have grabbed the path to the image selected, we can pass the image’s path to Tesseract.js to extract texts from it.
import { useState} from 'react';
import Tesseract from 'tesseract.js';
import './App.css';

function App() {
  const [imagePath, setImagePath] = useState("");
  const [text, setText] = useState("");

  const handleChange = (event) => {
    setImagePath(URL.createObjectURL(event.target.files[0]));
  }

  const handleClick = () => {

    Tesseract.recognize(
      imagePath,'eng',
      {
        logger: m => console.log(m)
      }
    )
    .catch (err => {
      console.error(err);
    })
    .then(result => {
      // Get Confidence score
      let confidence = result.confidence

      let text = result.text
      setText(text);

    })
  }

  return (
    <div className="App">
      <main className="App-main">
        <h3>Actual imagePath uploaded</h3>
        <img
           src={imagePath} className="App-image" alt="logo"/>

          <h3>Extracted text</h3>
        <div className="text-box">
          <p> {text} </p>
        </div>
        <input type="file" onChange={handleChange} />
        <button onClick={handleClick} style={{height:50}}> convert to text</button>
      </main>
    </div>
  );
}

export default App
We add the function “handleClick” to “App.js and it contains Tesseract.js API that takes the path to the selected image. Tesseract.js takes “imagePath”, “language”, “a setting object”.
The button below is added to the form to call “handClick” which triggers image-to-text conversion whenever the button is clicked.
<button onClick={handleClick} style={{height:50}}> convert to text</button>
When the processing is successful, we access both “confidence” and “text” from the result. Then, we add “text” to the state with “setText(text)”.
By adding to <p> {text} </p>, we display the extracted text.
It is obvious that “text” is extracted from the image but what is confidence?
Confidence shows how accurate the conversion is. The confidence level is between 1 to 100. 1 stands for the worst while 100 stands for the best in terms of accuracy. It can also be used to determine whether an extracted text should be accepted as accurate or not.
Then the question is what factors can affect the confidence score or the accuracy of the entire conversion? It is mostly affected by three major factors — the quality and nature of the document used, the quality of the scan created from the document and the processing abilities of the Tesseract engine.
Now, let’s add the code below to “App.css” to style the application a bit.
.App {
  text-align: center;
}

.App-image {
  width: 60vmin;
  pointer-events: none;
}

.App-main {
  background-color: #282c34;
  min-height: 100vh;
  display: flex;
  flex-direction: column;
  align-items: center;
  justify-content: center;
  font-size: calc(7px + 2vmin);
  color: white;
}

.text-box {
  background: #fff;
  color: #333;
  border-radius: 5px;
  text-align: center;
}
Here is the result of my first test:
Outcome In Firefox
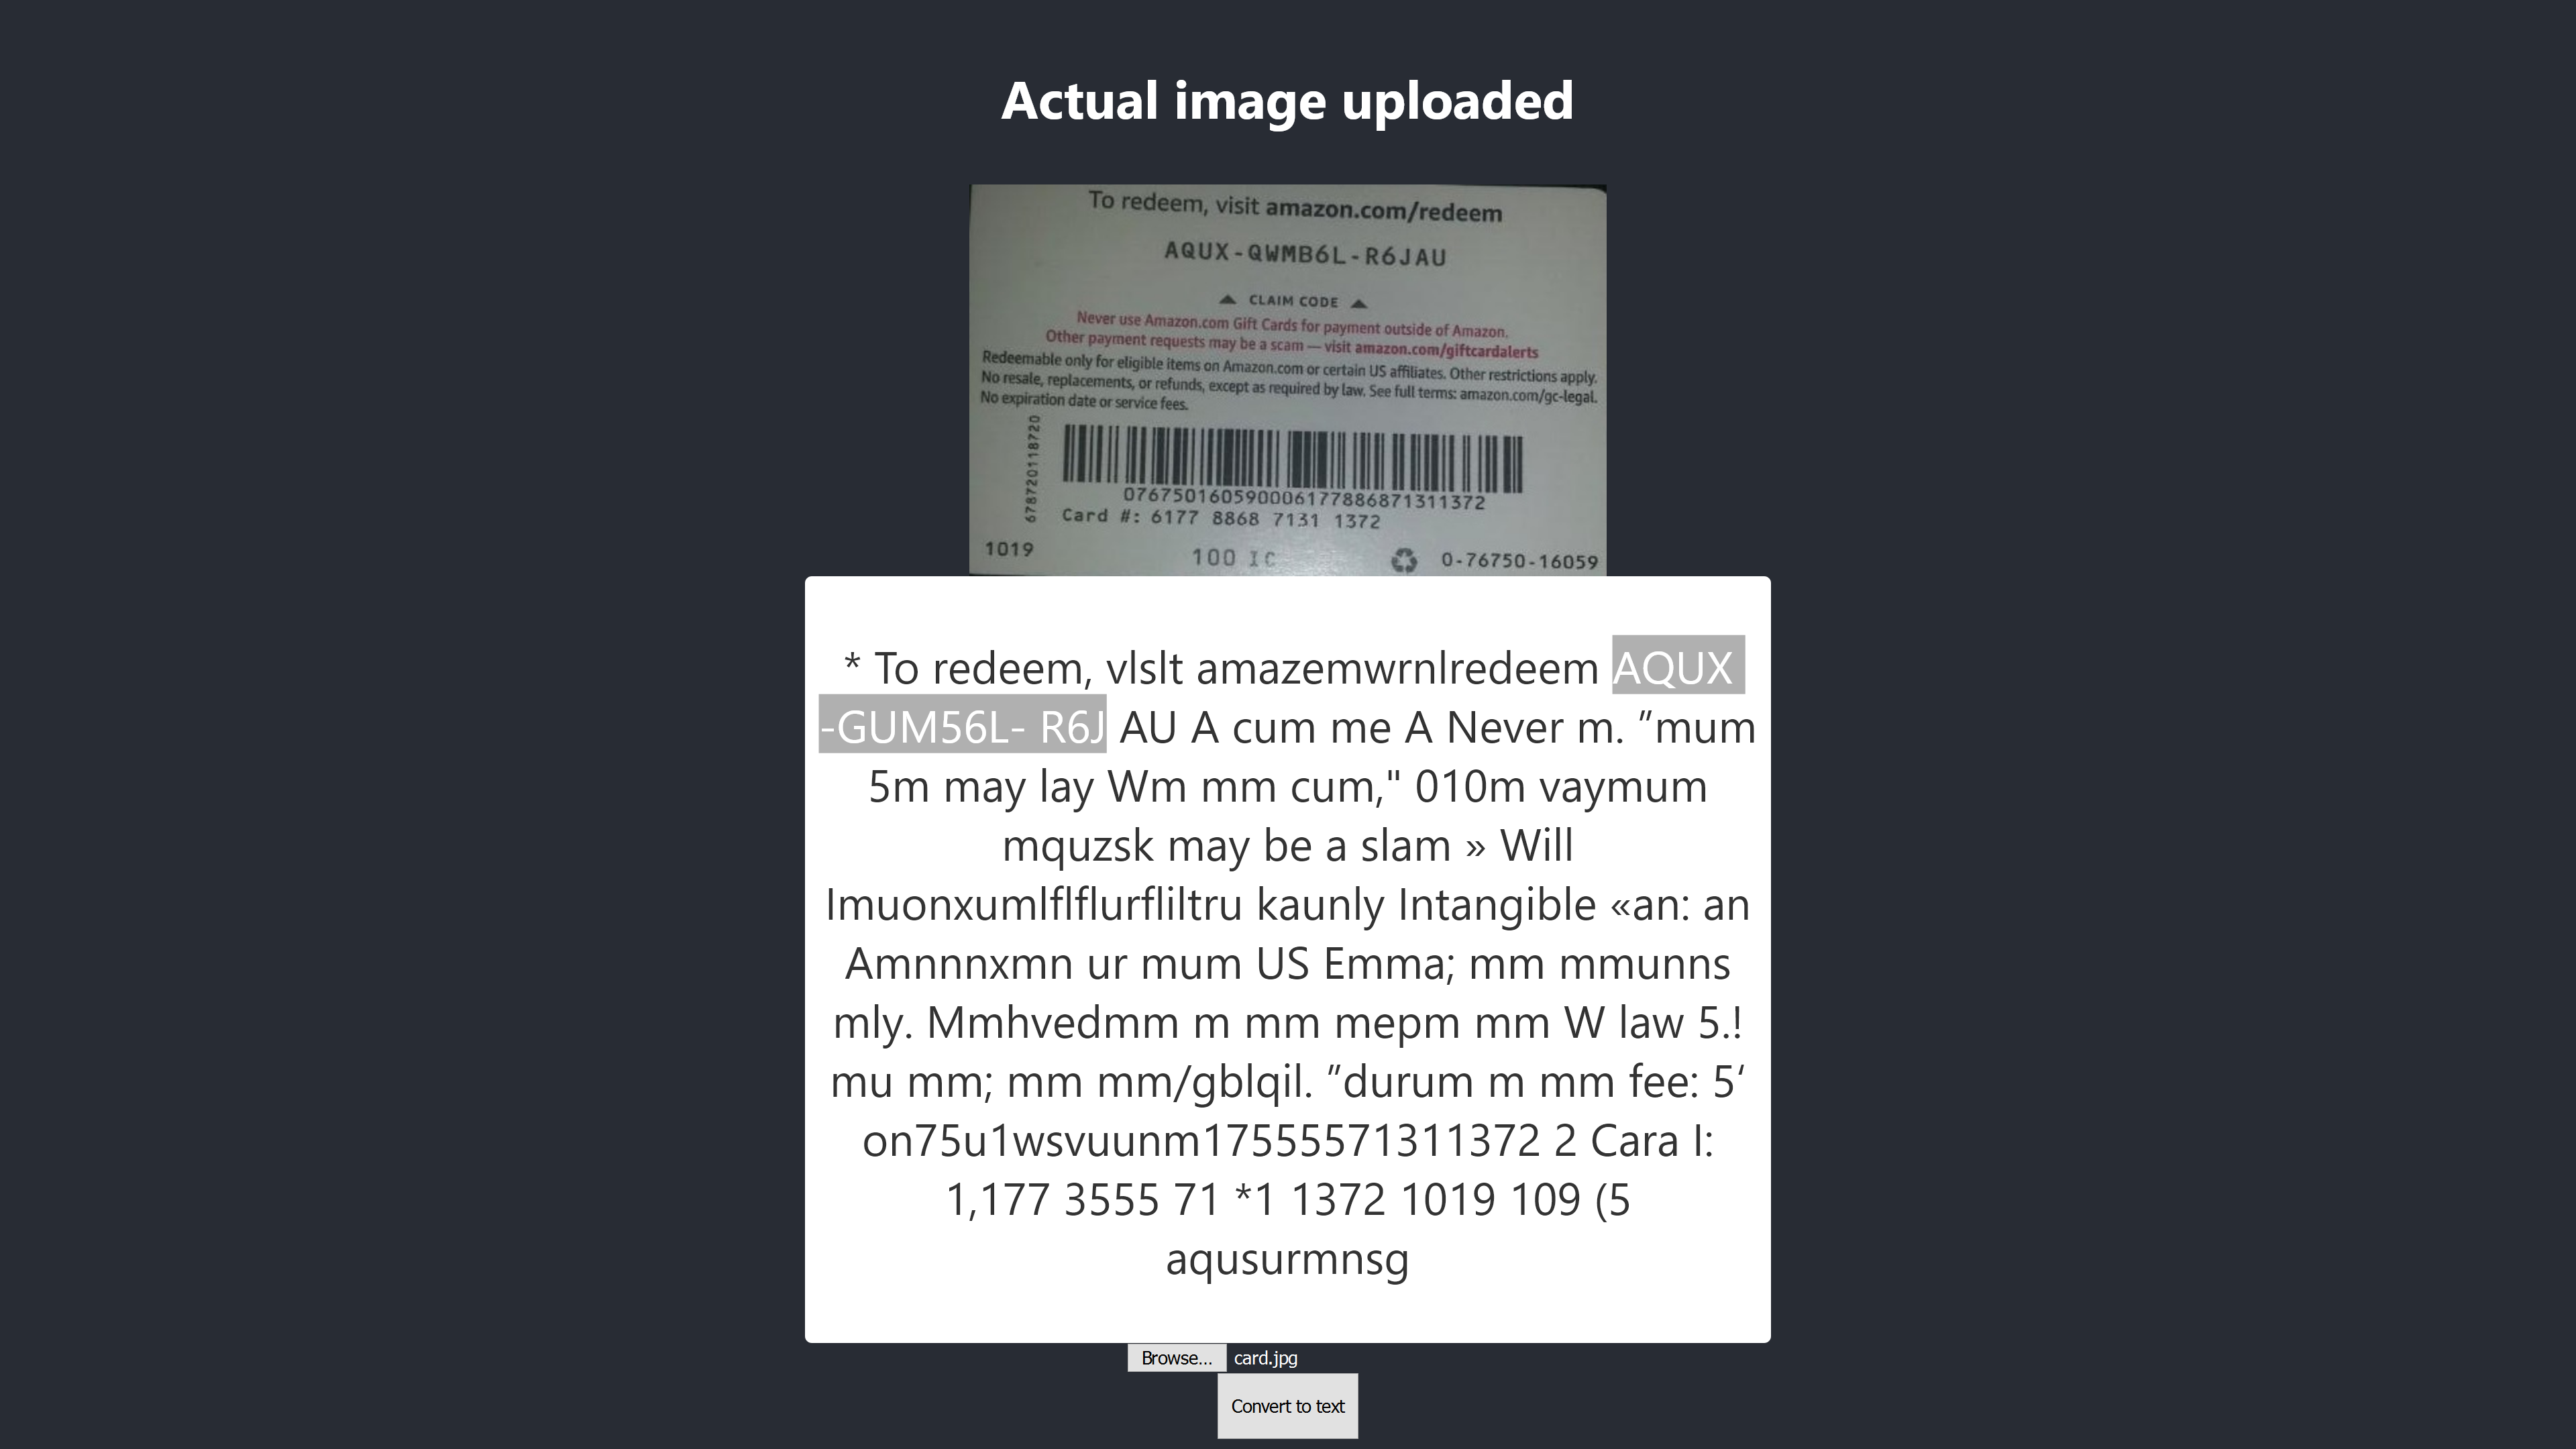
The confidence level of the result above is 64. It is worth noting that the gift card image is dark in color and it definitely affects the result we get.
If you take a closer look at the image above, you will see the pin from the card is almost accurate in the extracted text. It is not accurate because the gift card is not really clear.
Oh, wait! What will it look like in Chrome?
Outcome In Chrome
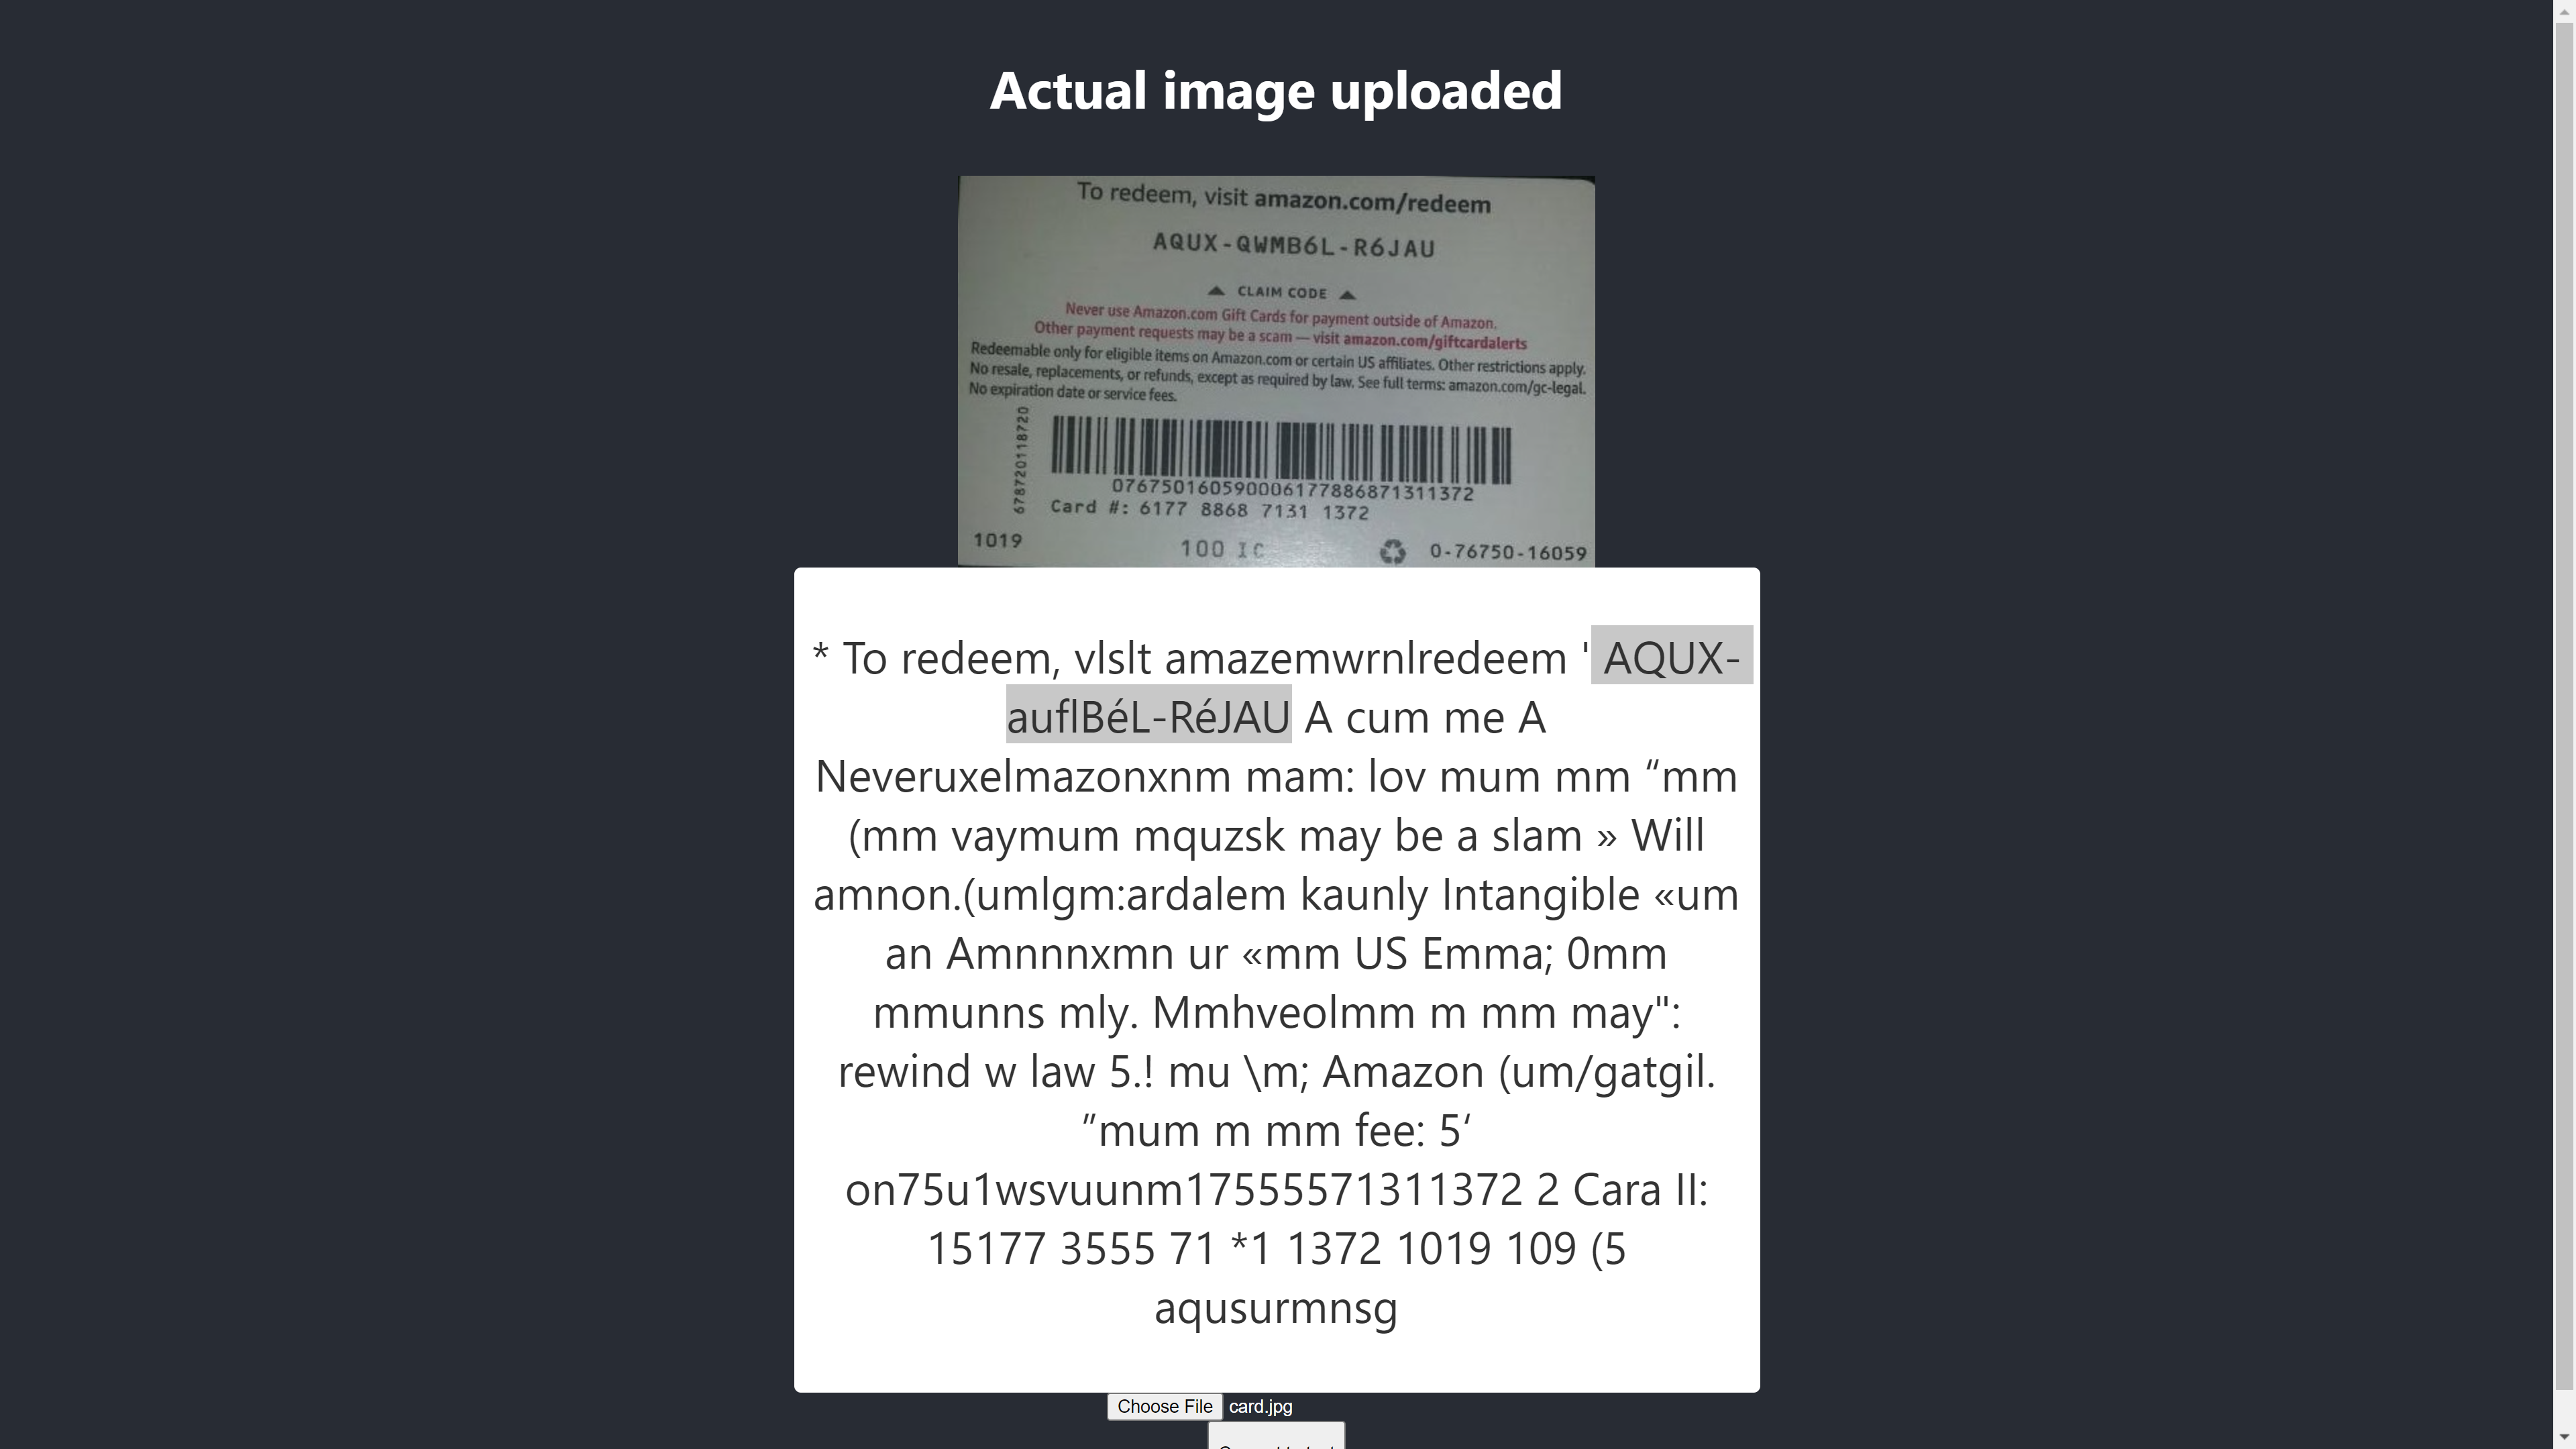
Ah! The outcome is even worse in Chrome. But why is the outcome in Chrome different from Mozilla Firefox? Different browsers handle images and their colour profiles differently. That means, an image can be rendered differently depending on the browser. By supplying pre-rendered image.data to Tesseract, it is likely to produce a different outcome in different browsers because different image.data is supplied to Tesseract depending on the browser in use. Preprocessing an image, as we will see later in this article, will help achieve a consistent result.
We need to be more accurate so that we can be sure we are getting or giving the right information. So we have to take it a bit further.
Let’s try more to see if we can achieve the aim in the end.
Testing For Accuracy
There are a lot of factors that affect an image-to-text conversion with Tesseract.js. Most of these factors revolve around the nature of the image we want to process and the rest depends on how the Tesseract engine handles the conversion.
Internally, Tesseract preprocesses images before the actual OCR conversion but it doesn’t always give accurate results.
As a solution, we can preprocess images to achieve accurate conversions. We can binarise, invert, dilate, deskew or rescale an image to preprocess it for Tesseract.js.
Image pre-processing is a lot of work or an extensive field on its own. Fortunately, P5.js has provided all the image preprocessing techniques we want to use. Instead of reinventing the wheel or using the whole of the library just because we want to use a tiny part of it, I have copied the ones we need. All the image preprocessing techniques are included in preprocess.js.
What Is Binarization?
Binarization is the conversion of the pixels of an image to either black or white. We want to binarize the previous gift card to check whether the accuracy will be better or not.
Previously, we extracted some texts from a gift card but the target PIN was not as accurate as we wanted. So there is a need to find another way to get an accurate result.
Now, we want to binarize the gift card, i.e. we want to convert its pixels to black and white so that we can see whether a better level of accuracy can be achieved or not.
The functions below will be used for binarization and it is included in a separate file called preprocess.js.
function preprocessImage(canvas) {
    const ctx = canvas.getContext('2d');
    const image = ctx.getImageData(0,0,canvas.width, canvas.height);
    thresholdFilter(image.data, 0.5);
    return image;
 }

 Export default preprocessImage
What does the code above do?
We introduce canvas to hold an image data to apply some filters, to pre-process the image, before passing it to Tesseract for conversion.
The first preprocessImage function is located in preprocess.js and prepares the canvas for use by getting its pixels. The function thresholdFilter binarizes the image by converting its pixels to either black or white.
Let’s call preprocessImage to see if the text extracted from the previous gift card can be more accurate.
By the time we update App.js, it should now look like the code this:
import { useState, useRef } from 'react';
import preprocessImage from './preprocess';
import Tesseract from 'tesseract.js';
import './App.css';

function App() {
  const [image, setImage] = useState("");
  const [text, setText] = useState("");
  const canvasRef = useRef(null);
  const imageRef = useRef(null);

  const handleChange = (event) => {
    setImage(URL.createObjectURL(event.target.files[0]))
  }

  const handleClick = () => {

    const canvas = canvasRef.current;
    const ctx = canvas.getContext('2d');

    ctx.drawImage(imageRef.current, 0, 0);
    ctx.putImageData(preprocessImage(canvas),0,0);
    const dataUrl = canvas.toDataURL("image/jpeg");

    Tesseract.recognize(
      dataUrl,'eng',
      {
        logger: m => console.log(m)
      }
    )
    .catch (err => {
      console.error(err);
    })
    .then(result => {
      // Get Confidence score
      let confidence = result.confidence
      console.log(confidence)
      // Get full output
      let text = result.text

      setText(text);
    })
  }

  return (
    <div className="App">
      <main className="App-main">
        <h3>Actual image uploaded</h3>
        <img
           src={image} className="App-logo" alt="logo"
           ref={imageRef}
           />
        <h3>Canvas</h3>
        <canvas ref={canvasRef} width={700} height={250}></canvas>
          <h3>Extracted text</h3>
        <div className="pin-box">
          <p> {text} </p>
        </div>
        <input type="file" onChange={handleChange} />
        <button onClick={handleClick} style={{height:50}}>Convert to text</button>
      </main>
    </div>
  );
}

export default App
First, we have to import “preprocessImage” from “preprocess.js” with the code below:
import preprocessImage from './preprocess';
Then, we add a canvas tag to the form. We set the ref attribute of both the canvas and the img tags to { canvasRef } and { imageRef } respectively. The refs are used to access the canvas and the image from the App component. We get hold of both the canvas and the image with “useRef” as in:
const canvasRef = useRef(null);
const imageRef = useRef(null);
In this part of the code, we merge the image to the canvas as we can only preprocess a canvas in JavaScript. We then convert it to a data URL with “jpeg” as its image format.
const canvas = canvasRef.current;
const ctx = canvas.getContext('2d');

ctx.drawImage(imageRef.current, 0, 0);
ctx.putImageData(preprocessImage(canvas),0,0);
const dataUrl = canvas.toDataURL("image/jpeg");
“dataUrl” is passed to Tesseract as the image to be processed.
Now, let’s check whether the text extracted will be more accurate.
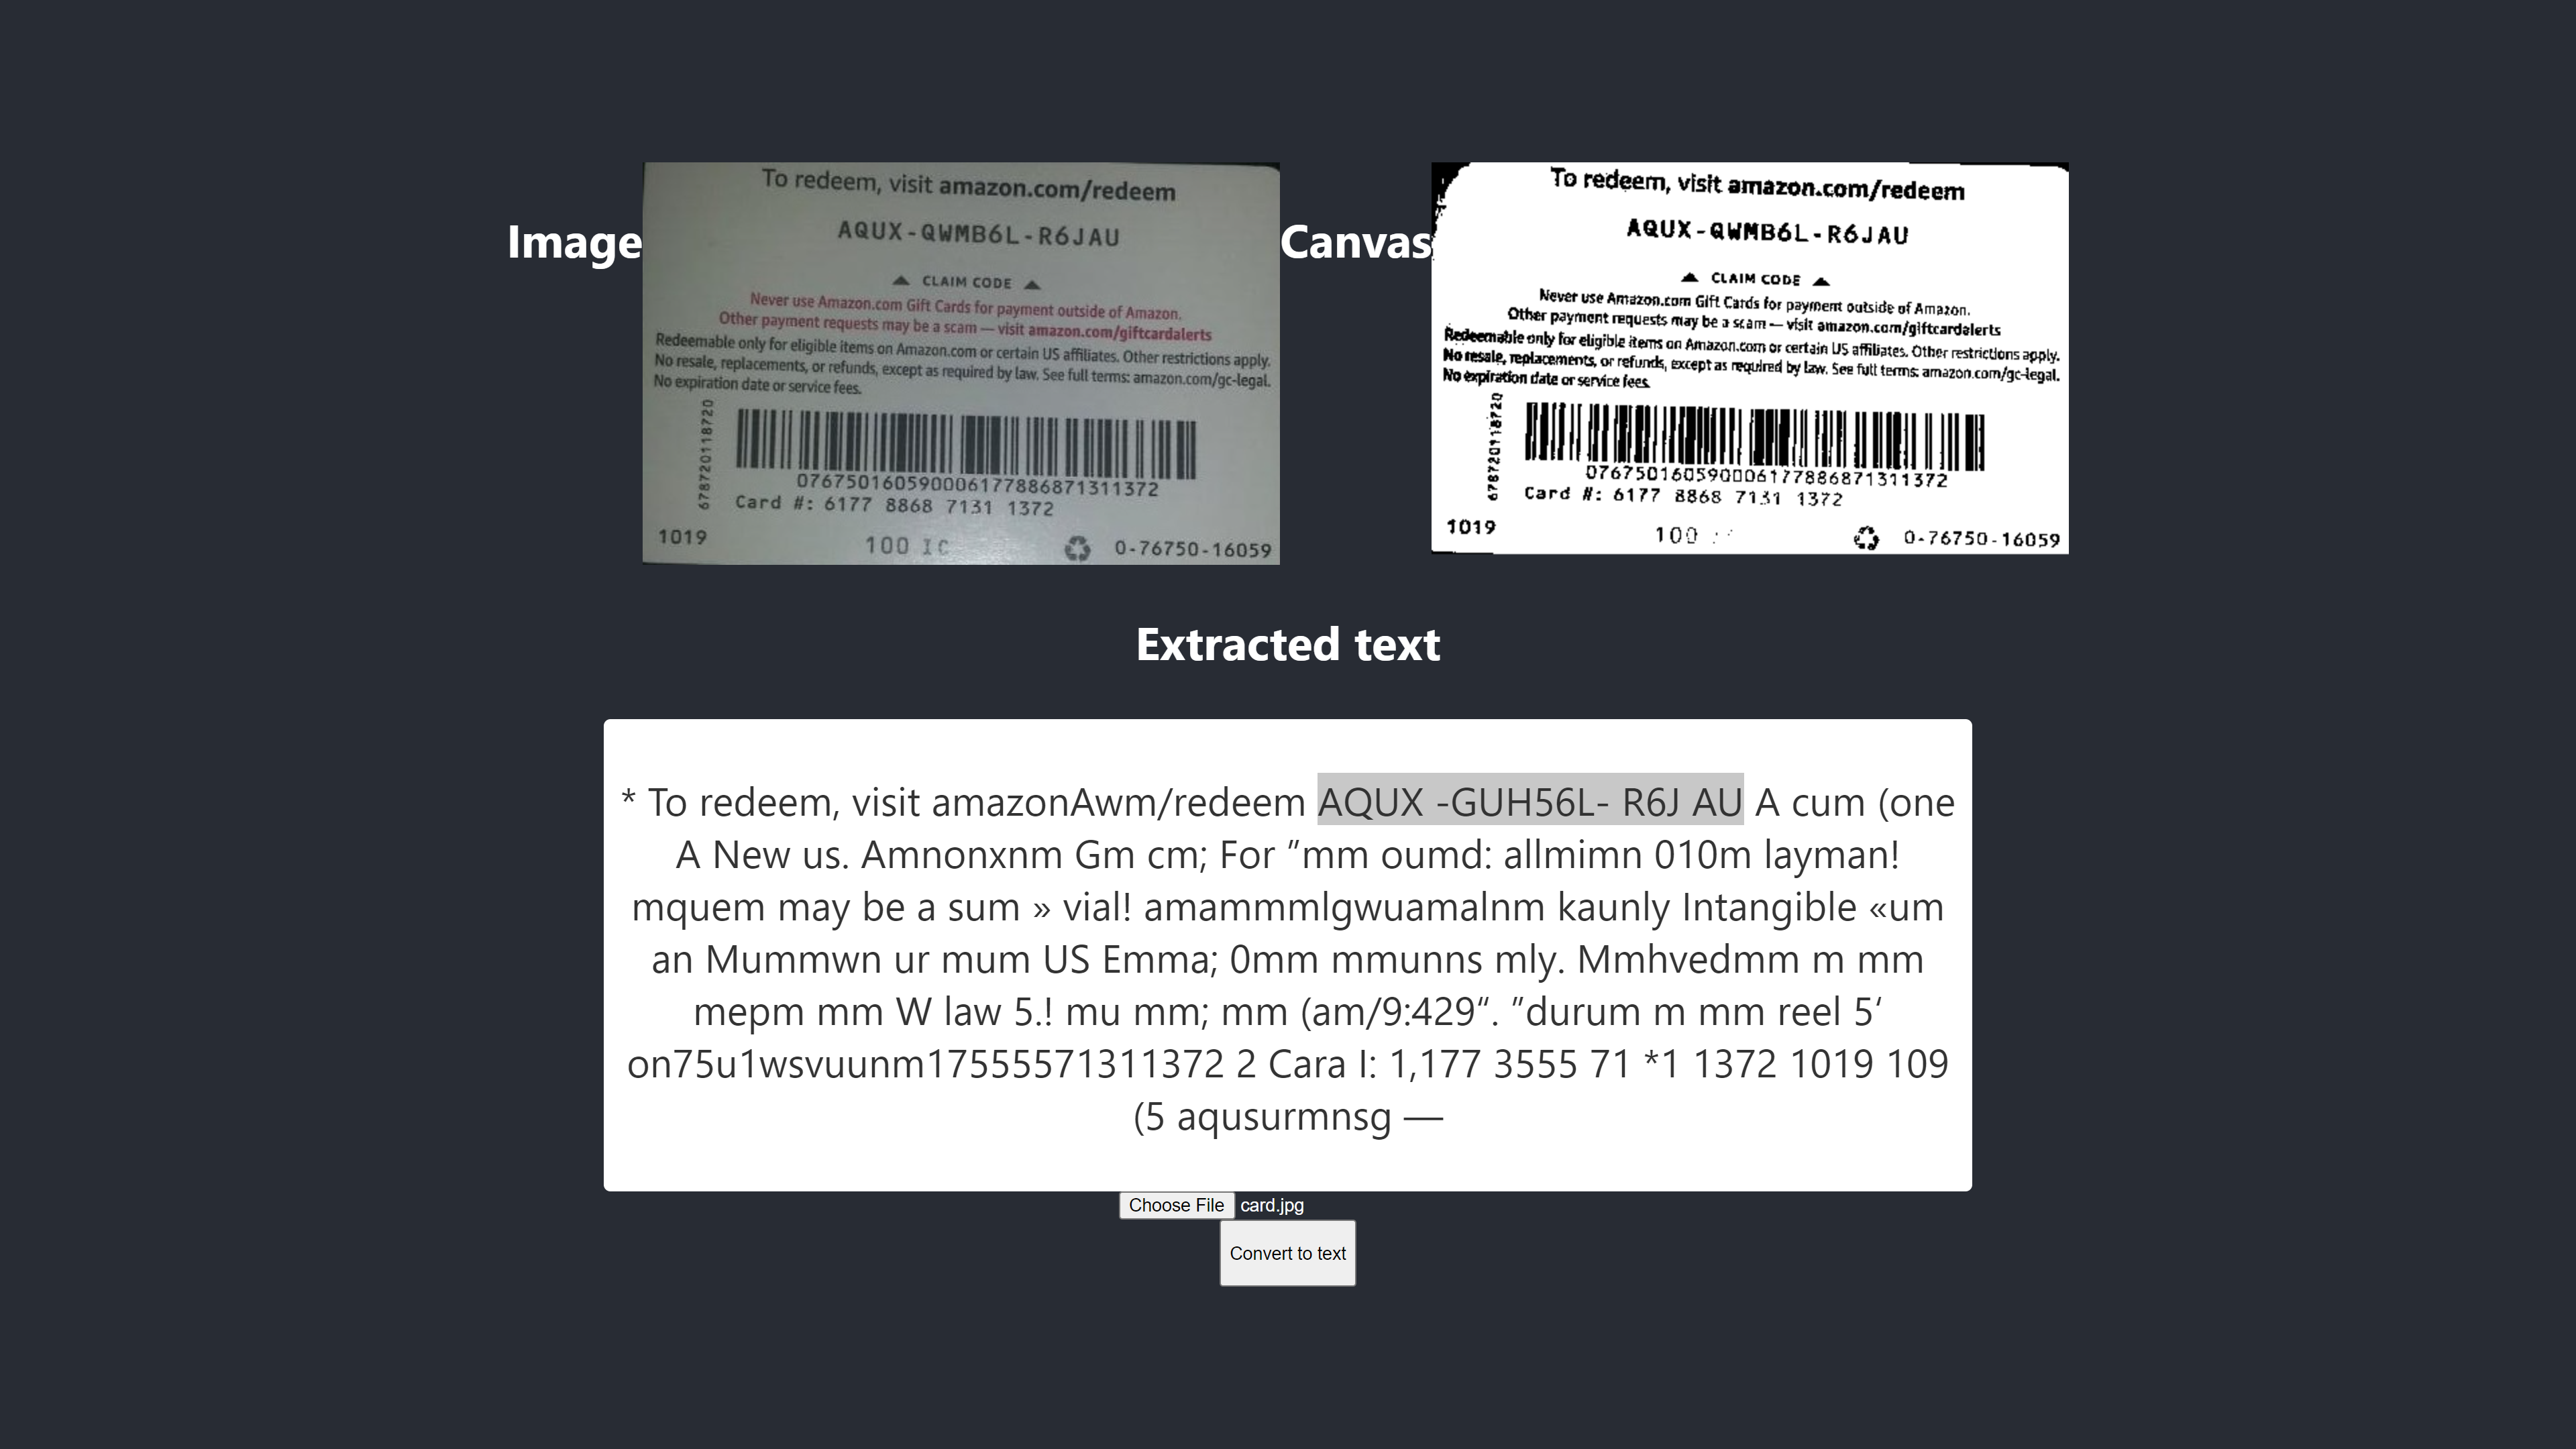
Test #2

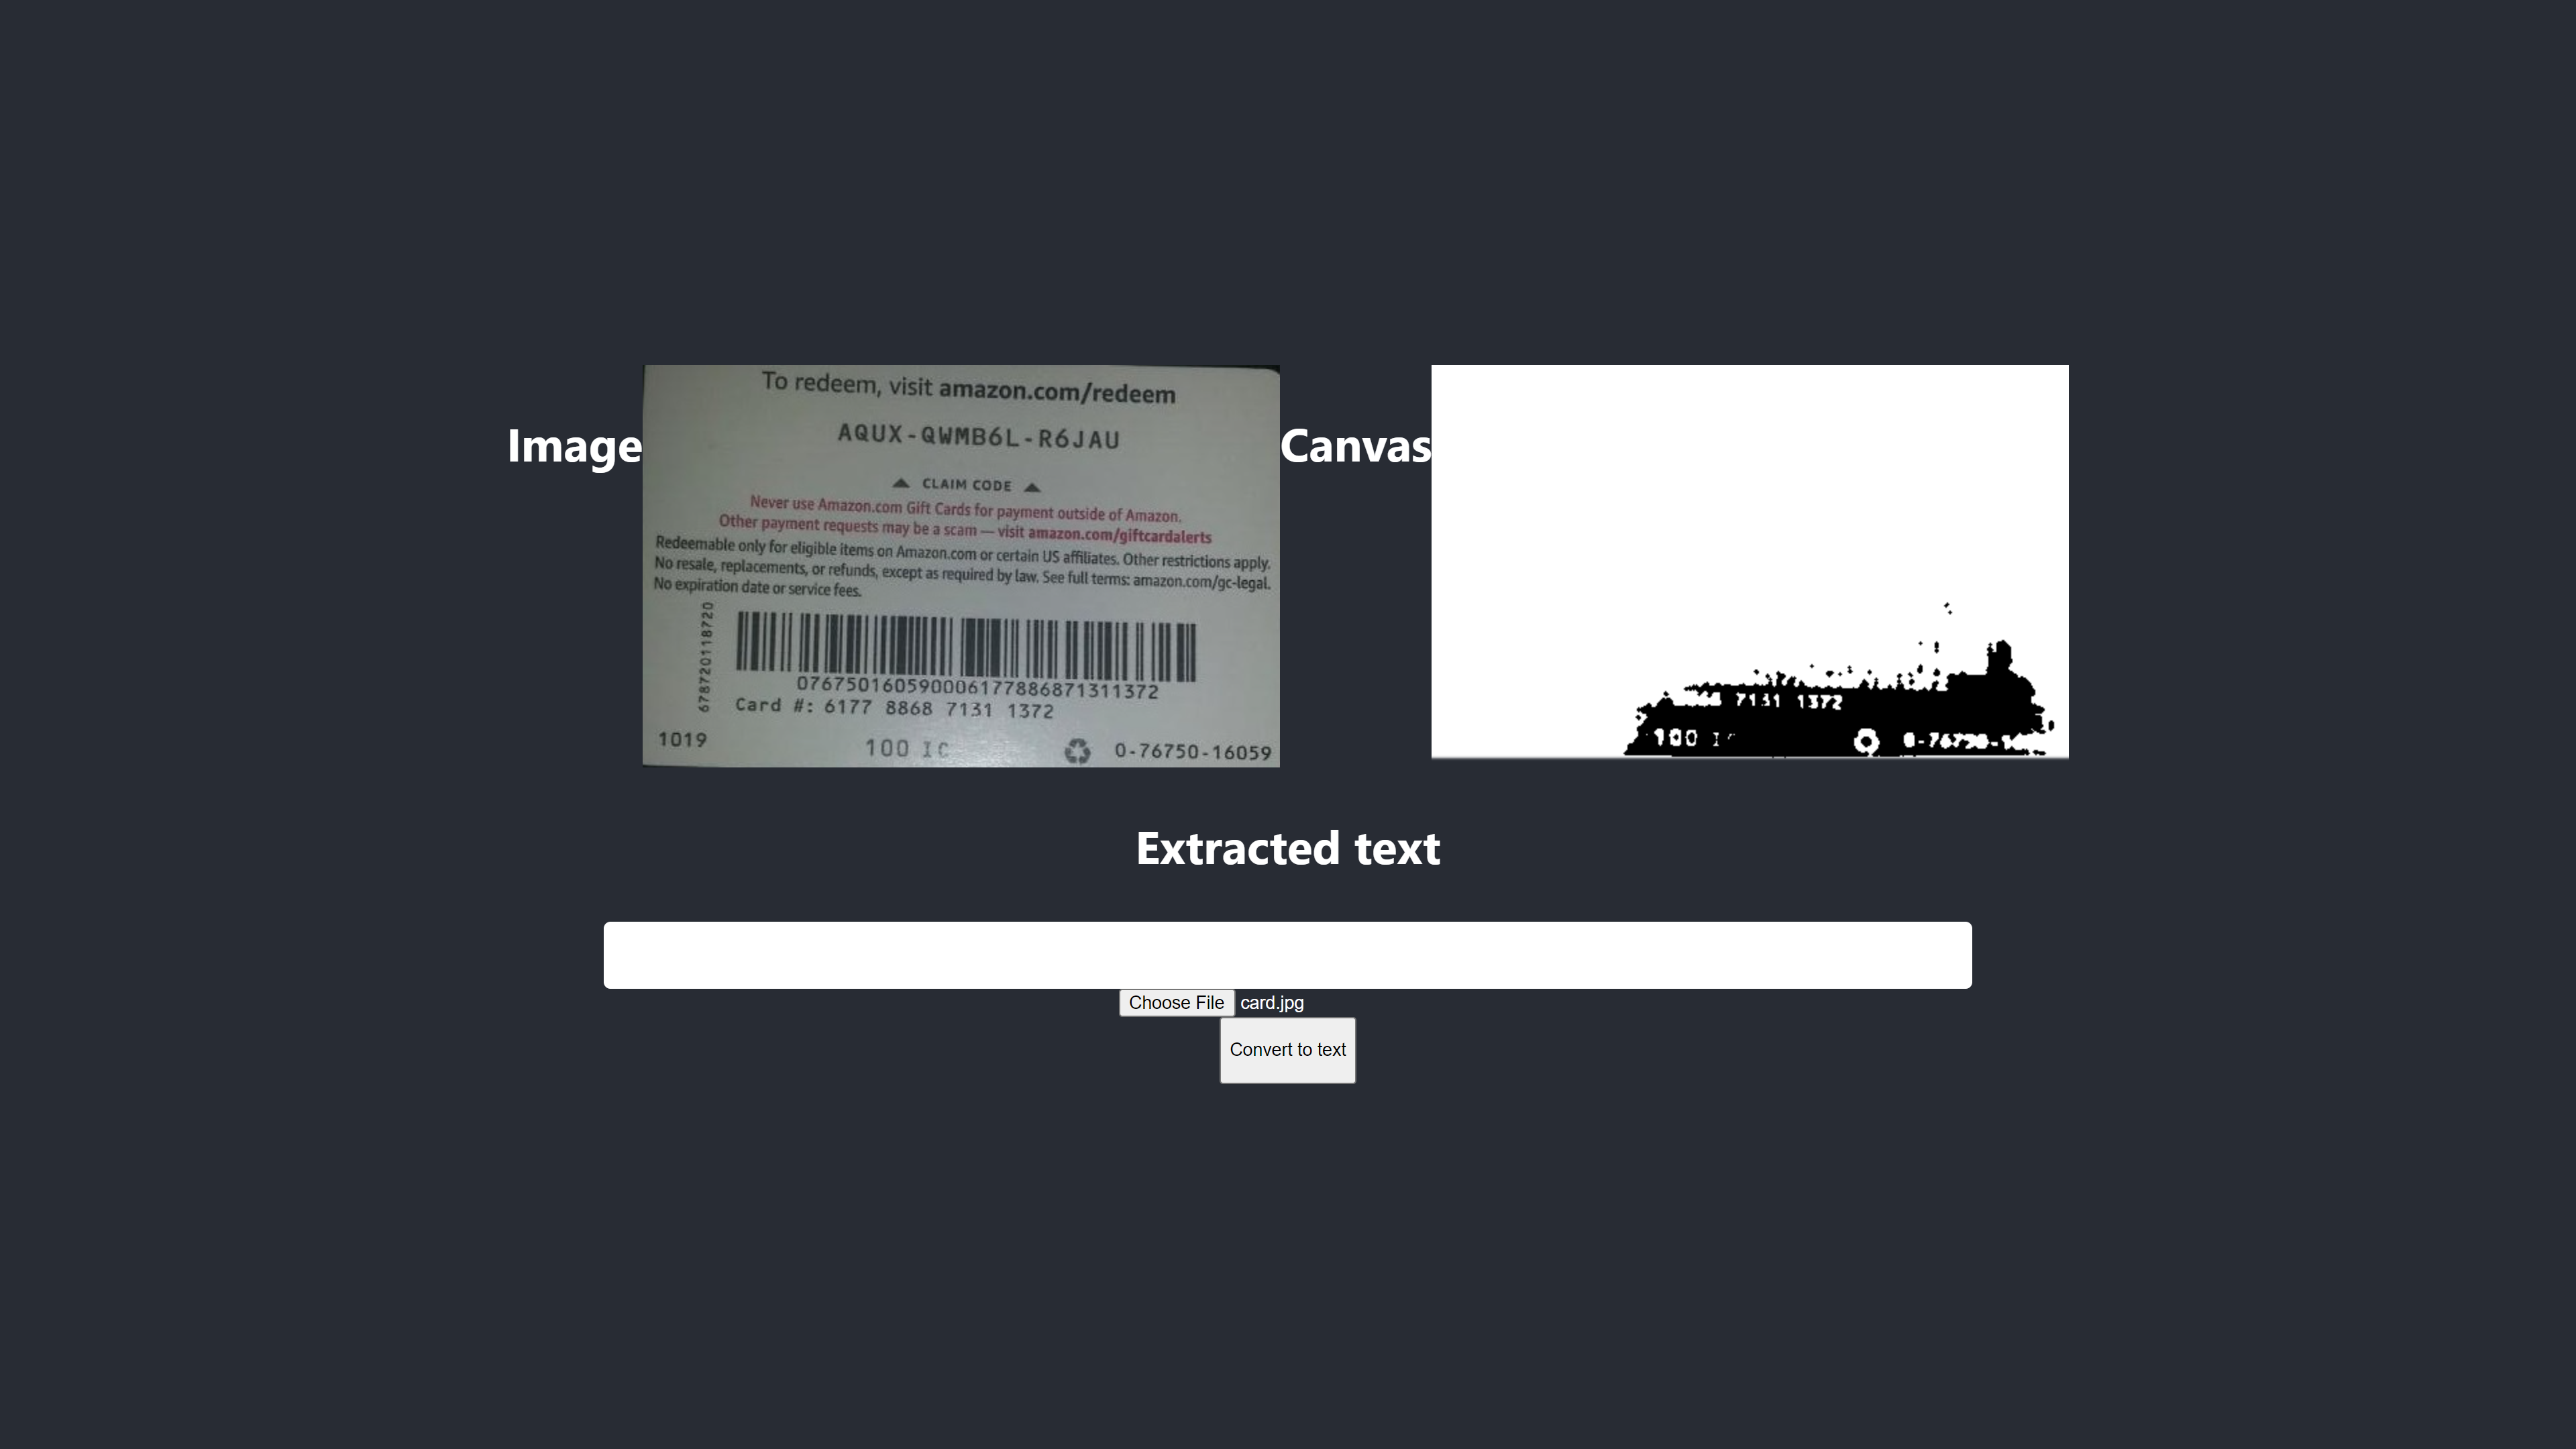
The image above shows the result in Firefox. It is obvious that the dark part of the image has been changed to white but preprocessing the image doesn’t lead to a more accurate result. It is even worse.
The first conversion only has two incorrect characters but this one has four incorrect characters. I even tried changing the threshold level but to no avail. We don’t get a better result not because binarization is bad but because binarizing the image doesn’t fix the nature of the image in a way that is suitable for the Tesseract engine.
Let’s check what it also looks like in Chrome:
We get the same outcome.
After getting a worse result by binarizing the image, there is a need to check other image preprocessing techniques to see whether we can solve the problem or not. So, we are going to try dilation, inversion, and blurring next.
Let’s just get the code for each of the techniques from P5.js as used by this article. We will add the image processing techniques to preprocess.js and use them one by one. It is necessary to understand each of the image preprocessing techniques we want to use before using them, so we are going to discuss them first.
What Is Dilation?
Dilation is adding pixels to the boundaries of objects in an image to make it wider, larger, or more open. The “dilate” technique is used to preprocess our images to increase the brightness of the objects on the images. We need a function to dilate images using JavaScript, so the code snippet to dilate an image is added to preprocess.js.
What Is Blur?
Blurring is smoothing the colors of an image by reducing its sharpness. Sometimes, images have small dots/patches. To remove those patches, we can blur the images. The code snippet to blur an image is included in preprocess.js.
What Is Inversion?
Inversion is changing light areas of an image to a dark color and dark areas to a light color. For example, if an image has a black background and white foreground, we can invert it so that its background will be white and its foreground will be black. We have also added the code snippet to invert an image to preprocess.js.
After adding dilate, invertColors and blurARGB to “preprocess.js”, we can now use them to preprocess images. To use them, we need to update the initial “preprocessImage” function in preprocess.js:
preprocessImage(...) now looks like this:
function preprocessImage(canvas) {
  const level = 0.4;
  const radius = 1;
  const ctx = canvas.getContext('2d');
  const image = ctx.getImageData(0,0,canvas.width, canvas.height);
  blurARGB(image.data, canvas, radius);
  dilate(image.data, canvas);
  invertColors(image.data);
  thresholdFilter(image.data, level);
  return image;
 }
In preprocessImage above, we apply four preprocessing techniques to an image: blurARGB() to remove the dots on the image, dilate() to increase the brightness of the image, invertColors() to switch the foreground and background color of the image and thresholdFilter() to convert the image to black and white which is more suitable for Tesseract conversion.
The thresholdFilter() takes image.data and level as its parameters. level is used to set how white or black the image should be. We determined the thresholdFilter level and blurRGB radius by trial and error as we are not sure how white, dark or smooth the image should be for Tesseract to produce a great result.
Test #3
Here is the new result after applying four techniques:
The image above represents the result we get in both Chrome and Firefox.
Oops! The outcome is terrible.
Instead of using all four techniques, why don’t we just use two of them at a time?
Yeah! We can simply use invertColors and thresholdFilter techniques to convert the image to black and white, and switch the foreground and the background of the image. But how do we know what and what techniques to combine? We know what to combine based on the nature of the image we want to preprocess.
For example, a digital image has to be converted to black and white, and an image with patches has to be blurred to remove the dots/patches. What really matters is to understand what each of the techniques is used for.
To use invertColors and thresholdFilter, we need to comment out both blurARGB and dilate in preprocessImage:
function preprocessImage(canvas) {
    const ctx = canvas.getContext('2d');
    const image = ctx.getImageData(0,0,canvas.width, canvas.height);
    // blurARGB(image.data, canvas, 1);
    // dilate(image.data, canvas);
    invertColors(image.data);
    thresholdFilter(image.data, 0.5);
    return image;
}
Test #4
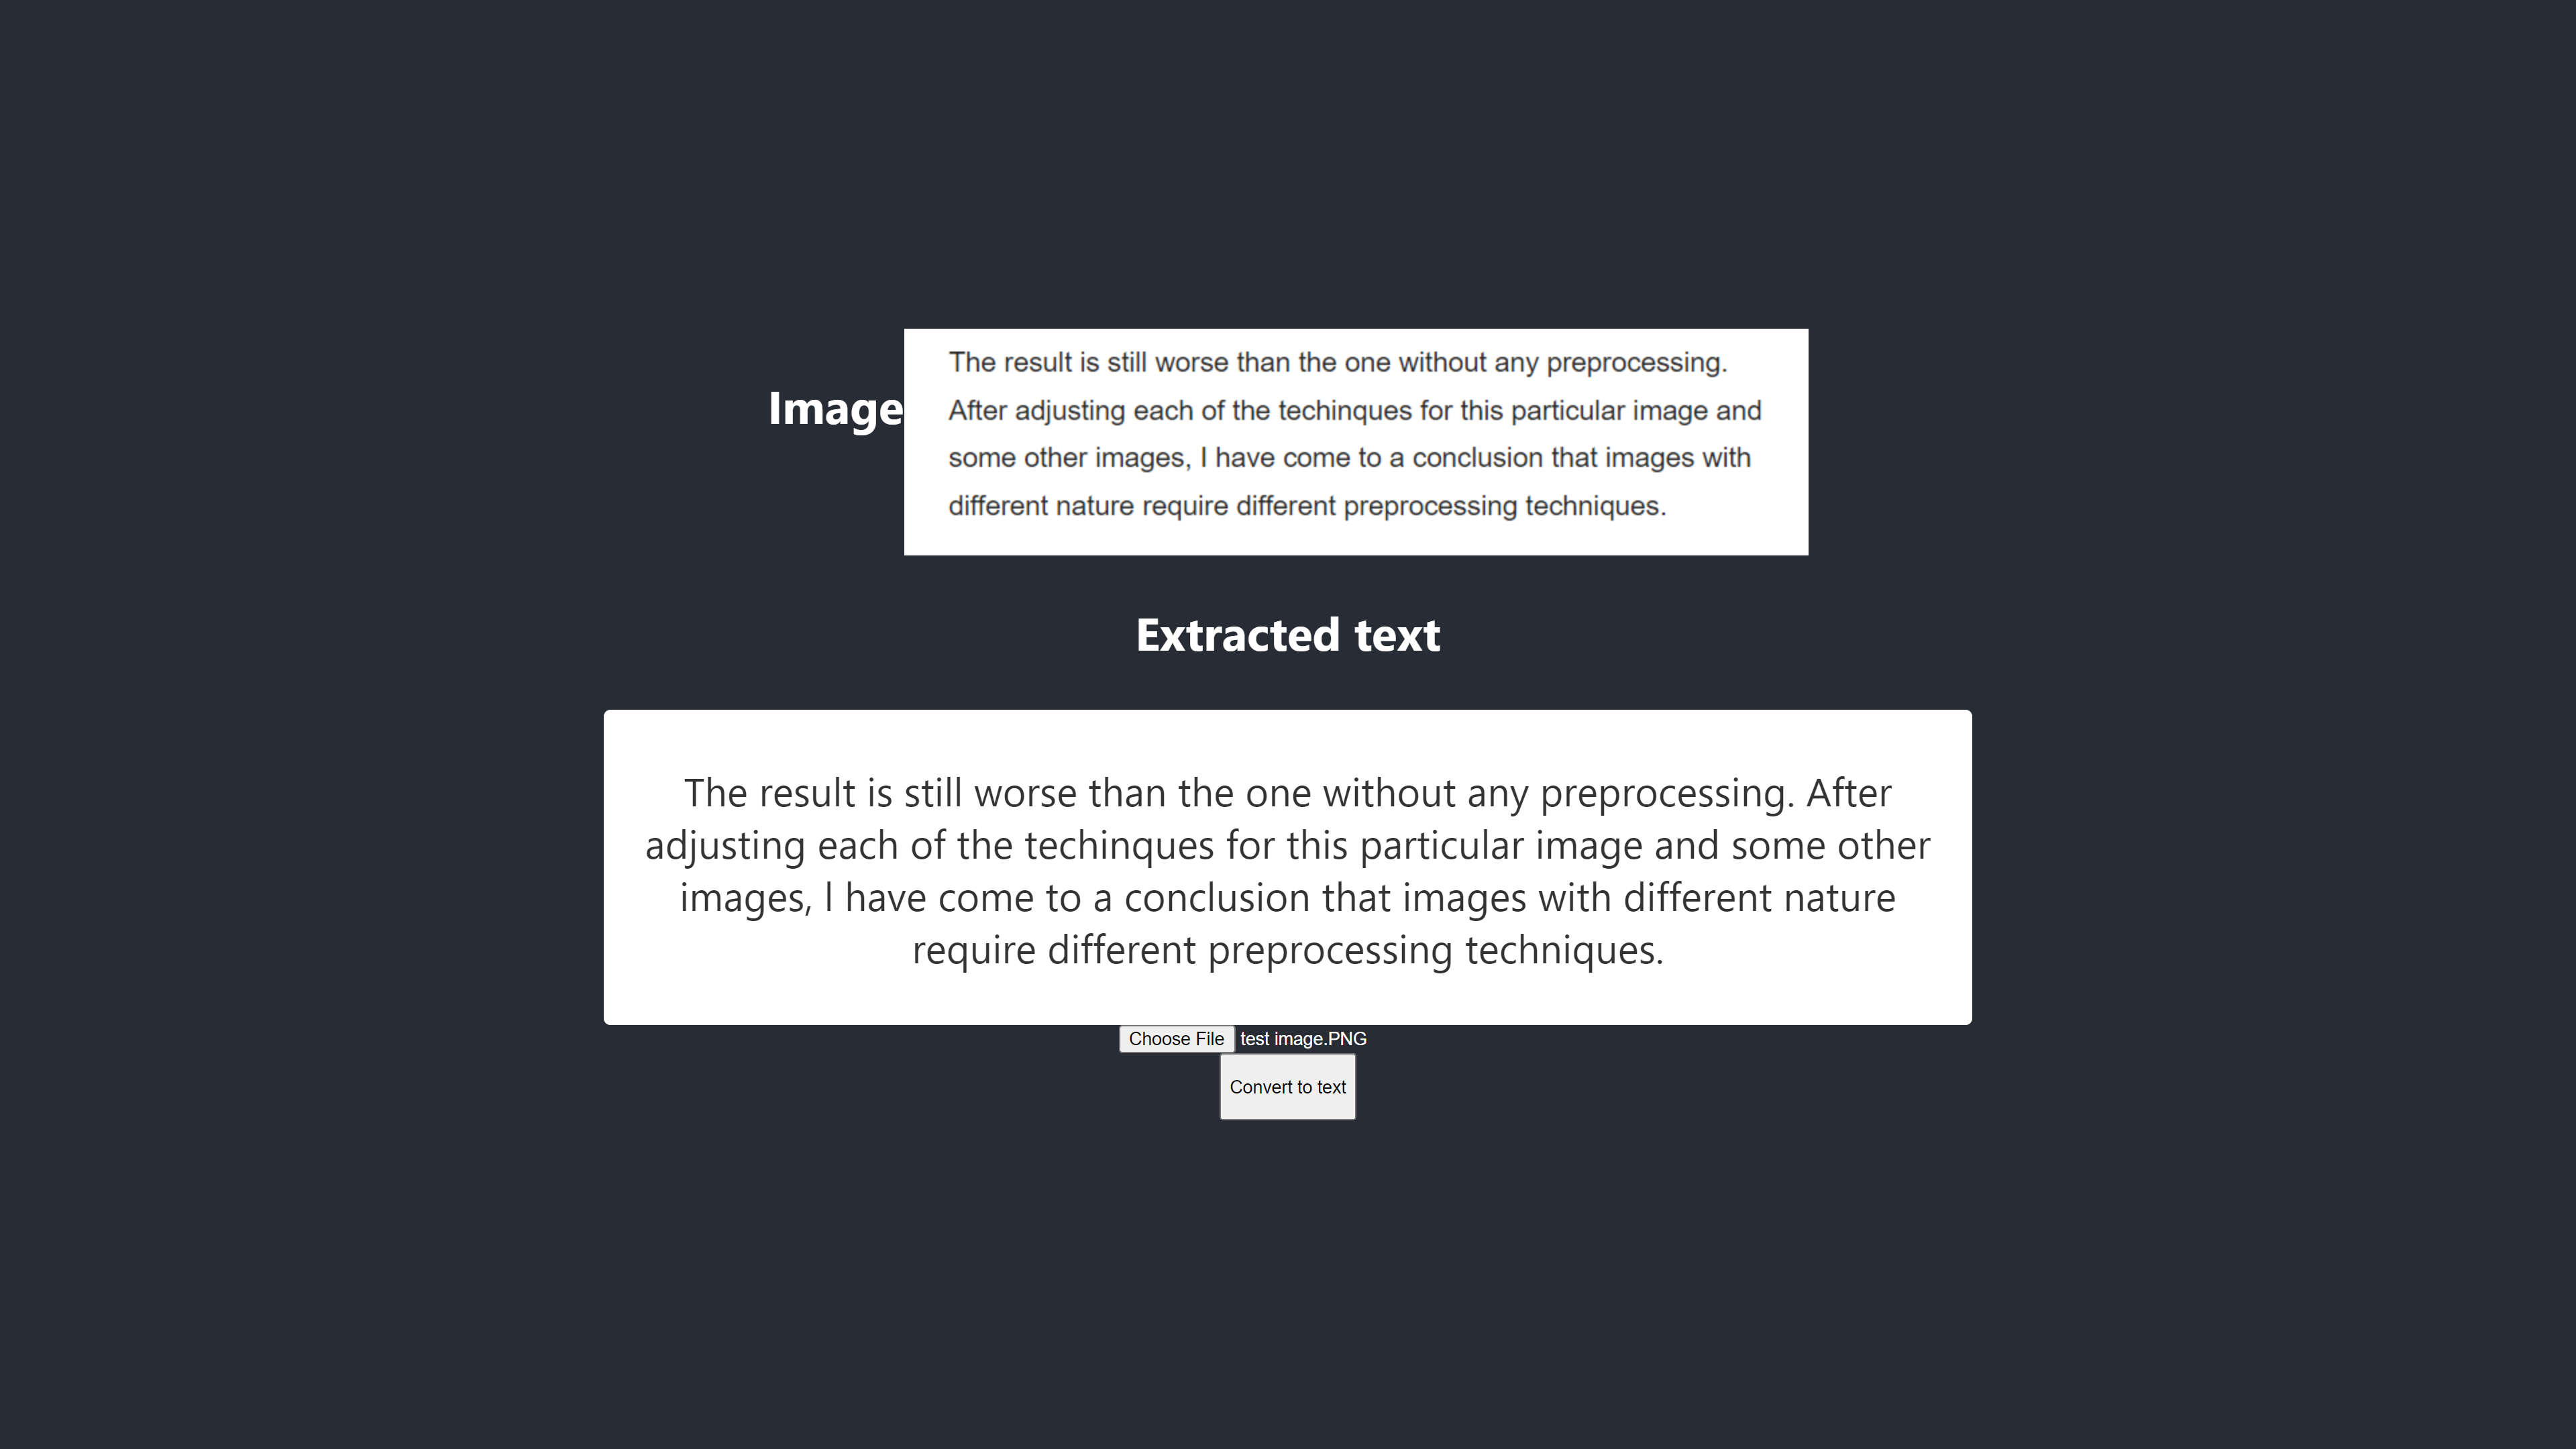
Now, here is the new outcome:
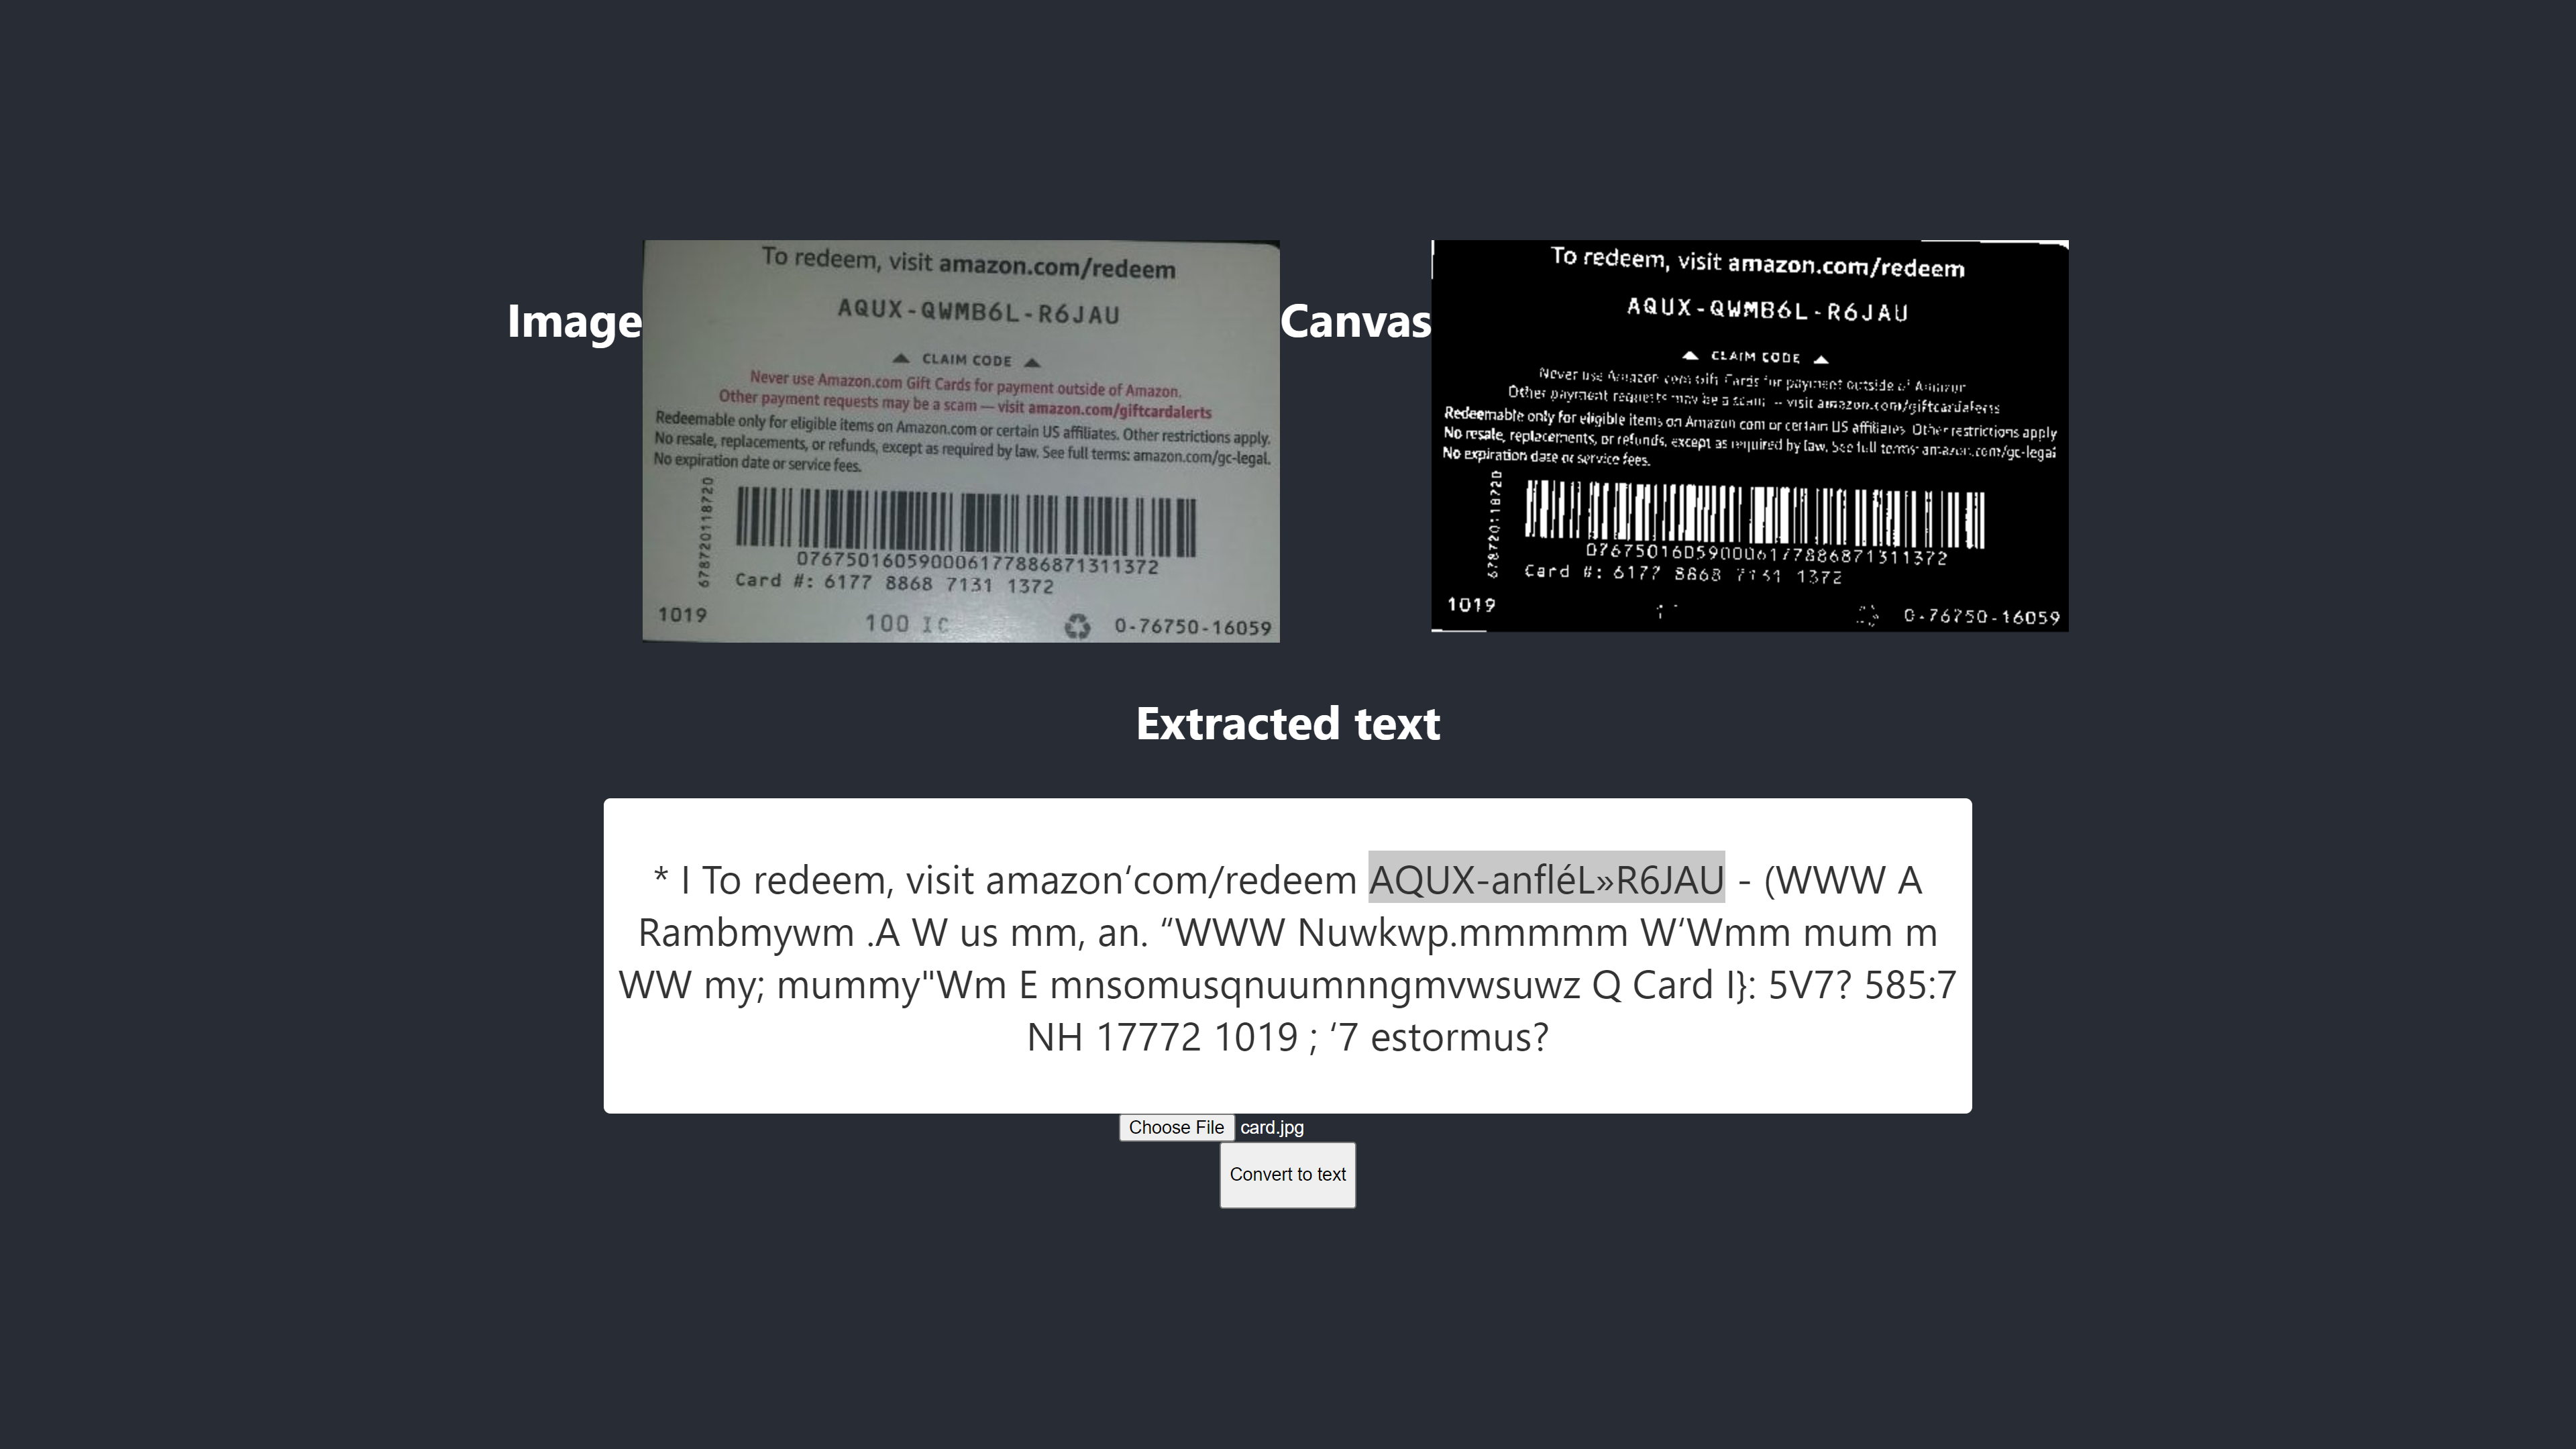
The result is still worse than the one without any preprocessing. After adjusting each of the techniques for this particular image and some other images, I have come to the conclusion that images with different nature require different preprocessing techniques.
In short, using Tesseract.js without image preprocessing produced the best outcome for the gift card above. All other experiments with image preprocessing yielded less accurate outcomes.
Issue
Initially, I wanted to extract the PIN from any Amazon gift card but I couldn’t achieve that because there is no point to match an inconsistent PIN to get a consistent result. Although it is possible to process an image to get an accurate PIN, yet such preprocessing will be inconsistent by the time another image with different nature is used.
The Best Outcome Produced
The image below showcases the best outcome produced by the experiments.
Test #5
The texts on the image and the ones extracted are totally the same. The conversion has 100% accuracy. I tried to reproduce the result but I was only able to reproduce it when using images with similar nature.
Observation And Lessons
- Some images that are not preprocessed may give different outcomes in different browsers. This claim is evident in the first test. The outcome in Firefox is different from the one in Chrome. However, preprocessing images helps achieve a consistent outcome in other tests.
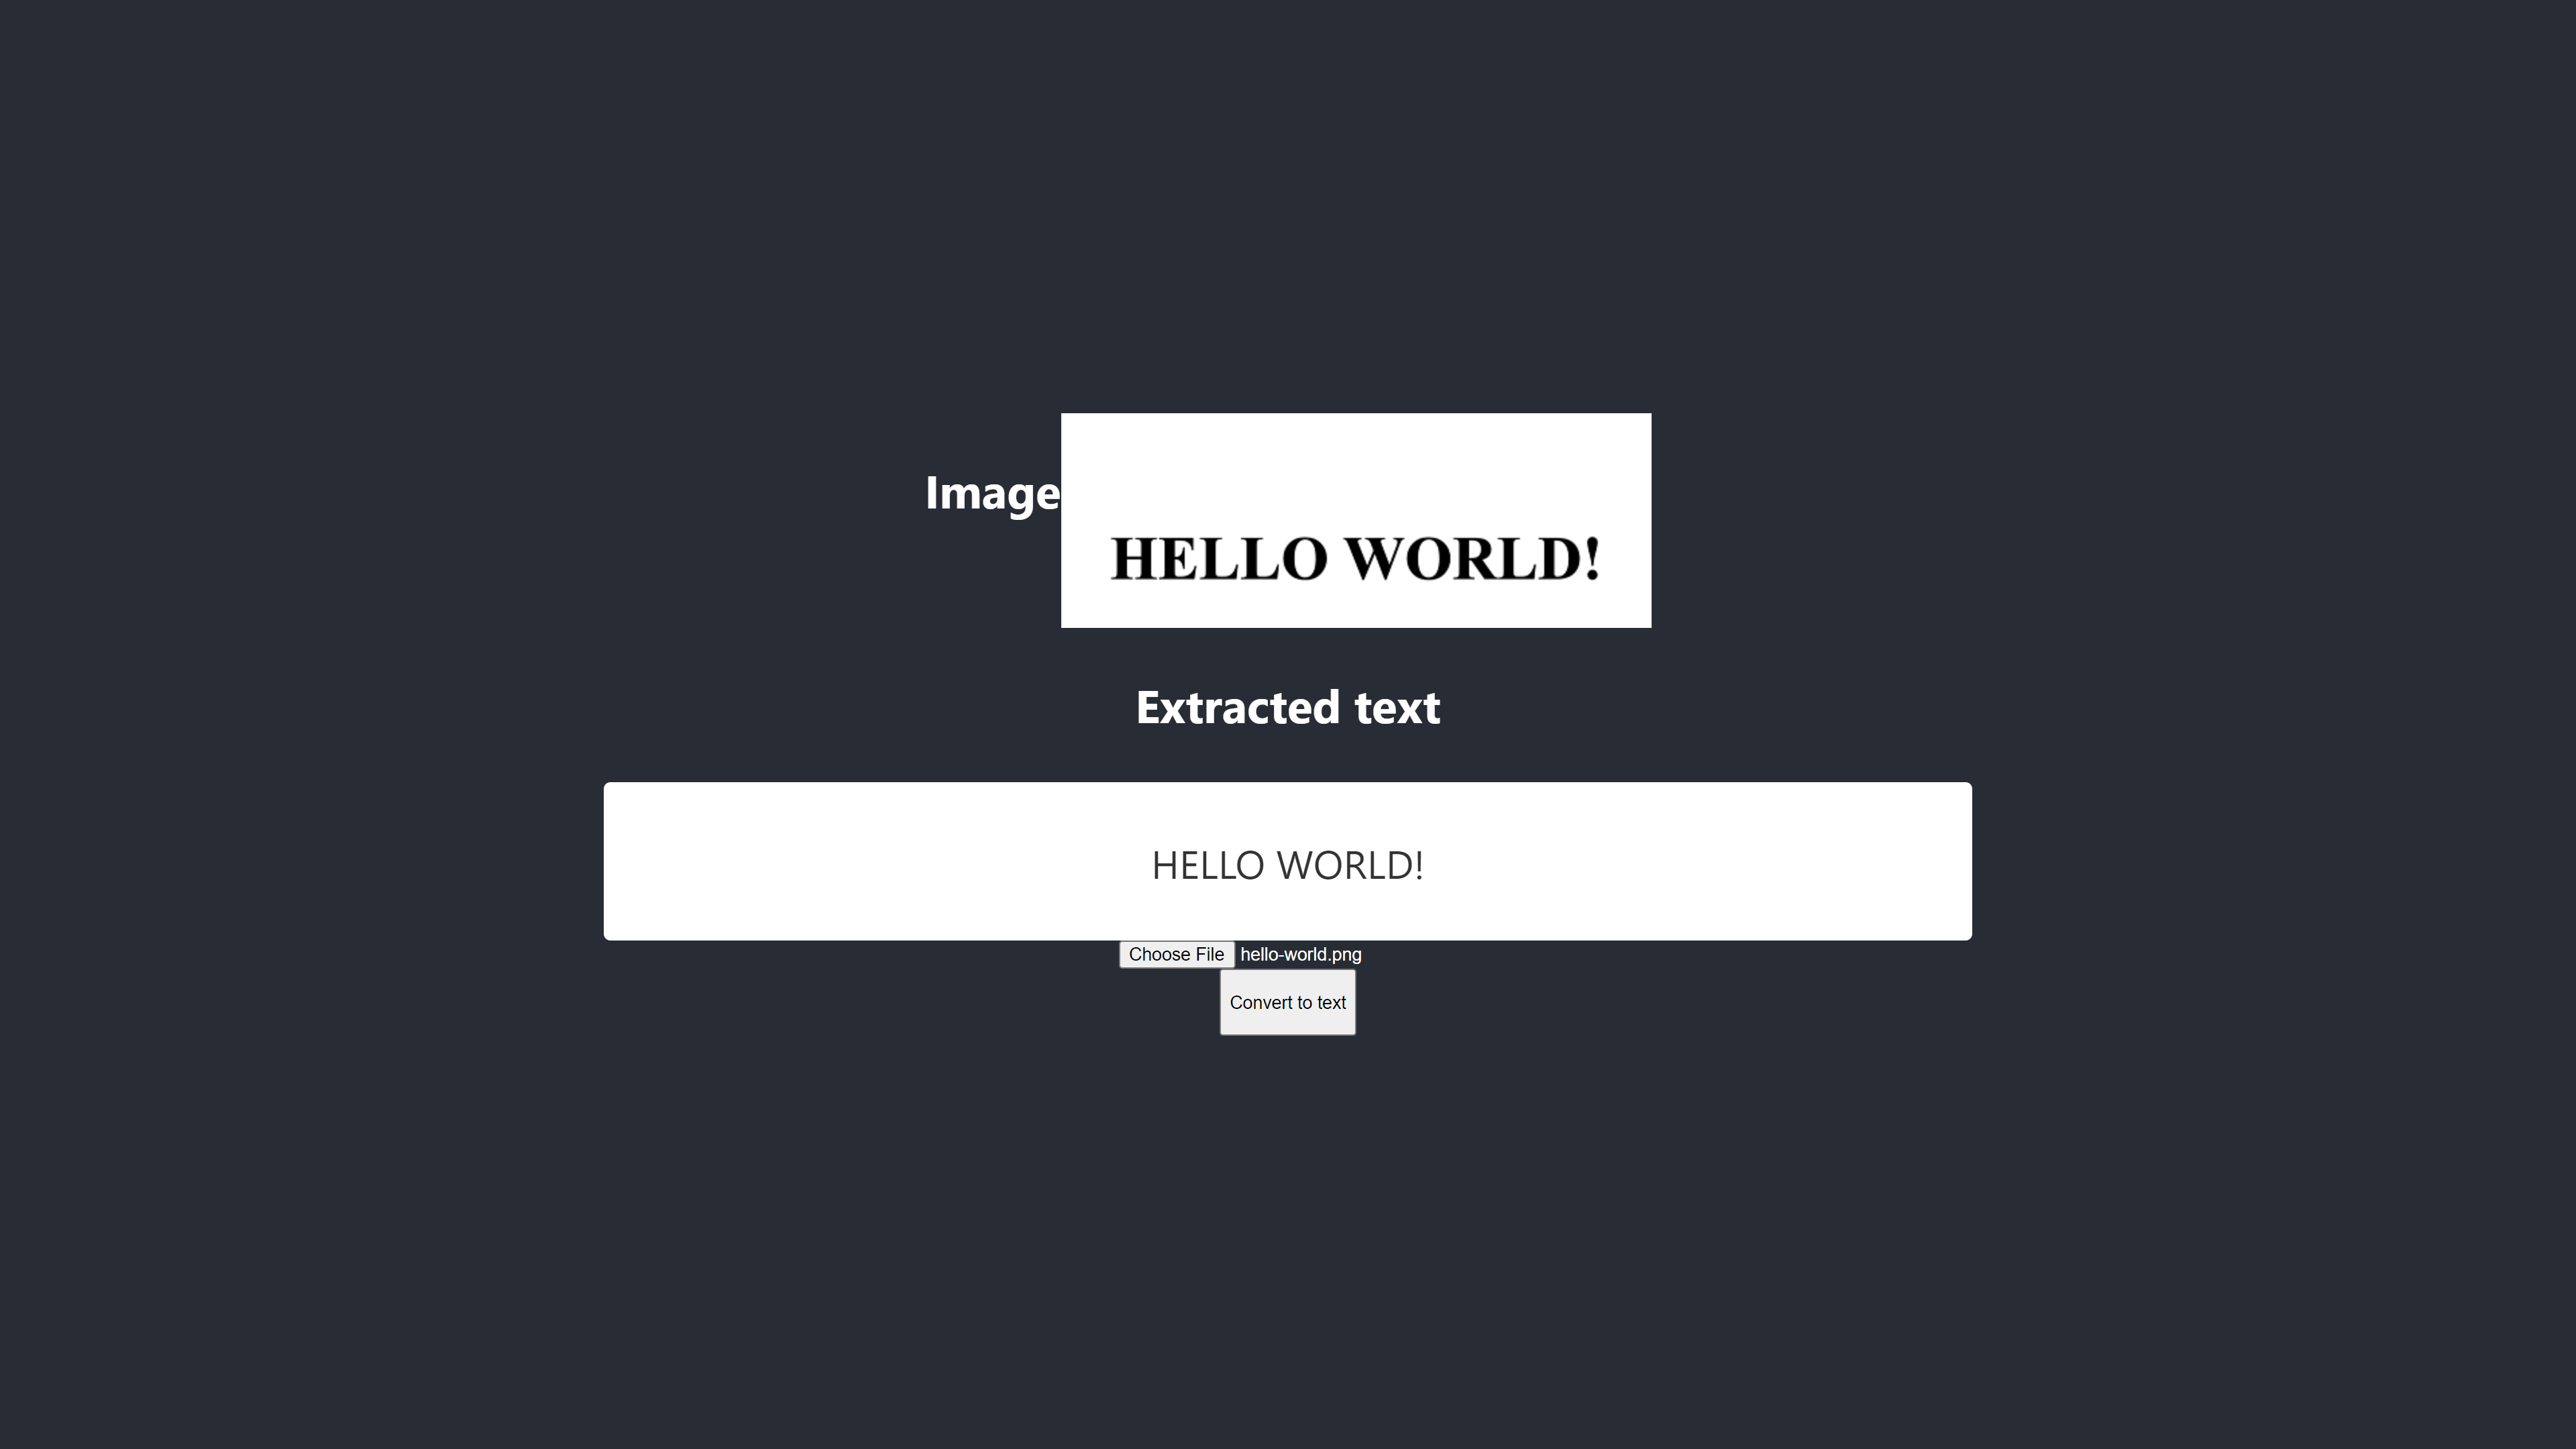
- Black color on a white background tends to give manageable results. The image below is an example of an accurate result without any preprocessing. I also was able to get the same level of accuracy by preprocessing the image but it took me a lot of adjustment which was unnecessary.
The conversion is 100% accurate.
- A text with a big font size tends to be more accurate.
- Fonts with curved edges tend to confuse Tesseract. The best result I got was achieved when I used Arial (font).
- OCR is currently not good enough for automating image-to-text conversion, especially when more than 80% level of accuracy is required. However, it can be used to make the manual processing of texts on images less stressful by extracting texts for manual correction.
- OCR is currently not good enough to pass useful information to screen readers for accessibility. Supplying inaccurate information to a screen reader can easily mislead or distract users.
- OCR is very promising as neural networks make it possible to learn and improve. Deep learning will make OCR a game-changer in the near future.
- Making decisions with confidence. A confidence score can be used to make decisions that can greatly impact our applications. The confidence score can be used to determine whether to accept or reject a result. From my experience and experiment, I realized that any confidence score below 90 isn’t really useful. If I only need to extract some pins from a text, I will expect a confidence score between 75 and 100, and anything below 75 will be rejected.
In case I am dealing with texts without the need to extract any part of it, I will definitely accept a confidence score between 90 to 100 but reject any score below that. For example, 90 and above accuracy will be expected if I want to digitize documents such as cheques, a historic draft or whenever an exact copy is necessary. But a score that is between 75 and 90 is acceptable when an exact copy is not important such as getting the PIN from a gift card. In short, a confidence score helps in making decisions that impact our applications.
Conclusion
Given the data processing limitation caused by texts on images and the disadvantages associated with it, Optical Character Recognition (OCR) is a useful technology to embrace. Although OCR has its limitations, it is very promising because of its use of neural networks.
Over time, OCR will overcome most of its limitations with the help of deep learning, but before then, the approaches highlighted in this article can be utilized to deal with text extraction from images, at least, to reduce the hardship and losses associated with manual processing — especially from a business point of view.
It is now your turn to try OCR to extract texts from images. Good luck!
Other Resources
- P5.js
- Pre-Processing in OCR
- Improving the quality of the output
- Using JavaScript to Preprocess Images for OCR
- OCR in the browser with Tesseract.js
- A Quick History of Optical Character Recognition
- The Future of OCR is Deep Learning
- Timeline of Optical Character Recognition
Further Reading
- The Forensics Of React Server Components (RSCs)
- Automatically Transforming And Optimizing Images And Videos On Your WordPress Website
- Build A Static RSS Reader To Fight Your Inner FOMO
- Setting And Persisting Color Scheme Preferences With CSS And A “Touch” Of JavaScript


