Building A Dynamic Header With Intersection Observer

Email Newsletter
Weekly tips on front-end & UX.
Trusted by 182,000+ folks.


 Custom Web Forms for Angular, React, & Vue. Your backend.
 Celebrating 10 million developers
The Intersection Observer API is a JavaScript API that enables us to observe an element and detect when it passes a specified point in a scrolling container — often (but not always) the viewport — triggering a callback function.
Intersection Observer can be considered more performant than listening for scroll events on the main thread, as it is asynchronous, and the callback will only fire when the element we’re observing meets the specified threshold, instead every time the scroll position is updated. In this article, we’ll walk through an example of how we can use Intersection Observer to build a fixed header component that changes when it intersects with different sections of the webpage.
Basic Usage
To use Intersection Observer, we need to first create a new observer, which takes two parameters: An object with the observer’s options, and the callback function that we want to execute whenever the element we’re observing (known as the observer target) intersects with the root (the scrolling container, which must be an ancestor of the target element).
const options = {
  root: document.querySelector('[data-scroll-root]'),
  rootMargin: '0px',
  threshold: 1.0
}

const callback = (entries, observer) => {
  entries.forEach((entry) => console.log(entry))
}

const observer = new IntersectionObserver(callback, options)
When we’ve created our observer, we then need to instruct it to watch a target element:
const targetEl = document.querySelector('[data-target]')

observer.observe(targetEl)
Any of the options values can be omitted, as they will fall back to their default values:
const options = {
  rootMargin: '0px',
  threshold: 1.0
}
If no root is specified, then it will be classed as the browser viewport. The above code example shows the default values for both rootMargin and threshold. These can be hard to visualize, so are worth explaining:
rootMargin
The rootMargin value is a bit like adding CSS margins to the root element — and, just like margins, can take multiple values, including negative values. The target element will be considered to be intersecting relative to the margins.
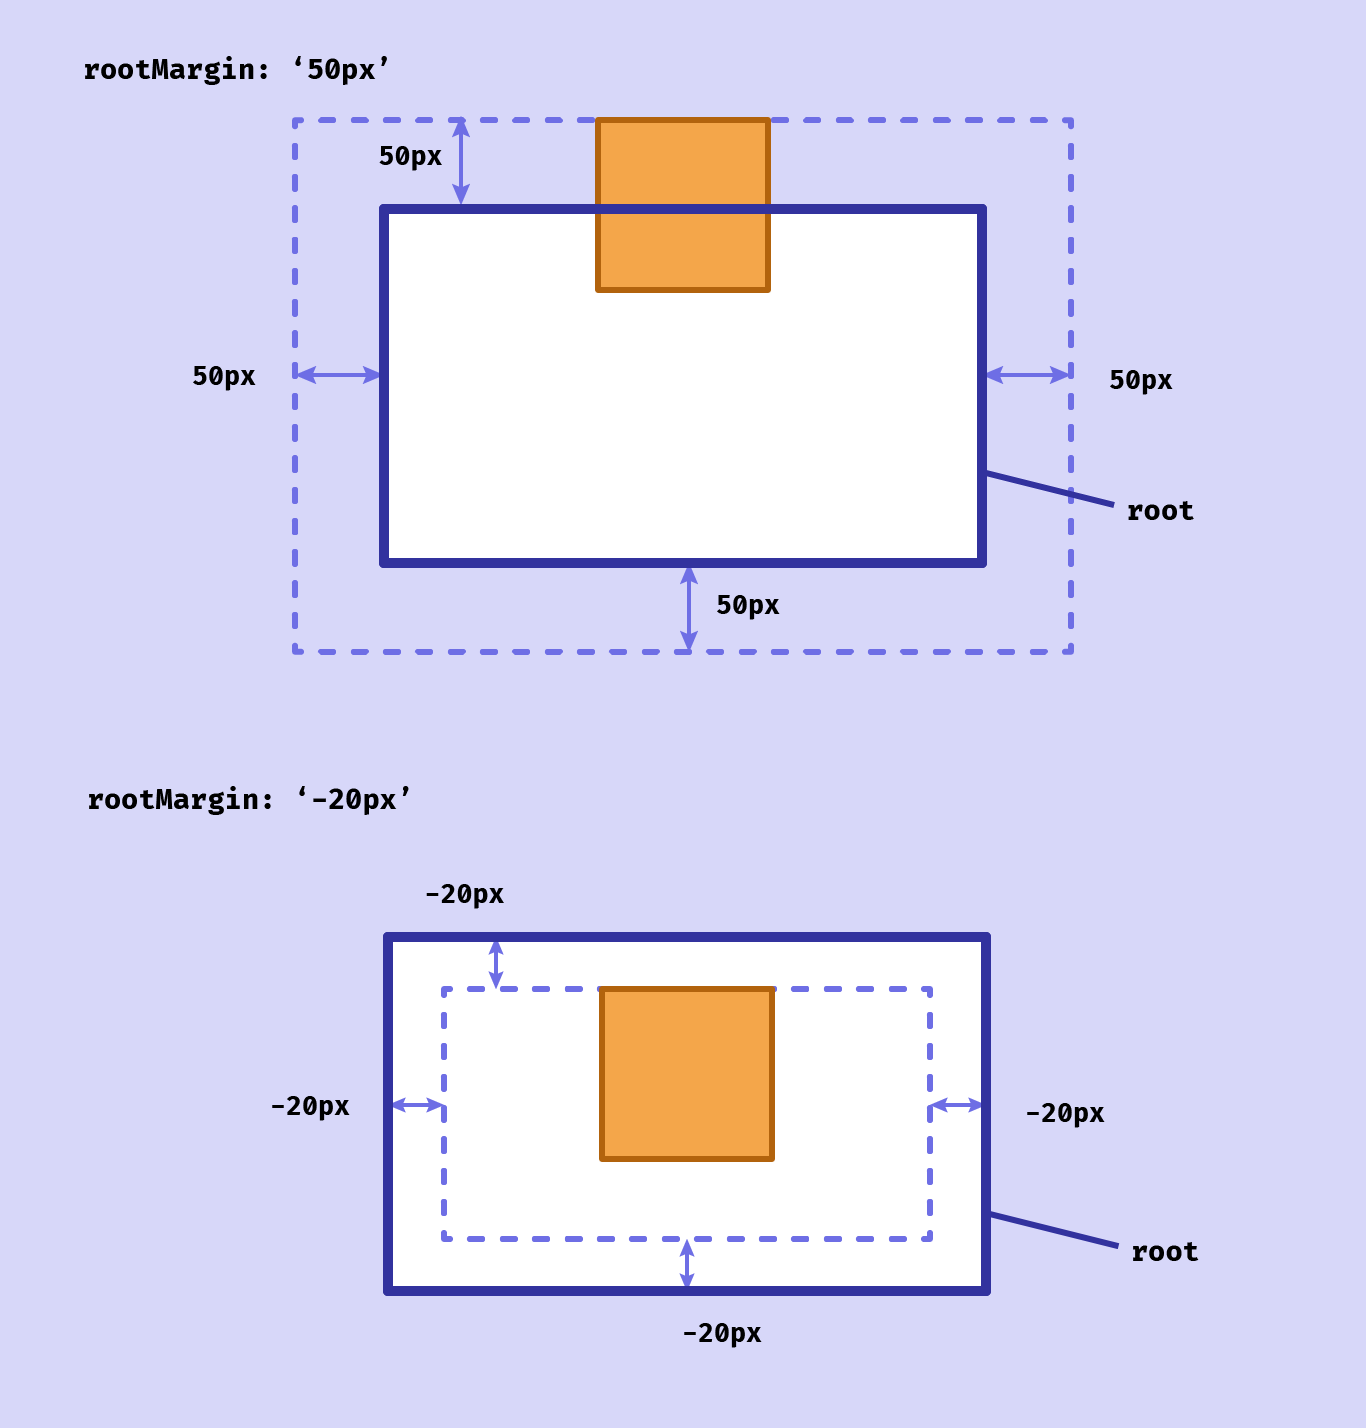
That means that an element can technically be classed as “intersecting” even when it is out of view (if our scroll root is the viewport).
rootMargin defaults to 0px, but can take a string consisting of multiple values, just like using the margin property in CSS.
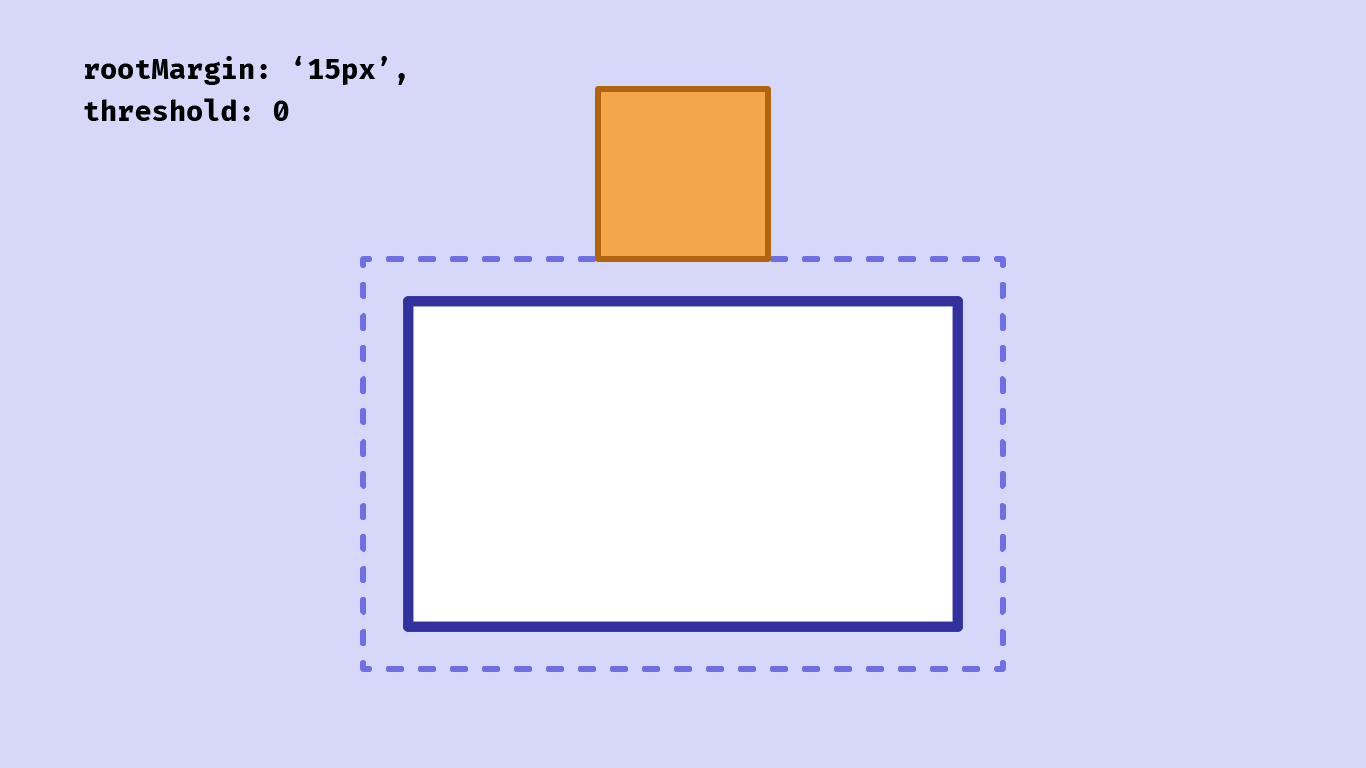
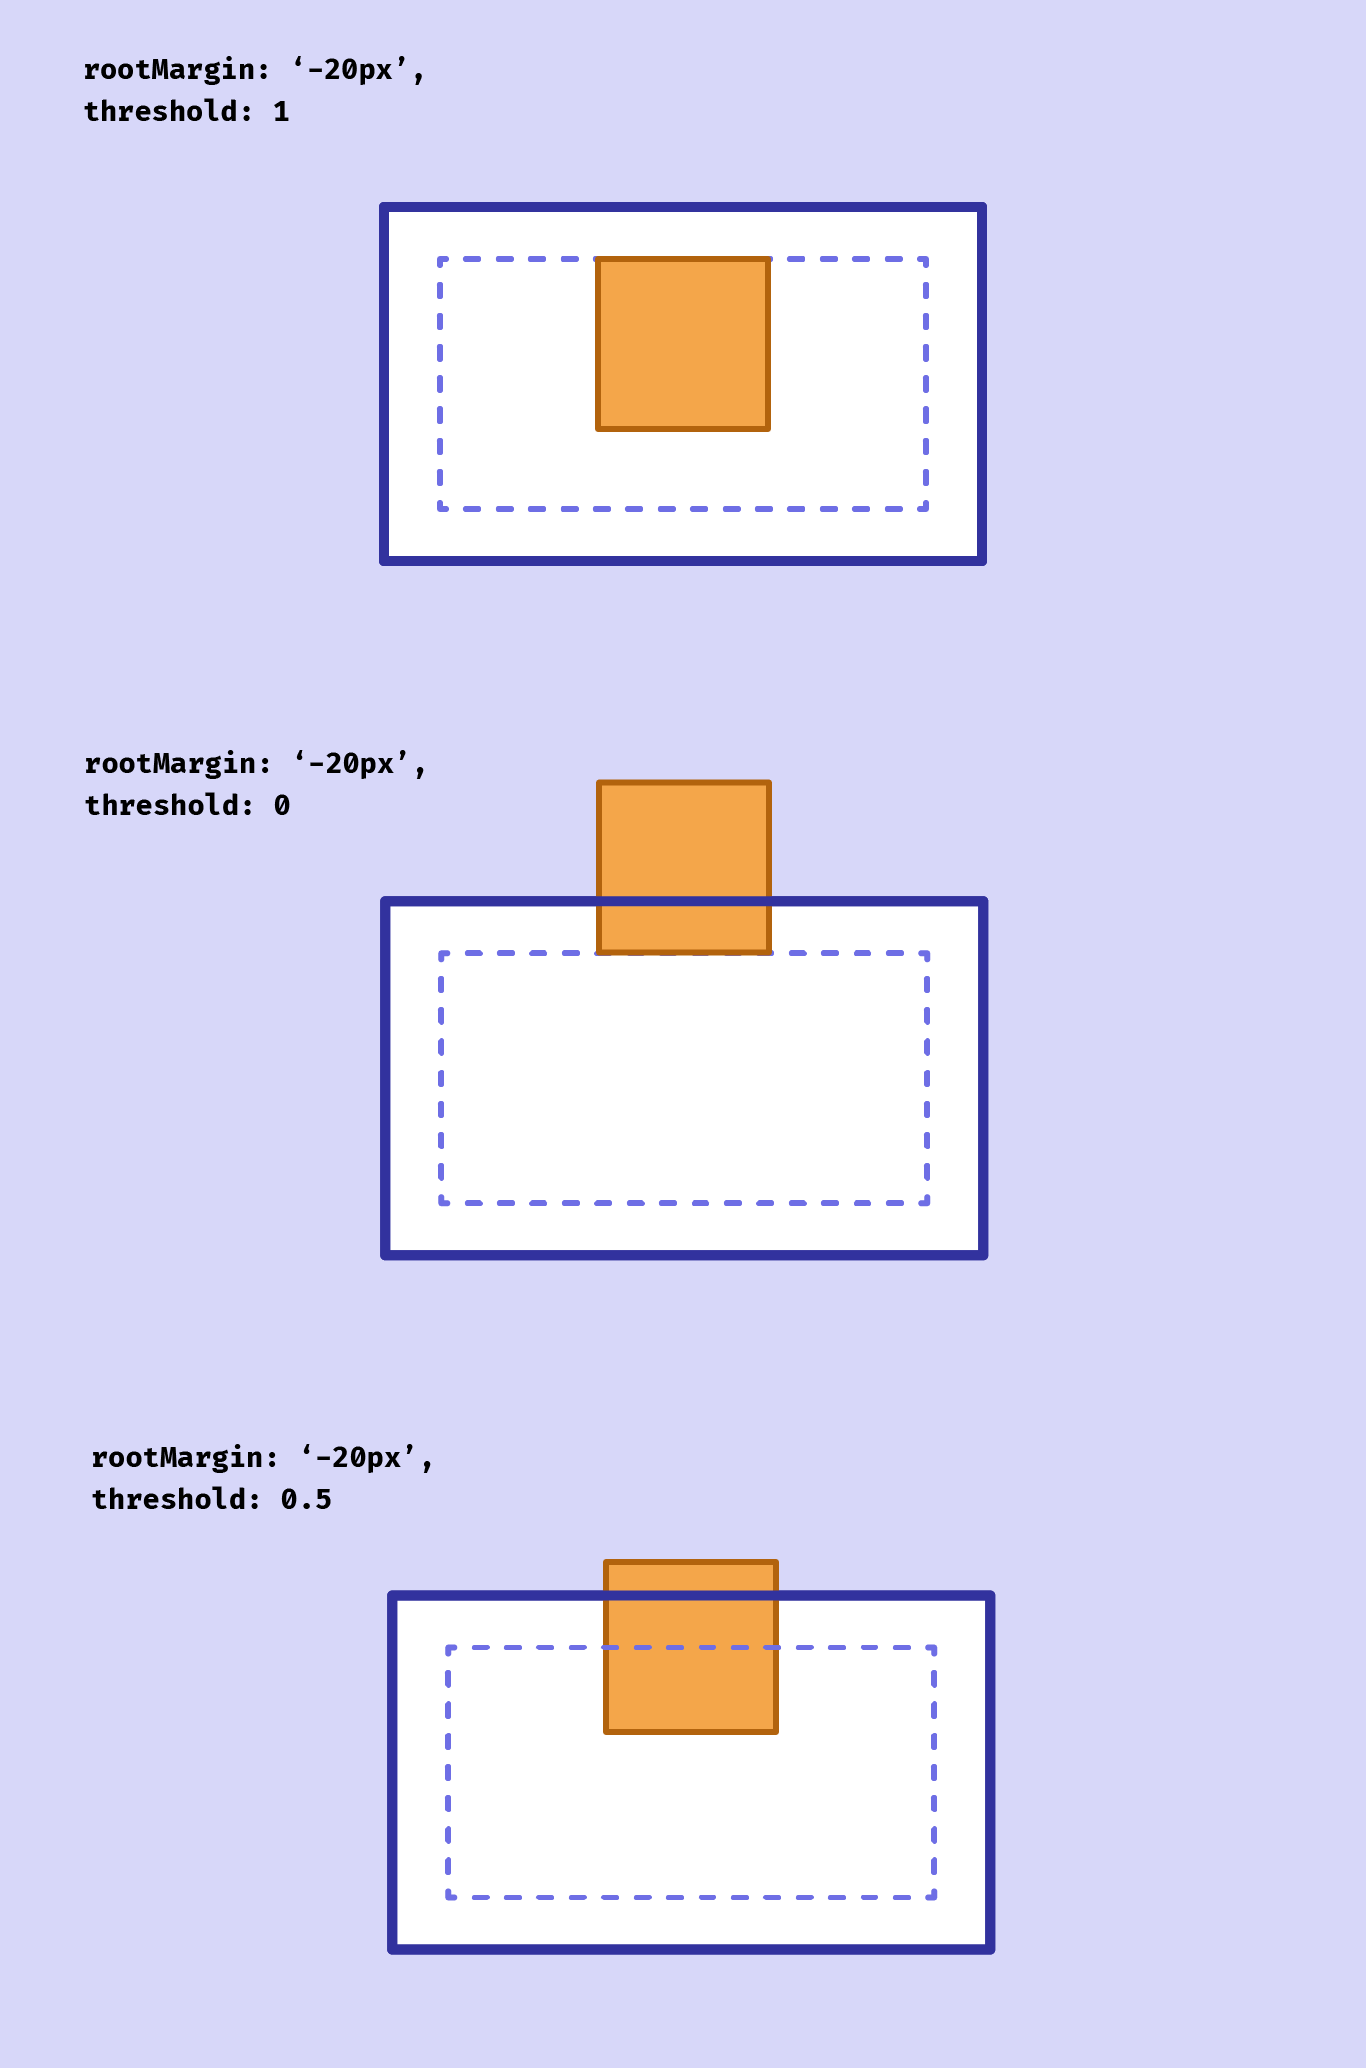
threshold
The threshold can consist of a single value or an array of values between 0 and 1. It represents the proportion of the element that must be within the root bounds for it to be considered intersecting. Using the default value of 1, the callback will fire when 100% of the target element is visible within the root.
It’s not always easy to visualize when an element will be classed as visible using these options. I’ve built a small tool to help get to grips with Intersection Observer.
Creating The Header
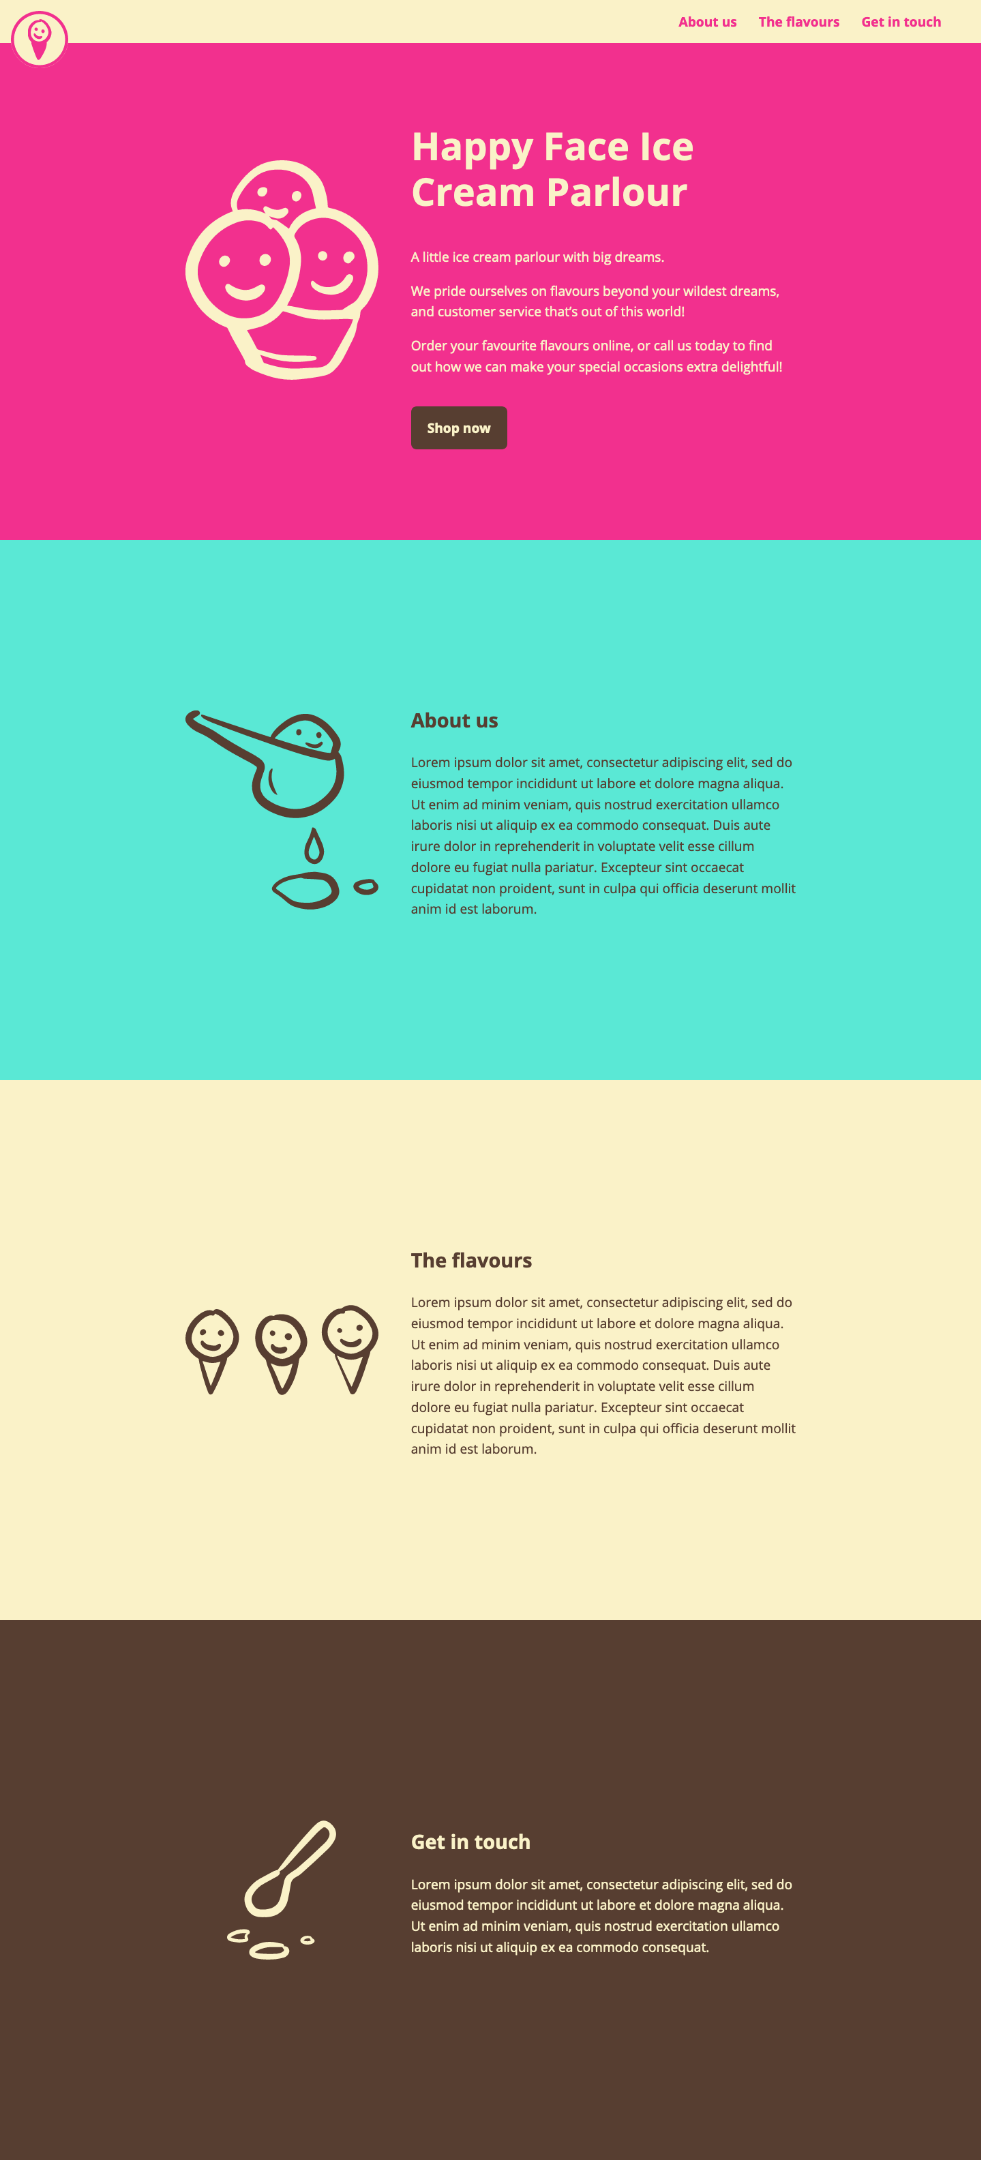
Now that we’ve grasped the basic principles, let’s start building our dynamic header. We’ll start with a webpage divided up into sections. This image shows the complete layout of the page we’ll be building:
I’ve included a demo at the end of this article, so feel free to jump straight to it if you’re keen to unpick the code. (There’s also a Github repository.)
Each section has a minimum height of 100vh (although they could be longer, depending on content). Our header is fixed at the top of the page and stays in place as the user scrolls (using position: fixed). The sections have different colored backgrounds, and when they meet the header, the colors of the header change to complement those of the section. There is also a marker to show the current section the user is in, which slides along when the next section arrives.
To make it easier for us to get straight to the relevant code, I’ve set up a minimal demo with our starting point (before we start using the Intersection Observer API), in case you’d like to follow along.
Markup
We’ll start with the HTML for our header. This is going to be a fairly simple header with a home link and navigation, nothing especially fancy, but we’re going to use a couple of data attributes: data-header for the header itself (so we can target the element with JS), and three anchor links with the attribute data-link, which will scroll the user to the relevant section when clicked:
<header data-header>
  <nav class="header__nav">
    <div class="header__left-content">
      <a href="#0">Home</a>
    </div>
    <ul class="header__list">
      <li>
        <a href="#about-us" data-link>About us</a>
      </li>
      <li>
        <a href="#flavours" data-link>The flavours</a>
      </li>
      <li>
        <a href="#get-in-touch" data-link>Get in touch</a>
      </li>
    </ul>
  </nav>
</header>
Next, the HTML for the rest of our page, which is divided up into sections. For brevity, I’ve only included the parts relevant to the article, but the full markup is included in the demo. Each section includes a data attribute specifying the name of the background color, and an id that corresponds to one of the anchor links in the header:
<main>
  <section data-section="raspberry" id="home">
    <!--Section content-->
  </section>
  <section data-section="mint" id="about-us">
    <!--Section content-->
  </section>
  <section data-section="vanilla" id="the-flavours">
    <!--Section content-->
  </section>
  <section data-section="chocolate" id="get-in-touch">
    <!--Section content-->
  </section>
</main>
We’ll position our header with CSS so that it will stay fixed at the top of the page as the user scrolls:
header {
  position: fixed;
  width: 100%;
}
We’ll also give our sections a minimum height, and center the content. (This code isn’t necessary for the Intersection Observer to work, it’s just for the design.)
section {
  padding: 5rem 0;
  min-height: 100vh;
  display: flex;
  justify-content: center;
  align-items: center;
}
iframe Warning
While building this Codepen demo, I ran into a perplexing issue where my Intersection Observer code that should have worked perfectly was failing to fire the callback at the correct point of the intersection but instead firing when the target element intersected with the viewport edge. After a bit of head-scratching, I realized that this was because in Codepen the content is loaded within an iframe, which is treated differently. (See the section of the MDN docs on Clipping and the intersection rectangle for full details.)
As a workaround, in the demo we can wrap our markup in another element, which will act as the scrolling container — the root in our IO options — rather than the browser viewport, as we might expect:
<div class="scroller" data-scroller>
  <header data-header>
    <!--Header content-->
  </header>
  <main>
    <!--Sections-->
  </main>
</div>
If you want to see how to use the viewport as the root instead for the same demo, this is included in the Github repository.
CSS
In our CSS we’ll define some custom properties for the colors we’re using. We’ll also define two additional custom properties for the header text and background colors, and set some initial values. (We’re going to update these two custom properties for the different sections later on.)
:root {
  --mint: #5ae8d5;
  --chocolate: #573e31;
  --raspberry: #f2308e;
  --vanilla: #faf2c8;

  --headerText: var(--vanilla);
  --headerBg: var(--raspberry);
}
We’ll use these custom properties in our header:
header {
  background-color: var(--headerBg);
  color: var(--headerText);
}
We’ll also set the colors for our different sections. I’m using the data attributes as the selectors, but you could just as easily use a class if you prefer.
[data-section="raspberry"] {
  background-color: var(--raspberry);
  color: var(--vanilla);
}

[data-section="mint"]  {
  background-color: var(--mint);
  color: var(--chocolate);
}

[data-section="vanilla"] {
  background-color: var(--vanilla);
  color: var(--chocolate);
}

[data-section="chocolate"] {
  background-color: var(--chocolate);
  color: var(--vanilla);
}
We can also set some styles for our header when each section is in view:
/* Header */
[data-theme="raspberry"]  {
  --headerText: var(--raspberry);
  --headerBg: var(--vanilla);
}

[data-theme="mint"] {
  --headerText: var(--mint);
  --headerBg: var(--chocolate);
}

[data-theme="chocolate"]  {
  --headerText: var(--chocolate);
  --headerBg: var(--vanilla);
}
There’s a stronger case for using data attributes here because we’re going to toggle the data-theme attribute of the header upon each intersection.
Creating The Observer
Now that we have the basic HTML and CSS for our page set up, we can create an observer to watch for each of our sections coming into view. We want to fire a callback whenever a section comes into contact with the bottom of the header as we’re scrolling down the page. This means we need to set a negative root margin that corresponds to the height of the header.
const header = document.querySelector('[data-header]')
const sections = [...document.querySelectorAll('[data-section]')]
const scrollRoot = document.querySelector('[data-scroller]')

const options = {
  root: scrollRoot,
  rootMargin: `${header.offsetHeight * -1}px`,
  threshold: 0
}
We’re setting a threshold of 0, as we want it to fire if any part of the section is intersecting with the root margin.
First of all, we’ll create a callback to change the data-theme value of the header. (This is more straightforward than adding and removing classes, especially when our header element may have other classes applied.)
/* The callback that will fire on intersection */
const onIntersect = (entries) => {
  entries.forEach((entry) => {
    const theme = entry.target.dataset.section
    header.setAttribute('data-theme', theme)
  })
}
Then we’ll create the observer to watch for the sections intersecting:
/* Create the observer */
const observer = new IntersectionObserver(onIntersect, options)

/* Set our observer to observe each section */
sections.forEach((section) => {
  observer.observe(section)
})
Now we should see our header colors update when each section meets the header.
See the Pen [Happy Face Ice Cream Parlour – Step 2](https://codepen.io/smashingmag/pen/poPgpjZ) by Michelle Barker.
However, you might notice that the colors aren’t updating correctly as we scroll down. In fact, the header is updating with the previous section’s colors each time! Scrolling upwards, on the other hand, it works perfectly. We need to determine the scroll direction and change the behavior accordingly.
Finding The Scroll Direction
We’ll set a variable in our JS for the direction of scroll, with an initial value of 'up', and another for the last known scroll position (prevYPosition). Then, within the callback, if the scroll position is greater than the previous value, we can set the direction value as 'down', or 'up' if vice versa.
let direction = 'up'
let prevYPosition = 0

const setScrollDirection = () => {
  if (scrollRoot.scrollTop > prevYPosition) {
    direction = 'down'
  } else {
    direction = 'up'
  }

  prevYPosition = scrollRoot.scrollTop
}

const onIntersect = (entries, observer) => {
  entries.forEach((entry) => {
    setScrollDirection()

    /* ... */
  })
}
We’ll also create a new function to update the header colors, passing in the target section as an argument:
const updateColors = (target) => {
  const theme = target.dataset.section
  header.setAttribute('data-theme', theme)
}

const onIntersect = (entries) => {
  entries.forEach((entry) => {
    setScrollDirection()
    updateColors(entry.target)
  })
}
So far we should see no change to the behavior of our header. But now that we know the scroll direction, we can pass in a different target for our updateColors() function. If the scroll direction is up, we’ll use the entry target. If it’s down, we’ll use the next section (if there is one).
const getTargetSection = (target) => {
  if (direction === 'up') return target

  if (target.nextElementSibling) {
    return target.nextElementSibling
  } else {
    return target
  }
}

const onIntersect = (entries) => {
  entries.forEach((entry) => {
    setScrollDirection()

    const target = getTargetSection(entry.target)
    updateColors(target)
  })
}
There’s one more issue, however: the header will update not only when the section hits the header, but when the next element comes into view at the bottom of the viewport. This is because our observer fires the callback twice: once as the element is entering, and again as it’s leaving.
To determine whether the header should update, we can use the isIntersecting key from the entry object. Let’s create another function to return a boolean value for whether the header colors should update:
const shouldUpdate = (entry) => {
  if (direction === 'down' && !entry.isIntersecting) {
    return true
  }

  if (direction === 'up' && entry.isIntersecting) {
    return true
  }

  return false
}
We’ll update our onIntersect() function accordingly:
const onIntersect = (entries) => {
  entries.forEach((entry) => {
    setScrollDirection()

    /* Do nothing if no need to update */
    if (!shouldUpdate(entry)) return

    const target = getTargetSection(entry.target)
    updateColors(target)
  })
}
Now our colors should update correctly. We can set a CSS transition, so that the effect is a little nicer:
header {
  transition: background-color 200ms, color 200ms;
}
See the Pen [Happy Face Ice Cream Parlour – Step 3](https://codepen.io/smashingmag/pen/bGWEaEa) by Michelle Barker.
Adding The Dynamic Marker
Next we’ll add a marker to the header that updates its position as we scroll to the different sections. We can use a pseudo-element for this, so we don’t need to add anything to our HTML. We’ll give it some simple CSS styling to position it at the top left of the header, and give it a background color. We’re using currentColor for this, as it will take on the value of the header text color:
header::after {
  content: '';
  position: absolute;
  top: 0;
  left: 0;
  height: 0.4rem;
  background-color: currentColor;
}
We can use a custom property for the width, with a default value of 0. We’ll also use a custom property for the translate x value. We’re going to set the values for these in our callback function as the user scrolls.
header::after {
  content: '';
  position: absolute;
  top: 0;
  left: 0;
  height: 0.4rem;
  width: var(--markerWidth, 0);
  background-color: currentColor;
  transform: translate3d(var(--markerLeft, 0), 0, 0);
}
Now we can write a function that will update the width and position of the marker at the point of intersection:
const updateMarker = (target) => {
  const id = target.id

  /* Do nothing if no target ID */
  if (!id) return

  /* Find the corresponding nav link, or use the first one */
  let link = headerLinks.find((el) => {
    return el.getAttribute('href') === `#${id}`
  })

  link = link || headerLinks[0]

  /* Get the values and set the custom properties */
  const distanceFromLeft = link.getBoundingClientRect().left

  header.style.setProperty('--markerWidth', `${link.clientWidth}px`)
  header.style.setProperty('--markerLeft', `${distanceFromLeft}px`)
}
We can call the function at the same time we update the colors:
const onIntersect = (entries) => {
  entries.forEach((entry) => {
    setScrollDirection()

    if (!shouldUpdate(entry)) return

    const target = getTargetSection(entry.target)
    updateColors(target)
    updateMarker(target)
  })
}
We’ll also need to set an initial position for the marker, so it doesn’t just appear out of nowhere. When the document is loaded, we’ll call the updateMarker() function, using the first section as the target:
document.addEventListener('readystatechange', e => {
  if (e.target.readyState === 'complete') {
    updateMarker(sections[0])
  }
})
Finally, let’s add a CSS transition so that the marker slides across the header from one link to the next. As we’re transitioning the width property, we can use will-change to enable the browser to perform optimizations.
header::after {
  transition: transform 250ms, width 200ms, background-color 200ms;
  will-change: width;
}
Smooth Scrolling
For a final touch, it would be nice if, when a user clicks a link, they’re scrolled smoothly down the page, instead of it jumping to the section. These days we can do it right in our CSS, no JS required! For a more accessible experience, it’s a good idea to respect the user’s motion preferences by only implementing smooth scrolling if they haven’t specified a preference for reduced motion in their system settings:
@media (prefers-reduced-motion: no-preference) {
  .scroller {
    scroll-behavior: smooth;
  }
}
Final Demo
Putting all the above steps together results in the complete demo.
See the Pen [Happy Face Ice Cream Parlour – Intersection Observer example](https://codepen.io/smashingmag/pen/XWRXVXQ) by Michelle Barker.
Browser Support
Intersection Observer is widely supported in modern browsers. Where necessary it can be polyfilled for older browsers — but I prefer to take a progressive enhancement approach where possible. In the case of our header, it would not be vastly detrimental to the user experience to provide a simple, unchanging version for non-supporting browsers.
To detect if Intersection Observer is supported, we can use the following:
if ('IntersectionObserver' in window && 'IntersectionObserverEntry' in window && 'intersectionRatio' in window.IntersectionObserverEntry.prototype) {
  /* Code to execute if IO is supported */
} else {
  /* Code to execute if not supported */
}
Resources
Read more about Intersection Observer:
- Extensive documentation, with some practical examples from MDN
- Intersection Observer visualiser tool
- Timing Element Visibility with the Intersection Observer API – another tutorial from MDN, that looks at how IO can be used to track ad visibility
- This article by Denys Mishunov covers some other uses for IO, including lazy-loading assets. Although that’s less necessary now (thanks to the
loadingattribute), there’s still plenty to learn here.
Further Reading
- Creating Accessible UI Animations
- Advanced Form Control Styling With Selectmenu And Anchoring API
- Creating An Effective Multistep Form For Better User Experience
- The Fight For The Main Thread


