Maintaining End-To-End Quality With Visual Testing

Email Newsletter
Weekly tips on front-end & UX.
Trusted by 182,000+ folks.

 Custom Web Forms for Angular, React, & Vue. Your backend.

 Celebrating 10 million developers
Testing is a critical part of any developer’s workflow. It helps us to ensure that our project is going to maintain a high level of quality, as well as prevent any pesky bugs from getting out into the wild.
But often automated tests can be a pain to manage. Between an endless amount of code to make sure you’re providing full coverage and dealing with the fragile nature of front-end tests — where a simple selector change can completely break an end-to-end workflow — it can sometimes feel like an uphill battle.
By adding automated visual testing, we can eliminate those flaky tests, leveling up our testing pipelines providing that coverage (and more) by taking advantage of smart image comparisons using screenshots of our website or app.
Before we dive into visual testing, let’s take a minute to refresh ourselves on the different types of automated testing and how they fit together. We’ll then talk about what exactly visual testing is and how it can provide you another level of testing coverage for your project.
A Quick Look At Some Of The Types Of Automated Testing
Automated testing is an interesting part of the development cycle. Some clients or stakeholders are able to clearly see the value they provide, but others would prefer any development time spent on pure feature development.
This can sometimes be counterintuitive, where the goal of automated testing is to protect the business or prevent the team from having to spend time fixing bugs in the first place. Writing solid automated tests can prevent major financial losses! It’s ultimately a risk that some are more willing to take than others.
Luckily, that value isn’t always hard to sell, and when we are afforded the time to focus on quality automated tests, we have a variety of options for how to tackle those tests like unit testing, integration testing, end-to-end testing, and visual testing (which can also provide extended coverage for the first three).
When applied with the strengths of each type of test, we’re able to spend more time writing tests that can actually help protect our work and save our customers’ frustration.
Let’s take a look at what some of these testing strategies look like in practice.
Unit Testing
Unit testing focuses on testing smaller, focused areas of an application. Want to test that a function that calculates an order total after promotions is working properly? You’d want to write a unit test.
function myBusinessLogic(pricePerItem, quantity, discount) {
  const subtotal = pricePerItem * quantity;
  return subtotal - ( discount * subtotal );
}

expect(myBusinessLogic(2, 4, .1)).toEqual(7.2);
The great part about unit tests is they’re cheap to write and don’t take a lot of time to run. That’s why you’ll often see companies spend a lot of time building a suite of unit tests to capture those granular pieces of an application.
But because of that focused testing, unit testing might not cover how those different pieces work together, which is where we start moving into integration testing.
Integration Testing
The goal of integration testing is to take the smaller pieces and components of an application and test how they work together. A common example could be how a particular part of a UI responds to interactions followed by requests to a server or database.
cy.get('.add-to-cart').click();
cy.url().should('contain', 'cart');
cy.get('.cart li').contains('My Item');
It could be entirely possible that your small UI component works as expected by itself. Your synthetic events might trigger properly on an onClick instance. That code wrapping your API requests might perform perfectly with some mocked data. But there might be holes between those two pieces working together that your unit tests might not catch.
Integration tests are a compelling way to test your application, but you can take that a step further as you look to test “all the things”.
End-To-End Testing
End-to-end testing captures an entire user’s journey end-to-end for a focused workflow. For instance, if I’m building an e-commerce store, the “happy path” (or the expected path with the least resistance) would be finding a product, adding it to a cart, and paying for those items. If I’m writing an end-to-end test, I would capture that entire process, i.e. from finding a product on a product listing page to paying for that item.
cy.visit('/products');
cy.get('.product a[href="/product/1234"]').click()
cy.url().should('contain', 'product/1234');
...
cy.get('.order-button').click();
cy.url().should('contain', 'receipt');
cy.get('.receipt li').contains('My Item');
The great part about end-to-end testing is it’s essentially a big integration test. You’re capturing a lot of different components of the application including how the UI works, that the APIs are responding correctly, and that those pieces are working together.
The issue is that end-to-end testing, and even integration testing, takes more time to write and they also take a lot longer to run. So how can we take advantage of all of our testing options and put together a suite of tests that will provide an efficient way to cover our application?
Leveraging The Different Types Of Testing
There are a variety of mindsets that generally describe how many tests of each type you should be spending time writing.
Mike Cohn came up with the concept of the “test pyramid” in his book Succeeding with Agile.
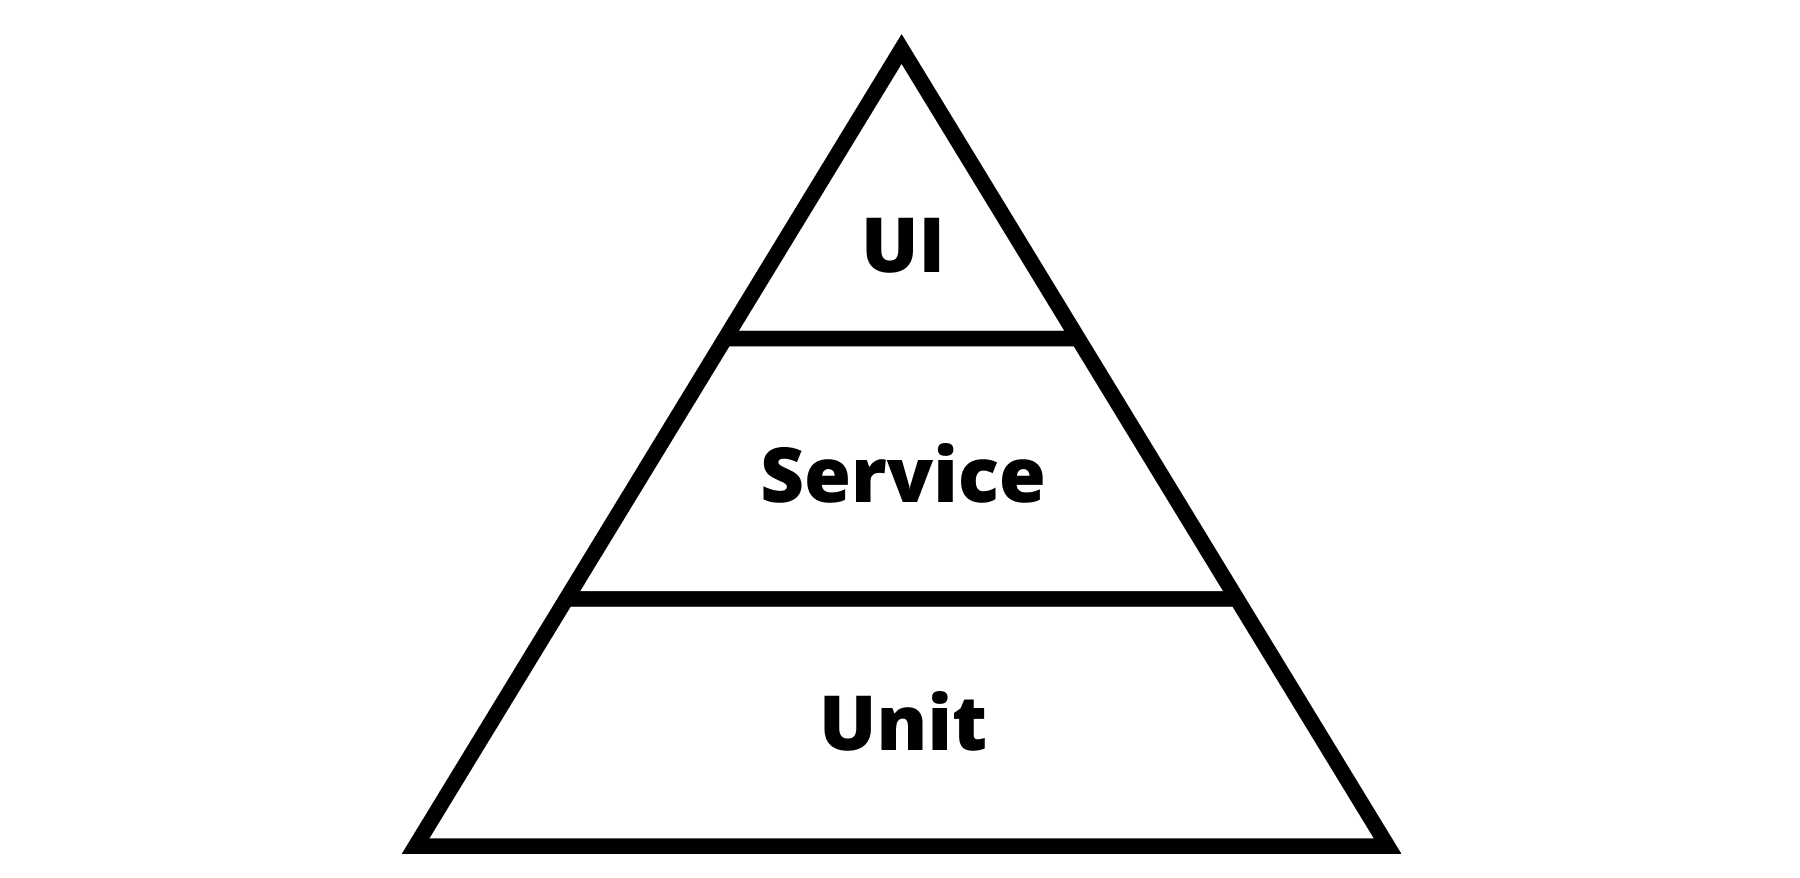
He argues that you should be writing more unit tests where they’re less expensive to write and faster to run. While his original diagram labels the various tests a bit differently, as you lean more into integration-type testing, they become slower to run and more expensive to write. While those tests are valuable, you don’t want to have as many integrations or end-to-end tests as you would unit tests.
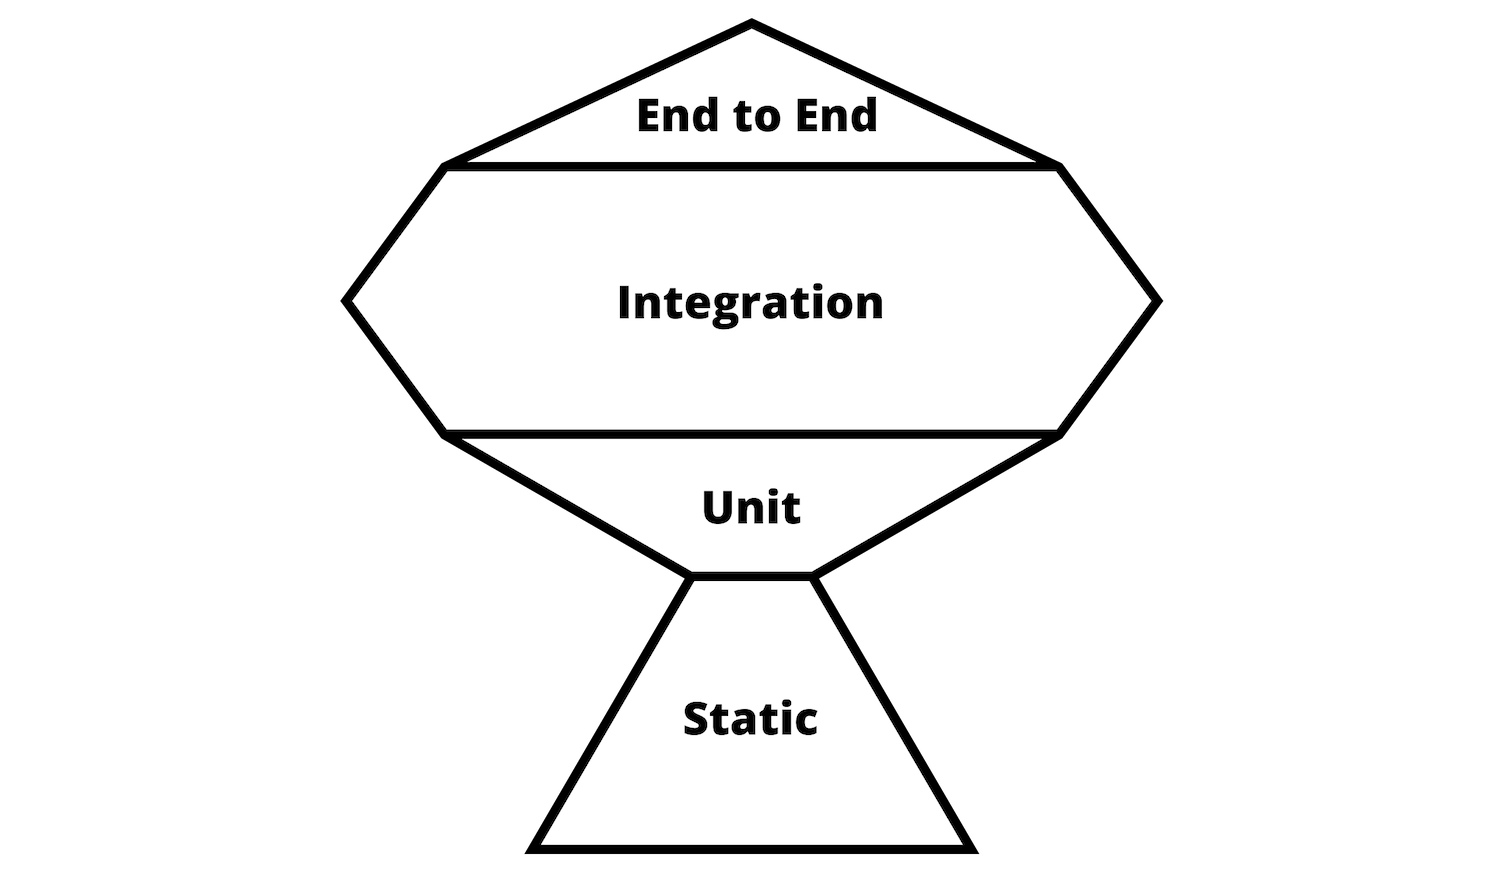
Having this balance can help you focus on capturing the critical parts of the application, such as business logic with unit tests and how they work together with integration tests, but Kent C. Dodds argues testing technology has caught up to a point where there are no longer large cost trade-offs for writing integration tests, which is where his concept of the “test trophy” comes in.
In modern development environments, we have a lot of amazing tools at our disposal like Cypress, Selenium, and Playwright which each give developers and QA engineers the ability to write tests that easily interact with browsers like Chrome and Firefox.
With Cypress, writing a test that clicks a button could look as simple as:
cy.get('#my-button').click()
That’s arguably just as simple as testing that the button is working with synthetic events, if not simpler. The best part is you’re testing how that button actually works in a browser.
Regardless of which diagram you subscribe to, ultimately the goal is to weigh the different options between cost and speed to determine the right fit for your particular application. It’s important to not just hit that 100% on your coverage report, but to actually make sure the experience you’re giving to visitors is working as it should.
But no matter the mix of tests you run, these programmatic tests that only interact with and test the DOM (Document Object Model) are missing one big piece of the puzzle: how your visitors visually see that application.
What Traditional Types Of Testing Doesn’t Capture
As you’re running your unit, integration, and end-to-end testing on your application, they all have one thing in common. They’re all testing the code.
What I mean by that is they’re not testing what the visitor of your application actually sees.
If you’re running a suite of integration tests and like our example earlier, testing that someone can add a product to a cart and purchase it, each step of the way, you’re finding an element in the DOM through code and confirming that it worked in the same way.
This doesn’t test things like whether or not the text on your page is legible. Did someone add a CSS change that accidentally floated all things to the left and flipped them upside down?

These types of bugs are referred to as “visual bugs”, where they might pass all of your tests with flying colors, but when someone actually looks at it, it’s not quite right or worse, completely unusable.
Realistically, we can’t expect to provide 100% full coverage of every detail of a user interface with traditional testing. Between the endless amount of application states and the fact that we’re always adding new features, it simply doesn’t scale.
This is what leads us to the headline of this story: Visual Testing.
What Is Visual Testing?
Visual Testing captures the visible output (like a screenshot) of an application and compares it to the same application at another point in time.
This commonly happens by first capturing a baseline screenshot, or a previously captured instance of the application with expected results, and comparing each new test to that baseline.
But as your project is developed, things change. As time goes on, that baseline will update right along with your application as you approve new visual differences as accepted changes.
Types Of Visual Testing
An interesting thing about Visual Testing is there are different ways to handle this.
One approach to visually test is by using pixel-by-pixel comparisons in which the testing framework will flag literally any difference it sees between two images. While such comparisons provide an entry-level into visual testing, it tends to be flaky and can lead to a lot of false positives.
As you could imagine, when working with the web, things tend to render ever-so-slightly different between page loads and browser updates. If the browser renders the page off by 1 pixel due to a rendering change, your text cursor showing, or “just because”, your deployments may be blocked due to these failed tests.
Your tests are also prone to failures when dealing with dynamic content. For instance, if you ran daily pixel-by-pixel visual tests on the homepage of this site, Smashing Magazine, you’re going to get a lot of failed tests as they produce more and more content.
A better way to handle visual testing is by leveraging technology like AI where each time a test is run, the testing framework intelligently looks at the screenshot captured compared to the baseline.
It can detect that the two captures are different or even detect if it’s a content change as opposed to a layout change. It won’t flag that test as failed if something didn’t actually change and you can even add rules to ignore dynamic regions of an application that might change due to that content.
Where Visual Testing Helps
Visual testing thrives in being able to capture the current state of an application just the way your customer saw it. This makes it compelling for really any application that will have real humans interacting with it.
As it’s capturing that snapshot, it’s providing coverage of many pieces of that application, not just a single granular component that you wrote a test for. It ends up capturing the context around that component, leading to wider coverage.
This becomes a great way to provide broad coverage with low overhead. Back to the test pyramid or test trophy, we’re able to actually provide comprehensive coverage on top of all of our other tests.
How Does Visual Testing Work?
The gist is simple — comparing two images against each other and looking for the difference — but it’s a little more involved than that.
Image Comparisons
When implementing visual testing, the goal will be to provide coverage for critical workflows that can capture how a real person is using the application. That often includes the very first screen someone may see, but that’s typically not the only screen they see.
Just like creating a strategy for how to run traditional tests, you want to make sure you look for real interactions that end up with real results in the UI, such as adding an item to a shopping cart or adding a favorite item to your wishlist.
With that in mind, you’ll want to capture a screenshot each step of the way. For example, if you were testing an online store, you may want to add steps for the following:
- List of products loaded on a page;
- Product page after selecting a single product;
- On-page cart UI after adding a product to that cart;
- Cart page after navigating to the cart;
- Payment and shipping UI once entering the checkout flow;
- Receipt page upon successful purchase.
This will capture the results of all of the interactions as someone is making their way through your online store, where you’re able to verify that not only does it functionally work from a code perspective, but that the person can actually use your application without visual bugs interfering.
Technical Bits
As you’re making your way through planning screenshots, you’ll need a mechanism to automate those tasks. Something that can interact with a browser-based on a set of tasks.
This is where popular browser automation frameworks like Selenium, Cypress and Playwright come in, where those testing frameworks take advantage of browser APIs to run through your commands, finding and clicking things just like a human would, where you would then tell the visual testing framework when to capture the UI state visually.
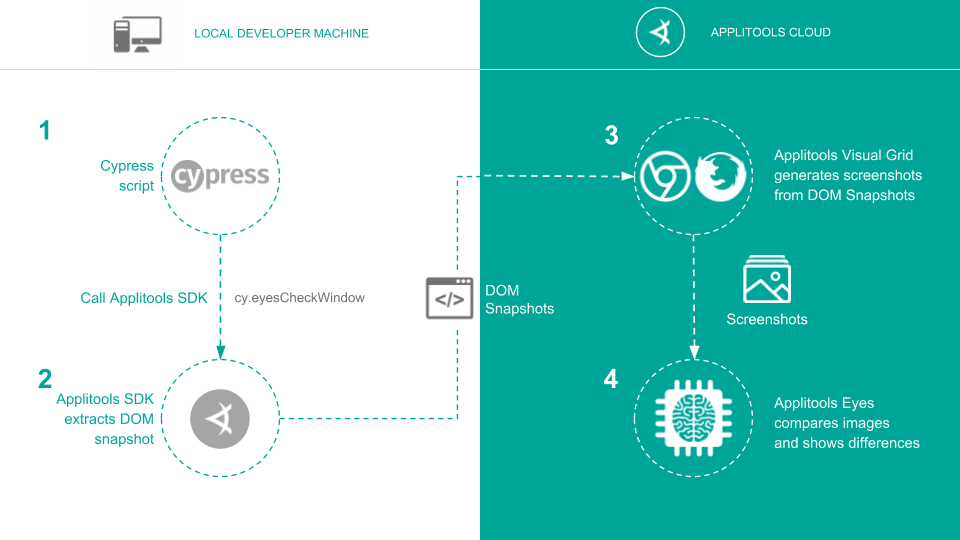
In the case of Cypress and Applitools, Cypress would navigate through each page, where then the Applitools SDK would extract a snapshot of the DOM, and send that snapshot up to the Applitools cloud, where it would finally generate screenshots for comparison.
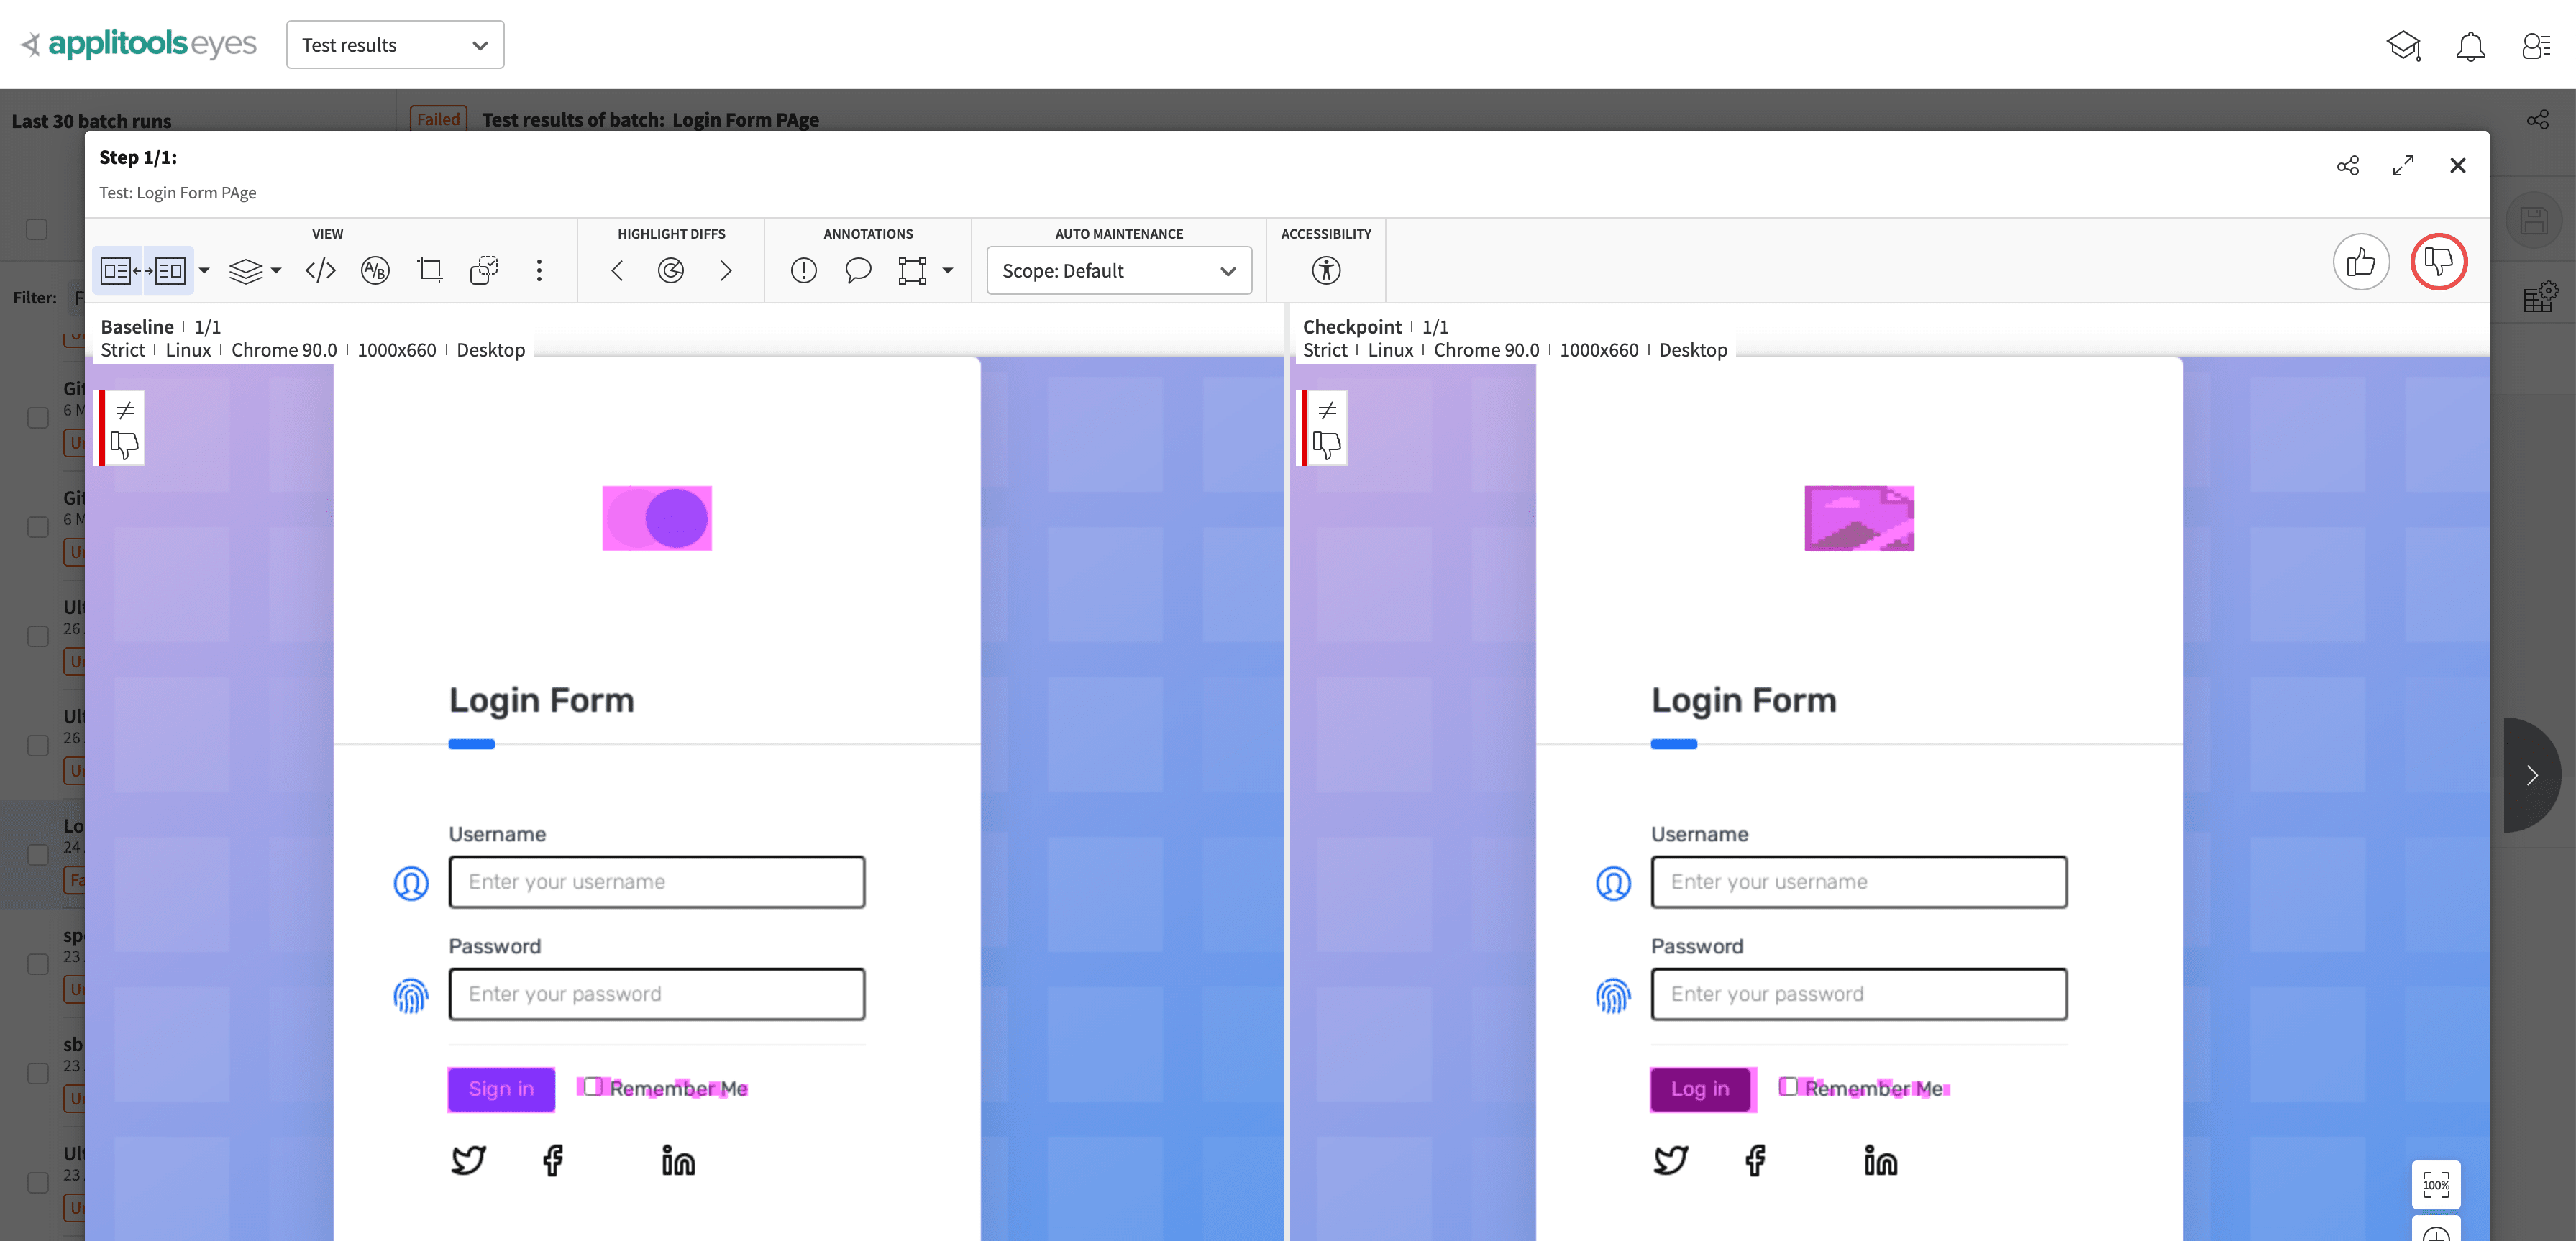
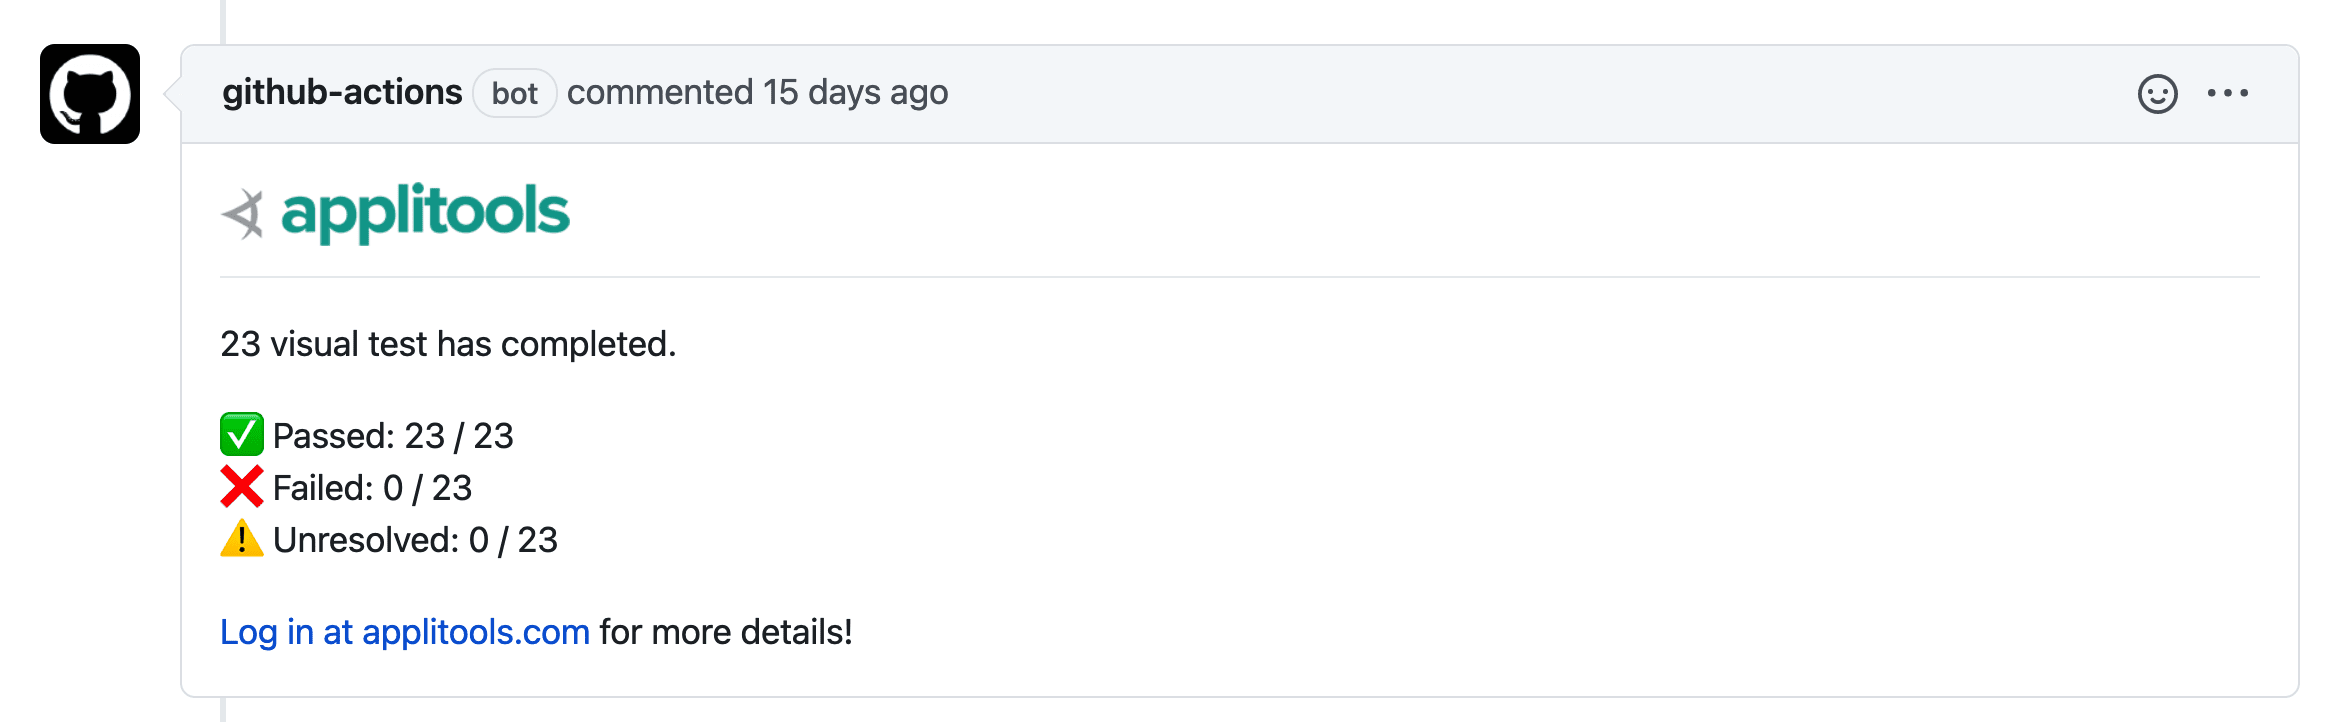
At that point, depending on the visual testing platform, you’ll get a set of results in the form of highlighted differences or a nice green checkmark if things look good.
Integration With Existing Testing Frameworks
Like the Cypress and Applitools integration above, integration typically has low friction. A lot of the available visual testing platforms can integrate directly into existing testing frameworks, it mostly just depends on which SDKs they have available.
cy.visit('/product/1234');
cy.eyesOpen({ appName: 'Online Store', testName: 'Product Page' });
cy.eyesCheckWindow();
cy.eyesClose();
This means you typically don’t need to completely rewrite your test suite to strengthen your tests and get visual coverage; you can add those checkpoints to the tests you already have.
Automating Tests
Fortunately, automation of development and test-related tasks has been maturing quickly, providing a lot of great options for how we can automate our tests.
Traditional CI/CD solutions like Jenkins or Travis CI allow you to run your tests on their environments right alongside the rest of the integration and deployment pipeline. Relatively new to the automation space are tools like GitHub Actions, where they provide a similar mechanism to the traditional CI/CD environments, but right inside of your existing GitHub repo. This makes it an easy win when trying to run your tests and other code tasks automatically, where you don’t need an entirely new system but instead use your existing tools.
name: Node.js CI

on: [push, pull_request]

jobs:
  build:
    runs-on: ubuntu-latest

    steps:
    - uses: actions/checkout@v2
    - uses: actions/setup-node@v2
      with:
        node-version: 12.x
    - run: npm ci
    - run: npm test
But regardless of the environment you use, ultimately you’re subject to the requirements of the testing framework. Cypress works pretty seamlessly wherever you can install Node.js, which is pretty common these days, as long as you have access to a headless browser like Electron or Chrome. Others might require a little extra environment, but at that point, you can typically scaffold that environment as you’d like, creating the conditions you need to run your tests.
What Are The Benefits Of Visual Testing?
Visual testing is going to provide a wide variety of benefits like some of the ones we already discussed, but it really helps all stakeholders including executives, product managers, developers, designers, and really anyone else on the team.
For instance, for a CEO or Product Manager, you’re gaining confidence that your test coverage is actually capturing real-world usage. For the development team, you’re gaining the same confidence that whenever you make changes, you’re going to get immediate feedback, eliminating the fear factor involved when trying to move quickly. But there are also a lot of practical benefits.
Less Code To Maintain
When integrating with a visual testing platform, the majority of your code is going to revolve around two things: interactions and screenshots.
The interactions are essentially navigating through an application, finding what page or user flow you want to capture. Regardless of how you’re testing, you’ll likely need to maintain this in one form or another.
The screenshots, on the other hand, are going to cover all of the assertions you would normally write in a test. By comparing each screenshot against a baseline, you automatically are making sure that each component of your project is working exactly as intended.
Tests Are Less Fragile
And by using those screenshots as your assertion mechanism, your tests are going to be less flaky and fragile.
If you’re writing an assertion against a particular part of the DOM, such as using an ID or an automatically generated selector, you’re risking a breaking test with any change to that component.
With an ID, someone might simply accidentally remove or change it. Maybe you thought it was for functional purposes only and updated it when reworking things, which ended up breaking the test (happened to me!).
Or if you’re using general selectors, whether automatically generated or not, they tend to be very specific as you’re testing very specific parts of the application. If you end up nesting some HTML or moving things around in the code a little bit, even if you didn’t change how it visually looks, it could end up breaking that test.
Testing What People Are Actually Using
Speaking of testing how it visually looks, when visual testing, you’re testing what your visitors or customers actually see.
Using proper, semantic HTML doesn’t automatically make your project usable. A small CSS change (like z-index) can completely change the usability and how something looks.
By capturing a screenshot and comparing the actual state of the application through interactions of a user’s flow, you’re able to make sure that your application is both functionally working as well as making sure it’s usable by more than just automation robots.
Recommended reading: Managing CSS Z-Index In Large Projects
Testing Things You Didn’t Think To Test
You’re also getting coverage of different parts of your application that you didn’t even think to test.
Consider the list of tests that you have in your suite, those are the ones you thought to write or wrote because you previously hit a bug. What about the rest of the application?
That screenshot is going to capture more detail and context that your other tests might not have included.
What Doesn’t Visual Testing Cover?
But visual testing isn’t intended to be an end-all solution to replace your entire suite of tests. Like the other types of tests, it should co-exist, filling in the gaps of the others and ultimately providing more meaningful coverage.
Testing Data-Driven Business Logic
As you’re running through visual tests, you might be able to capture some aspects of your business logic, such as making sure when someone adds an item to the cart, that the math checks out, but your online store likely has a wider variety than just that one product.
It’s still important to capture that complex business logic with unit testing, making sure you’re capturing different use cases like how various discounts impact that total.
Comprehensive API Testing
When dealing with APIs, you can think of a visual test like an integration test. We’re able to test that when interacting with the browser, our request logic is working as expected. But it doesn’t provide a comprehensive look at how that API is functioning.
Similar to business logic, your API should still be backed by a suite of tests that will ensure it’s working as expected such as unit tests or health checks.
Getting Started With Visual Testing
As another tool in our belt, visual testing can really help provide another level of coverage that helps us maintain a high level of quality for our applications, but where do we start?
Fitting Into The Development Lifecycle
Because visual testing helps work towards the goals of all of the stakeholders, this can really fit in at any part of the development lifecycle.
For instance, traditionally tests are only used to validate that the code is working as intended, but we can also use visual testing for design handoff and UX collaboration. The designers on the team can plug in their mockups as a baseline and easily use them to compare the actual experience.
But from a code perspective, visual testing can thrive in automated environments like running checks on pull requests, on staging environments before deployment, and making sure production is looking good post-deploy.
You can even run your visual testing on a cron, replacing your health check synthetic events, which typically are flaky and don’t really ever truly tell you what state your application is in.
Luckily there are a lot of options for both what service you use, but also the integration points for using those services.
Available Solutions For Visual Testing
Determining what solution to move forward with relies on picking the library or service you’ll be using to run the tests. Like we covered earlier, the biggest differentiator will be the type of visual testing these services provide.
A lot of platforms are using pixel-by-pixel visual testing to perform checks. This includes tools like Percy and Chromatic which will flag changes between two screenshots.
Then you have AI-powered visual testing, where Applitools is really the only service that’s currently providing that capability. Instead of simply checking images pixel-by-pixel, Applitools intelligently compares the images avoiding any flaky tests or false positives, giving meaningful change detection.
Regardless of the solution, you’ll ultimately need to integrate it into your development environment, whether you’re starting from scratch or adding it to an existing testing framework.
Integrating Visual Testing
When integrating your visual testing platform of choice, you have the option of starting from scratch or the easier route of integrating into your existing testing framework. Tools like Applitools make this easy, where the large variety of SDKs that are supported helps make it easy to drop into existing workflows.
A good example of this is if you’re already set up and running with Cypress:
it('should log into the application', () => {
  cy.get('#username').type('colbyfayock');
  cy.get('#password').type('Password1234');
  cy.get('#log-in').click();
  cy.get('h1').contains('Dashboard');
});
If you’re already performing programmatic tests, you can simply layer in visual testing to provide another layer of coverage.
it('should log into the application', () => {
  cy.eyesOpen({ appName: 'My App', testName: 'Login' });
  cy.get('#username').type('colbyfayock');
  cy.get('#password').type('Password1234');
  cy.get('#log-in').click();
  cy.eyesCheckWindow();
  cy.eyesClose();
});
And some SDKs make it even easier, where if you’re already running a Storybook library, all you need to do is install the package with npm and run a simple command, then you have complete coverage of all of your components.
npm install @applitools/eyes-storybook --save-dev
npx eyes-storybook
Ultimately, the biggest question is what testing framework you’ll want to use and if the service you want to use supports that framework.
Creative Uses Of Visual Testing
Outside of gaining another level of testing coverage for your application, there are a variety of other ways you can take advantage of visual testing.
- Uptime Monitoring
Regularly run a meaningful visual test instead of typical uptime monitoring with fragile synthetic events. - Design/UX Collaboration
From handoff to usability issues, use visual testing to give the entire team a medium to collaborate. - Accessibility Testing
Capture key issues that can limit the accessibility of your application. - Historical Snapshots
Periodically running a visual test can help you capture snapshots, easily giving you a way to reference an older state of the project. - Localization Testing
With AI-based visual testing being able to detect content changes, you have the ability to make sure everything is looking and working as expected no matter the language. Bonus: you can reduce overhead when trying to compare different versions of a given language.
By adding the visual element to your tests, you’re gaining more options to add meaningful ways to maintain a high level of quality for your app.
Further Reading
- AI’s Transformative Impact On Web Design: Supercharging Productivity Across The Industry
- Five-Second Testing: Taking A Closer Look At First Impressions (Case Study)
- How To Create A Weekly Google Analytics Report That Posts To Slack
- Testing Sites And Apps With Blind Users: A Cheat Sheet


