Let’s Dive Into Cypress For End-to-End Testing
This article has been sponsored by our dear friends at LambdaTest who are making the cross-browser testing experience smoother for so many folks around the globe. Thank you!
Software development without automated testing is hard to imagine today. A good variety of different test procedures will ensure a high level of quality. As a foundation for testing, we can use a number of unit tests. On top of that, in the middle of the pyramid, so to speak, are integration tests. End-to-end tests are at the very top, covering the most critical use cases. This third kind of testing will be the focus of this article.
However, end-to-end testing does have some pitfalls that are cause for concern:
- End-to-end tests are slow and, thus, pose a significant hurdle in every continuous integration and continuous deployment (CI/CD) strategy. Not only that, but imagine finishing a task, a feature, or any other implementation — waiting for the test to execute can drain everyone’s patience.
- Such end-to-end tests are hard to maintain, error-prone, and expensive in every way due to the effort of debugging. Various factors can cause this. Your test should feel like an assistant, never a hindrance.
- The biggest nightmare for developers is a flaky test, which is a test that is executed the same way but leads to different results. It’s like a “Heisenbug”, which only occurs if you don’t measure the application being tested — that is, if you don’t look at it.

But don’t worry: You don’t have to succumb to these pitfalls. Let’s look at how to prevent many of them. However, I won’t just promise the moon and not deliver. In this guide, we’ll write some tests together, which I’ve made public for you in a GitHub repository. This way, I hope to show you that end-end testing can be fun! Let’s get started.
What Are End-to-End Tests?
When talking about end-to-end (or E2E) testing, I like to refer to it as being “workflow-based”. The phrase sums up end-to-end testing well: It simulates actual user workflows and should include as many functional areas and parts of the technology stack used in the application as possible. In the end, the computer is pretending to be a customer and tries to behave like a real user. These tests are best for applying constant stress to your application’s entire system and, thus, are a great measure to ensure quality when the whole application stack is present.
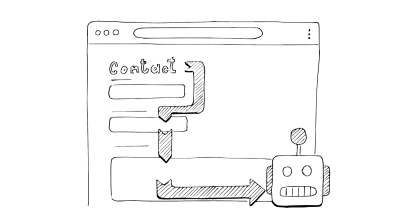
Let’s recall what we want to achieve with all of this. We know that front-end testing is a set of practices for testing the UI of a web application, including its functionality. Makes sense — with these measures, we can ensure that our application is working correctly and that no future changes will break our code. In order to achieve this efficiently, you might be wondering what and how much you need to test.
This is a valid question. You might find one possible answer in a metaphor: The test automation pyramid, first introduced by Mike Cohn and further specified by Martin Fowler, shows how to make testing efficient. We find fast and cheap unit tests on the lowest pyramid level, and time-consuming and expensive UI tests (end-to-end testing) at the top.

Explaining this and its advantages and drawbacks would be enough for its own article. I’d like to focus on one level. End-to-end tests in particular can bring significant improvements in quality if prioritized efficiently. In doing so, we can constantly put our system under stress and ensure that our application’s main functions are working correctly.
My Journey To Cypress
When I started learning how to write end-to-end tests, I used Mink, a PHP library, on top of Behat, a scenario-oriented behavior-driven development (BDD) framework. I started using Selenium, with all of its advantages and disadvantages. Because my team had started working with Vue.js a lot, we changed to a JavaScript-based testing framework to ensure flawless integration and compatibility. Our choice back then was Nightwatch.js, so I built our new test suite from scratch.
During this time, we often stumbled upon compatibility problems. You could call it dependency hell — not to mention all of the limitations we saw with Selenium and later with WebDriver.
- On our team, we weren’t able to pin down the Chrome version of our CI. So if updates to Chrome were released, Nightwatch.js wasn’t fast enough to be compatible, causing many failures in our testing pipelines.
- The number of test-sided causes of flaky tests started to rise, as the waiting possibilities of Nightwatch.js didn’t optimally match our product.
So, we came to consider building our test suite anew. After visiting an unconference, I discovered Cypress.
Cypress is an all-in-one testing framework that does not use Selenium or WebDriver. The tool uses Node.js to start a browser under special control. The tests in this framework are run at the browser level, not just remote-controlling. That offers several advantages.
In short, here are the reasons why I chose this framework:
- Excellent debugging capability
Cypress’ test runner can jump back to any state of the application via snapshots. So, we can directly see an error and all of the steps before it. In addition, there is full access to Chrome’s developer tools (DevTools), and clicks are fully recorded. - Better ways to wait for actions in the test or UI or in the responses from the API
Cypress brings implicit waiting, so there is no need for appropriate checks. You can also make the test wait for animations and API responses. - Tests are written in JavaScript
This mitigates the learning curve to write tests. Cypress’ test runner is open-source, so it fits our product strategy.
However, this article is a guide, so let’s stop with this general information and get going.
Getting Started
Install And Start Cypress
Let’s start from scratch. In my talks about Cypress, I usually begin by creating a new directory via mkdir, and then immediately installing Cypress. The easiest way to install is shown in this drawing:
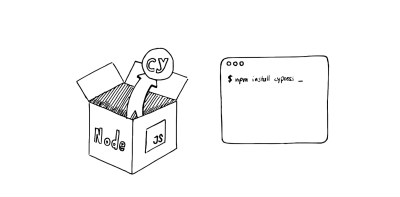
A little hint: If you don’t want to use npm, you can install Cypress via Yarn:
yarn add cypress --dev
An alternative is the direct download, using the ZIP folders that Cypress provides. That’s it! Once the installation is complete, you’re ready to start.
There are two ways to start running Cypress tests. The first is by starting Cypress in the console, and running your tests headlessly:
./node_modules/.bin/cypress run
The second way is to use one of Cypress’ neat features, which is its integrated test runner. The test runner is a UI for running tests. To launch it, you can use a similar command:
./node_modules/.bin/cypress open
This command will open the test runner. When you open Cypress for the first time, you will see this interface:
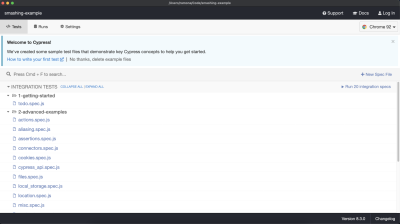
Cypress provides some prewritten sample tests to showcase its features and give you some starting points — this is the reason for the tests that are available. Let’s ignore those for now, because we want to write our own soon. However, please keep this “Integration Tests” area in mind, because it will account for a lot of the magic that will happen later.
First Impression Of Cypress’ Structure
Now it’s time to open our newly created project in the integrated development environment (IDE) of choice. If you navigate to this folder, you will see the following test structure:
smashing-example
  └── cypress
      └── fixtures
      └── integration
      └── plugins
      └── support
  └── cypress.json
Let’s go over these folders:
fixtures
Here is where you’ll find fixed test data, which have no relation to the other entities. So, no IDs are stored here, which can change according to the local state.integration
You will find the actual tests here.plugins
Here, you can extend Cypress, whether with existing Cypress plugins or your own.support
Here, you can extend Cypress itself. Your own commands and helpers are located here.cypress.json
Modify configurations here, including for the environment.
All right, I think we can find our way around Cypress now, whether the test runner or the source code. But how do we start? What do we want to test?
Choose A Test Case
A typical end-to-end test can get complex, particularly if has a lot of steps. It would take a lot of time to execute manually. Because of this complexity, E2E tests can be challenging to automate and slow to run. As a result, we need to carefully decide which cases to automate.
In my opinion, the term “workflow-based” is key: We would select test cases based on typical user stories. However, due to run times, it is not advisable to cover every single available workflow. Therefore, we need a way to prioritize our test cases.
On my team, we had several criteria for our project. The test case should:
- cover the most general and most used workflows of a feature, such as CRUD operations (the term “happy path” describes these workflows quite well);
- use risk analysis, covering the workflows with E2E tests that are most vulnerable (i.e. where errors would cause the most damage);
- avoid duplicate coverage;
- not necessarily be used if unit tests are more appropriate (use an E2E test to test your software’s response to an error, not the error itself).
The second most important thing to keep in mind is to only test the workflow that you explicitly want to test. All other steps required to make your test work should be done with API operations outside of the test, to avoid testing them. This way, you will ensure minimal test run times and get a clear result of your test case if it fails. Think of this workflow as an end user would: Focus on using the feature rather than on the technical implementation.
Example:
If you want to test the checkout process in an online shop, don’t perform all of the other steps, such as creating the products and categories, even though you will need them to process the checkout. Use, for example, an API or a database dump to make these things, and configure the test only for the checkout.
Example: Finding My Articles in Smashing Magazine
I want to write a test for this website, Smashing Magazine. I cannot guarantee that this test will be up to date forever, but let’s hope it will last. Either way, you’ll be able to find this example in a GitHub repository.
Creating Our First Cypress Test
In the integration folder, we’ll begin by creating a new file. Let’s call it find-author.spec.js. The suffix .spec stands for “specification”. In terms of a test, this refers to the technical details of a given feature or application that your application must fulfill.
To turn this empty JavaScript file into a test’s home, we’ll start by giving the test suite its structure. We’ll use the method called describe. describe(), or context(), is used to contain and organize the tests. In other words, this method serves as a frame for our tests. Thus, our test file will look like this:
// find-author.spec.js
describe('Find authors at smashing', () => {
  //...
});
The next step is to create the actual test. We’ll use the method it. it(), or specify(), is used to represent the actual test. As you can see, we can capture multiple tests in one file, which allows for some excellent structuring options.
// find-author.spec.js
describe('Find authors at smashing', () => {
  it('Find the author Ramona Schwering', () => {
    cy.log('This is our brand-new test');
  });
});
Little hint: If you’re familiar with Mocha, you might have noticed some similarities. Cypress is built on top of Mocha, so the syntax is the same.
All right, let’s proceed. If we run our test in Cypress’ test runner, we’ll notice that Cypress will open a browser to run the test. This browser is seen in the screenshot below:
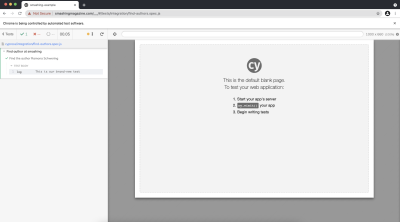
Congratulations! We’ve written our first test! Sure, it doesn’t do much. We need to continue. Let’s fill our test with life.
Fill The Test With Life
What’s the first thing to do when testing a website? Right, we need to open the website. We can do that using a Cypress command. What is the command, you might be wondering?
Working With Commands
There are mainly two types of instructions used in an E2E test. The first type of instruction, the commands, represents the individual steps in the test. In the context of Cypress, commands are everything that Cypress does to interact with your website. This interaction could be anything — a click, scrolling down the website, or even finding an element. As a result, commands will be one of the important things we’ll fill our test with.
So, our first command will be the one to navigate to the website — smashingmagazine.com. This command is called visit.
Using it, our test will look like this:
// find-author.spec.js
describe('Find authors at smashing', () => {
  it('Find the author Ramona Schwering', () => {
    cy.visit('https://www.smashingmagazine.com/');
  });
});
There is one command that I use often — and you will, too. It’s called get:
cy.get(‘selector’);This command returns an element according to its selector — similar to jQuery’s $(…). So, you would use this command to find the parts to interact with. Usually, you would use it to start a chain of commands. But wait — what is meant by a chain of commands?
As mentioned at the beginning of this article, all tests and everything else that goes with them are written in JavaScript. You can put the commands in the tests (i.e. the statements) in a chain (chained, in other words). This means that the commands can pass on a subject (or return value) of a command to the following command, as we know from many test frameworks.
All right, we will start a chain of commands with the get command. To find an element with get, we need to find its selector first. Finding a unique selector is essential, because Cypress would otherwise return all matching elements; so, keep this in mind and avoid it if it’s unintended.
Interacting With Elements
Cypress itself has a feature to help you find the selectors of the elements that you want to work with. This feature is called the Selector Playground, and it helps you to discover unique selectors of a component or to see all matching elements for a selector or a text string. So, this feature can help you a lot in this task. To enable it, simply click the crosshair icon in the header of your test’s UI, and then hover over the desired element:

As seen in the screenshot above, a tooltip will display the selector on hover or in this little bar under the crosshair icon, which appeared when the element was clicked. In this bar, you can also see how many elements would match the given selector — ensuring its uniqueness in our case.
Sometimes, those automatically generated selectors might not be the ones you want to use (e.g. if they are long or hard to read or do not fulfill your other criteria). The selector generated below is challenging to understand and too long, in my humble opinion:

In this case, I would fall back to the browser’s DevTools to find my unique selectors. You might be familiar with these tools; in my case, I often choose Chrome for this purpose. However, other supported browsers might provide similar features. The process feels similar to the Selector Playground, except that we’re using the DevTools’ features in the “Element” tab.
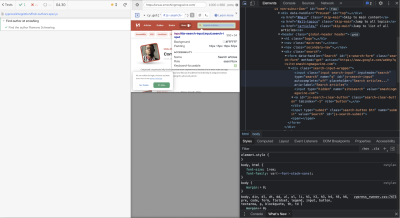
To ensure that a selector is unique, I’d recommend searching for it in your DevTools’ code view. If you find only one result, you can be confident that it’s unique.
Did you know that there are many different selector types? Depending on the variety, tests can look and even behave pretty differently. Some varieties are better suited to end-to-end testing than others. If you want to know which selectors to use to keep your tests stable and clean, I can point you to one of my articles that covers this issue. Cypress’ developers themselves provide some guidance on this topic in their best practices.
Our Test As A Sequence Of Commands
OK, back to our test. In it, we want to display our workflow:
“I, as a user, will search for the author’s article and navigate to the author’s website through the reference area in one of their articles.”
We’ll reproduce the steps that a user would take by using commands. I’ll paste below the finished test with comments, which will explain the steps:
// find-author.spec.js
it('Find the author Ramona Schwering', () => {
  // Open the website
  cy.visit('https://www.smashingmagazine.com');

  // Enter author’s name in search field
  cy.get('#js-search-input').type('Ramona Schwering');

  // Navigate to author’s article
  cy.get('h2 > a').first().click();

  // Open the author’s page
  cy.get('.author-post__author-title').click();
});
This example deals with the workflow that we want to test. Cypress will execute this test. So, is it time to say “Congratulations”? Have we finally finished writing our first test?
Well, please take a closer look. Cypress will execute it, but it will only do what the test tells it to, which is whatever you wrote. If you run it in the test runner, you can see whether it has passed — but not in case you ran it headlessly. With this test, we only know whether Cypress could run our commands successfully — not whether we ended up on the author’s website. So, we need to teach our test to determine that.
Working With Assertions
The second type of statement takes care of the descriptions of the desired state of the UI — that is, whether something should exist, be visible, or no longer be visible. The assertions in Cypress are based on Chai and Sinon-Chai assertions, which is noticeable in the syntax.
Remember that we want to check whether we’re on the author’s profile page — mine in this example. So, we need to add an assertion for exactly that:
// find-author.spec.js
it('Find the author Ramona Schwering', () => {
  // Open the website
  cy.visit('https://www.smashingmagazine.com');

  // Enter author’s name in search field
  cy.get('#js-search-input').type('Ramona Schwering');

  // Navigate to author’s article
  cy.get('h2 > a').first().click();

  // Open the author’s page
  cy.get('.author-post__author-title').click();

  // Check if we’re on the author’s site
  cy.contains('.author__title', 'Ramona Schwering').should('be.visible');
});
All right, now we’ve written a test that has value. So, yes, congratulations on writing your first test… even if it’s not yet perfect.
Let’s Make Our Test Pretty
Even if we’ve succeeded in writing a first meaningful test and learned the core concept in the process, I wouldn’t merge this one yet if it was proposed in a pull request. A couple of things are left to do to make it shine.
Take Your Time
Cypress has a built-in retry option in almost every command, so you don’t have to wait to see whether, for example, an element already exists. However, this only looks to see whether an element exists in the DOM, not more than that. Cypress can’t predict everything your application does, so there might be some flakiness if you rely solely on this.

What would a user do if they wanted to see a website that is still loading? They would most likely wait until some parts of the website become visible (thus, loaded) and would then interact with them. In our test, we want to mimic precisely that: We want to wait for changes in the UI before starting to interact. In most cases, we’d limit this behavior to the elements we need, thus using assertions on those elements.
As you can see, we must make our test wait on several occasions. However, waiting too many times is not good either. As a rule of thumb, I’d suggest using an assertion to check whether the element to be interacted with has fully loaded, as the first step to determining whether the website being test has loaded.
Let’s take a look at such a part of our test as an example. I added one assertion to make sure our page has fully loaded:
// find-author-assertions.spec.js
// Open website
cy.visit('https://www.smashingmagazine.com');

// Ensure site is fully loaded
cy.get('.headline-content').should('be.visible');

// Enter author’s name in the search field
cy.get('#js-search-input').type('Ramona Schwering');
Keep adding assertions in such a manner to all instances where our website will have loading times or several elements that need to be rendered anew. For the complete test file, please look at the corresponding test in the GitHub repository.
To avoid falling into the trap of flaky tests, I would like to give you one last hint: Never use fixed wait times, such as cy.wait(500) or the like.
API Responses Are Your Friends
There’s one neat waiting possibility in particular that I love to make use of in my tests. In Cypress, it’s possible to work with network features — another helpful way of waiting in your application is to use these features to work with network requests. This way, you can make the test wait for a successful API response.
If we remember our workflow as an example, one step could make great use of an API waiting possibility. I’m thinking about search. A corresponding user story could be the following:
“I, as a developer, want to make sure that our search results have fully loaded so that no article of older results will mislead our test.”
Let’s apply that to our test. First of all, we need to define the route that we want to wait for later on. We can use the intercept command for this. I would search for the request, bringing the data that I need — the search results in this case.
To keep this example simple, I’ll use a wildcard for the URL. After that, I’ll use an alias so that Cypress can work with this route later on.
// find-author-hooks.spec.js
// Set the route to work with
it('Find the author Ramona Schwering', () => {

  // Route to wait for later
  cy.intercept({
    url: '*/indexes/smashingmagazine/*',
    method: 'POST'
  }).as('search'); // With this alias Cypress will find the request again

  //...
In Cypress, all defined routes are displayed at the beginning of the test. So, I’d like to put those intercept commands at the beginning of my test, too.

Now, we can use this route alias in assertions. The leanest way to do this would be with Cypress’ wait command, directly with the alias mentioned before. However, using this command alone would lead to waiting for the response regardless of its outcome. Even error codes such as 400 or 500 would count as passing, whereas your application would most likely break. So I’d recommend adding another assertion like this:
// find-author-hooks.spec.js
// Later: Assertion of the search request’s status code
cy.wait('@search')
   .its('response.statusCode').should('equal', 200);
This way, we can wait for the software’s data, changes, and so on with precision, without wasting time or getting into problems if the application is heavily stressed. Again, you can find the complete example file in my GitHub repository.
Configuring Cypress
I’ve left out one small detail. If you take a closer look at the complete test example, it differs slightly from those we used here in this guide.
// Cypress
describe('Find author at smashing', () => {
  beforeEach(() => {
    // Open website
    cy.visit('https://www.smashingmagazine.com');
  });

//...
I only use a slash to open the website of Smashing Magazine. How does that work? Well, using this command like so will navigate to the baseUrl of our tests. baseUrl is a configuration value that can be used as prefix for the cy.visit() or cy.request() command’s URL. Among other values, we can define this value in the cypress.json file. For our test, we’ll set the baseUrl like so:
// cypress.json
{
  "baseUrl": "https://www.smashingmagazine.com"
}
Honorable Mention: Hooks
There’s one topic left that I want to mention, even if our example test is not suited to using it. As is common in other test frameworks, we can define what happens before and after our tests via so-called lifecycle hooks. More precisely, these exist to execute code before or after one or all tests:
// Cypress
describe('Hooks', function() {
  before(() =>  {
    // Runs once before all tests
  });

  after(() =>  {
    // Runs once after all tests
  });

  beforeEach(() =>  {
    // Runs before each test
  });

  afterEach(() => {
    // Runs after each test
  });
});
We want to fill our test file with more than one test, so we should look for common steps that we want to execute before or after them. Our first line is a case in point, being the visit command. Assuming we want to open this website before each of these tests, a beforeEach hook in our example would look like this:
// Cypress
describe('Find author at smashing', () => {
  beforeEach(() => {
    // Open website
    cy.visit('https://www.smashingmagazine.com');
  });

  //...

beforeEach hook is displayed in the test runner’s log. (Large preview)I frequently use this in my daily work to ensure, for example, that my application is reset to its default state before the test, thus isolating the test from other tests. (Never rely on previous tests!) Run your tests in isolation from each other to maintain control over the application’s state.
Each test should be able to run on its own — independent of other tests. This is critical to ensuring valid test results. For details on this, see the section “Data We Used to Share” in one of my recent articles. For now, refer to the complete example on GitHub if you want to see the entire test.
Conclusion
In my opinion, end-to-end tests are an essential component of CI, keeping the quality of applications at a high level and at the same time relieving the work of testers. Cypress is my tool of choice for debugging end-to-end tests quickly, stably, and efficiently, and for running them parallel to any pull request as part of CI. The learning curve is gentle if you’re already familiar with JavaScript.
I hope I’ve been able to guide you a bit and given you a starting point to write Cypress tests and some practical tips to get started. Of course, all code examples are available in the GitHub repository, so feel free to take a look.
Of course, this is only a starting point; there are many more things to learn and discuss regarding Cypress tests — I’ll leave you with some suggestions on what to learn next. With this in mind, happy testing!
Resources
- Original smashing-example, Ramona Schwering
GitHub repository for the example in this article. - Cypress documentation
- “Recipes”, Cypress
A selection of examples, recipes, and courses. - “Learn to Code With JavaScript: Cypress” (lesson), CodeLikeThis
- Best Practises on Writing End-to-End Tests”, Shopware Docs

