How To Build An Amazon Product Scraper With Node.js
Have you ever been in a position where you need to intimately know the market for a particular product? Maybe you’re launching some software and need to know how to price it. Or perhaps you already have your own product on the market and want to see which features to add for a competitive advantage. Or maybe you just want to buy something for yourself and want to make sure you get the best bang for your buck.
All these situations have one thing in common: you need accurate data to make the correct decision. Actually, there’s another thing they share. All scenarios can benefit from the use of a web scraper.
Web scraping is the practice of extracting large amounts of web data through the use of software. So, in essence, it’s a way to automate the tedious process of hitting ‘copy’ and then ‘paste’ 200 times. Of course, a bot can do that in the time it took you to read this sentence, so it’s not only less boring but a lot faster, too.
But the burning question is: why would someone want to scrape Amazon pages?
You’re about to find out! But first of all, I’d like to make something clear right now — while the act of scraping publicly available data is legal, Amazon has some measures to prevent it on their pages. As such, I urge you always to be mindful of the website while scraping, take care not to damage it, and follow ethical guidelines.
Recommended Reading: “The Guide To Ethical Scraping Of Dynamic Websites With Node.js And Puppeteer” by Andreas Altheimer
Why You Should Extract Amazon Product Data
Being the largest online retailer on the planet, it’s safe to say that if you want to buy something, you can probably get it on Amazon. So, it goes without saying just how big of a data treasure trove the website is.
“
Let’s start with the first scenario. Unless you’ve designed a truly innovative new product, the chances are that you can already find something at least similar on Amazon. Scraping those product pages can net you invaluable data such as:
- The competitors’ pricing strategy
So, that you can adjust your prices to be competitive and understand how others handle promotional deals; - Customer opinions
To see what your future client base cares about most and how to improve their experience; - Most common features
To see what your competition offers to know which functionalities are crucial and which can be left for later.
In essence, Amazon has everything you need for a deep market and product analysis. You’ll be better prepared to design, launch, and expand your product lineup with that data.
The second scenario can apply to both businesses and regular people. The idea is pretty similar to what I mentioned earlier. You can scrape the prices, features, and reviews of all the products you could choose, and so, you’ll be able to pick the one that offers the most benefits for the lowest price. After all, who doesn’t like a good deal?
Not all products deserve this level of attention to detail, but it can make a massive difference with expensive purchases. Unfortunately, while the benefits are clear, many difficulties go along with scraping Amazon.
The Challenges Of Scraping Amazon Product Data
Not all websites are the same. As a rule of thumb, the more complex and widespread a website is, the harder it is to scrape it. Remember when I said that Amazon was the most prominent e-commerce site? Well, that makes it both extremely popular and reasonably complex.
First off, Amazon knows how scraping bots act, so the website has countermeasures in place. Namely, if the scraper follows a predictable pattern, sending requests at fixed intervals, faster than a human could or with almost identical parameters, Amazon will notice and block the IP. Proxies can solve this problem, but I didn’t need them since we won’t be scraping too many pages in the example.
Next, Amazon deliberately uses varying page structures for their products. That is to say, that if you inspect the pages for different products, there’s a good chance that you’ll find significant differences in their structure and attributes. The reason behind this is quite simple. You need to adapt your scraper’s code for a specific system, and if you use the same script on a new kind of page, you’d have to rewrite parts of it. So, they’re essentially making you work more for the data.
Lastly, Amazon is a vast website. If you want to gather large amounts of data, running the scraping software on your computer might turn out to take way too much time for your needs. This problem is further consolidated by the fact that going too fast will get your scraper blocked. So, if you want loads of data quickly, you’ll need a truly powerful scraper.
Well, that’s enough talk about problems, let’s focus on solutions!
How To Build A Web Scraper For Amazon
To keep things simple, we’ll take a step-by-step approach to writing the code. Feel free to work in parallel with the guide.
Look For The Data We Need
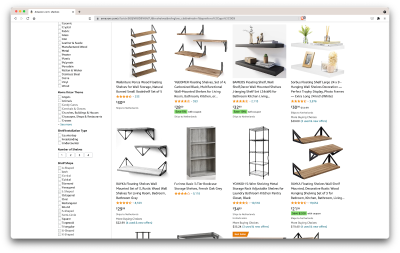
So, here’s a scenario: I’m moving in a few months to a new place, and I’ll need a couple of new shelves to hold books and magazines. I want to know all my options and get as good of a deal as I can. So, let’s go to the Amazon market, search for “shelves”, and see what we get.
The URL for this search and the page we’ll be scraping is here.

Ok, let’s take stock of what we have here. Just by glancing at the page, we can get a good picture about:
- how the shelves look;
- what the package includes;
- how customers rate them;
- their price;
- the link to the product;
- a suggestion for a cheaper alternative for some of the items.
That’s more than we could ask for!
Get the required tools
Let’s ensure we have all the following tools installed and configured before continuing to the next step.
- Chrome
We can download it from here. - VSCode
Follow the instructions on this page to install it on your specific device. - Node.js
Before starting using Axios or Cheerio, we need to install Node.js and the Node Package Manager. The easiest way to install Node.js and NPM is to get one of the installers from the Node.Js official source and run it.
Now, let’s create a new NPM project. Create a new folder for the project and run the following command:
npm init -yTo create the web scraper, we need to install a couple of dependencies in our project:
- Cheerio
An open-source library that helps us extract useful information by parsing markup and providing an API for manipulating the resulting data. Cheerio allows us to select tags of an HTML document by using selectors:$("div"). This specific selector helps us pick all<div>elements on a page. To install Cheerio, please run the following command in the projects’ folder:
npm install cheerio- Axios
A JavaScript library used to make HTTP requests from Node.js.
npm install axiosInspect The Page Source
In the following steps, we will learn more about how the information is organized on the page. The idea is to get a better understanding of what we can scrape from our source.
The developer tools help us interactively explore the website’s Document Object Model (DOM). We will use the developer tools in Chrome, but you can use any web browser you’re comfortable with.
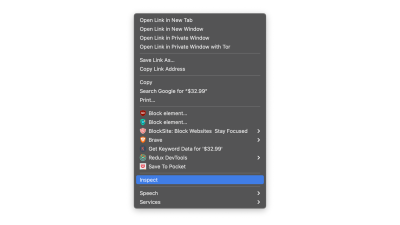
Let’s open it by right-clicking anywhere on the page and selecting the “Inspect” option:

This will open up a new window containing the source code of the page. As we have said before, we are looking to scrape every shelf’s information.

As we can see from the screenshot above, the containers that hold all the data have the following classes:
sg-col-4-of-12 s-result-item s-asin sg-col-4-of-16 sg-col sg-col-4-of-20In the next step, we will use Cheerio to select all the elements containing the data we need.
Fetch The Data
After we installed all the dependencies presented above, let’s create a new index.js file and type the following lines of code:
const axios = require("axios");
const cheerio = require("cheerio");

const fetchShelves = async () => {
   try {
       const response = await axios.get('https://www.amazon.com/s?crid=36QNR0DBY6M7J&k=shelves&ref=glow_cls&refresh=1&sprefix=s%2Caps%2C309');

       const html = response.data;

       const $ = cheerio.load(html);

       const shelves = [];

 $('div.sg-col-4-of-12.s-result-item.s-asin.sg-col-4-of-16.sg-col.sg-col-4-of-20').each((_idx, el) => {
           const shelf = $(el)
           const title = shelf.find('span.a-size-base-plus.a-color-base.a-text-normal').text()

           shelves.push(title)
       });

       return shelves;
   } catch (error) {
       throw error;
   }
};

fetchShelves().then((shelves) => console.log(shelves));
As we can see, we import the dependencies we need on the first two lines, and then we create a fetchShelves() function that, using Cheerio, gets all the elements containing our products’ information from the page.
It iterates over each of them and pushes it to an empty array to get a better-formatted result.
The fetchShelves() function will only return the product’s title at the moment, so let’s get the rest of the information we need. Please add the following lines of code after the line where we defined the variable title.
const image = shelf.find('img.s-image').attr('src')

const link = shelf.find('a.a-link-normal.a-text-normal').attr('href')

const reviews = shelf.find('div.a-section.a-spacing-none.a-spacing-top-micro > div.a-row.a-size-small').children('span').last().attr('aria-label')

const stars = shelf.find('div.a-section.a-spacing-none.a-spacing-top-micro > div > span').attr('aria-label')

const price = shelf.find('span.a-price > span.a-offscreen').text()


    let element = {
        title,
        image,
        link: `https://amazon.com${link}`,
        price,
    }

    if (reviews) {
        element.reviews = reviews
    }

    if (stars) {
        element.stars = stars
    }
And replace shelves.push(title) with shelves.push(element).
We are now selecting all the information we need and adding it to a new object called element. Every element is then pushed to the shelves array to get a list of objects containing just the data we are looking for.
This is how a shelf object should look like before it is added to our list:
  {
    title: 'SUPERJARE Wall Mounted Shelves, Set of 2, Display Ledge, Storage Rack for Room/Kitchen/Office - White',
    image: 'https://m.media-amazon.com/images/I/61fTtaQNPnL._AC_UL320_.jpg',
    link: 'https://amazon.com/gp/slredirect/picassoRedirect.html/ref=pa_sp_btf_aps_sr_pg1_1?ie=UTF8&adId=A03078372WABZ8V6NFP9L&url=%2FSUPERJARE-Mounted-Floating-Shelves-Display%2Fdp%2FB07H4NRT36%2Fref%3Dsr_1_59_sspa%3Fcrid%3D36QNR0DBY6M7J%26dchild%3D1%26keywords%3Dshelves%26qid%3D1627970918%26refresh%3D1%26sprefix%3Ds%252Caps%252C309%26sr%3D8-59-spons%26psc%3D1&qualifier=1627970918&id=3373422987100422&widgetName=sp_btf',
    price: '$32.99',
    reviews: '6,171',
    stars: '4.7 out of 5 stars'
  }
Format The Data
Now that we have managed to fetch the data we need, it’s a good idea to save it as a .CSV file to improve readability. After getting all the data, we will use the fs module provided by Node.js and save a new file called saved-shelves.csv to the project’s folder. Import the fs module at the top of the file and copy or write along the following lines of code:
let csvContent = shelves.map(element => {
   return Object.values(element).map(item => `"${item}"`).join(',')
}).join("\n")

fs.writeFile('saved-shelves.csv', "Title, Image, Link, Price, Reviews, Stars" + '\n' + csvContent, 'utf8', function (err) {
   if (err) {
     console.log('Some error occurred - file either not saved or corrupted.')
   } else{
     console.log('File has been saved!')
   }
})
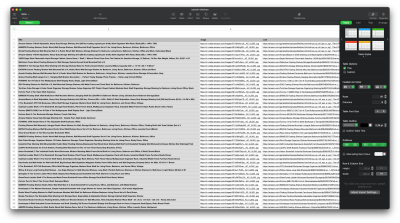
As we can see, on the first three lines, we format the data we have previously gathered by joining all the values of a shelve object using a comma. Then, using the fs module, we create a file called saved-shelves.csv, add a new row that contains the column headers, add the data we have just formatted and create a callback function that handles the errors.
The result should look something like this:

Bonus Tips!
Scraping Single Page Applications
Dynamic content is becoming the standard nowadays, as websites are more complex than ever before. To provide the best user experience possible, developers must adopt different load mechanisms for dynamic content, making our job a little more complicated. If you don’t know what that means, imagine a browser lacking a graphical user interface. Luckily, there is ✨Puppeteer✨ — the magical Node library that provides a high-level API to control a Chrome instance over the DevTools Protocol. Still, it offers the same functionality as a browser, but it must be controlled programmatically by typing a couple of lines of code. Let’s see how that works.
In the previously created project, install the Puppeteer library by running npm install puppeteer, create a new puppeteer.js file, and copy or write along the following lines of code:
const puppeteer = require('puppeteer')

(async () => {
 try {
   const chrome = await puppeteer.launch()
   const page = await chrome.newPage()
   await page.goto('https://www.reddit.com/r/Kanye/hot/')
   await page.waitForSelector('.rpBJOHq2PR60pnwJlUyP0', { timeout: 2000 })

   const body = await page.evaluate(() => {
     return document.querySelector('body').innerHTML
   })

   console.log(body)

   await chrome.close()
 } catch (error) {
   console.log(error)
 }
})()
In the example above, we create a Chrome instance and open up a new browser page that is required to go to this link. In the following line, we tell the headless browser to wait until the element with the class rpBJOHq2PR60pnwJlUyP0 appears on the page. We have also specified how long the browser should wait for the page to load (2000 milliseconds).
Using the evaluate method on the page variable, we instructed Puppeteer to execute the Javascript snippets within the page’s context just after the element was finally loaded. This will allow us to access the page’s HTML content and return the page’s body as the output. We then close the Chrome instance by calling the close method on the chrome variable. The resulted work should consist of all the dynamically generated HTML code. This is how Puppeteer can help us load dynamic HTML content.
If you don’t feel comfortable using Puppeteer, note that there are a couple of alternatives out there, like NightwatchJS, NightmareJS, or CasperJS. They are slightly different, but in the end, the process is pretty similar.
Setting user-agent Headers
user-agent is a request header that tells the website you are visiting about yourself, namely your browser and OS. This is used to optimize the content for your set-up, but websites also use it to identify bots sending tons of requests — even if it changes IPS.
Here’s what a user-agent header looks like:
Mozilla/5.0 (Windows NT 10.0; Win64; x64) AppleWebKit/537.36 (KHTML, like Gecko) Chrome/93.0.4577.82 Safari/537.36
In the interest of not being detected and blocked, you should regularly change this header. Take extra care not to send an empty or outdated header since this should never happen for a run-fo-the-mill user, and you’ll stand out.
Rate Limiting
Web scrapers can gather content extremely fast, but you should avoid going at top speed. There are two reasons for this:
- Too many requests in short order can slow down the website’s server or even bring it down, causing trouble for the owner and other visitors. It can essentially become a DoS attack.
- Without rotating proxies, it’s akin to loudly announcing that you’re using a bot since no human would send hundreds or thousands of requests per second.
The solution is to introduce a delay between your requests, a practice called “rate limiting”. (It’s pretty simple to implement, too!)
In the Puppeteer example provided above, before creating the body variable, we can use the waitForTimeout method provided by Puppeteer to wait a couple of seconds before making another request:
await page.waitForTimeout(3000);Where ms is the number of seconds you would want to wait.
Also, if we would want to do the same thig for the axios example, we can create a promise that calls the setTimeout() method, in order to help us wait for our desired number of miliseconds:
fetchShelves.then(result => new Promise(resolve => setTimeout(() => resolve(result), 3000)))In this way, you can avoid putting too much pressure on the targeted server and also, bring a more human approach to web scraping.
Closing Thoughts
And there you have it, a step-by-step guide to creating your own web scraper for Amazon product data! But remember, this was just one situation. If you’d like to scrape a different website, you’ll have to make a few tweaks to get any meaningful results.
Related Reading
If you’d still like to see more web scraping in action, here is some useful reading material for you:
- “The Ultimate Guide to Web Scraping with JavaScript and Node.Js,” Robert Sfichi
- “Advanced Node.JS Web Scraping with Puppeteer,” Gabriel Cioci
- “Python Web Scraping: The Ultimate Guide to Building Your Scraper,” Raluca Penciuc
Further Reading
- Building And Dockerizing A Node.js App With Stateless Architecture With Help From Kinsta
- Build A Static RSS Reader To Fight Your Inner FOMO
- A Simple Guide To Retrieval Augmented Generation Language Models
- Tight Mode: Why Browsers Produce Different Performance Results


 SurveyJS: White-Label Survey Solution for Your JS App
 Register for free to attend Axe-con
 Register now for WAS 2026
 Celebrating 10 million developers

