An Introduction To Quasar Framework: Building Cross-Platform Applications

Email Newsletter
Weekly tips on front-end & UX.
Trusted by 182,000+ folks.
 Register for Free

 Celebrating 10 million developers
 Custom Web Forms for Angular, React, & Vue. Your backend.

In this article, I will explain how to use Quasar Framework and its state-of-the-art UI (which follows Material guidelines) to build a notes app. The app will get its data from and store its data to Firebase. This tutorial is meant for anyone interested in building cross-platform applications that work well across all devices simultaneously. At the end of the article, you should have a proper understanding of what Quasar is, how to get started creating apps with Quasar, and also how to use Firebase.
To follow along in this article, you should have:
- an understanding of HTML, CSS, and JavaScript;
- at least a little experience with Vue.js;
- Node.js version 10 or above and npm version 5 or above installed on your machine.
- knowledge of how the command-line interface (CLI) works.
The deployed app is available for viewing, and the final code is on Github.
What Is Quasar Framework?
Quasar Framework is an open-source Vue.js-based cross-platform framework whose motto is: “write code once and simultaneously deploy it as a website, a mobile app and/or an Electron app”. It has many features that enable you, as a web developer, to build apps on desktop and mobile and to create progressive web apps (PWAs) using technologies such as Cordova, Electron, and the web (Vue.js).
Why Quasar Framework?
Quasar is an easy-to-use but powerful UI kit comprising a lot of UI components, layout elements, and helpers. Together, these elements provide a full-featured toolset for building responsive front-end apps, without your having to make use of many different UI libraries. It does the heavy lifting for you, allowing you to focus on features and not boilerplate.
In summary, Quasar offers support for many build modes, including:
- single-page applications;
- progressive web applications;
- server-side rendering;
- mobile apps (iOS and Android), using Cordova or Сapacitor;
- multi-platform desktop apps, using Electron;
- browser extensions.
Getting Started
To get started, let’s look at how to install Quasar on your local machine and set up a project.
Installation
There are three ways to start using Quasar:
- embedding to an existing project via a content delivery network (CDN);
- installing using the Vue.js CLI Quasar plugin;
- installing using the Quasar CLI.
For this tutorial, we will be using the third method, which is the Quasar CLI. The first thing to do is install the Quasar CLI globally on your computer, or check whether it is installed by running the following commands in your CLI:
quasar -v #check if quasar has been installed previously

yarn global add @quasar/cli
# or
npm install -g @quasar/cli
Once this is done, you can now move on to setting up the project.
Project Set-Up
Run the following command in your CLI:
quasar create <folder_name>Following this, you are going to be asked some questions. Here is my full configuration for the app we will be building.
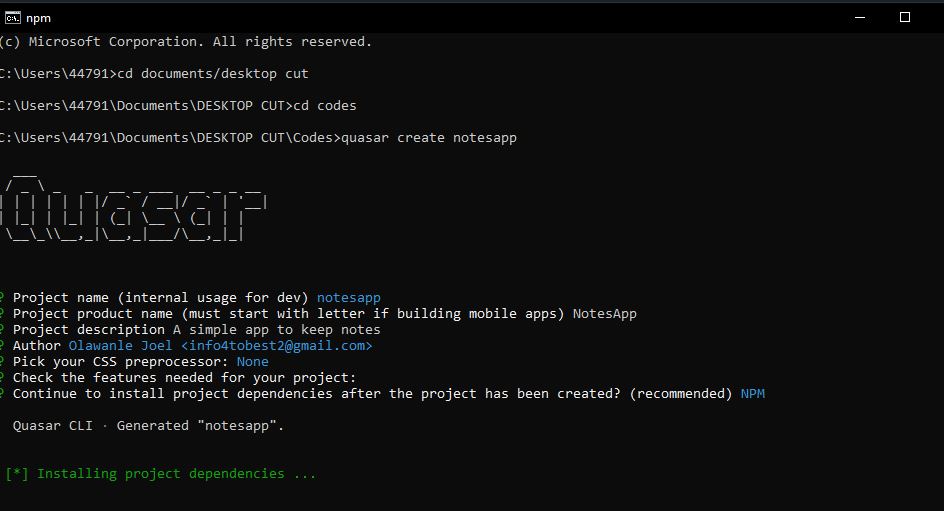
Now we can move into the project folder and start up the application using the following commands:
cd <folder_name>
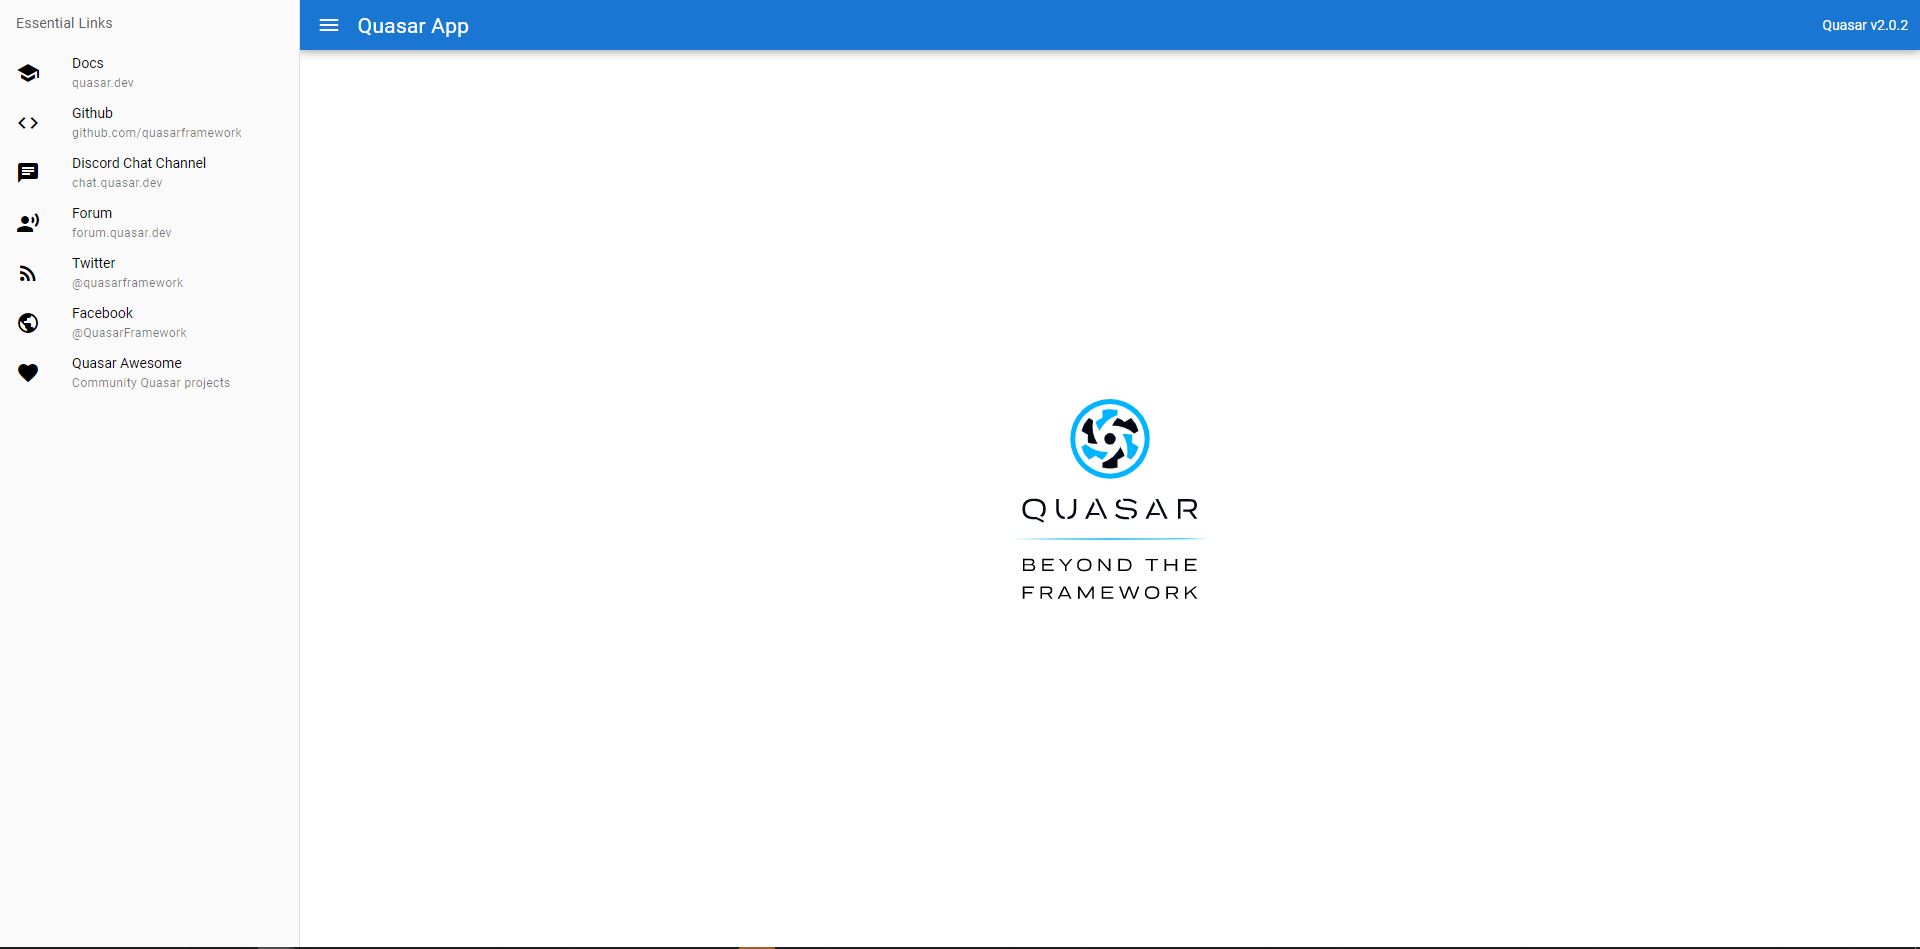
quasar devWith the steps above complete, our app should be running on http://localhost:8080. This is what we should see:
Quasar’s Folder Structure
The default application structure for Quasar is intended to be a great starting point for developers to build any type of application. You can organize the application however you like and create directories whenever you need them.
.
├── public/                  # pure static assets (directly copied)
├── src/
│   ├── assets/              # dynamic assets (processed by Webpack)
│   ├── components/          # .vue components used in pages and layouts
│   ├── css/                 # CSS/Stylus/Sass/… files for your app
│   ├── layouts/             # layout .vue files
│   ├── pages/               # page .vue files
│   ├── boot/                # boot files (app initialization code)
│   ├── router/              # Vue Router
│   ├── store/               # Vuex Store
│   ├── App.vue              # root Vue component of your app
│   └── index.template.html  # template for index.html
├── .editorconfig            # editor config
├── .gitignore               # GIT ignore paths
├── .postcssrc.js            # PostCSS config
├── babel.config.js          # Babel config
├── package.json             # npm scripts and dependencies
├── quasar.conf.js           # Quasar app config file
└── README.md                # readme for your app
The source folder consists of about seven major directories that a beginner should care about:
quasar.conf.js
This is the brain behind any Quasar application, because most configurations are done in this file. Amazingly, Quasar handles most of the complex configurations needed by the various tools and packages that you might use in an application. Some of these configurations are for:- Quasar components, directives, and plugins that would be needed in your app;
- icon packs;
- CSS animation;
- PWA manifest file and Workbox options;
- Electron packager and/or Electron builder;
- and a lot more.
src/assets
Theassetsdirectory contains your uncompiled assets, such as Stylus or Sass files, images, and fonts.src/components
This is where all of your reusable components will live. These components make up the different parts of the application and can be reused and imported into your pages, layouts, and even other components.src/css
You will not find this in Vue.js, but Quasar provides this so that we can have all of our global CSS in Sass form. It consists of two files:app.sassis where all of our styles will go, whilequasar.variables.sasscontains all of the reusable variables we would want to make use of when styling our app. You could ignore the CSS directory if you feel it’s of no use to you.src/layouts
This helps us create defined layouts for an app without repeating code. This is useful when you want to include sidebars or fixed bottom bars or have distinct layouts for mobile and desktop.src/pages
Thepagesdirectory contains our application’s views and routes. Our pages are injected into the app and managed through Vue Router in/src/router/routes.js. This means that each page needs to be referenced there.src/router
This holds the routing configuration of our app. It consists of two folders:/src/router/index.jsholds the Vue Router initialization code./src/router/routes.jsholds the routes of the app, loading our layouts alongside the routes or pages in the app.
You might not need to do anything to theindex.jsfile in a small project, but if your project will have routes, you will need to add them to theroutes.jsfile.
Building A Notes App
When building an application with Quasar, the first thing we will want to do is create a layout. Quasar has made this process a lot easier than any other framework by making use of a layout builder. For our notes app, we will want something like the following, which is quite similar to the default layout but with a few modifications:

App Layout
In the sidebar of Quasar’s documentation, you will see the “Layout and Grid” option. When you click it, a dropdown will appear with more options, one of which is “Layout Builder”. Click on “Layout Builder”, which will bring you here:
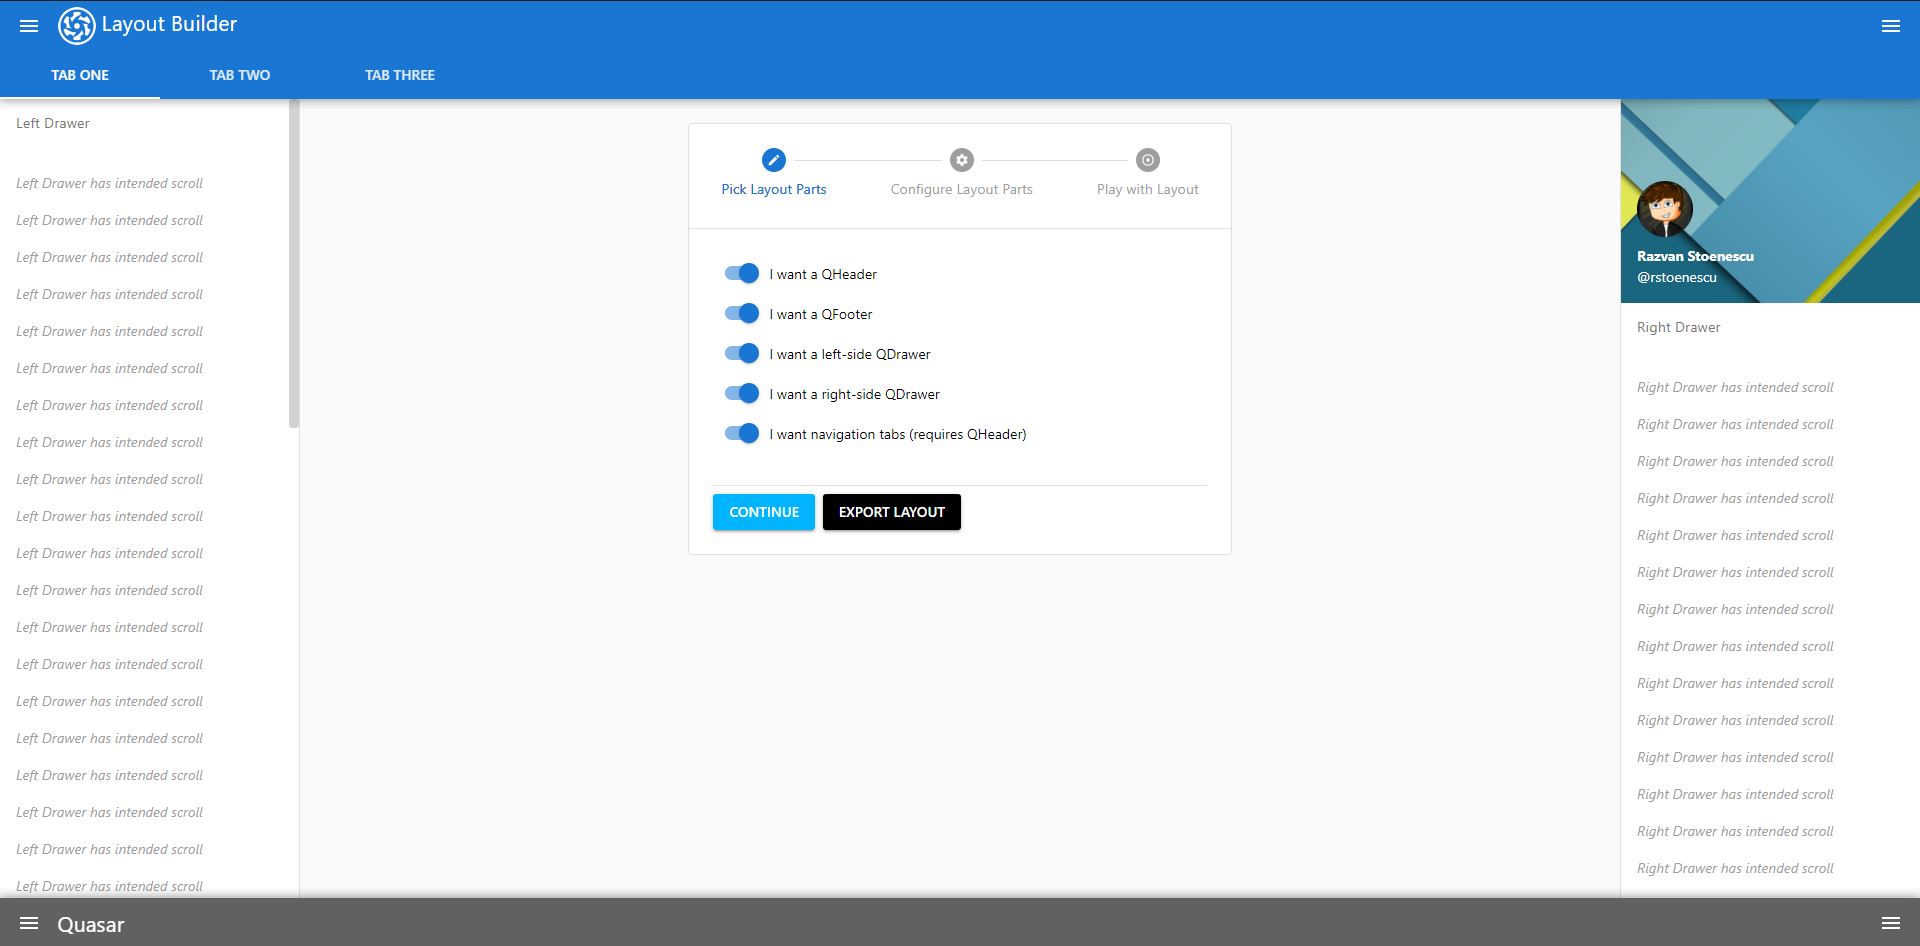
This allows us to choose the options we want and remove the ones we don’t. Then, we would generate the code to paste in the layout file.
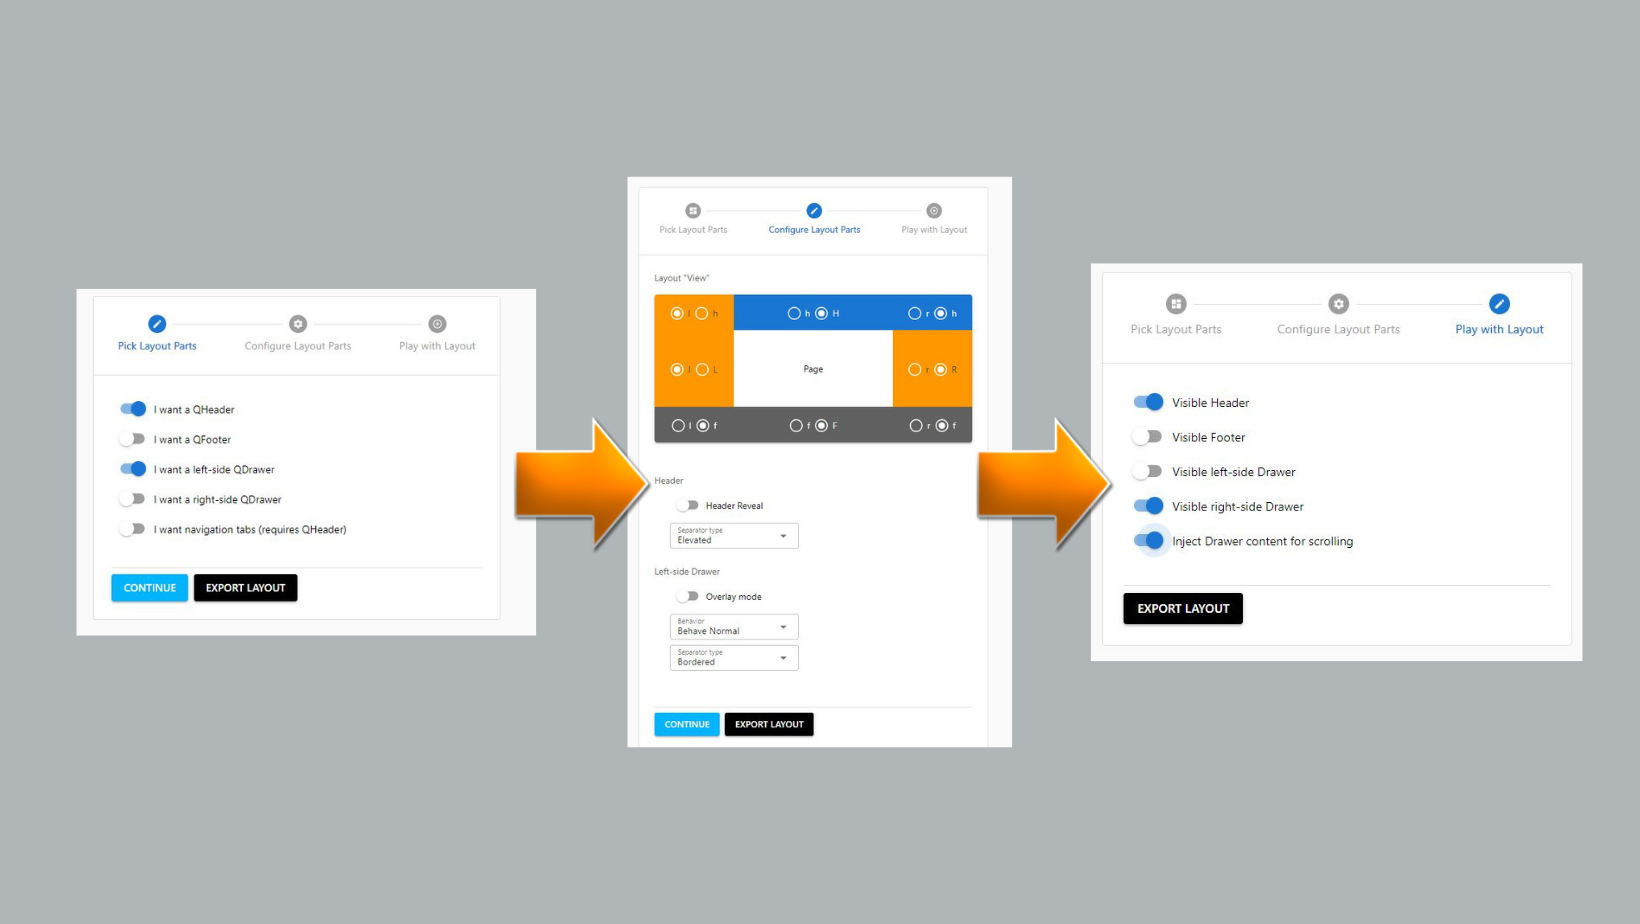
The first option helps us to pick the layout parts, while the second allows us to configure the layout parts. Finally, we export the generated layout.
If you want the exact same layout as mine, use the code below:
<template>
  <q-layout view="lHh lpR fFf">
    <q-header elevated class="bg-primary text-white">
      <q-toolbar>
        <q-btn dense flat round icon="menu" @click="left = !left" />
        <q-toolbar-title>
          <q-avatar>
            <img src="https://cdn.quasar.dev/logo-v2/svg/logo-mono-white.svg" />
          </q-avatar>
          Title
        </q-toolbar-title>
      </q-toolbar>
    </q-header>
    <q-drawer show-if-above v-model="left" side="left" bordered>
      <!-- drawer content -->
    </q-drawer>
    <q-page-container>
      <router-view />
    </q-page-container>
  </q-layout>
</template>

<script>
export default {
  data() {
    return {
      left: false
    };
  }
};
</script>
Remove the default layout and paste the code above or the code that you have generated into src/layouts/MainLayout.vue.
The code above is divided into three sections: the header (navbar), the drawer (sidebar), and the page container (which contains the router view).
We’ve made use of the state-of-the-art UI to style the whole page. As I said earlier, when using Quasar, you won’t need additional heavy libraries such as Hammer.js, Moment.js, or Bootstrap.
We will be adding data to the sidebar and editing the navbar. Once you’ve saved, you will notice our app now looks like this:

Let’s work on the layout, adding some items to the sidebar and changing the title of the app, If you scan the layout code that we added, you will see where we are supposed to edit and add these various items.
Here is what my layout looks like after I’ve added items to the sidebar and changed the title:
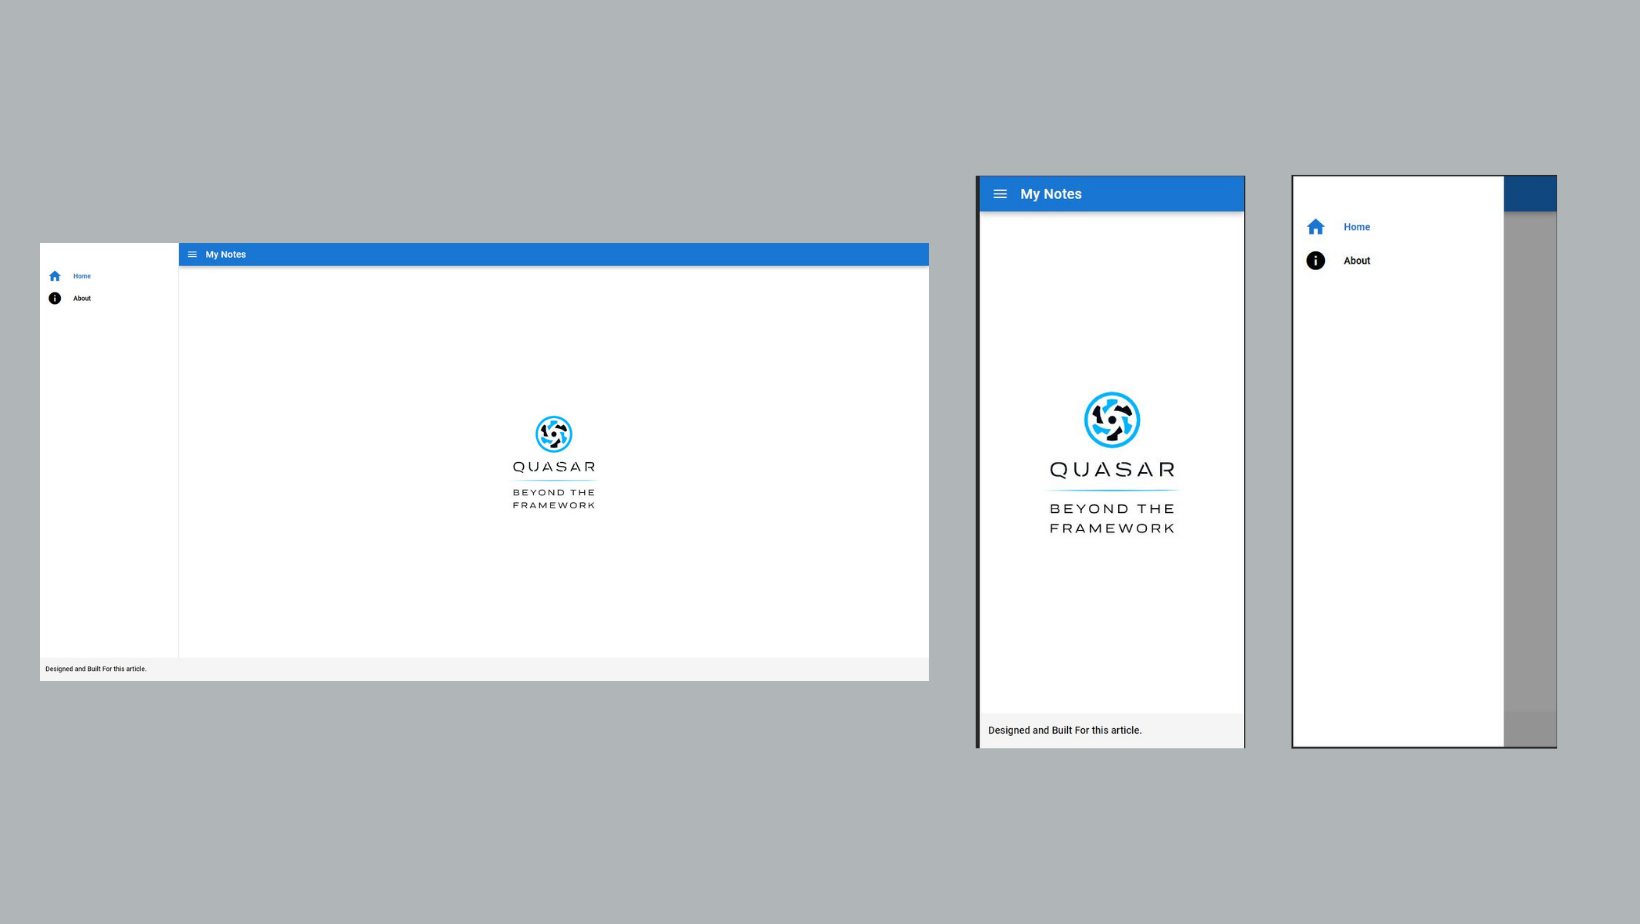
And here is the code:
<template>
  <q-layout view="lHh lpR fFf">
    <q-header elevated class="bg-primary text-white">
      <q-toolbar>
        <q-btn dense flat round icon="menu" @click="left = !left" />
        <q-toolbar-title class="text-h6">
          My Notes
        </q-toolbar-title>
      </q-toolbar>
    </q-header>
    <q-drawer show-if-above v-model="left" side="left" bordered>
      <q-list class="q-pt-xl">
        <q-item clickable v-ripple to="/">
          <q-item-section avatar>
            <q-icon name="home" size="md" />
          </q-item-section>
          <q-item-section class="text-weight-bold">Home</q-item-section>
        </q-item>
        <q-item clickable v-ripple to="/about">
          <q-item-section avatar>
            <q-icon name="info" size="md" />
          </q-item-section>
          <q-item-section class="text-weight-bold">About</q-item-section>
        </q-item>
      </q-list>
    </q-drawer>
    <q-page-container>
      <router-view />
    </q-page-container>
    <q-footer class="bg-grey-2 text-black ">
      <q-toolbar>
        <q-toolbar-title class="text-subtitle2">
          Designed and Built For this article.
        </q-toolbar-title>
      </q-toolbar>
    </q-footer>
  </q-layout>
</template>
<script>
export default {
  data() {
    return {
      left: false
    };
  }
};
</script>
We removed the logo in the navbar and edited the text, then added a list to the sidebar, making use of Quasar’s state-of-the-art UI. Check out the list items, and copy the code of any you wish to use.
App Design
Earlier on, I said I was going to use Quasar’s state-of-the-art UI (which follows Material guidelines) to build a notes app, and that’s what we will be doing now. Explaining the whole process in an article like this is difficult, but the “Style & Identity” section of Quasar’s documentation covers it well.
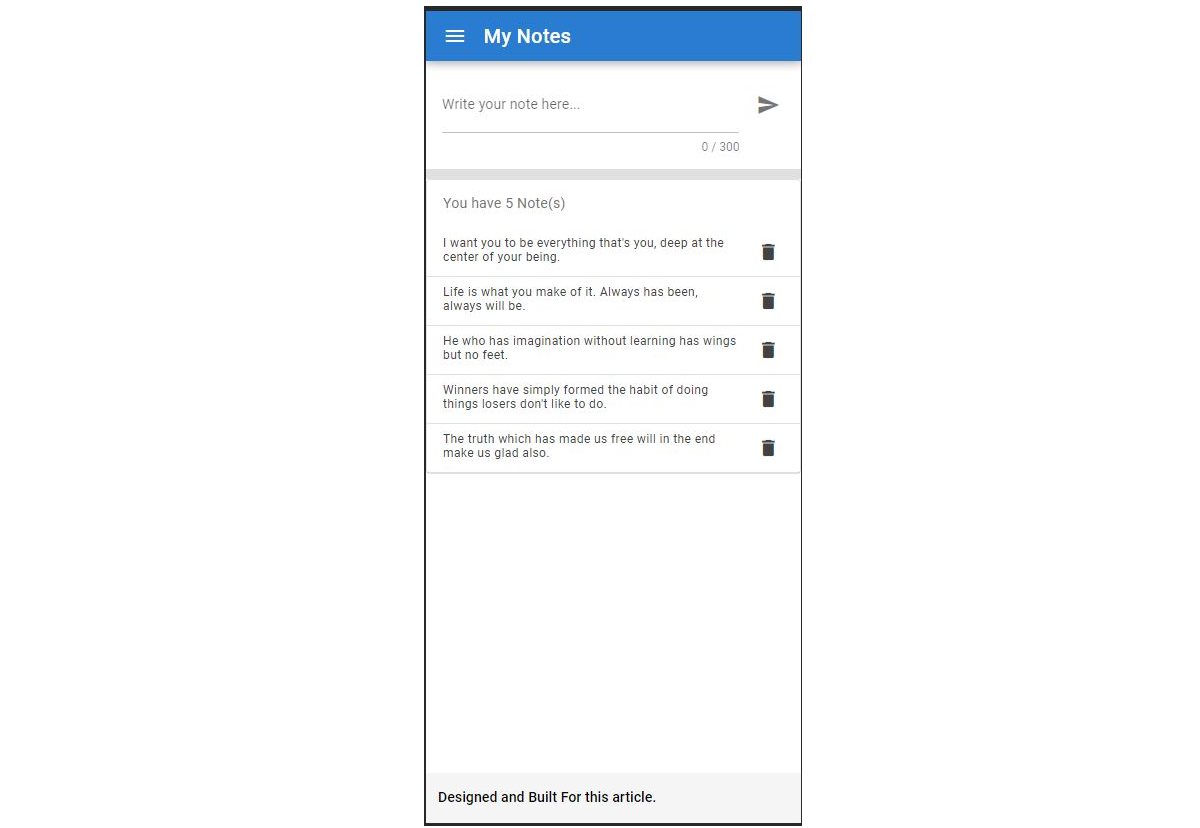
This will be a one-page app (index.vue), and here is the code, without any styling applied:
<template>
  <q-page class="">
    <div class="q-pa-md">
      <q-input
        bottom-slots
        v-model="newNoteContent"
        placeholder="Write your note here..."
        counter
        autogrow
        maxlength="300"
      >
        <template v-slot:after>
          <q-btn round dense flat icon="send" />
        </template>
      </q-input>
    </div>
    <q-separator size="10px" />
    <q-list bordered class="rounded-borders" style="max-width: 600px">
      <q-item-label header>You have 3 Note(s)</q-item-label>
      <div>
        <q-item>
          <q-item-section top>
            <q-item-label caption class="text-grey-9">
              He who has imagination without learning has wings but no feet.
            </q-item-label>
          </q-item-section>
          <q-item-section top side>
            <div class="text-grey-9 q-gutter-xs">
              <q-btn size="13px" flat dense round icon="delete" />
            </div>
          </q-item-section>
        </q-item>
        <q-separator size="1px" />
      </div>
    </q-list>
  </q-page>
</template>
<script>
import db from "src/boot/firebase";
export default {
  name: "PageIndex",
  data() {
    return {
      basic: false,
      fixed: false,
      newNoteContent: ""
    };
  }
};
</script>
In the code above, we have an input field from Quasar. We’ve attached a v-model to get the data from the input field once the “Submit” button is clicked. We also have a list of items that will be used to display each note, and each list item has an icon used to delete that particular item when clicked.
Setting Up Local Data
At this point, the design of our app is in place. The next thing we will do is create an array that would contain all of our notes. We will ensure that we can add to and delete from this array before setting up Firebase.
Here is the array that we will be making use of in our app for now. Later, we will remove this array or comment out the code.
notes: [
  {
    id: 1,
    noteContent: "Lorem ipsum dolor sit amet consectetur adipisicing elit. Ea vereprehenderit aspernatur mollitia saepe cupiditate pariatur natus accusantium esse repudiandae nisi velit provident corporis commodi eius fugiat reiciendis non aliquam."
  },
  {
    id: 2,
    noteContent: "Lorem ipsum dolor sit amet consectetur adipisicing elit. Ea vereprehenderit aspernatur mollitia saepe cupiditate pariatur natus accusantium esse repudiandae nisi velit provident corporis commodi eius fugiat reiciendis non aliquam."
  },
  {
    id: 3,
    noteContent: "Lorem ipsum dolor sit amet consectetur adipisicing elit. Ea vereprehenderit aspernatur mollitia saepe cupiditate pariatur natus accusantium esse repudiandae nisi velit provident corporis commodi eius fugiat reiciendis non aliquam."
  }
]
Fetching Data
We now have our array. Let’s add these data to our app. Because we understand Vue.js, all we will do is loop through this array using the v-for directive, use the data gotten from the array, and then put the content wherever we want it to appear.
<div v-for="noteContent in notes" :key="noteContent.id">
  <q-item>
    <q-item-section top>
      <q-item-label caption class="text-grey-9">
        {{ noteContent.note }}
      </q-item-label>
    </q-item-section>
    <q-item-section top side>
      <div class="text-grey-9 q-gutter-xs">
        <q-btn
          size="13px"
          flat
          dense
          round
          icon="delete"
          @click="deleteNote(noteContent)"
        />
      </div>
    </q-item-section>
  </q-item>
  <q-separator size="1px" />
</div>
We also added a click event handler to the delete button, so that it loads this function whenever it’s created.
Adding Notes
Let’s see how to add notes to our app by using the input field. We will use JavaScript’s unShift() methods, which adds one or more elements to the beginning of an array and returns the new length of the array.
The first thing to do is to add a click event handler to the button.
<q-btn round dense flat icon="send" @click="addNote" />Then, proceed to create this method in the script area.
methods: {
  addNote() {
    let newNote = {
      id: this.notes.length + 1,
     note: this.newNoteContent
    };
    this.notes.unshift(newNote);
    this.newNoteContent = "";
  }
}
In the code above, we created an object for the new note, which comprises the ID and the note itself, and then we added this newNote to the array of notes via the unShift() method.
Deleting Notes
Finally, before proceeding to use Firebase in our app, let’s see how to delete a note. The first thing would be to add an event listener to the delete icon:
<q-btn
  size="13px"
  flat
  dense
  round
  icon="delete"
  @click="deleteNote(noteContent)"
/>
And then we would create a method:
deleteNote(noteContent) {
  let noteId = noteContent.id;

  //doing this to get the real id of the notes
  let index = this.notes.findIndex(noteContent => noteContent.id === noteId);
  this.notes.splice(index, 1);
}
In this code, we got the id of the particular note that we want to delete through the parameter passed to the click event method that was created. Then, we made use of the splice method to remove only that item from the array.
Firebase
Now that these two pieces of functionality work, let’s now see how we can use Firebase in Quasar to add, fetch, and delete data. Firebase will also give us real-time data syncing across all devices. The data in our app won’t be very much, because it’s just for the purpose of learning. In case you are thinking of something big that would be used by millions of people, check out the pricing page.
Firebase is application development software from Google that enables us to develop iOS, Android, and web apps.
Setting Up Cloud Firestore
To get started, visit firebase.google.com and click on either the “Go to console” link in the top-right corner of your screen or the “Get started” button (ensure that you sign in with your Google account).

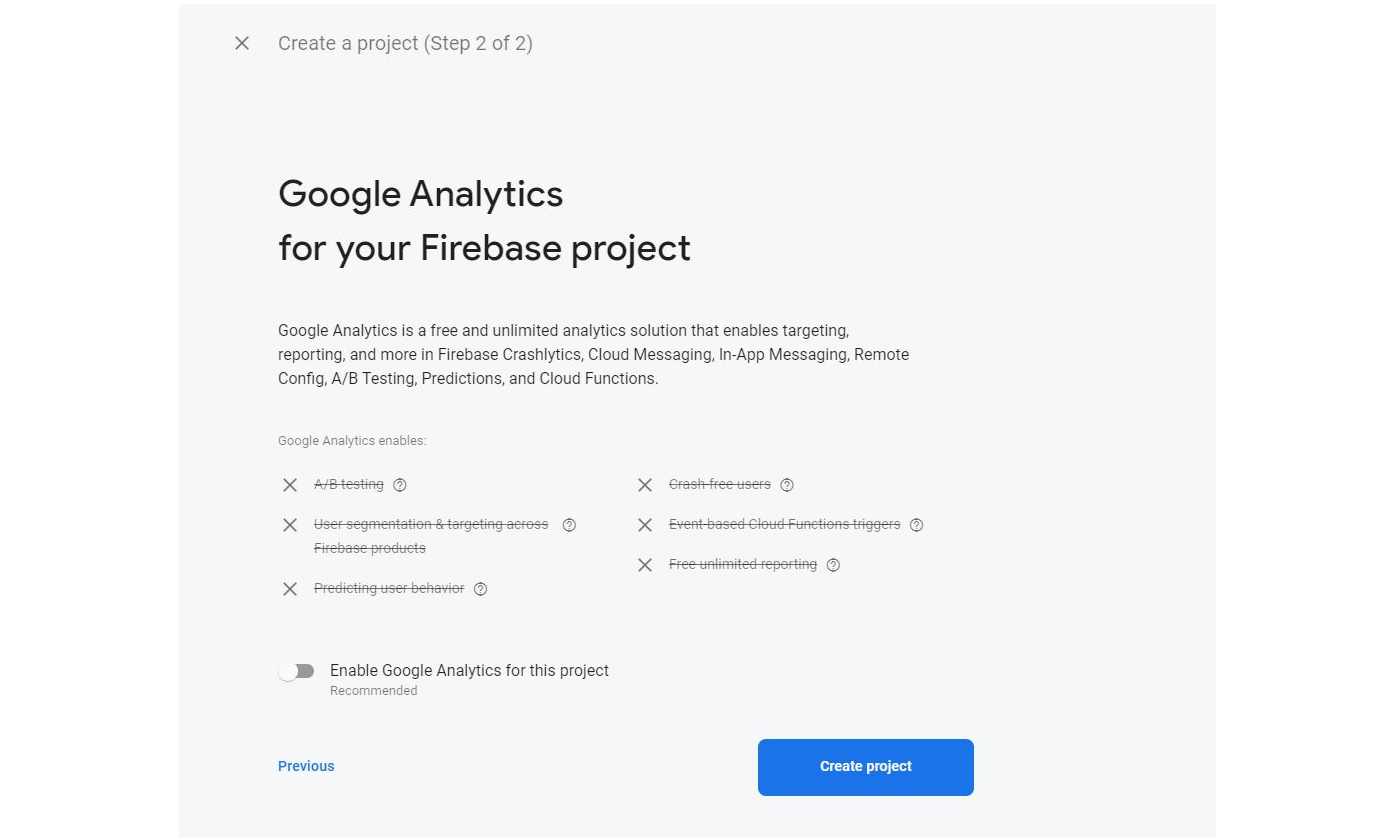
This will bring us to the console area, where we can create a project. Click on the “Add a project” button, and a form to create your project will appear. The first question will request the project’s name, which could be anything; for this article, we will call it “notesApp”. Let’s also disable Google Analytics because ours is a mini-app.
Click on the “Create project” button (this might take few seconds, so be patient). Then, click on “Continue”, so that we can create our cloud Firestore.
In the sidebar, click on “Firestore”, and then “Create database”.
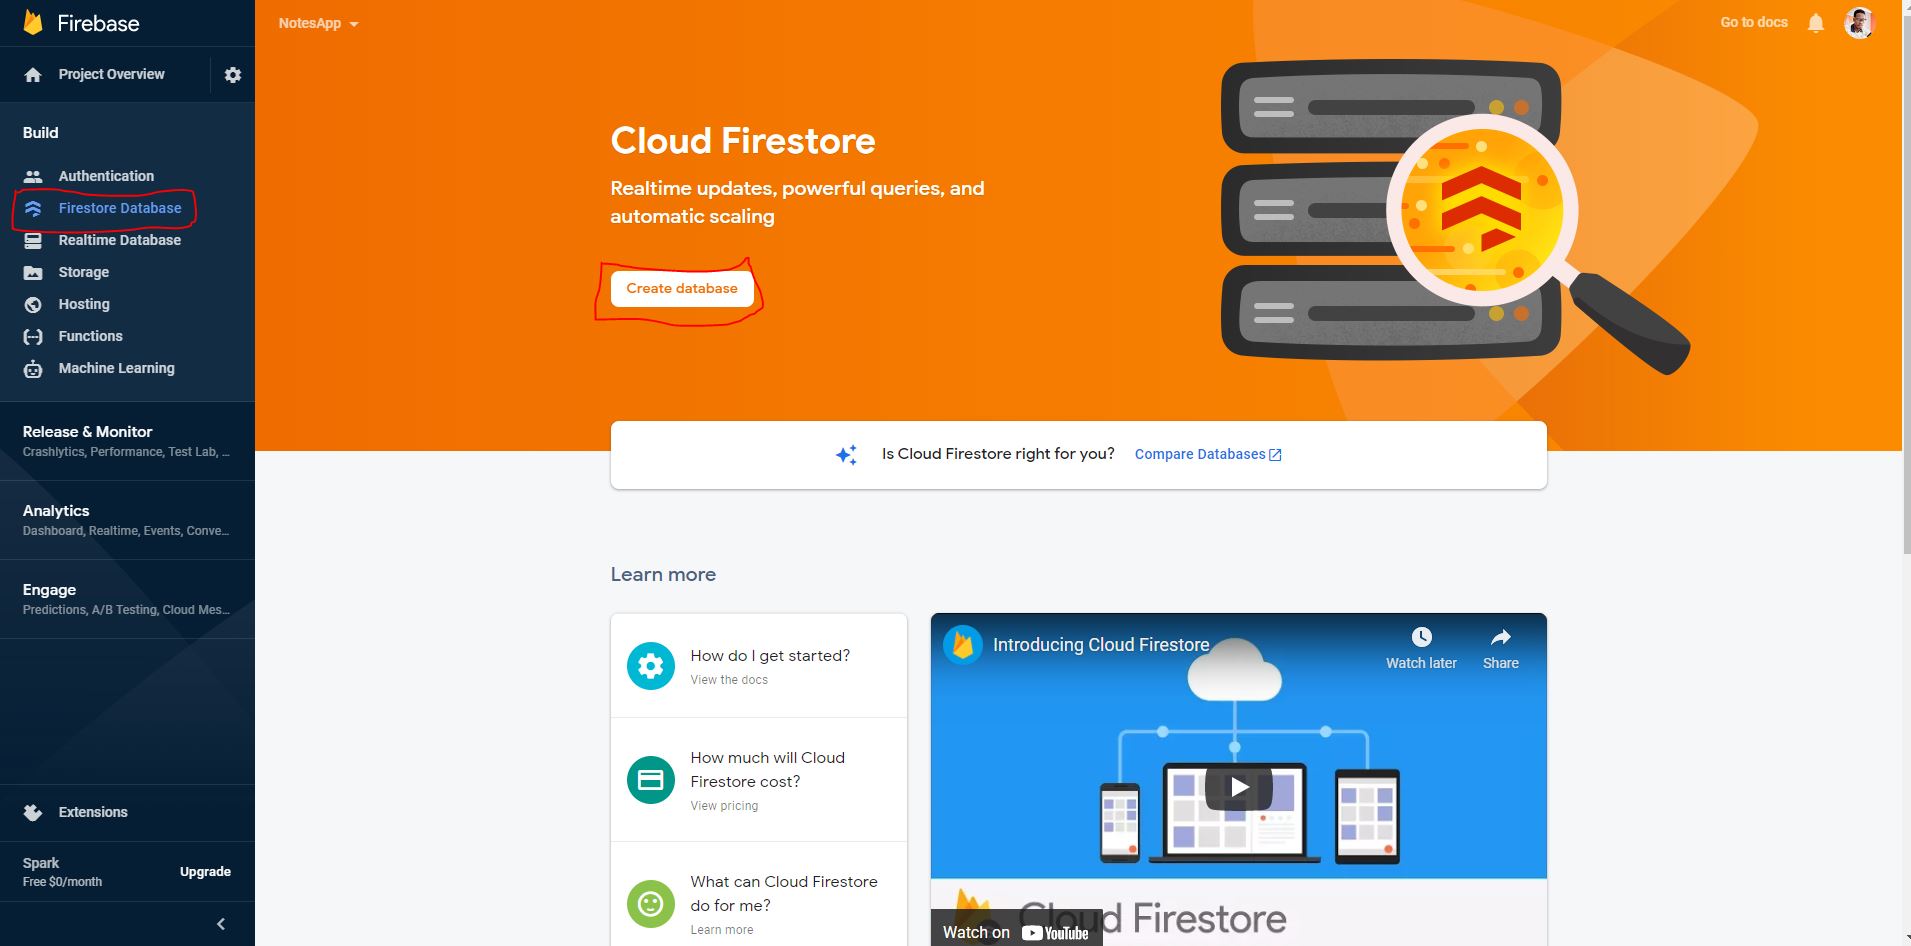
This will bring up a modal. Click on “Start in test mode”, which will make it easy for us to start working with our database. Bear in mind that, “The default security rules for test mode allow anyone with your database reference to view, edit and delete all data in your database for the next 30 days”.

Click on “Next”, leave the default Cloud Firestore location, and then click on the “Enable” button. Once it loads, our database will be fully ready for us to use.
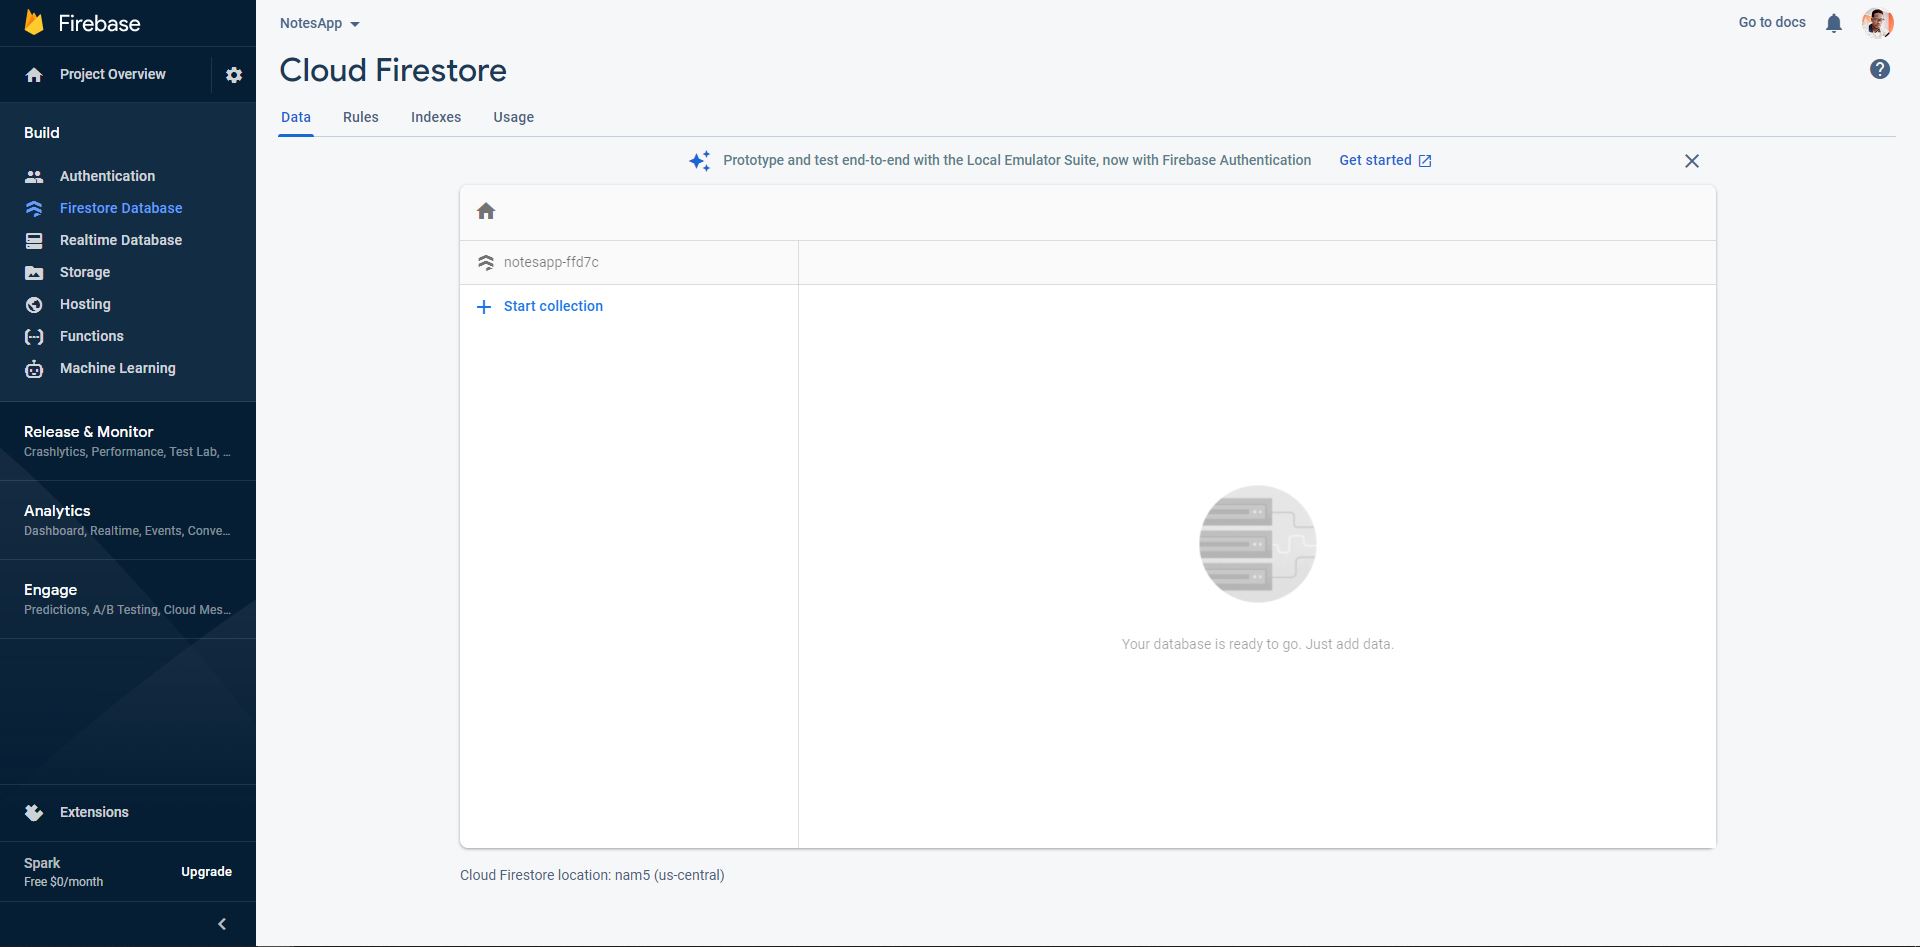
Note: The Firebase database is made up of collections, and these collections contain documents, and each document is a JavaScript object that has fields in it.
Let’s get started by creating a new collection for our notes.
To create a collection, click on “Start collection”. A modal will pop up for you to enter the collection ID — meaning, a name. Then, click on the “Next” button.
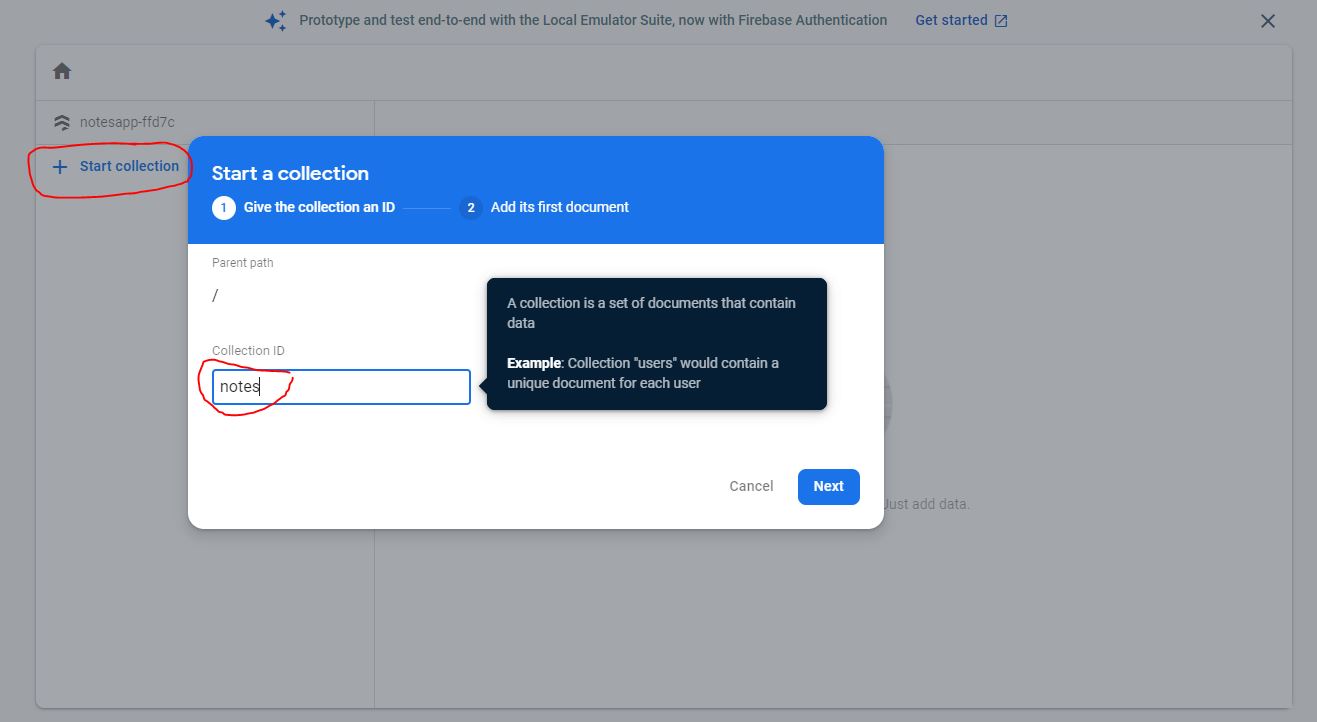
You can now start creating the documents and fields for each note. Auto-generate the ID of the document to ensure that it is unique by clicking “Auto-ID” beside the document field.
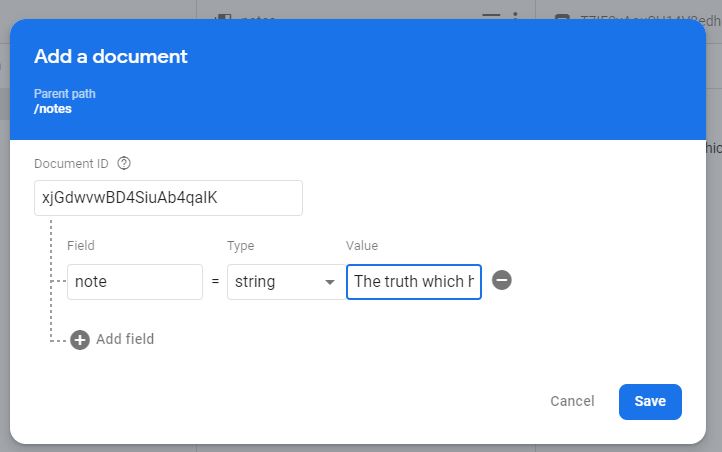
Click “Save”, and continue to create more documents. In the end, this is what my database looks like:

Now that we are done, let’s see how to connect Firebase to our app. Go to “Project overview” in the sidebar, and let’s add this to a web app by clicking the “Web” button.
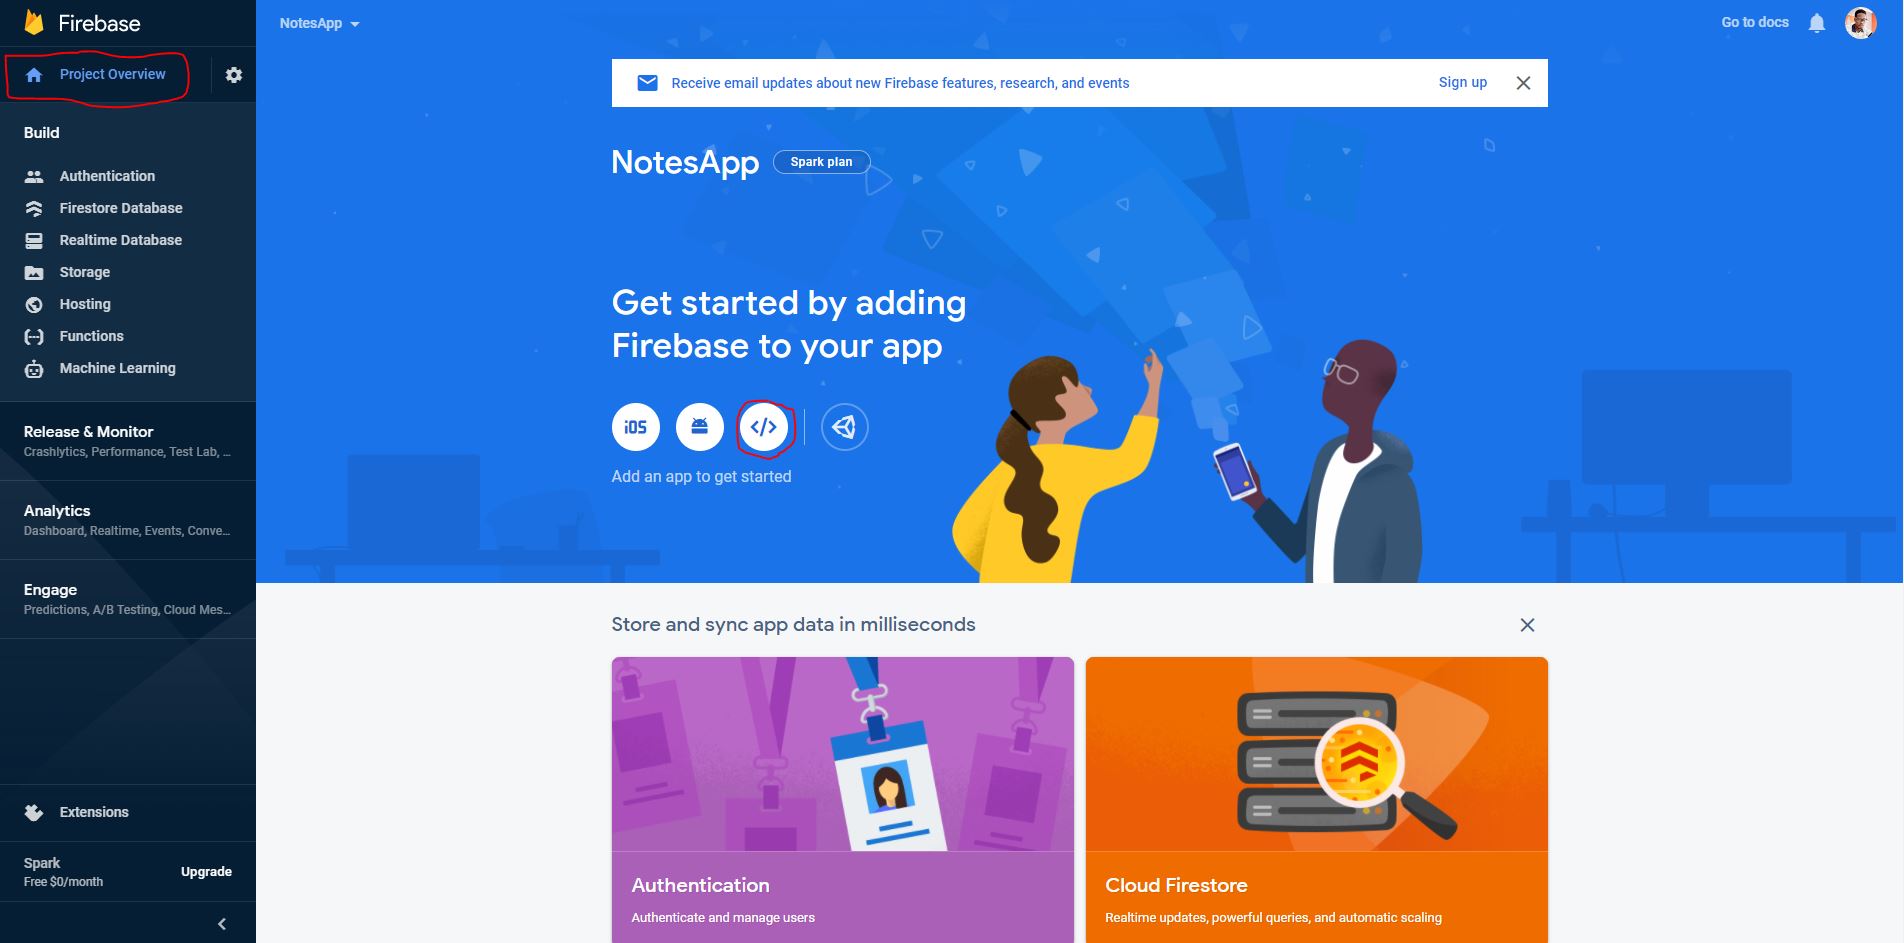
A form will appear for us to “Add Firebase” to our web app. We will give it the same name, “notesApp”, and register the app (don’t check the “Firebase hosting” field).
Once it has loaded, it will bring up an SDK to help us initialize our database in the app. We won’t do it this way, although we will need some information from the generated SDK. The right way to do this in Quasar is to import the modules that we need and use a boot file.
So, leave that tab open, and let’s see how to add the Firebase SDK and initialize Firebase in our Quasar app.
The first thing to do would be to install Firebase in our project with npm.
npm install --save firebaseOnce installation is complete, we are going to initialize our app’s connection to Firebase by creating a boot file, so that we have immediate access to the database when our app is ready.
A boot file helps us to run code before the app’s Vue.js root component is instantiated. Quasar’s documentation has more information about boot files and when to use boot files.
To generate a boot file, we will run this command in our CLI:
quasar new boot firebaseNote: You don’t need to use Firebase as the name of the boot file.
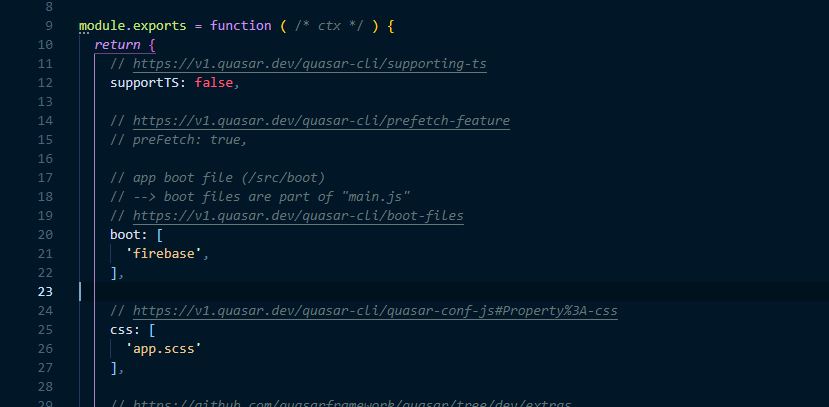
Once this is done, you will notice that the file is now created in the boot folder. To make use of this newly created boot file, we’ll need to add it to the quasar.config.js file’s boot array.
Let’s go back to the newly created boot file. Delete all of the code there because we don’t need it. We’ll import the modules that we need and configure our database. Paste in the following code:
import firebase from "firebase/app";
import "firebase/firestore";

const firebaseConfig = {
  // ...
};

// Initialize Firebase
firebase.initializeApp(firebaseConfig);
Here, we’ve imported Firebase itself and Firestore, and we’ve initialized Firebase, making use of the config, which we will be adding now.
At this point, we are almost done configuring our app. We need to add our unique configuration, which was provided in the SDK that was generated when we added Firebase to our web app. Copy only the configuration, and paste it into our array.
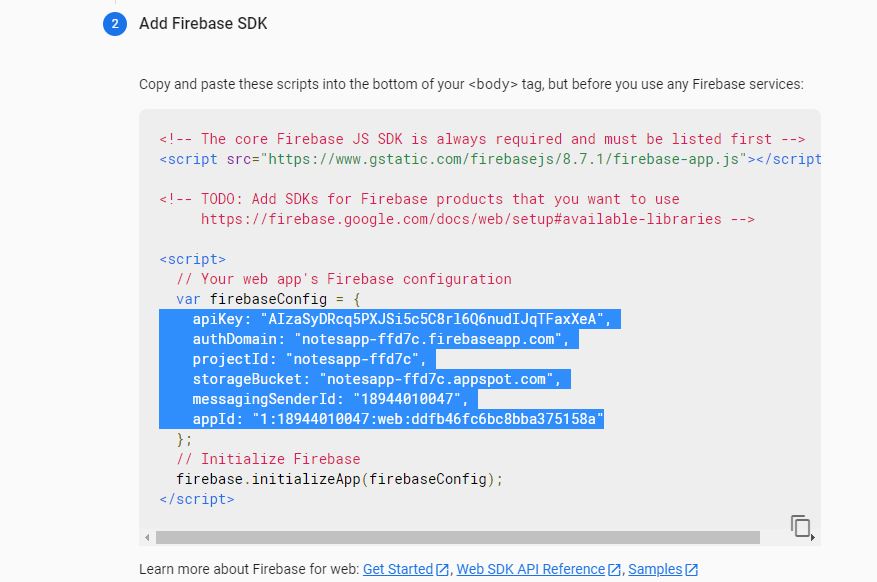
We should now have something like this:
import firebase from "firebase/app";
import "firebase/firestore";
const firebaseConfig = {
  apiKey: "***",
  authDomain: "notesapp-ffd7c.firebaseapp.com",
  projectId: "notesapp-ffd7c",
  storageBucket: "notesapp-ffd7c.appspot.com",
  messagingSenderId: "18944010047",
  appId: "1:18944010047:web:ddfb46fc6bc8bba375158a"
};
// Initialize Firebase
firebase.initializeApp(firebaseConfig);
One last thing, since we are making use of Firestore, is that we’ll need to initialize the cloud Firestore by adding this code to our boot file (the last line):
let db = firebase.firestore();
export default db;
This db will give us access to our Firestore database. We also exported it so that we can use it anywhere in our app.
At this point, you might still be a little confused, but if you have followed this guide, then you will have properly initialized Firebase for your application. You can read more about adding Firebase to your JavaScript project in the documentation.
Fetching Data From Firebase
If you have followed the guide so far, everything should work fine once you launch your app. Now let’s grab the notes created in the database and display them in our app.
For this, we will be making use of the .onSnapshot hook, which will be fired any time the data in our collection changes. This will tell us whether a document has been added, removed, or updated. For this guide, we will only deal with the addition and removal of documents. Using hooks like this makes real-time syncing across devices possible. Let’s get started.
The first thing to do would be for us to get access to the database by importing it into the index page of our app.
import db from 'src/boot/firebase';Then, create a mounted hook, because we want to fetch our data immediately after the app has loaded.
mounted() {
  db.collection("notes").onSnapshot(snapshot => {
    snapshot.docChanges().forEach(change => {

      let noteChange = change.doc.data();

      if (change.type === "added") {
        console.log("New note: ", noteChange);
        this.notes.unshift(noteChange);
      }
      if (change.type === "modified") {
        console.log("Modified note: ", noteChange);
      }
      if (change.type === "removed") {
        console.log("Removed note: ", noteChange);
      }
    });
  });
}
In the code above, we are simply grabbing our notes collection, and every time there is a change in the collection, the onSnapShot method will be fired, which will return a snapShot of all our data. All of these data will be objects with type properties. These type properties will tell us the type of change that has happened and give us access to the data that was either added, modified, or removed.
This might sound confusing, but you will understand what we are doing as you read on.
If you save your code and check the console environment, you will notice that each note has been logged out. We can now push these objects to the notes array that we created earlier, so that we can display real-time data in our application.
The first thing to do is delete or comment out the objects in the notes array, so that we have something like this:
notes: []Then, pass the objects to this array:
this.notes.unshift(noteChange);Your code should now look like this:
if (change.type === "added") {
  this.notes.unshift(noteChange);
}
At this point, if you load the app, you will notice that you have successfully fetched your data from Firebase.
Adding Data To Firebase
Let’s see how to add a note to our notes collection in this app. At this point, if you try to use the input field to add a note, it will work but the note will disappear once you refresh the page because it’s not stored in any database.
To do this with Firebase, all that is needed is to update the addNote() method that we created earlier.
addNote() {
  let newNote = {
    // id: this.notes.length + 1,
    note: this.newNoteContent
  };
  // this.notes.unshift(newNote);

  db.collection("notes")
    .add(newNote)
    .then(docRef => {
      console.log("Document written with ID: ", docRef.id);
    })
    .catch(error => {
      console.error("Error adding document: ", error);
    });

  this.newNoteContent = "";
},
The first thing we did here was remove the ID that is used when we made use of the previous array, because we are now going to auto-generate the ID from Firebase. We also removed the unshift() method; it’s no longer useful because data is being fetched for our app once there is an update using the snapShot hook.
If we look at the code responsible for updating the Firestore db, all we are passing to the collection (notes) is the new object (newNote), and this function will automatically generate an ID for each of our documents. The documentation has more information on adding data to Firebase.
Deleting Data From Firebase
We are almost done with our app, but we need to be able to delete data in our app from Firebase. Currently, the delete function works, but if you reload the app, the deleted data will reappear.
As we did before, we are going to delete these data (or documents) from Firebase using the unique ID generated by Firebase.
Currently, we don’t have access to the ID. To access it, we will add it to the noteChange object:
noteChange.id = change.doc.id;Once that is set, deleting data will be as easy as adding it. All we have to do is go to the deleteNote(noteContent) method that we created previously, delete the previous code, and make use of this:
deleteNote(noteContent) {
  let noteId = noteContent.id;
  db.collection("notes")
    .doc(noteId)
    .delete()
    .then(() => {
      console.log("Document successfully deleted!");
    })
    .catch(error => {
      console.error("Error removing document: ", error);
    });
}
This checks the notes collection for a document with the specified ID and then deletes it. But if we save our code now and click the delete icon, the data will delete but won’t leave the app’s interface unless we refresh our code, meaning that the snapshot hook needs to be updated. Go to the snapshot hook for removed, and add this code:
if (change.type === "removed") {
  console.log("Removed note: ", noteChange);
  let index = this.notes.findIndex(
    noteContent => noteContent.id === noteChange.id
  );
  this.notes.splice(index, 1);
}
This simply gets the ID of the post that we deleted and removes it from the interface.
With that done, we have built an app with Quasar that works with Firebase. One major advantage of Quasar is that it enables us to simultaneously deploy our project as a website, mobile app, or Electron app.
To deploy for iOS, Cordova needs to be installed on our local machine. A MacBook is highly preferable. Navigate to your CLI, and install Cordova globally:
$ npm install - g cordovaTo install on Windows, you would make use of Electron. The documentation properly explains how to do this.
Conclusion
In this guide, we have built a notes application using Quasar and Firebase. By following this guide, you are now in a position to improve on and add your own features and functionality. Here are a few ideas to get you started:
- Implement functionality to modify notes.
- Add dates, so that you can order the data by date.
- Style the app, and make it more creative.
- Add images.
- A lot more.
Useful Resources
Further Reading
- How To Boost Your Design Workflow With Setapp
- Composable CSS Animation In Vue With AnimXYZ
- The Era Of Platform Primitives Is Finally Here
- Creating An Effective Multistep Form For Better User Experience


