Open-Source 3dicons Library: Case Study And Free Downloads

Email Newsletter
Weekly tips on front-end & UX.
Trusted by 182,000+ folks.
 Celebrating 10 million developers
 Custom Web Forms for Angular, React, & Vue. Your backend.


In February 2021, I began studying 3D illustration using Blender. Like most beginners in the field of 3D design, I also created my first donut by following BlenderGuru’s (Andrew Price) tutorials. I firmly believe that learning by doing is the best way to learn. Picking an icon and following the steps on how to construct it in the 3D space was a great challenge for me, as each icon required a different approach to modeling.
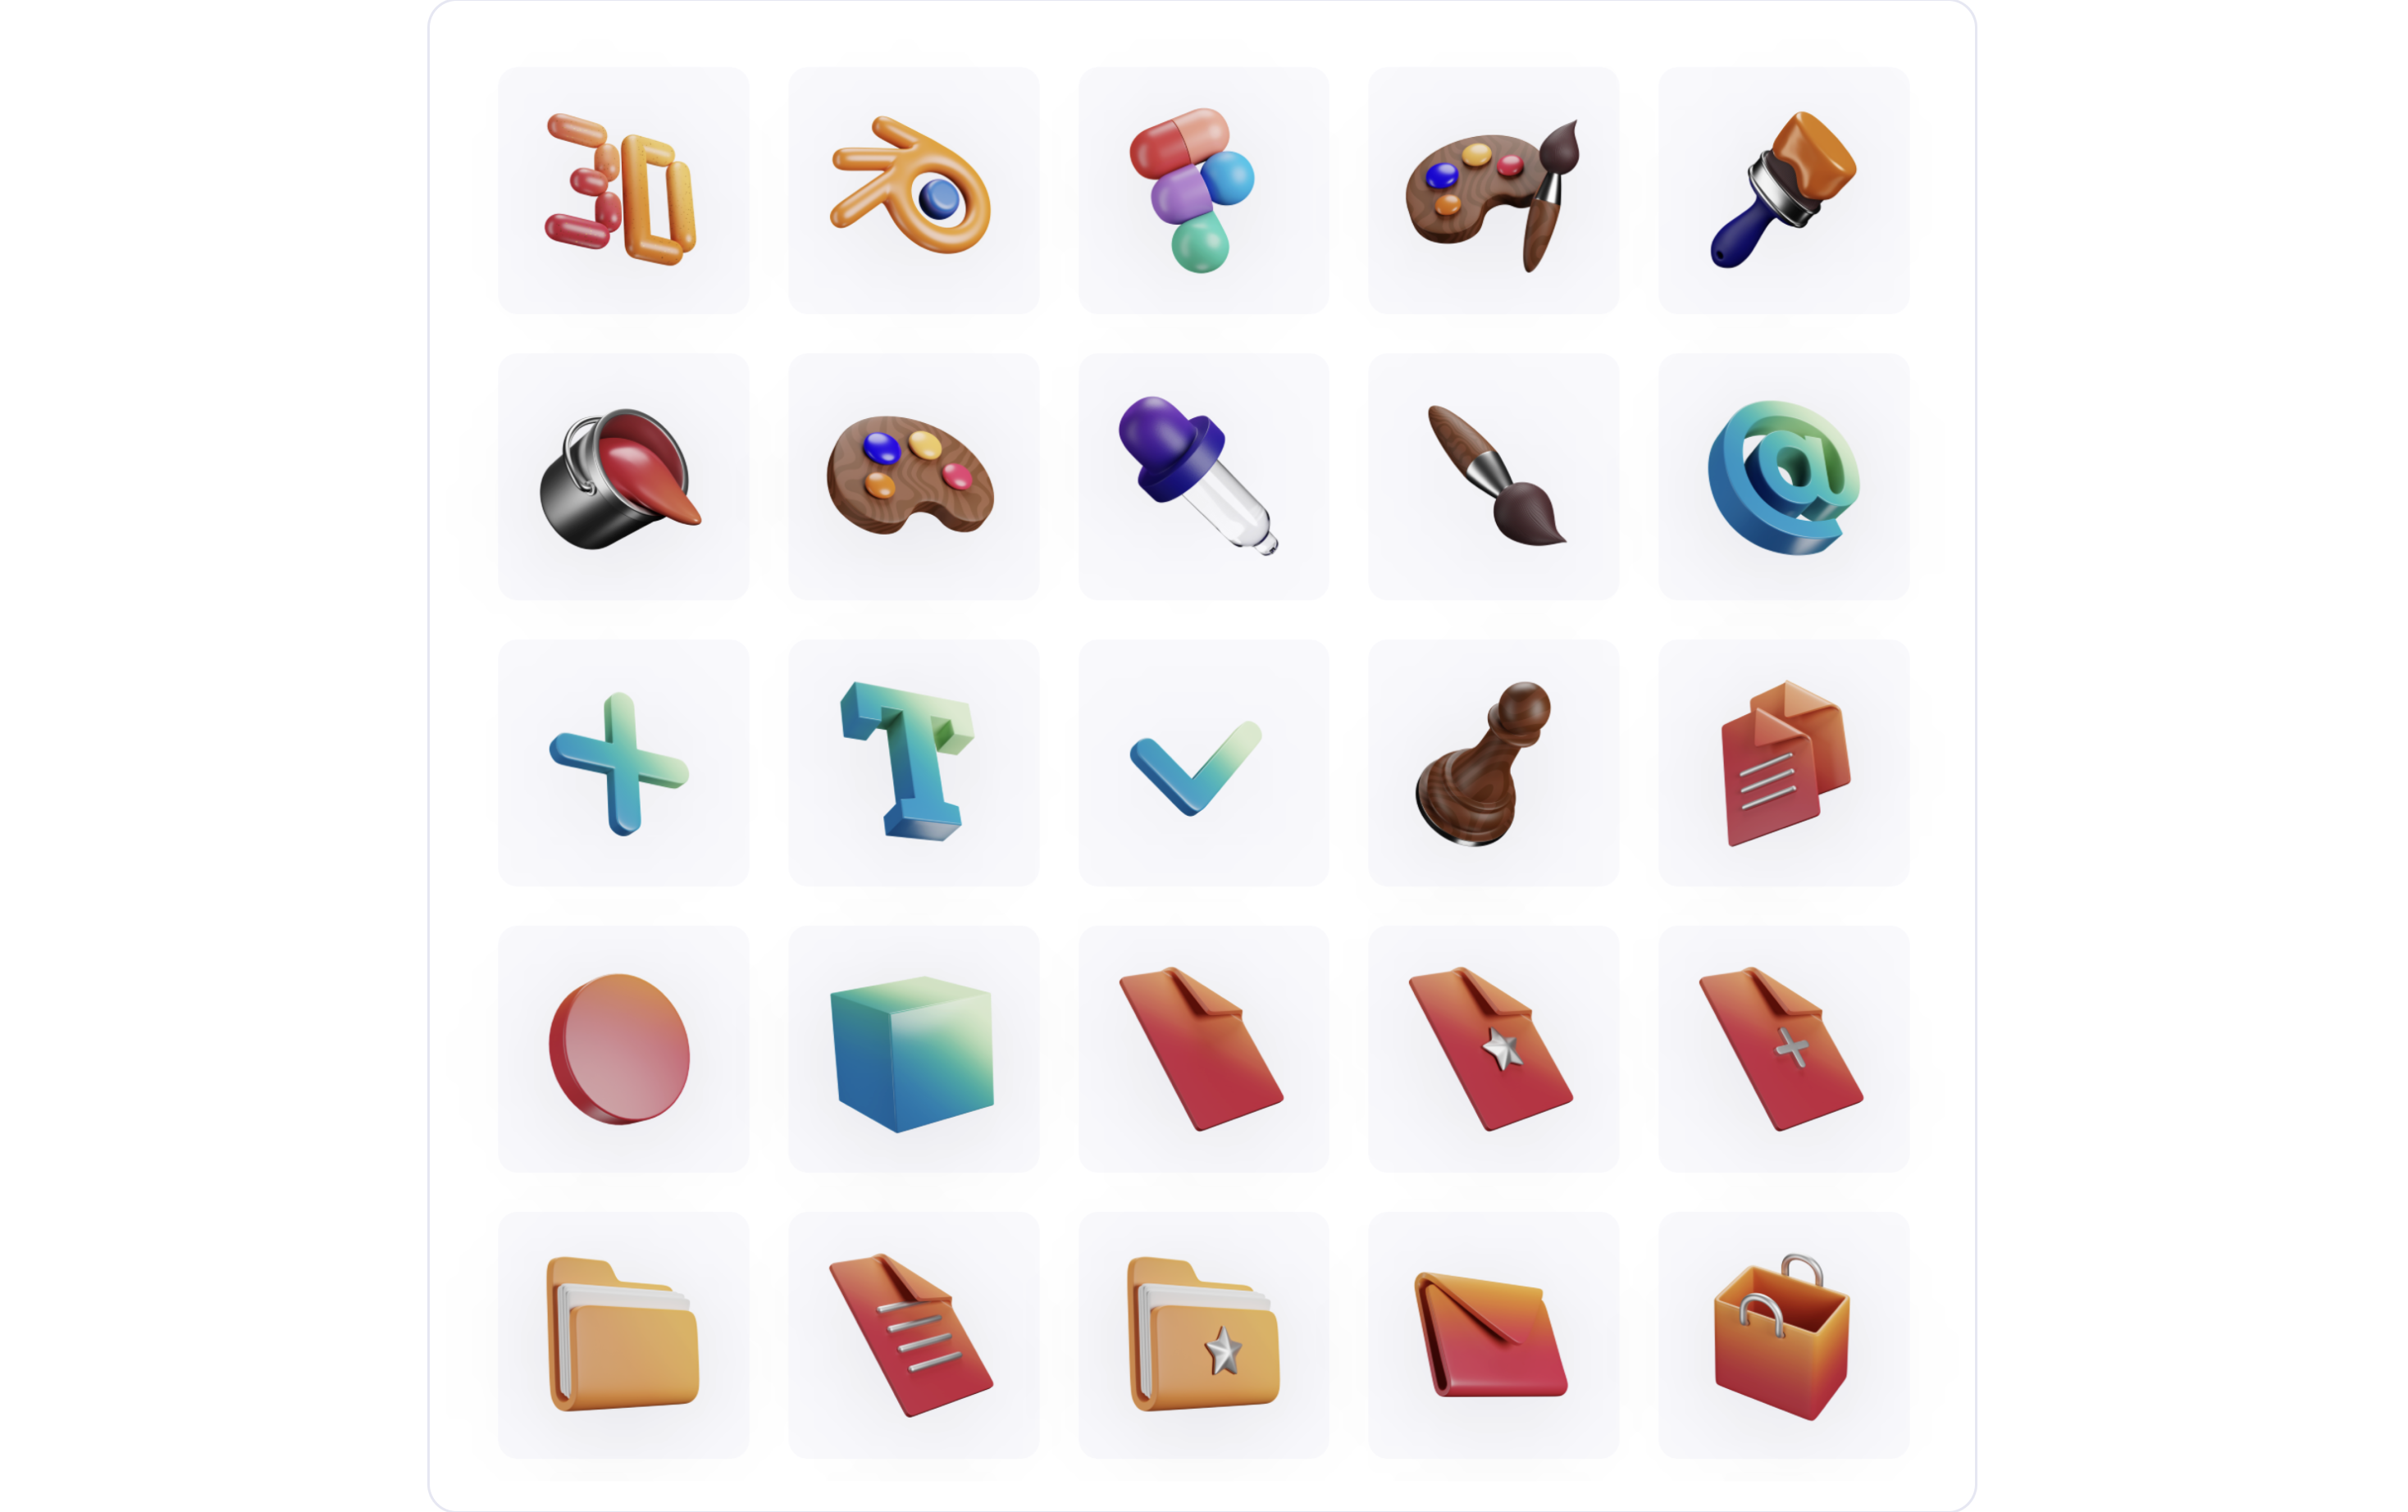
While learning, I noticed that the number of icons in my project had grown to almost 30, and at this moment, I decided to release them under an open-source license. I started preparing more icons for the most commonly used cases, and in the end, I created exactly 120 icons.
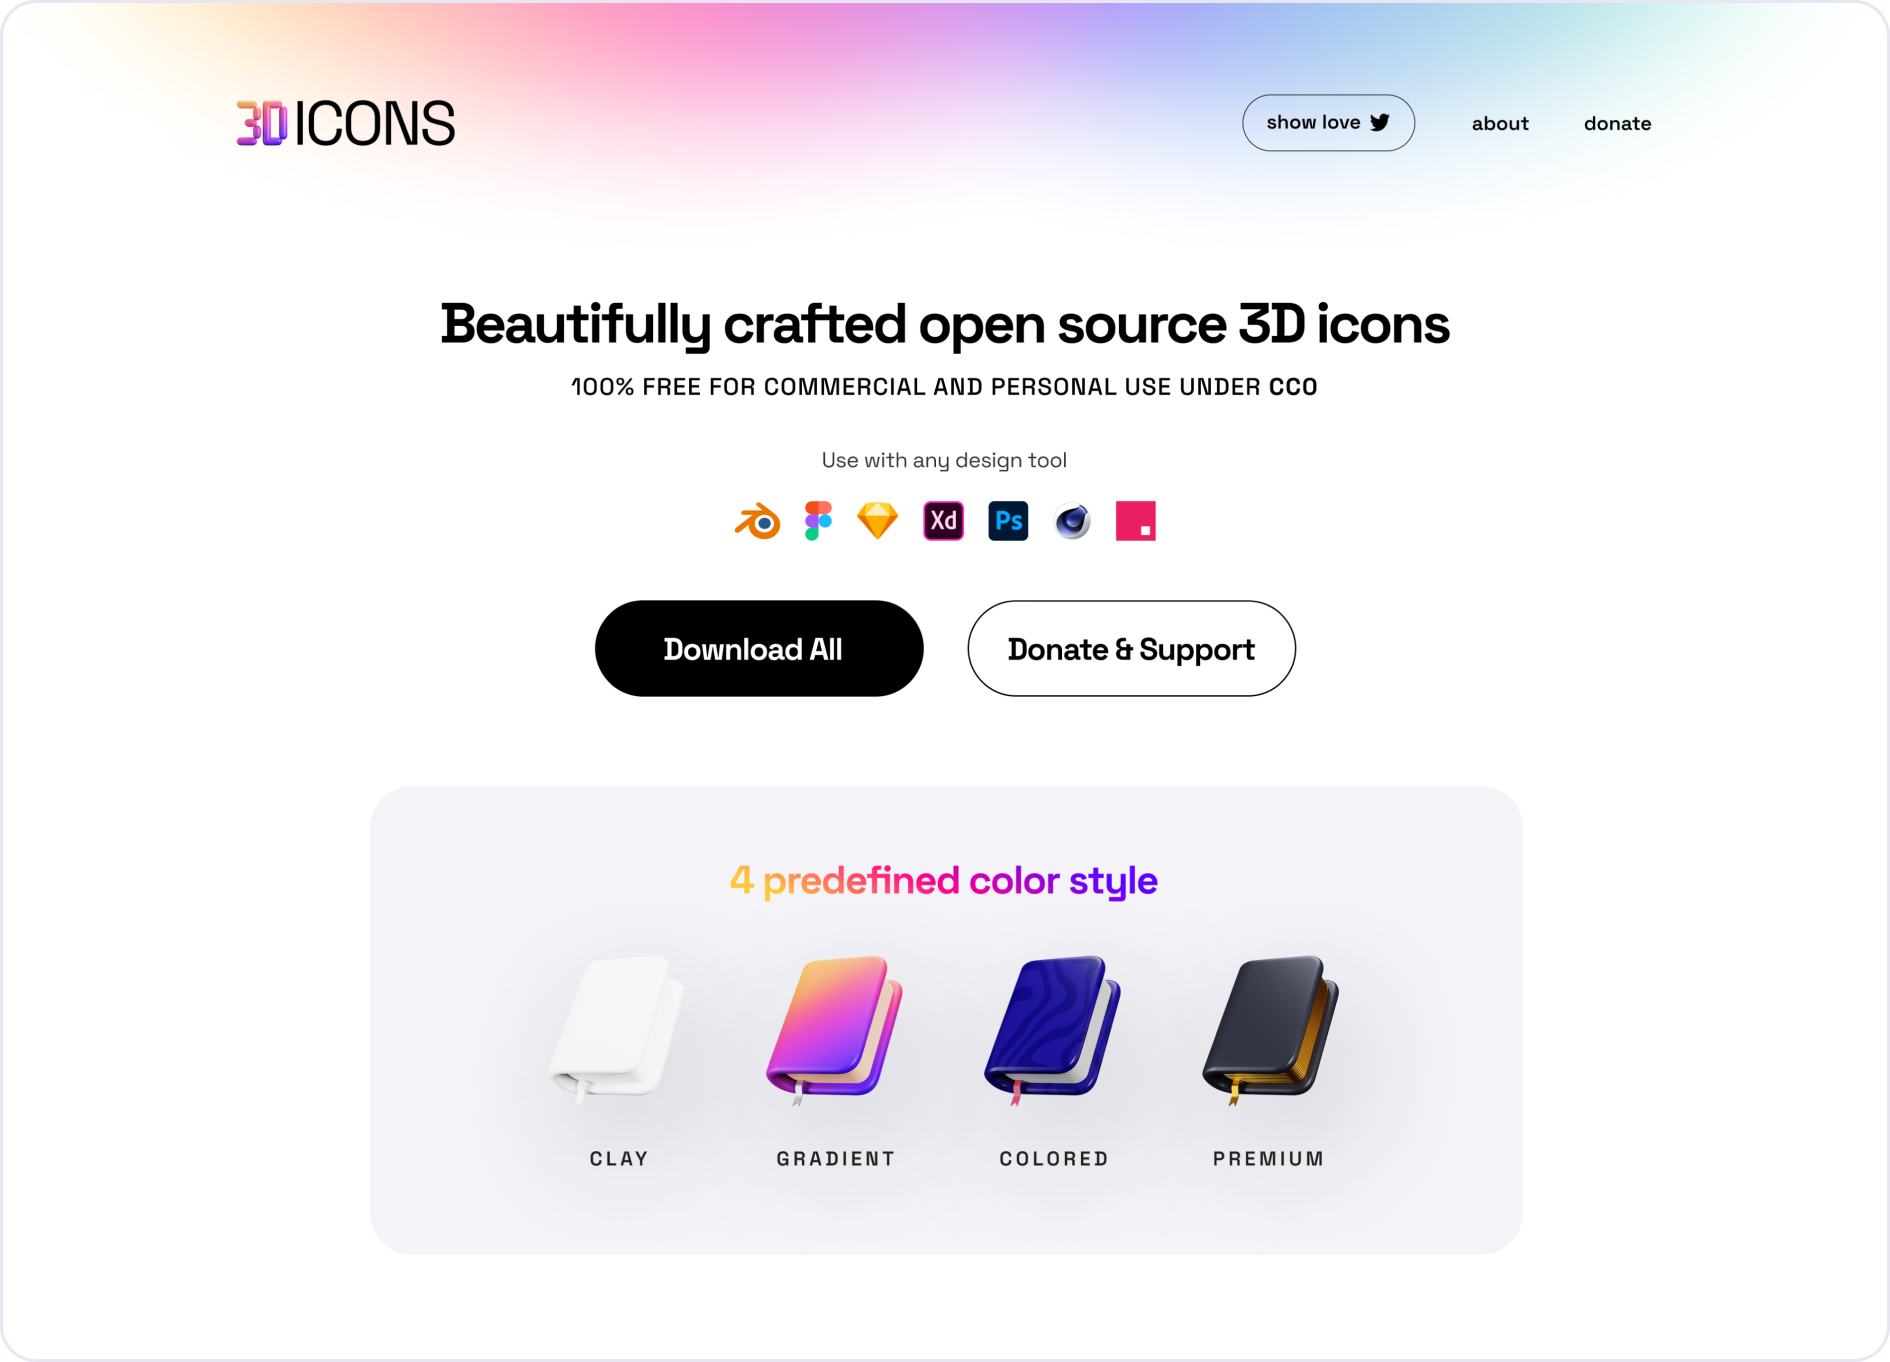
Then the main objective evolved into creating a set of icons that could be used on product screens, presentations, and social media posts. These icons should be rendered as product-ready assets, but I also wanted to share the editable source files with the optimized and exported icons.
In this article, I will share my experience of learning and managing to release this large set, where the images alone take up 3.8 GB in size! I have divided it into five parts:
Note: If you just want to download the 3dicons library, you can jump straight to the “Conclusion and Download” section at the end of the article.
Why Open Source?
Firstly, I believe in open-source design. Often, a project starts with the intent of learning and practice, when we redesign existing websites and apps like Facebook and Netflix, or various design screens, objects, or icons of interest, and then we post the results on Dribbble, Behance, and many other social platforms. We do this to improve our own skills, but when someone works on a concept, why not also share the source files with the community so that people can learn and benefit from how the design was crafted?
By sharing our source files and best practices, we uplift the community and make the Design world better. After realizing this (and also drawing inspiration from Pablo Stanley’s work), I decided to do something similar.
In 2019, I shared my first source file, which had 100+ illustrations. I had these illustrations sitting on my hard drive for years, but they were only taking up storage space. I wanted to make this resource available to the community and share it under an open-source license. Then I thought the same about the 100+ 3dicons, which I next created with the sole purpose of learning 3D design.
Important: Releasing my icons for free does not mean that I want to diminish the value of other artists’ work.
Secondly, there are a lot of 3D illustrations and icons available online for free or for a small fee. Unfortunately, most of the free resources out there do not allow you to modify them as you see fit — these freebies are often nothing more than a link to purchasing the final product. At the same time, many designers in the community are just starting out and need low-cost resources to learn from and use in their projects. These 3dicons should help them to get started, and when they are ready, they can either create their own 3D icons and art or buy and then build upon some existing ones.
Update: 3dicons has just been nominated as one of the finalist projects in the Figma Community Awards! (Editor’s Note in the last minute)
Tools Used
As a designer, I’m a huge fan of Apple products! But learning 3D on a 16” MacBook was not good enough for me, so I decided to build my own PC specifically for learning 3D design. The following are some of the hardware and software tools that I used to craft the project’s files:
- Windows machine (AMD Ryzen 7 3800X, nvidia GeForce RTX 2080);
- Blender: for all modeling, rendering, and compositing;
- PureRef: helping me collect references for icons, colors, and other things;
- Figma: using it for arranging the icons and for designing the web page;
- iPad with the Procreate app: for sketching, doodling, and ideation;
- Notion: it’s a tool for managing everything, and after Figma, it’s my next favorite tool on the list! :-)
Process And Learning
I created all these icons in Blender. Some of them were first doodled on an iPad using Procreate and then modeled in 3D. After modeling, all icons were rendered in different angles and styles for multipurpose use. I was considering releasing to the public both the rough master file and all the production-ready assets, and for this, I needed some sort of a plan.
Planning Stage
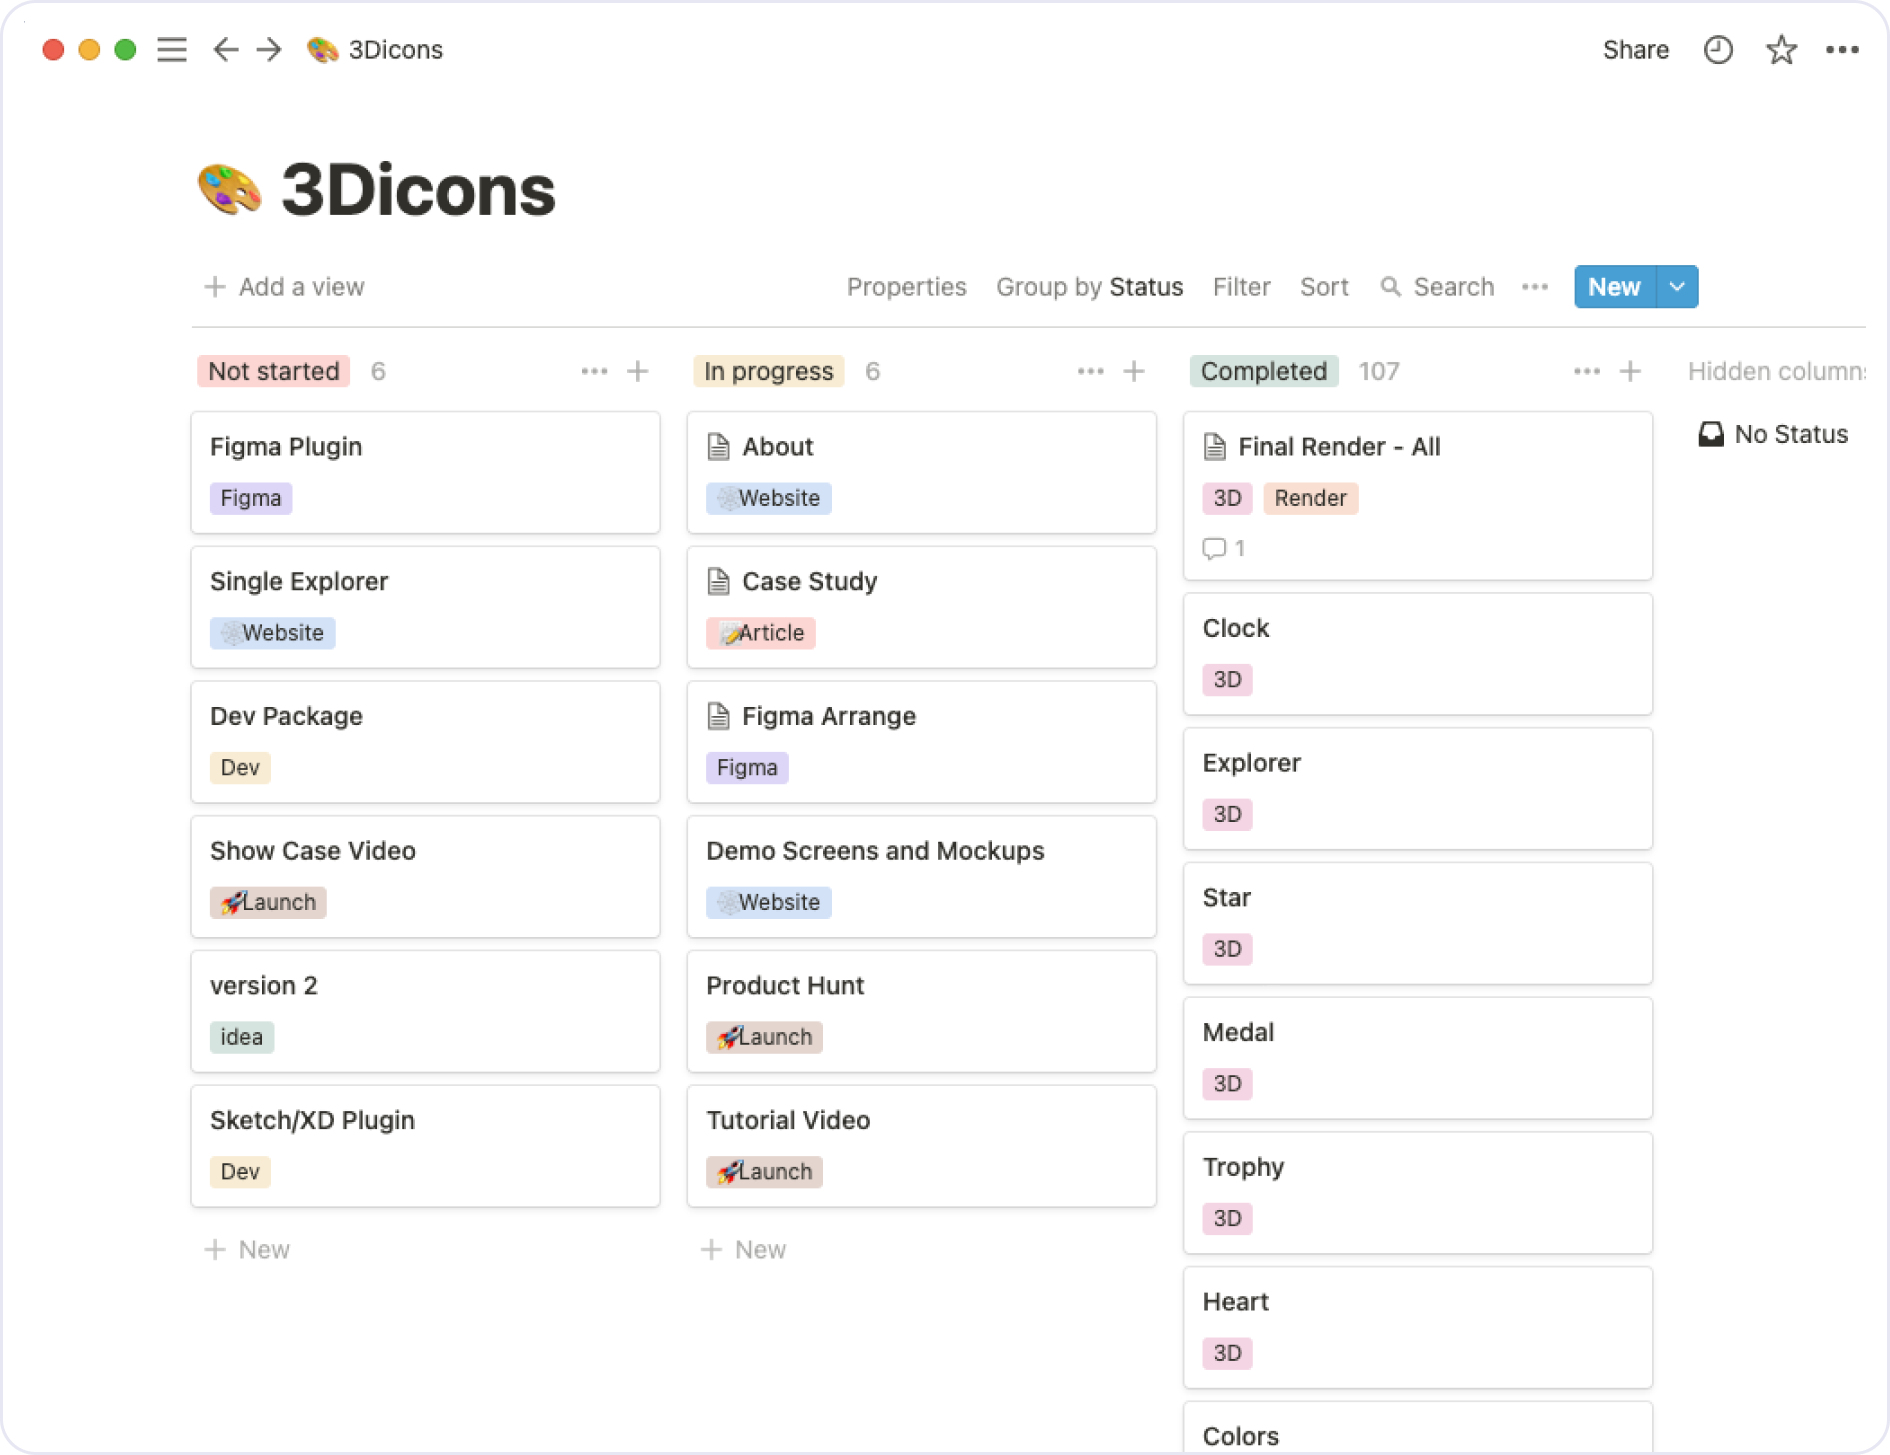
To manage all my projects, I use Notion. First, I created a board and listed all the initial requirements there.
Modeling
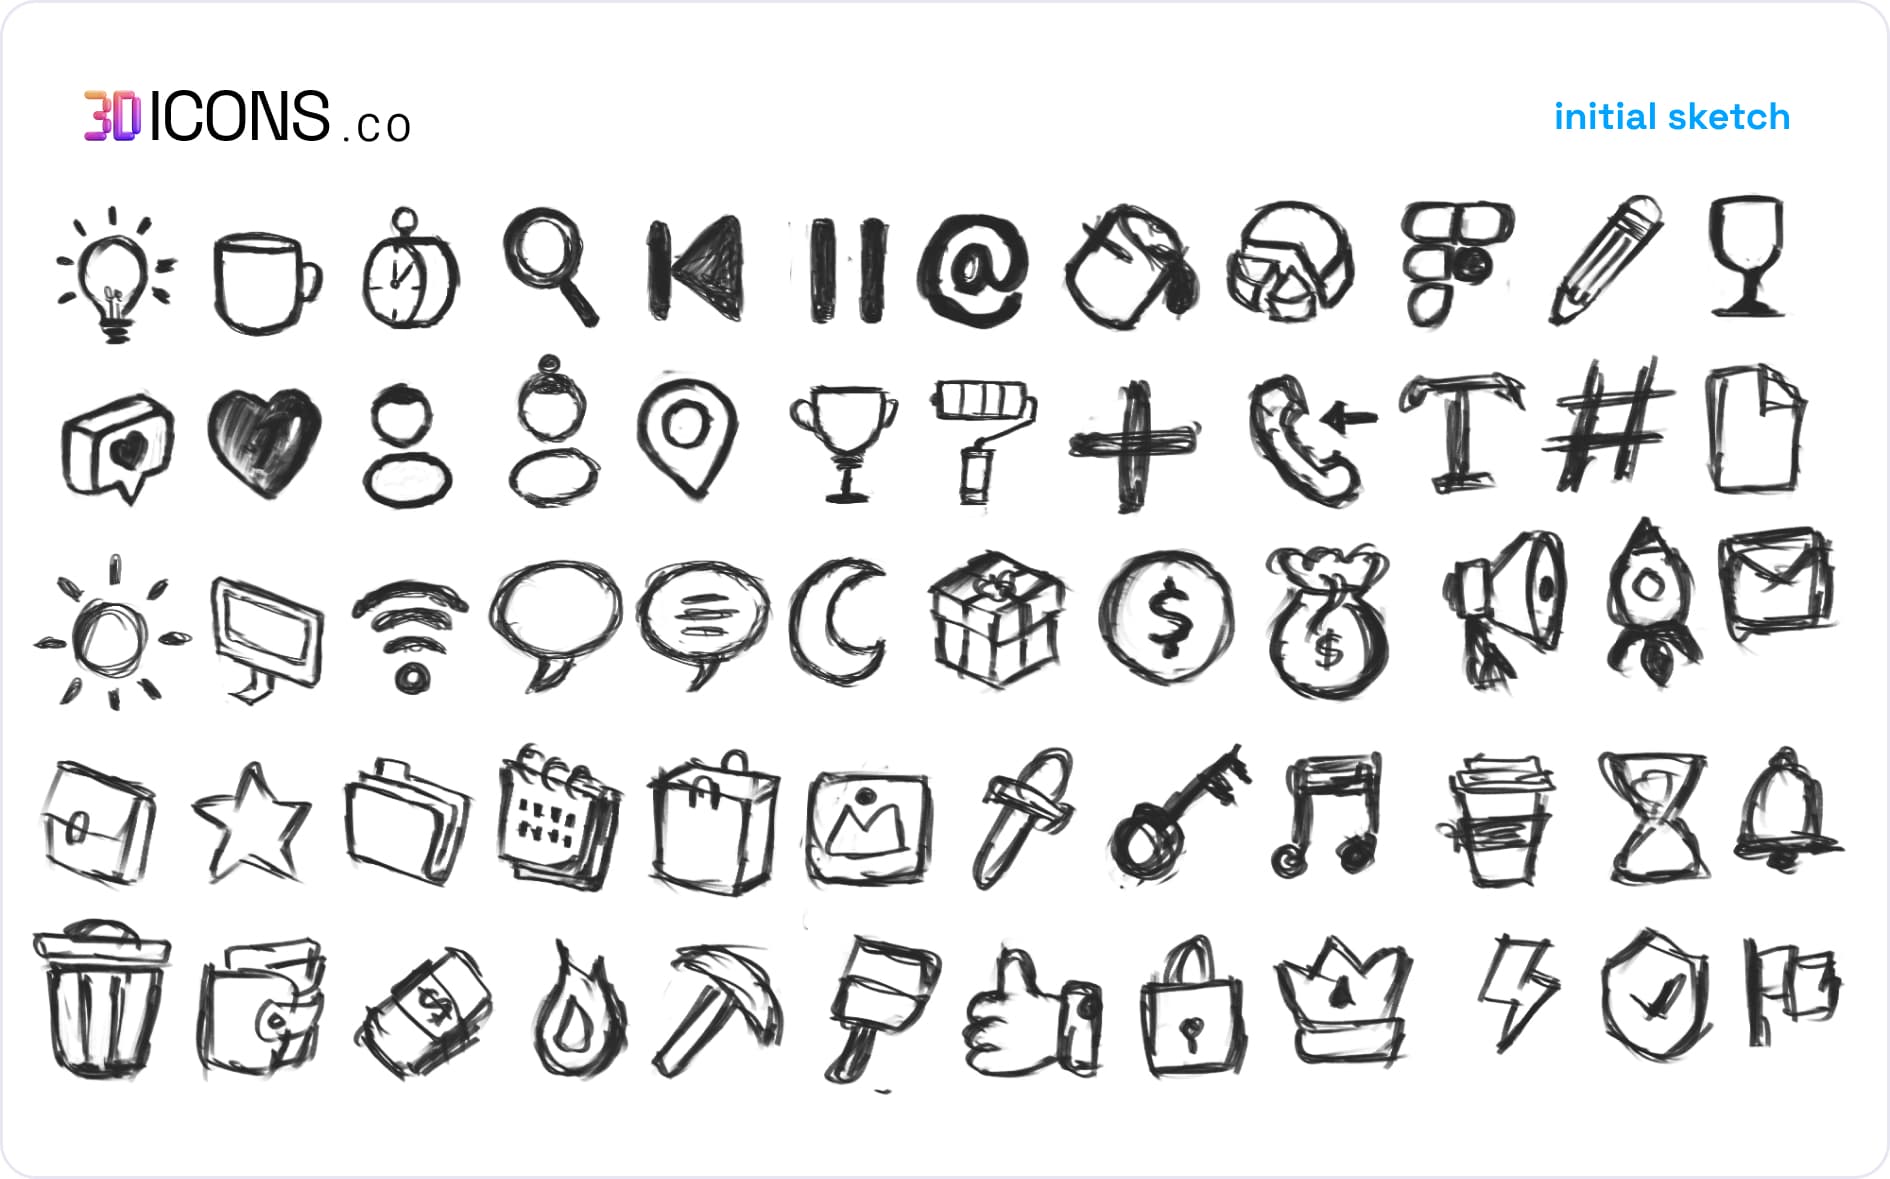
Some icons are easy to make and can be directly created from a reference. Some of them were conceived as doodles on my iPad using Procreate and then imported via Google Photos to my Windows machine. I created a basic guide window, and then all the icons were put together as a single file. This initial stage was quick, but then properly rendering all those models one by one was quite a challenging bit of work.
Challenges
Creating stuff for yourself is easy — nobody will see what’s inside your files. However, when you prepare to share a source file with someone else, you have to spend a lot of time managing and arranging all the layers and elements inside it.
Modeling
There is no doubt that modeling in Blender is very smooth. Learning was a trial and error process for me when I started. I figured it might be necessary to have a guide to make sure that all icons were the same size and positioned well. So, I made a basic guide with two cubes, one for the icon’s maximum boundaries and one for just the end edge of the area. Next, I modeled all the icons and stored them all in one file. I was looking for quality icons instead of low-poly ones, so I added surface modifiers to smooth them out.
If you’re new to modeling, check “Modeling for Absolute Beginners” — a Blender tutorial by Surfaced Studio.
Key point:
When you apply the subdivision surface modifier, it increases the file size. I want to share.objor.fbxfiles as well, so I need to apply all modifiers. Otherwise, it will mostly be low-poly icons, since modifiers will be removed.
Lighting
A perfectly lighted model looks good. If you don’t light up your model properly, no matter how much effort you put into modeling, the result won’t look right. Every object has a different shape and needs different levels of light intensity. Since I decided to render icons from three different angles, each angle required a different light position and light intensity. It is time-consuming and complicated to change the same lights for different models.
If you’re new to lighting, check “Lighting for Beginners (Intro)” — a Blender tutorial series by Blender Guru.
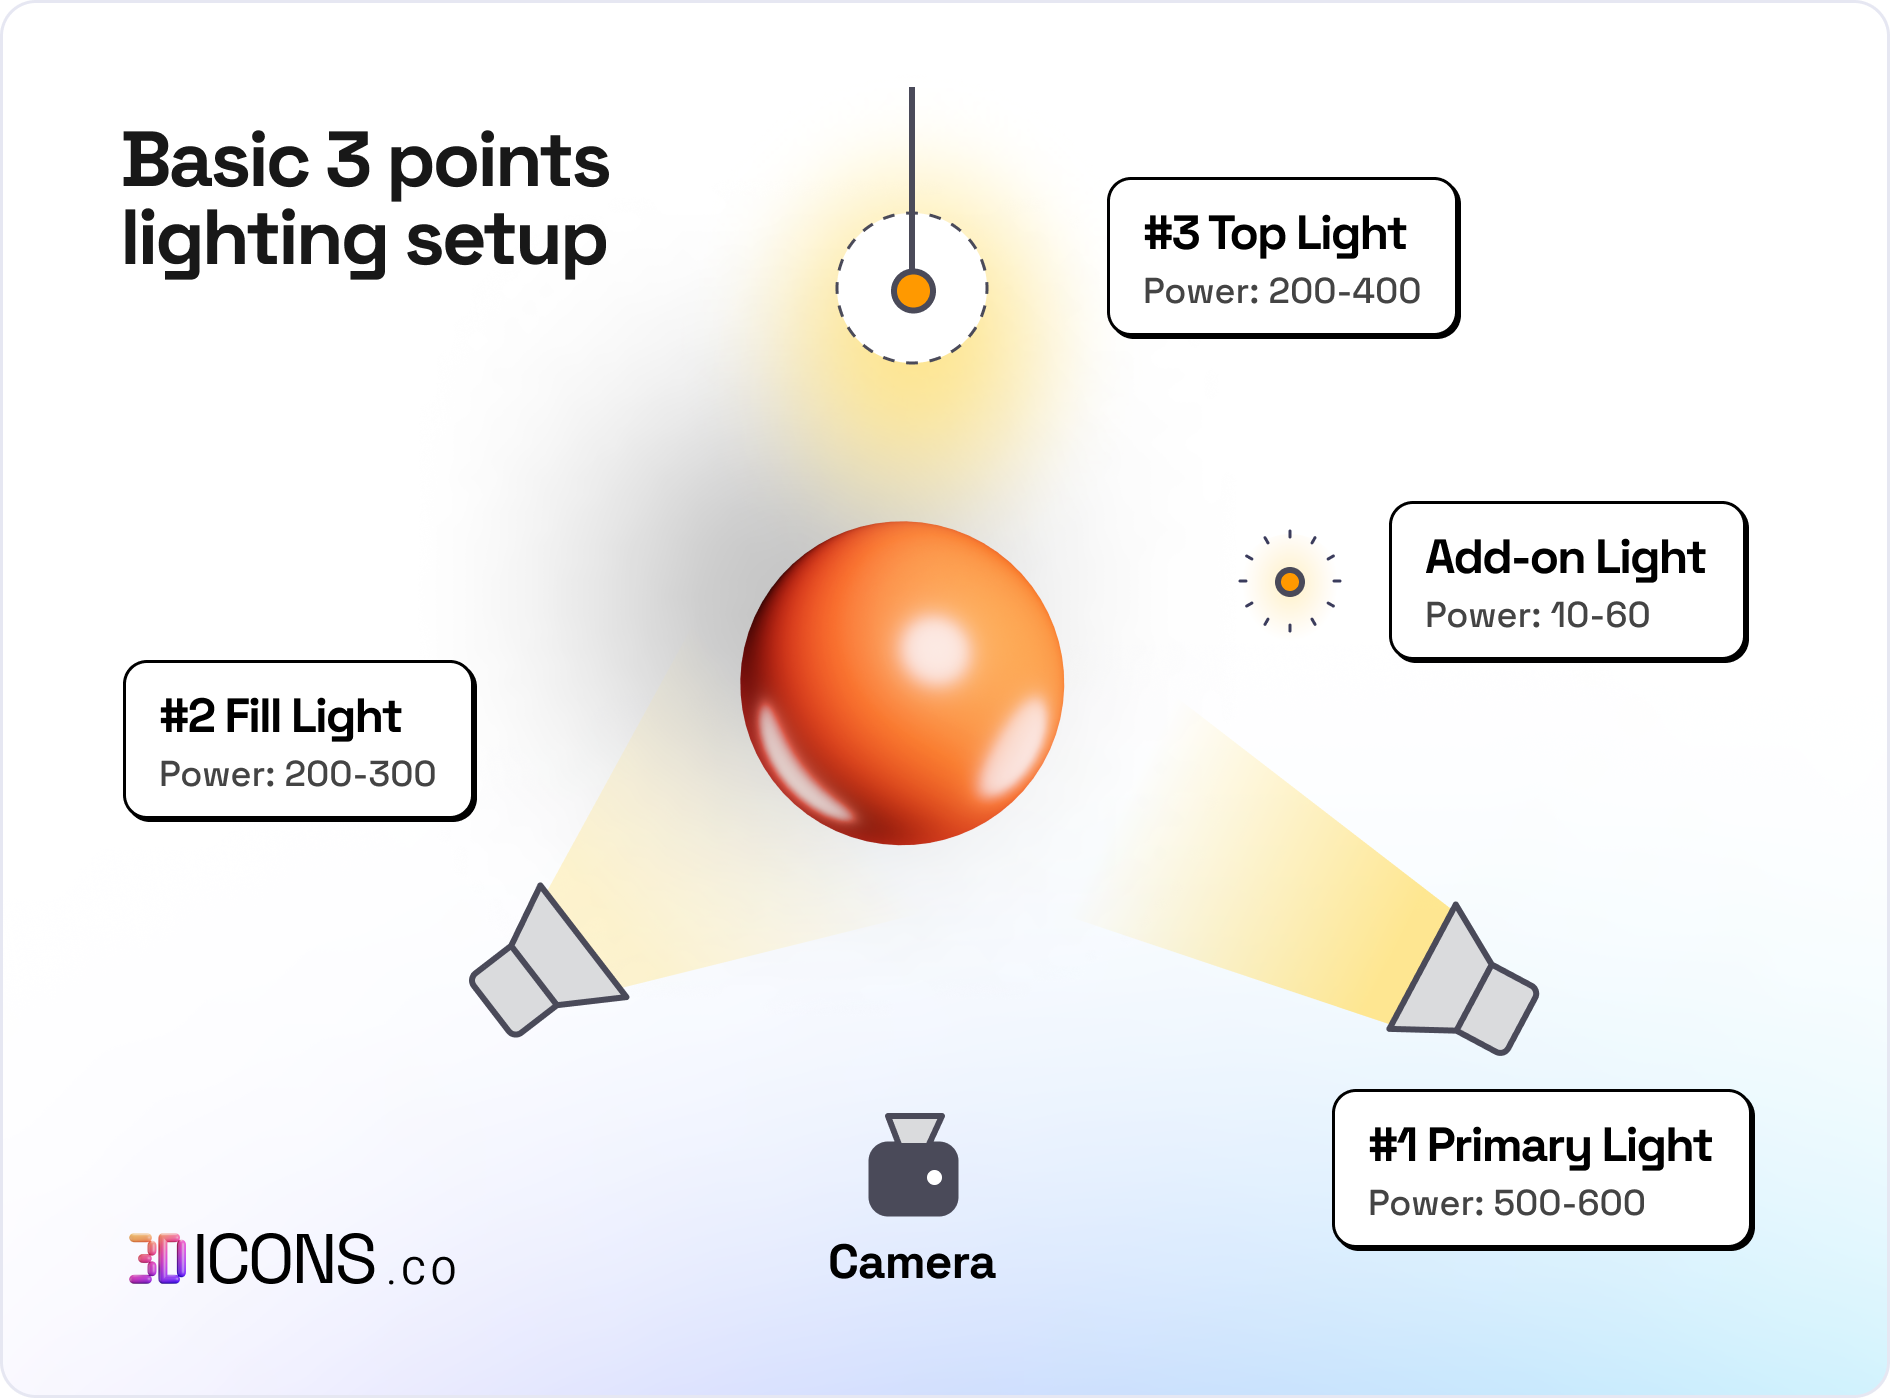
Key point:
As a result, I created three sets of the same lights with similar three-point light settings: ISO, Dynamic, and Front. The lights’ positions were adjusted accordingly.
Coloring (Shading)
It’s no secret that I’m a fan of vibrant colors — check my Dribbble profile if you don’t believe me or my Instagram.
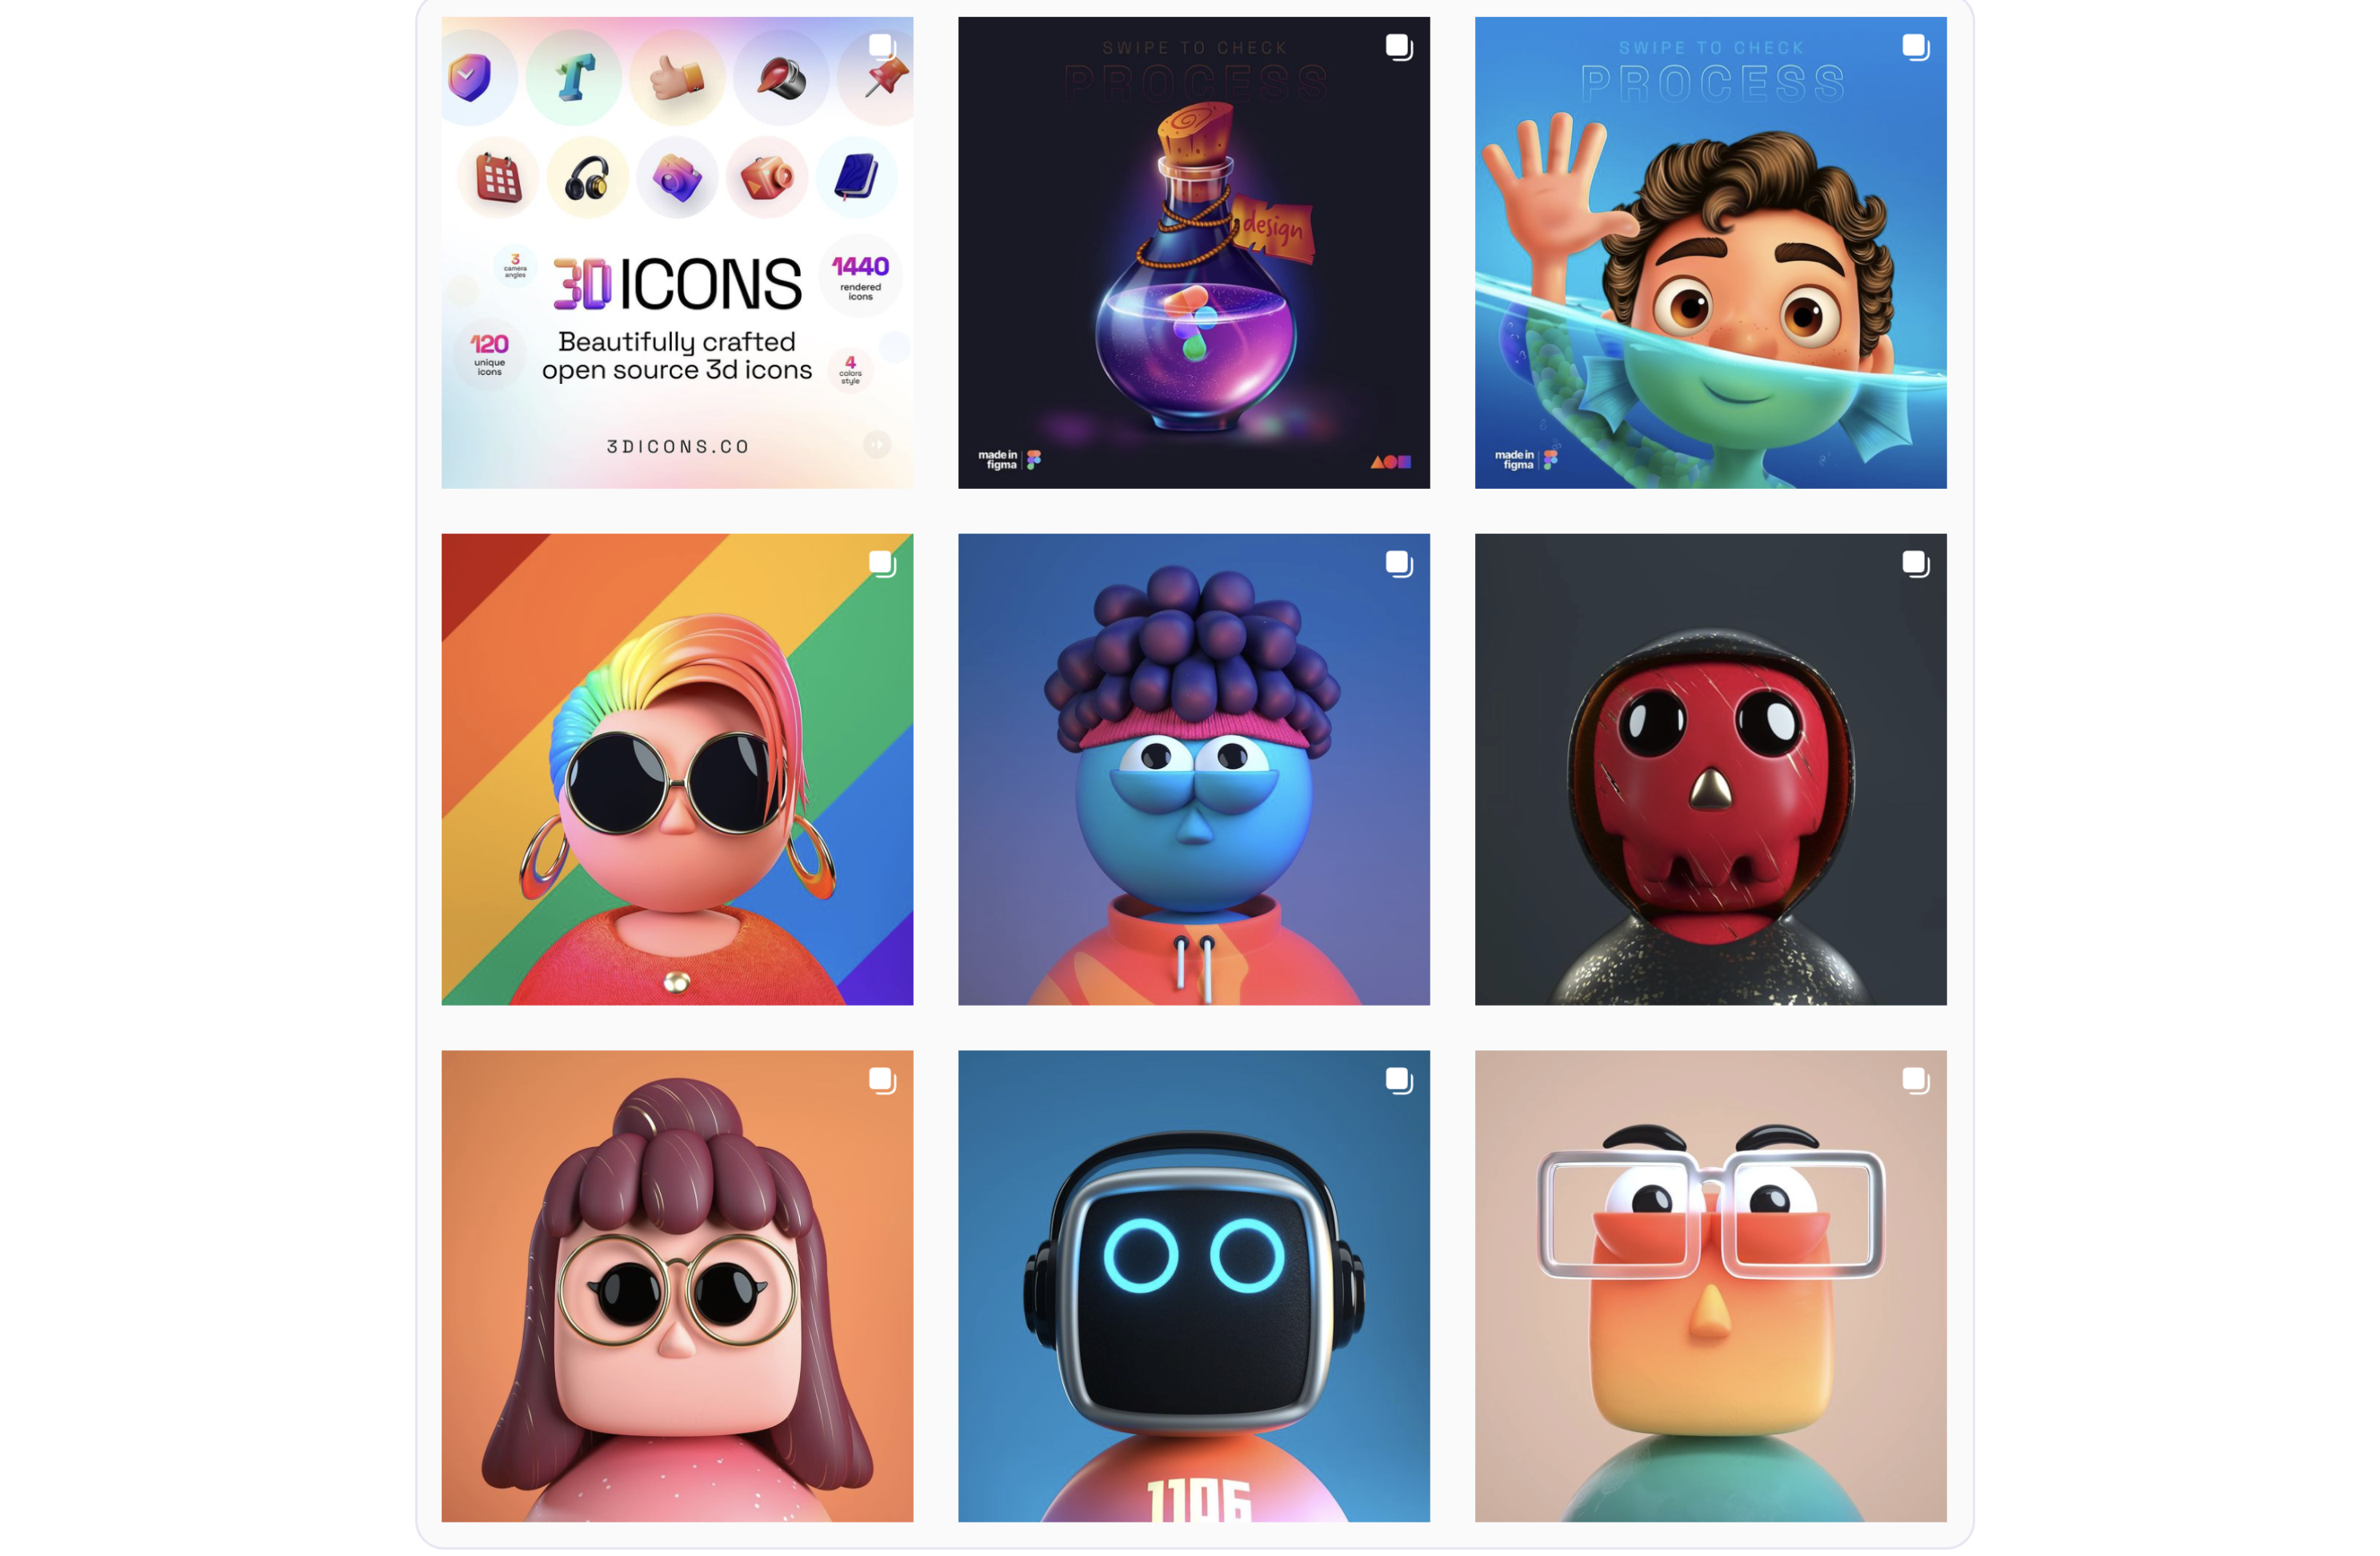
I did not have a problem when choosing colors, but in the 3D world, color intensity is affected by the light source, so this is an important thing to keep in mind. Additionally, I used to add gradients with light shades or complementary colors of the primary color rather than a direct “flat” color.
Key point:
Managing the same color for all angles is a challenge. I tried and failed a few times before finally fixing the colors and gradients for all icons. Also, I found that high contrast is a better option in Blender when you work with vibrant colors.
Rendering
It is quite challenging to render so many icons in four styles and at three different angles. Blender supports scripting, but it was difficult for me to learn too many things at the same time. Also, automatic rendering with the help of a script might not work for all icons due to their shape and angle — different icons will require different light amounts and intensity before being rendered. Therefore, the project was released later than expected.
Key points:
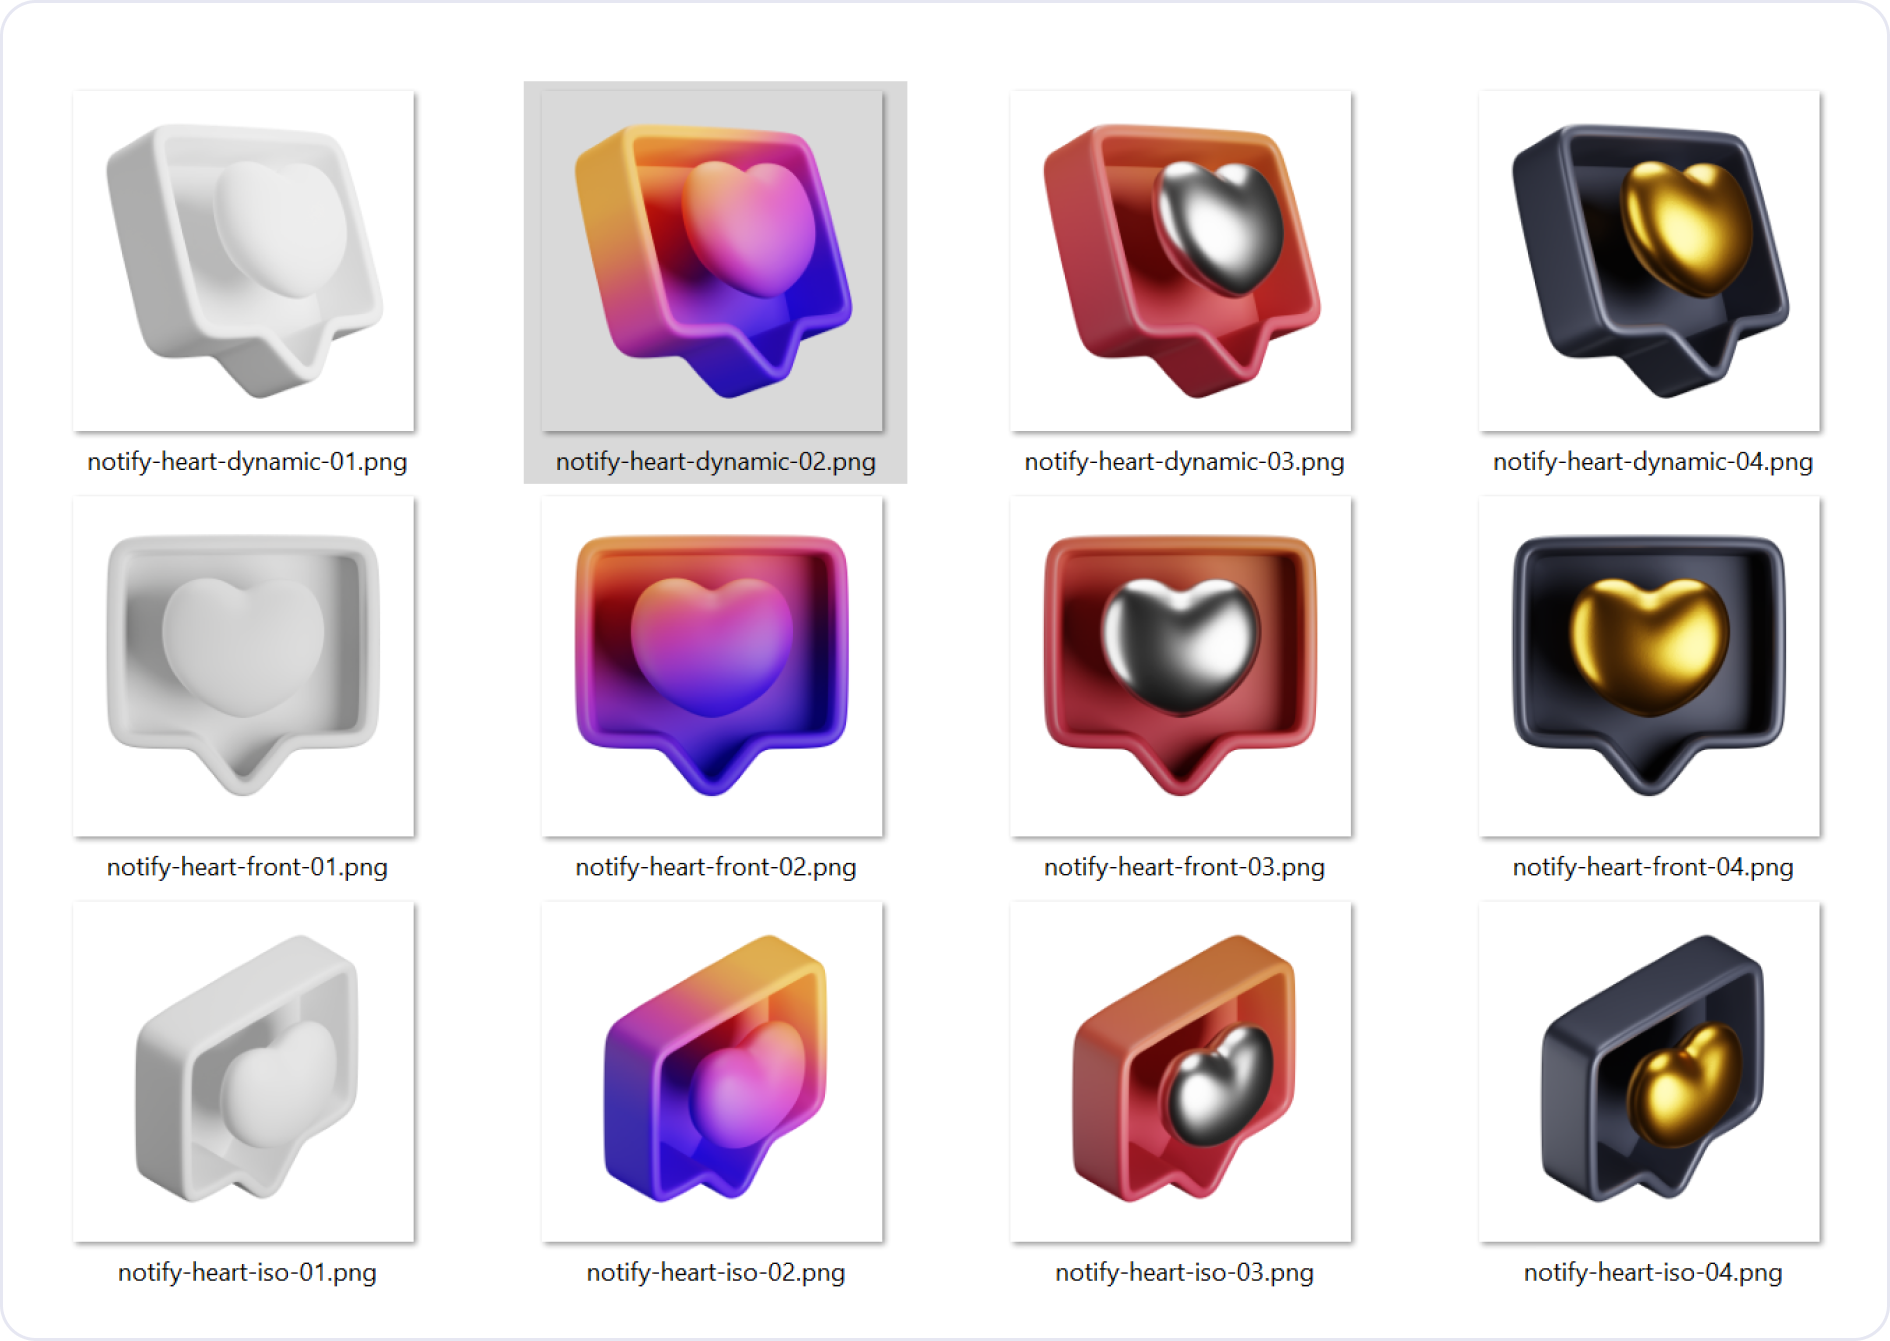
- In the end, I created two cameras: one Normal camera and the second TrueISO camera. I used the Normal camera to render the front and dynamic angles, while the TrueISO camera was used to shoot the icon in its isometric form.
- Rather than creating multiple cameras for the different angles, I used timelines and controlled the rotation and position of the objects.
- I used 800 samples to render all these icons. By increasing the icon sample size, the rendering times will also increase. Rendering a single image with a resolution of 2400 × 2400 pixels took 2-4 minutes.
Note: Samples are the noise that appears as your scene is rendering. In the Render panel, you define the number of samples, and then Blender stops once it reaches it. The more samples, the clearer the render will be, but it will also take a longer time to complete.
Compression and Post-processing
I tried to calculate the render times for the 120 icons in 12 variations (4 styles × 3 angles). When doing the first tests, at first, I was satisfied with the rendering at 3000x3000 px with 16-bit color depth. However, I discovered that one image file was about 15 MB in size. When I calculated the time and space needed for 1,200+ images rendered from different angles, I was shocked — I would need more than 8 GB in the storage space (including the source file), and also Figma couldn’t handle all those images in a single file either.
Key points:
- I could further optimize the images using Photoshop, but wouldn’t it be too time-consuming to add another step to the post-processing? Instead, I decided to change the resolution to 2400x2400 px, which is still quite large for an icon. Lastly, I changed the color depth to 8-bit and used 100% compression straight from Blender. And then, the single file size was reduced to 4 MB or less. The final icon library now was around 4 GB in size, which was manageable.
- At first, I planned to render each icon separately with different channels and arrange them all in Figma with the help of components; this would allow me to easily change colors, lighting, and shadows right in Figma. Unfortunately, Figma files became very heavy, and I had to abandon the idea.
Release
In total, more than two months of hard work (mostly done during the night) were needed to complete this project, from crafting the icons to rendering them and finally to hosting and building the project’s website.
Figma Community
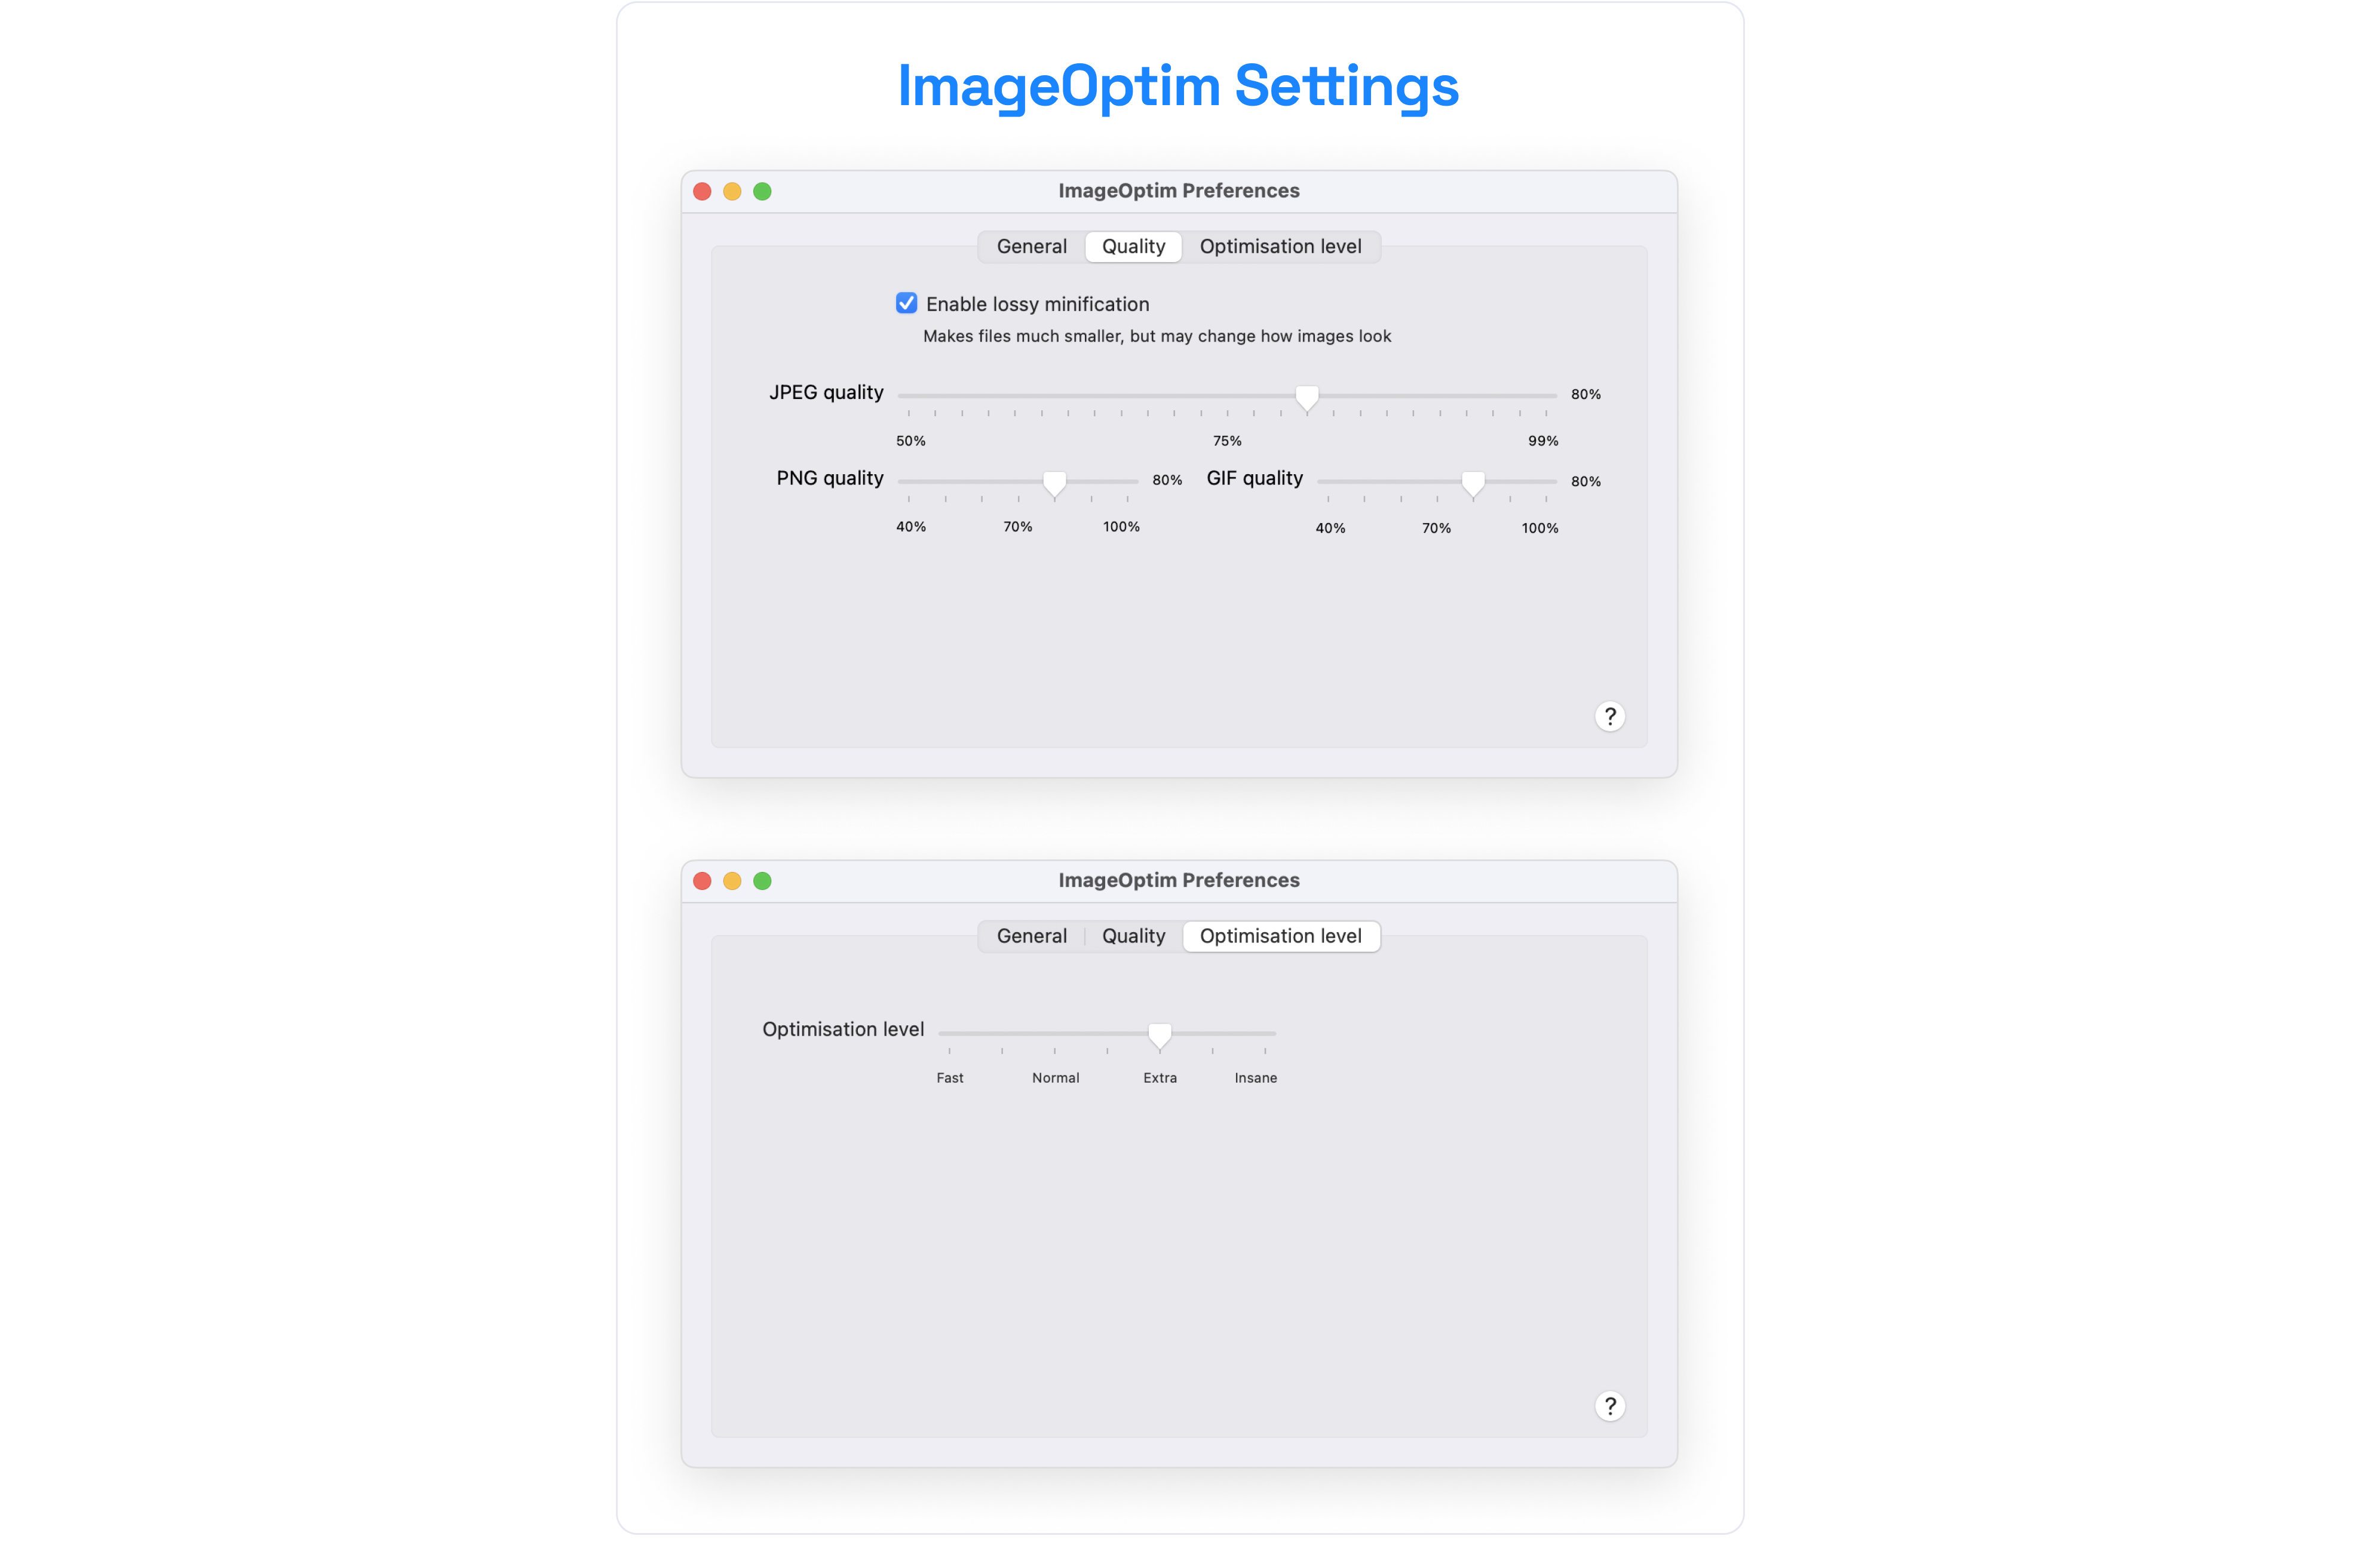
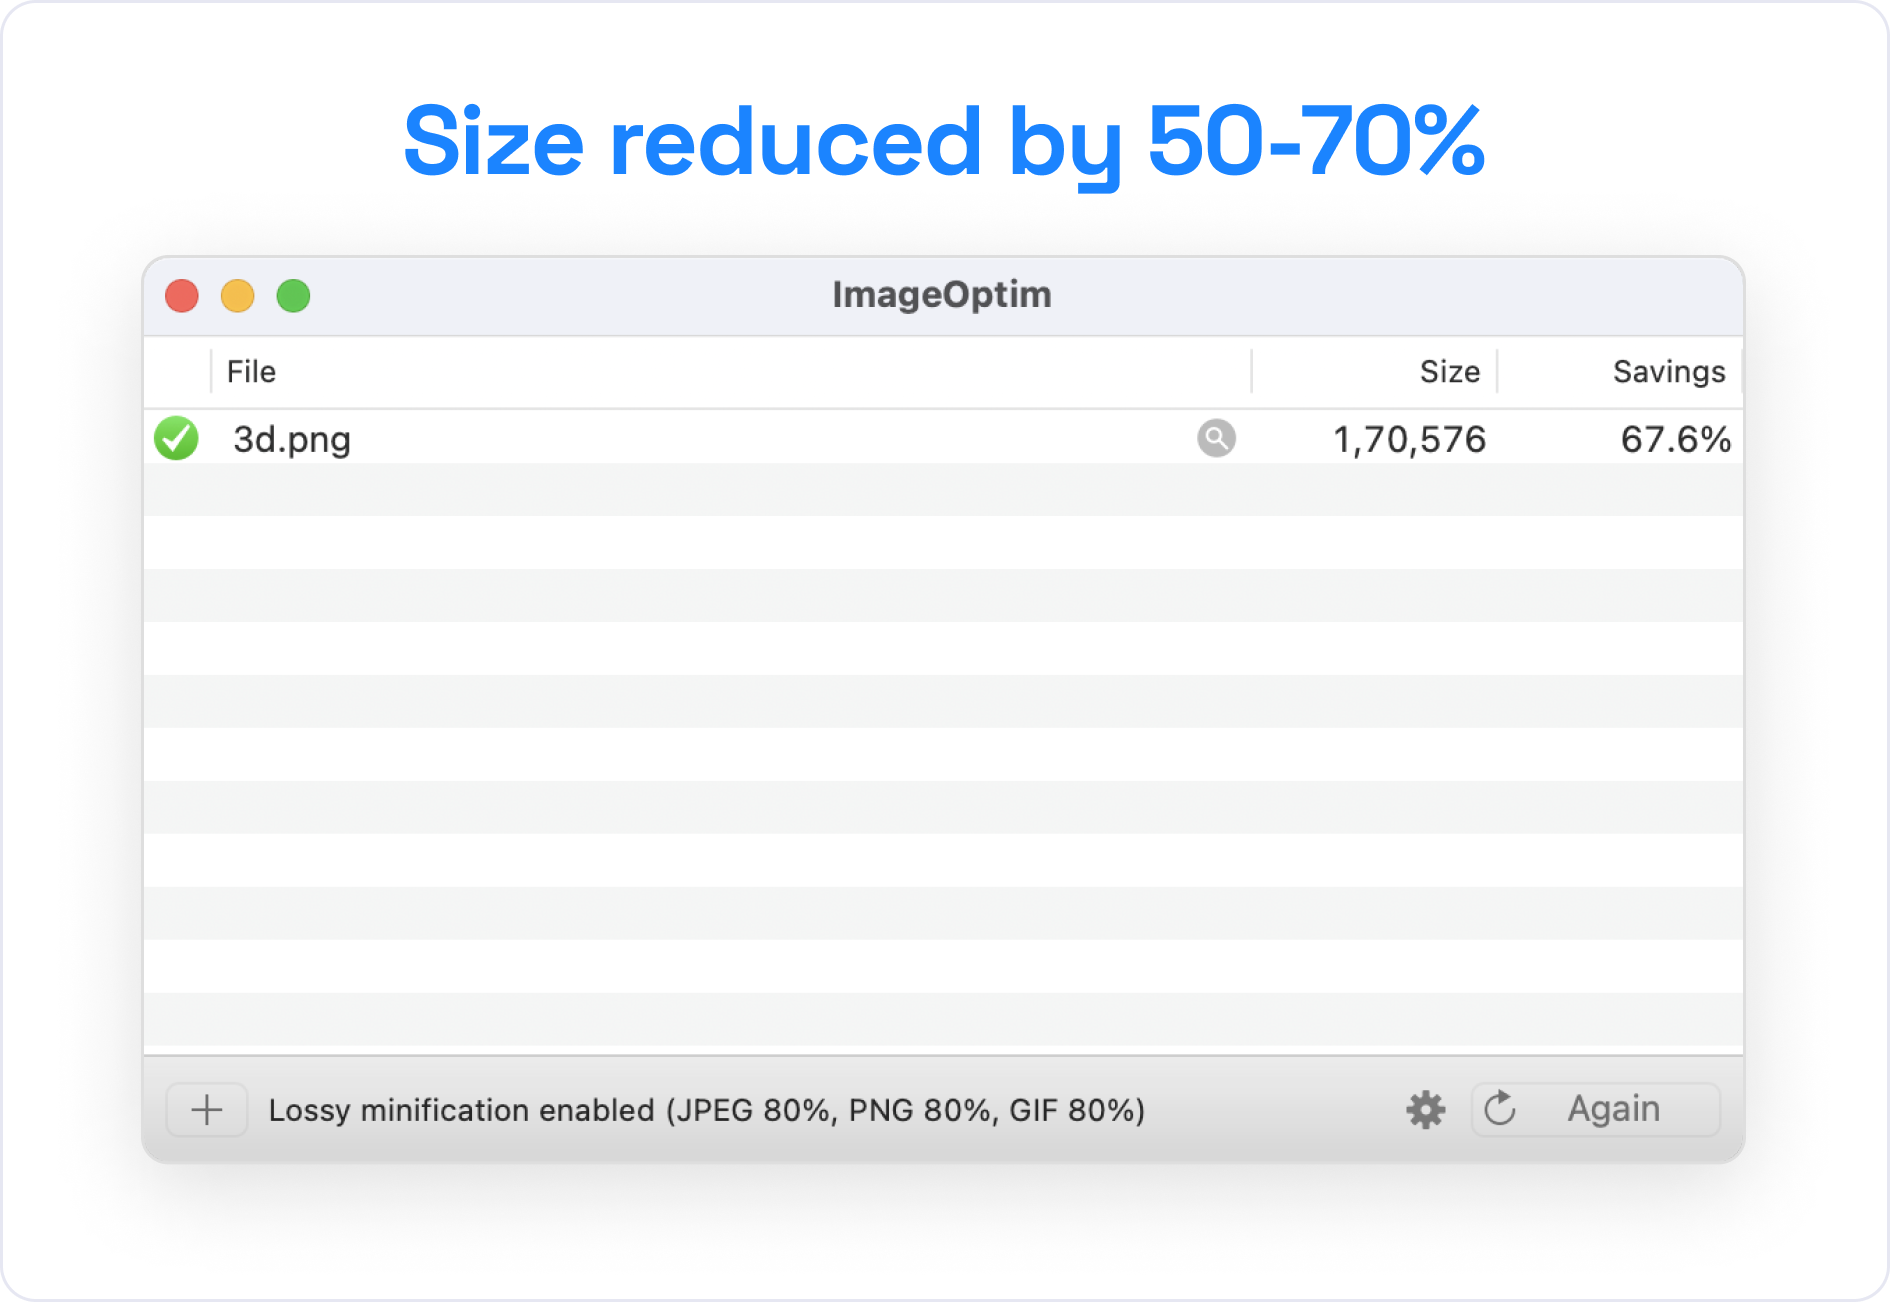
I had trouble creating more flexible versions of the Figma files as this icon set grew to more than 4 GB in size. Figma stopped responding as soon as I uploaded 300+ images, which is a lot of data! How did I solve this issue? I used ImageOptim to compress the images and then added them to Figma again. In addition, I dropped the idea of creating variations as the file size became excessively large. After that, I organized all the compressed 1000 × 1000 px images and shared them with the Figma community. (Eventually, I will create a customizable variant for Figma specifically, or maybe a plugin that will allow the icons to be easily imported and edited within Figma.)
ImageOptim: It is a powerful image lossless compression tool software that provides “lossless” compression services for PNG images, reducing file size by 60%–90%.
Here are the settings that I used to compress icons:
Hosting
I host all of my projects directly on GitHub pages, although I occasionally use other hosting services. The main question was where to host over 3 GB of data, so people can easily download the icons.
- Gumroad
As the first example, Gumroad doesn’t offer a free option for downloading files over 200 MB in size — if I hosted the project on Gumroad, I would need to charge for it at least 1$. So, I tried to explore a few other solutions. - Google Drive
It should work, but there are bandwidth limitations after some time. - Dropbox
Same, after a certain point, the bandwidth issue will come up. - AWS
I have used Amazon AWS in my experiential projects. Although usually a good solution, it’s quite complicated to set up. - Webflow
I tried it once, as I’m not a big fan of no-code solutions (at the moment). - Digital Ocean
After exploring a bit, I decided to store all my icons on the Digital Ocean hosting. It’s quite affordable at only 5$/month starting price. However, after running 3dicons for months, I discovered Digital Ocean is not an affordable solution after a certain bandwidth limit has been reached. I am charged 60-80 USD per month for the download bandwidth over 7 TB.
Hopefully, I will be able to find a better solution than the Digital Ocean hosting so that 3dicons may continue to provide frictionless downloads with an affordable maintenance/download fee. If you have any suggestions or you think you could help, message me on Twitter!
Website Domain
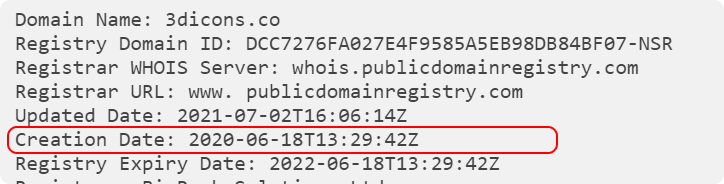
Honestly, I bought the 3dicons.co domain without any reason in 2020. Luckily for me, it was perfect for my new project!
Frontend
- Webflow
No doubt, a great no-code web solution. However, it limits my freedom to customize things, so I’m not a big fan, even though I have used it for clients. - Wix
Good for beginners. You can easily create sites by dragging and dropping. - Writing the code myself
I love coding all my projects. Most of my projects use the following stack:- Gatsby Framework
An easy and lightweight way to create static pages that can be directly hosted on GitHub pages. Gatsby is an open-source framework that combines functionality from React, GraphQL, and Webpack into a single tool. - GitHub pages
GitHub allows you to host static pages directly as well as add custom domains with SSL security without any additional cost.
- Gatsby Framework
Assets Creation
I use Figma Design for all my design needs, and the 3dicons project was no exception — I used Figma to help me create all the social media posts and Designs.
Conclusion and Download
Now, I do know quite a few things about 3D design, but it wasn’t so when I was only beginning to learn. At the start of the journey, I wasn’t familiar with how to handle 3D files and how to render them in such a way that there would be very few hiccups. Fast-forward a few months of learning and experiments, and I think that the most important thing is that the final outcome looks good and that I have hope that the community will like and support this project. As an example, recently, Morflax integrated 3dicons into their mesh project.
Note: The Morflax mesh lets you customize the colors of the icons and add scenes on the web without requiring the use of any complex 3D software. You can try the project for yourself.
Download
You can get the latest version of the icons from https://3dicons.co/, and as I have more plans for 3dicons (including adding a few more icons to the existing set), make sure to check the project’s website for updates.
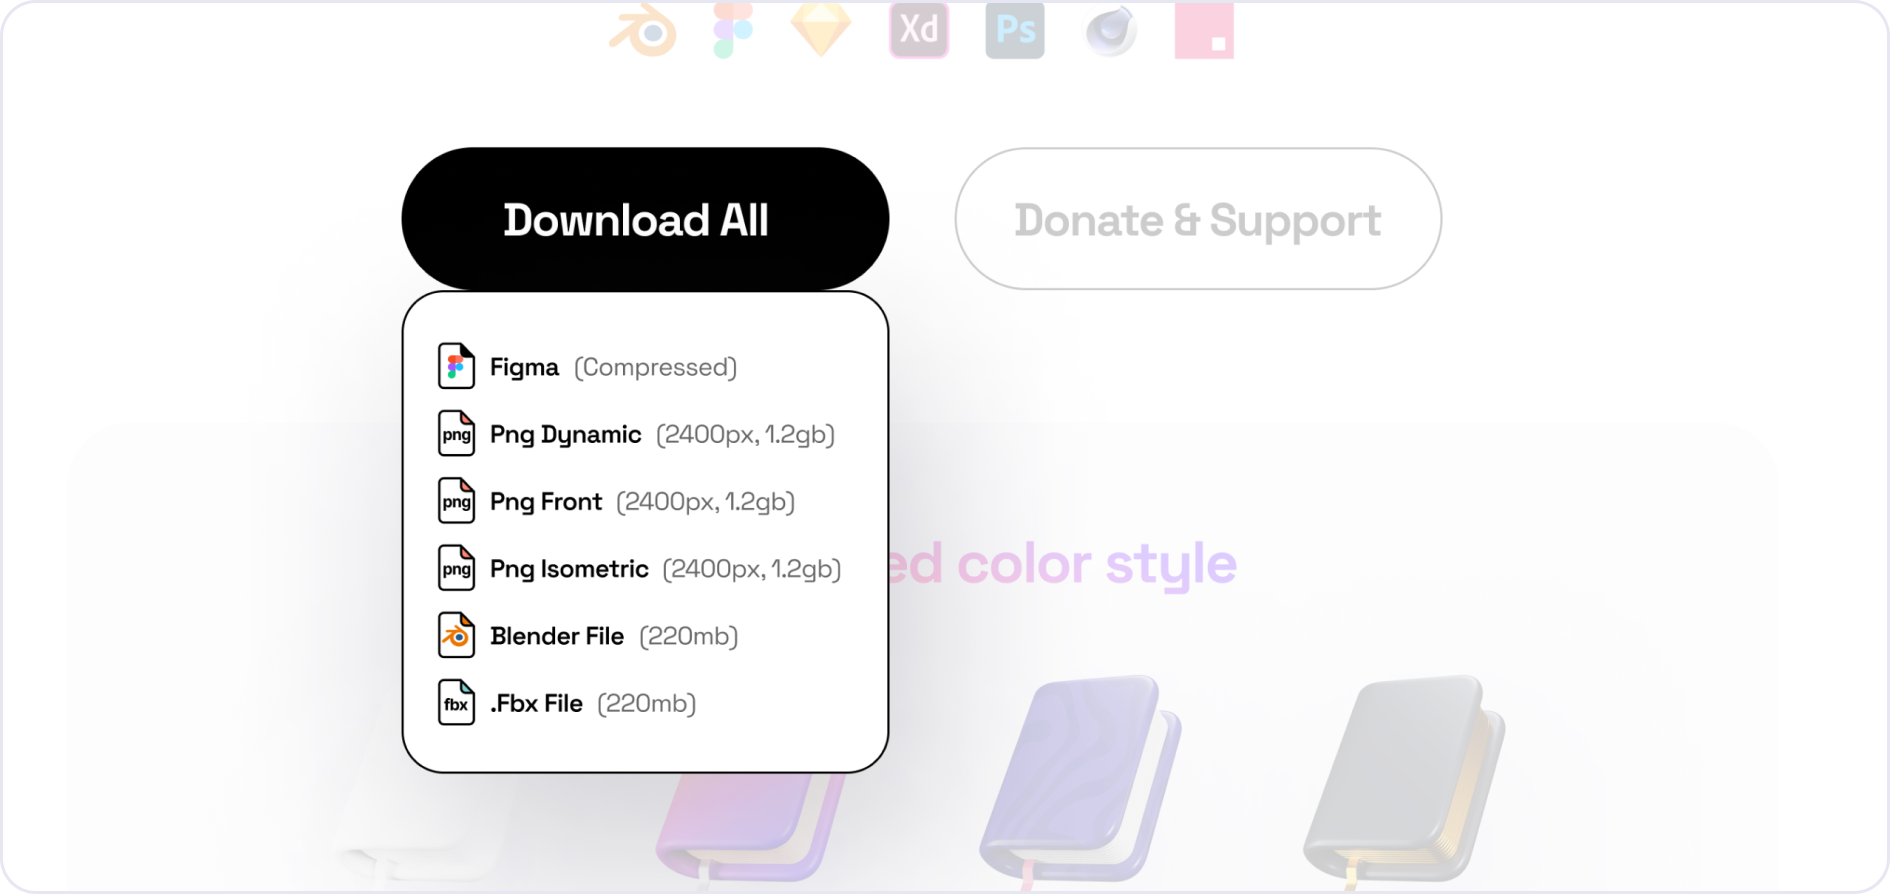
You can also download the icons set here:*Last updated in May 2022. For the latest versions, please check the 3dicons official webpage*
License
There are no restrictions on how you can use the 3dicons since they were released under a CC0 license (“No Rights Reserved”).
Need help?
There is a little FAQ Notion board that should help you when you want to change the icons and colors using Blender. You can also reach out to me on Twitter (@realvjy) for feedback and suggestions, and you can leave a comment here — I’d be happy to reply.


