How To Design An Open-Source iPhone Game
This article is the first in a series that will walk through iOS programming using this game as an example. This first article gives you an overview of the game and of iOS programming in general. We’ll look at a few specific pieces and see how the whole project fits together.
First Steps
This article uses the real game as the example. You’ll need a couple of things to start using the code:
- A Mac,
- The Xcode development environment from Apple, which you can get free from Apple.
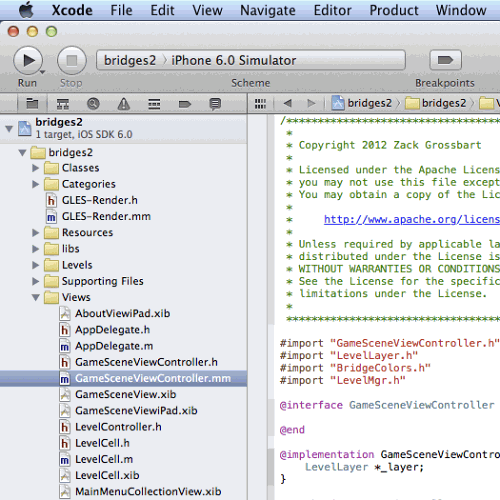
After you’ve set up Xcode, go ahead and download the project from GitHub. Open it, and then run it by pressing the big “Run” button in the upper-left corner of Xcode.
That will open the game in the simulator so that you can play for free and follow along with the article.
The Rules Of The Game
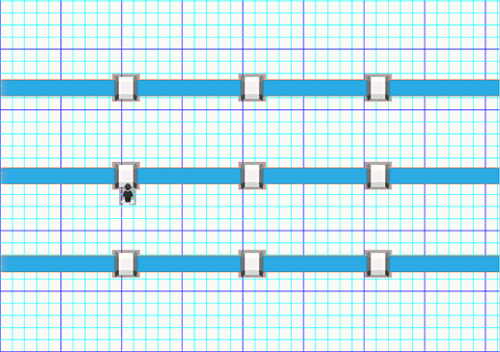
Seven Bridges is a puzzle game. The player visits a town of islands surrounded by rivers.
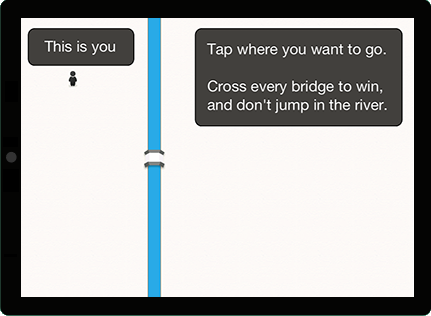
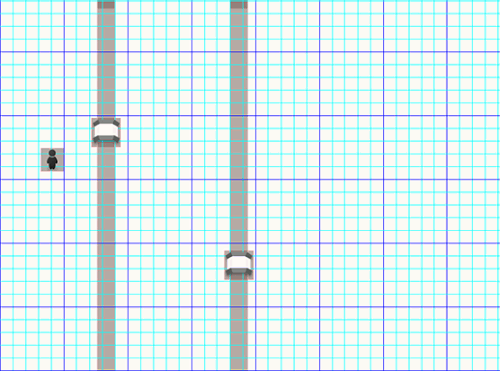
The game’s interaction works with a single gesture: tap where you want the player to go. If you hit a bridge, you’ll cross it; if you hit a river, you’ll bounce off it.
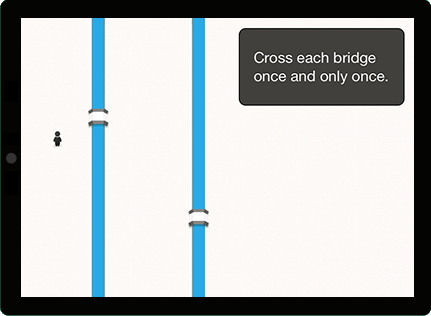
The game lets you restart the level, undo your last move and go back to the menu. There are also a few other screens to support the game.
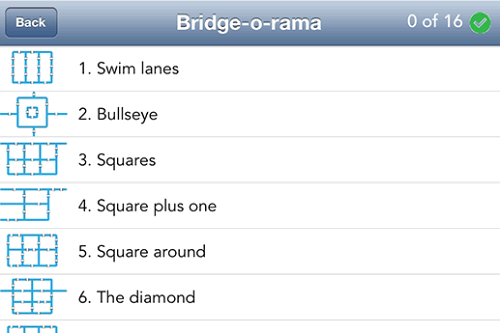
Confused? Check out the Seven Bridge walkthrough video.
You’ll see similar layouts in popular games such as Cut the Rope and Where’s My Water?
Before We Start
Seven Bridges is a simple game. It doesn’t handle complex physics like Angry Birds does or rich textures like Infinity Blade does. Seven Bridges has just a single player who walks over bridges and bumps into rivers. It sounds easy, but a lot goes into even a simple game like this.
Seven Bridges is written in a combination of Objective-C and Objective-C++. If you’re used to programming in scripting languages such as JavaScript, then Objective-C will come as a shock.
Programming For iOS
Getting started with JavaScript is easy. You start with a little jQuery behind a button and go from there. Many iPhone programming tutorials make it sound like writing iPhone applications is just as easy. It’s not.
Objective-C has been around for nearly 30 years. Programming with it entails learning a large ecosystem and some fundamental concepts of how it all holds together. All of the Objective-C documentation assumes that you have a strong background in both object-oriented programming and the C programming language.
Objective-C is very different from JavaScript, and programming with it requires an understanding of some of the old-school programming fundamentals. Make sure you’ve read a book about object-oriented programming, such as Object-Oriented Analysis and Design with Applications by Grady Booch, as well as The C Programming Language by Brian Kernighan and Dennis Ritchie. Reading “The Objective-C Programming Language” guide from Apple is also a good idea.
The news isn’t all bad. Objective-C shows its age in some areas, but the tools are well written and the runtime environment is amazing.
The Files
You already have the code on your computer, so let’s get a better idea of what we’re looking at. You can tell what each file does by looking at its extension.
.hThese files are class headers. Each of these files represents the public information available about a single class or object in the project..mThese files are Objective-C implementation files..mmThese files are Objective-C++ implementation files. Objective-C++ is a hybrid in which you can use parts of Objective-C and C++ in the same file. Seven Bridges uses Objective-C++ so that it can take advantage of frameworks written in C++..xibThese files define visual views in the game where you can lay out buttons and other controls..pngThese files are individual images used in the game..pvr.gzThese files contain large sets of images called sprite sheets. The images are combined into a single file so that they load faster and take up less space..plistThese are XML properties files. They define the basics of how the application works and the positions of the images in each sprite sheet..m4aThese are audio files that provide the sounds for the game.
Xcode projects also include a folder named your project.xcodeproj containing all of the project’s configuration files. Mine is named bridges2 because I messed up the project so badly that I had to start over.
The Frameworks
In addition to the standard Objective-C libraries, Seven Bridges uses three major frameworks.
UIKit
Every iOS application starts with UIKit. This comprehensive framework from Apple provides all of the basic controls your application uses, such as windows, buttons and text fields. Most of the classes in UIKit start with the prefix UI, like UIWindow and UIButton.
The easiest way to work with UIKit is by using the visual editor provided with Xcode. Xcode makes it easy to drag and drop controls into your application. It works well for business applications, but it wouldn’t know anything about the rivers or bridges in my game. For that, I need a gaming framework and a bit of code.
Cocos2d
You could draw on the screen directly with OpenGL, but that signs you up for a lot of work in managing each pixel on the screen. Game libraries provide higher-level support for placing images, creating animations and managing your game. There are a few for iOS.
I chose Cocos2d for iPhone because it’s well supported, has a simple API and comes with a lot of examples. It also has Ray Wenderlich’s excellent tutorials. Ray is a prolific writer about iOS games; every time I searched for a new topic, it led me back to him. His tutorial about collision detection provided the fundamentals for my game, and his simple iPhone game with a Cocos2D tutorial is a perfect little sample game.
Cocos2d handles all of the animations in my game, as well as the scenes where you’re actually playing; it also handles sprites, which we’ll get to a little later. It was originally written in Python for desktop applications, so make sure to search for “Cocos2d iPhone” when you’re looking for help on the Web. Cocos2d files start with the prefix CC.
Cocos2d handles user interactions, but it can’t handle interactions with objects. I need to know when the player runs into a river, bridge or any other object. That type of collision detection is made much easier with a physics library such as Box2d.
Box2d
Box2d is a physics engine written in portable C++. It can handle complex variables like gravity and friction, but we’re only using it for collision detection. Box2d files start with the prefix b2.
My game doesn’t use the complex physics of swinging candy from Cut the Rope or of sloshing liquids from Where’s My Water? It just handles a player walking around the screen and bumping into things. Box2d tells me when those bumps happen, and my code handles the rest.
In this article, we’ll see how to use these three frameworks together to build a scene, integrate sprites, respond to user gestures and detect collisions.
Building A Scene
The playable area of the game is drawn with LevelLayer, which extends the Cocos2d class CCLayerColor. This layer handles all of the drawing in the game and the responses when the user taps on the game screen.
The game is made up of a set of images called sprites. Each item in the game’s scene, such as a bridge or a piece of a river, is made up of a separate image file.
![]()
Images used this way, instead of being created programmatically, perform much faster and can include subtleties such as shading and texture without needing a lot of code. The technique also makes delegating artwork easier because the artist doesn’t need to know anything about Objective-C.
The sprites all fit together into a single file called a sprite sheet. Cocos2d takes that image and a properties file containing coordinates and creates the individual images from it when the application runs.
The real reason to use a sprite sheet is performance. Ray Wenderlich has written a good article comparing sprite sheet performance to individual images. The short story is that sprite sheets are much faster than images loaded individually.
Managing sprite sheets manually is a real pain, so I used TexturePacker. It costs a little money, but $25 is well worth the hours of adjusting pixel coordinates it saved me. TexturePacker can also convert a sprite sheet to PVR (the internal image format for iOS) and compress it with Gzip so that it loads even faster.
Once we’ve created the sprite sheet, we’re ready to add the sprites to a scene.
Adding the Sprites
Xcode makes it easy to drag and drop images into a view, but that won’t work for dynamic scenes like our game levels. We’ll need to write some code.
Cocos2d interprets our sprite sheet with the CCSpriteBatchNode class. We initialize the sprite sheet once for the application and then use the individual items when we build our level.
CCSpriteBatchNode *spriteSheet = [[CCSpriteBatchNode batchNodeWithFile:@"bridgesprites.pvr.gz"
                                 capacity:150] retain];
[[CCSpriteFrameCache sharedSpriteFrameCache]
addSpriteFramesWithFile:@"bridgesprites.plist"];
[self addChild:spriteSheet];
This code creates a new sprite sheet with our sprites file, initializes it with the properties file that defines the images in the sheet, and adds the sheet as a child to our current scene. You can see the full code for this in the init method of LevelLayer.mm.
Now that we have the sheet, we can use it to load individual sprites, like this:
CCSprite *bridge = [CCSprite spriteWithSpriteFrameName:@"bridge_v.png"];
[spriteSheet addChild:bridge];
bridge.position = ccp(100, 100);
This code snippet creates a new sprite from the sprite sheet, adds that sprite as a child of the sheet, and positions it 100 points from the left side of the screen and 100 points up from the bottom. (We’ll get to what “points” are in the next section.)
Cocos2d manages the sprite sheets with a caching mechanism it calls the sprite frame cache. We loaded the frame cache in the previous code snippet when we loaded the bridgesprites.pvr.gz sprite sheet file and the bridgesprites.plist file that describes it. Cocos2d loaded all of those images into the cache, and we can now get them by name.
All positions in Cocos2d are based on a coordinate system in which point 0,0 is in the bottom-left corner. UIKit puts the point 0,0 at the top left of the screen. There are a few places where we need to convert back and forth further in the code.
Instead of using points directly, the game uses a tile system to position the sprites.
Pixels, Points and Tiles
iOS supports five devices:
- iPhone 3.5 inch
- iPhone 3.5 inch with Retina display
- iPhone 4 inch with Retina display
- iPad
- iPad with Retina display
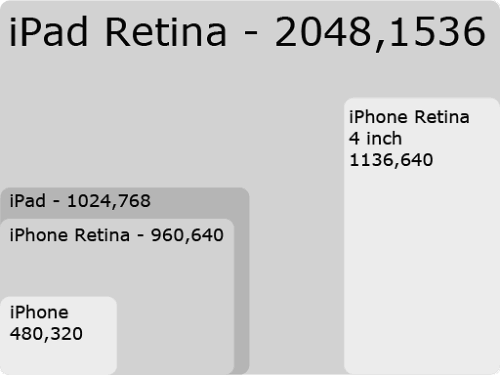
Supporting every device means handling multiple layouts. Cocos2d gives us a lot of help here by supporting points instead of pixels when specifying layout. Pixels represent an exact screen location, whereas points are relative to the device. This makes it easy to support Retina devices whose screens are the same size but pack in twice as many pixels.
Seven Bridges goes farther by defining a tile system. Tiles are a way of grouping pixels into larger squares for easier layout. We make the screen 28 tiles tall and at least 42 tiles wide. The tiles make it easy to define where the sprites go on each level. Switch the DEBUG_DRAW constant in Bridgecolors.h to true and you’ll be able to see the tile grid in the background of each level.
Touches and Interactions
UIKit handles touches on controls such as buttons and tables, but for the game scene we’ll need a generic touch handler. Cocos2d provides that with the ccTouchesEnded method. First, we have to tell Cocos2d that we want touch events, like this:
self.isTouchEnabled = YES;Then, we implement the ccTouchesEnded method to get called whenever the user taps the screen.
-(void)ccTouchesEnded:(NSSet*) touches withEvent:(UIEvent*) event {
   UITouch *touch = [touches anyObject];
   CGPoint location = [touch locationInView:[touch view]];
   location = [[CCDirector sharedDirector] convertToGL:location];

   // Do some stuff with the point that the user touched…
}
LevelLayer handles each screen touch with some simple logic:
- If the player isn’t on the screen yet, then place the player sprite where the user has touched and return.
- If the player is on the screen, then move the player from the current location to the place where the user has touched.
That’s all we need to do for the touch. The real logic of the game happens when we handle the collisions.
Boxes and Collisions
Each object on the screen is a sprite: a little image file that sits at particular coordinates on the screen. Cocos2d can handle the position and animation of those images, but it won’t know if they run into each other. This is where Box2d shines.
The LayerMgr class adds and removes all of the images from the layers in the game. When it adds an image, it also creates a box around it. Boxes are the fundamental concept of Box2d. They outline the position of an object on the screen and detect when it interacts with other objects. Box2d supports complex box shapes, but all of the boxes in this game are rectangles.
Whenever we add an image to the scene, we draw a box around it with Box2d. The box works with a helper class called a contact listener. This listener sits in a timer and asks the Box2d model if any of the objects have run into each other after each frame of the game.
The contact listener implements two important functions: BeginContact and EndContact. These functions are called when two objects come into contact and when that contact stops. When that happens, we save the data so that we can use it in the layer that renders the level.
void MyContactListener::BeginContact(b2Contact* contact) {
    MyContact myContact = { contact->GetFixtureA(), contact->GetFixtureB() };
    CCSprite *spriteA = (CCSprite *) contact->GetFixtureA()->GetBody()->GetUserData();
    CCSprite *spriteB = (CCSprite *) contact->GetFixtureB()->GetBody()->GetUserData();
    if (spriteA.tag == PLAYER || spriteB.tag == PLAYER) {
        _contacts.push_back(myContact);
    }
}

void MyContactListener::EndContact(b2Contact* contact) {
    MyContact myContact = { contact->GetFixtureA(), contact->GetFixtureB() };

    std::vector::iterator pos;
    pos = std::find(_contacts.begin(), _contacts.end(), myContact);
    if (pos != _contacts.end()) {
        _contacts.erase(pos);
    }
}
Once we’ve stored the data about the collisions, we use it every time we draw the level.
CCSprite *spriteA = (CCSprite *) bodyA->GetUserData();
    CCSprite *spriteB = (CCSprite *) bodyB->GetUserData();

    if (spriteA.tag == RIVER && spriteB.tag == PLAYER) {
        [self bumpObject:spriteB:spriteA];
    } else if (spriteA.tag == BRIDGE && spriteB.tag == PLAYER) {
        [self crossBridge:spriteB:spriteA];
The contact listener gives us the two sprites that collided, and we’ll use the tag of each sprite to determine how to handle it. When two sprites run into each other, we react with some simple logic:
- If the player contacts a river, then bounce back.
- If the player contacts a bridge, then check whether the bridge has been crossed.
- If the bridge is crossed, then bounce back.
- If the bridge isn’t crossed, then cross it and move the player to the other side.
Separating the player’s movement from the collision makes it easy to move the player around the screen. We don’t have to define islands or worry about managing where the player is allowed to move. We just place each sprite in the level and wait for the player to run into it.
Defining Levels
Each level in the game is defined in a separate JSON document. Separating the level definitions from the code is important so that we can update the levels or add new ones without having to change the code.
Each level defines a name, an ID and a set of objects that go in the level.
{
    "level": {
        "name": "Hello Bridges!",
        "rivers": [
            {
                "x": "14",
                "y": "b-t",
                "orient": "v"
            }
        ],
        "bridges": [
            {
                "x": "14",
                "y": "m",
                "orient": "h"
            }
        ]
    }
}
Each object has a coordinate in the tile system and a set of properties that define how the object works. For example, a bridge specifies an orient property to determine whether the bridge is horizontal or vertical and a color property to determine whether the bridge has a particular color. A separate page defines everything you can put in a level.
Many games define levels in XML, but I chose JSON because it’s faster to parse and works better with the Web. One day, I’d like to create a mode in which you can load new levels from a website without having to download a new version of the game.
The Level class defines each level; levels are controlled by a LevelMgr. The level manager loads the levels, sorts them for the menu and creates the thumbnails of each level on the menu screen.
Seven Bridges does a lot more, but this is a good place to stop for the first article.
What’s Next
This article has walked us through some of the core parts of games for iOS, but there’s a lot more. You can get Seven Bridges (not free) or download the source code and run it for free in the simulator.
We’ve reviewed the major frameworks, looked at the anatomy of a game, and learned the basics of user interactions. In the next article, we’ll delve deeper into the pieces and see how they all fit together.
Further Reading
- Creating Realistic iPhone Games With Cocos2D
- How To Build A SpriteKit Game In Swift 3
- Develop A One-Of-A-Kind CSS / JS-Based Game Portfolio
- Finger-Friendly Design: Ideal Mobile Touchscreen Target Sizes


 Register For Free
 JavaScript Form Builder — Create JSON-driven forms without coding.
 Get a Free Trial
 Enterprise UX Masterclass, with Marko Dugonjic
 Devs love Storyblok - Learn why!