Submitting Forms Without Reloading The Page: AJAX Implementation In WordPress
If you have ever wanted to send a form without reloading the page, provide a look-ahead search function that prompts the user with suggestions as they type, or auto-save documents, then what you need is AJAX (also known as XHR). A behind-the-scenes request is sent to the server, and returning data to your form. Whenever you see a loader animation after you have made some action on the page, it’s probably an AJAX request being submitted to the server.
In this article, I’m going to guide you through the entire process of creating and handling AJAX calls. You will learn not only how to make an AJAX call, but also how to do it the best way using features that WordPress offers developers right out of the box. We will build a simple plugin which will allow readers to send a report to the administrator with information about any bug they may spot on your website.
At the end of the article, you can download the working example and examine the code in full.
Let’s dig in!
AJAX
“Without reloading the page” is the key sentence here. AJAX stands for Asynchronous JavaScript And XML because initially, the data returned from the server is supposed to be in XML. However, it’s easier to send them in JSON, which JavaScript likes more.
We are going to use AJAX to send an email. You cannot do it from the front-end, so you have to call the back-end. Usually, we would send a POST request to the server, handle it and redirect the user back to the page with the form. In this iteration, we don’t want to reload the page. Instead, we are calling the backend directly where we’re going to capture the form data with JavaScript, then send an asynchronous request to the server to handle the response.
There are three things which WordPress AJAX needs to work — five of them to work well. These are:
- Object for the AJAX action
- JavaScript script
- WordPress action
- Protection
- Error handling
Let’s take a closer look at each of them.
Object
Our object is the form. This is our thing to handle with JavaScript. I started with creating a file with header needed by WordPress plugin and putting an empty object inside. In the end, I’m creating a new instance of the plugin’s class.
<?php
/*
Plugin Name: Report a bug
Description: Allow your visitors to report a bug in your articles
Author: Jakub Mikita
Author URI: https://underdev.it
Version: 1.0
License: GPL2
Text Domain: reportabug
*/
class Report_a_bug {
}
new Report_a_bug();
Even though I’m using some OOP here, we are not going to utilize any advanced practices. The code would work just as well when written procedurally with separate functions. But objects within WordPress plugins have one advantage: You don’t have to prefix your functions — only the class name has to be unique.
Let’s display our form to the users. We are going to hook into the the_content filter and embed the form at the end of every post. In class’ constructor I added the filter:
public function __construct() {

    add_filter( 'the_content', array( $this, 'report_button' ), 10, 1 );

}
And created a callback method with form HTML:
public function report_button( $content ) {

    // display button only on posts
    if ( ! is_single() ) {
        return $content;
    }

    $content .= '<div class="report-a-bug">
                    <button class="show-form" data-post_id="' . get_the_ID() . '">' .
                        __( 'Report a bug', 'reportabug' ) .
                    '</button>
                    <textarea class="report-a-bug-message" placeholder="' . __( 'Describe what\'s wrong...', 'reportabug' ) . '"></textarea>
                    <p class="report-a-bug-response"></p>
                </div>';

    return $content;

}
The form has all the needed markup:
- A button to show the form and send the message;
textarea;- Container for the response (we are going to use this later).
Button has the data-post_id attribute which stores the current post ID. We will grab this in the JavaScript to identify the article.
We only need some basic styling, so let’s register our own stylesheet with wp_enqueue_scripts action and the corresponding callback:
public function __construct() {

    add_filter( 'the_content', array( $this, 'report_button' ), 10, 1 );

    add_action( 'wp_enqueue_scripts', array( $this, 'scripts' ) );

}

function scripts() {

    wp_enqueue_style( 'report-a-bug', plugin_dir_url( __FILE__ ) . 'css/style.css' );

}
The stylesheet itself is very simple. We want to tidy up the design.
.report-a-bug-message {
    display: none;
    margin-top: 1em;
}

.report-a-bug-response {
    margin-top: 1em;
}
This is how the button looks:

Script
We have our object ready to put some life in it. Instead of doing it in plain JavaScript we are going to use jQuery which WordPress loads by default on every page.
In the existing scripts method, I’ll add the JS file using wp_enqueue_script function.
function scripts() {

    wp_enqueue_style( 'report-a-bug', plugin_dir_url( __FILE__ ) . 'css/style.css' );

    wp_enqueue_script( 'report-a-bug', plugin_dir_url( __FILE__ ) . 'js/scripts.js', array( 'jquery' ), null, true );

    // set variables for script
    wp_localize_script( 'report-a-bug', 'settings', array(
        'send_label' => __( 'Send report', 'reportabug' )
    ) );

}
I’m also using the wp_localize_script function to pass the translated button label to JS. We don’t have any gettext functions in JavaScript, so we have to do it here. This function will create the settings object which can be accessed directly from our script.
In our script, we are going to listen for a button click. Once that happens we will show the textarea and switch the button class to listen for the second click which is sending the form.
( function( $ ) {

    $( document ).ready( function() {

        $( '.report-a-bug' ).on( 'click', '.show-form', function( event ) {

            // change label and switch class
            $( this ).text( settings.send_label ).removeClass( 'show-form' ).addClass( 'send-report' );

            // show textarea
            $( '.report-a-bug-message' ).slideDown( 'slow' );

        })

    });

})( jQuery );
Here’s the current progress:
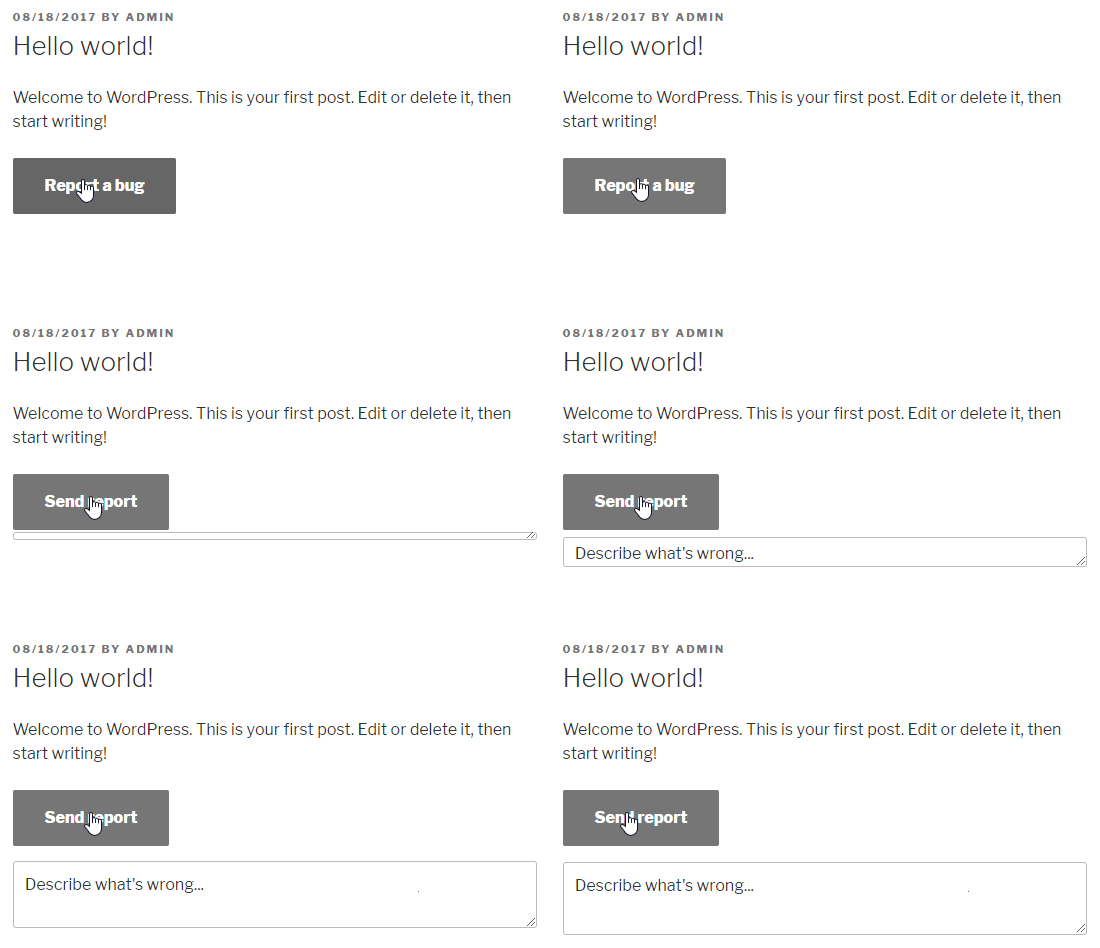
textarea drop-down on clickIt’s the best time to create the AJAX request!
AJAX Requests To WordPress
To send an AJAX request, you really need only one-and-only parameter: the requested URL. WordPress has the special file for AJAX, so we don’t have to create our own. It’s /wp-admin/admin-ajax.php.
As long as we are in the wp-admin area, this file URL is available in JS in the ajaxurl variable. On the front-end, we have to pass this variable on our own. Luckily we already used the wp_localize_script function, so we can just add another key to it:
wp_localize_script( 'report-a-bug', 'settings', array(
    'ajaxurl'    => admin_url( 'admin-ajax.php' ),
    'send_label' => __( 'Send report', 'reportabug' )
) );
We have prepared all the variables so let’s create the AJAX call. We are going to send it once the user clicks the button a second time.
$( '.report-a-bug' ).on( 'click', '.send-report', function( event ) {

    var $button = $( this );

    $button.width( $button.width() ).text('...');

    // set ajax data
    var data = {
        'action' : 'send_bug_report',
        'post_id': $button.data( 'post_id' ),
        'report' : $( '.report-a-bug-message' ).val()
    };

    $.post( settings.ajaxurl, data, function( response ) {

        console.log( 'ok' );

    } );

} );
We are listening for a click on class we switched on the button before.
As you can see, I’m changing the button text to “…” Why? Because it’s good practice to show the user that something is happening. AJAX requests depend on the server performance and will take some time. Maybe 30ms, but maybe also 3 seconds. If after clicking the button there seems to be no effect, most likely the button will be clicked a second time. This would duplicate the request because as you now know, these are asynchronous.
Next up, I’m creating the data object. This contains all the variables which will be sent to the server callback. The WordPress admin-ajax.php file requires the action property. This has to be unique unless you want the other plugin to handle your requests. The remainder of the parameters is optional. I’m sending the post ID and the report message from textarea.
We then are calling the $.post method. Next, you guessed it; it’s sending the POST request. It’s a shorthand method, but you can use $.ajax method as well, which has more options. As a first parameter we have to pass our handler file URL, then the parameters and then the success callback function. This is the place where we are handling the response. For now, we are just sending the simple message to the browser’s console.
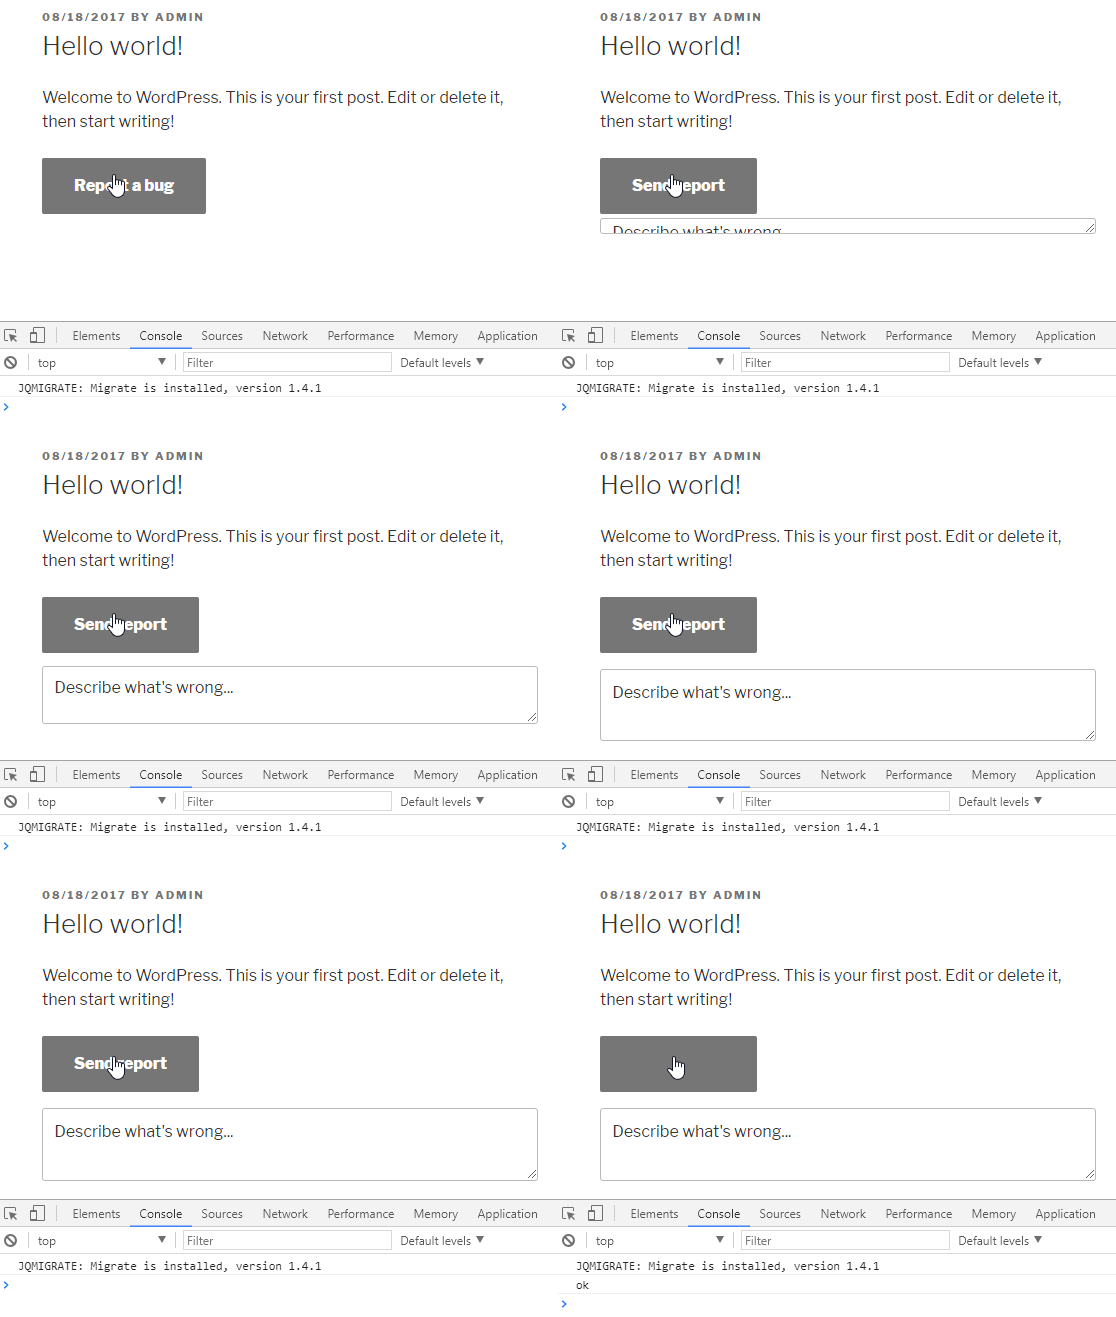
We are ready to handle the request on the back-end.
WordPress Action
You may be wondering how do we hook into the admin-ajax.php. With action, of course! WordPress has two action types:
wp_ajax_nopriv_{$action}
wp_ajax_{$action}
Where the $action is, the action name passed in AJAX params. It’s send_bug_report in our case.
First of these actions will be executed only for not logged-in users. The second one only for logged-in users. So if you want the request to be handled for both, you have to define both. This is what I’ve done in the class’ constructor:
public function __construct() {

    add_filter( 'the_content', array( $this, 'report_button' ), 10, 1 );

    add_action( 'wp_enqueue_scripts', array( $this, 'scripts' ) );

    add_action( 'wp_ajax_nopriv_send_bug_report', array( $this, 'send_bug_report' ) );
    add_action( 'wp_ajax_send_bug_report', array( $this, 'send_bug_report' ) );

}
In the callback, I’m just getting the post title, and I’m sending the email:
function send_bug_report() {

    $data = $_POST;

    $post_title = get_the_title( intval( $data['post_id'] ) );

    wp_mail( 'admin@ema.il', 'Bug report in post: ' . $post_title, $data['report'] );

    wp_send_json_success( __( 'Thanks for reporting!', 'reportabug' ) );

}
The most important part in terms of handling AJAX in WordPress is the last function - wp_send_json_success which prints the JSON encoded output and dies. All we need to grab the response with AJAX success callback. It has also a twin brother, wp_send_json_error, but we’ll get to that part later.
The object from these functions has two properties:
- success
Is a boolean and depends if you call it success or error function. - data
If you provide the parameter for the function.
That’s all from on the back-end side. Let’s handle the response in JS.
We are going to remove the button and textarea and display a message returned from the server in the container we prepared before:
$.post(settings.ajaxurl, data, function(response) {

    // remove button and textarea
    $button.remove();
    $('.report-a-bug-message').remove();

    // display success message
    $('.report-a-bug-response').html( response.data );

});
And that’s it! We have the working AJAX call! But don’t stop there. Our request is not secure and certainly not user-friendly. We have to make sure the request is executed only when it has to.
Protection
Nonce
The nonce is a “number used once.” It’s a short hash created from an input string. We can use it to validate the request — if it really has been made by WordPress and no one fakes it.
We are going to use another data attribute for the button:
$nonce = wp_create_nonce( 'report_a_bug_' . get_the_ID() );

$content .= '<div class="report-a-bug">
                <button class="show-form" data-nonce="' . $nonce . '" data-post_id="' . get_the_ID() . '">' .
                    __( 'Report a bug', 'reportabug' ) .
                '</button>
                <textarea class="report-a-bug-message" placeholder="' . __( 'Describe what\'s wrong...', 'reportabug' ) . '"></textarea>
                <p class="report-a-bug-response"></p>
            </div>';
As you can see, I’m adding the post ID to the input string. We will have this ID available in the AJAX request properties, so it’s just more secure.
Now we have to add the nonce to AJAX properties:
// set ajax data
var data = {
    'action' : 'send_bug_report',
    'post_id': $button.data('post_id'),
    'nonce'  : $button.data('nonce'),
    'report' : $('.report-a-bug-message').val()
};
Now we will validate it in the backend using the check_ajax_referer function, which WordPress provides:
function send_bug_report() {

    $data = $_POST;

    // check the nonce
    if ( check_ajax_referer( 'report_a_bug_' . $data['post_id'], 'nonce', false ) == false ) {
        wp_send_json_error();
    }

    $post_title = get_the_title( intval( $data['post_id'] ) );

    wp_mail( 'admin@ema.il', 'Bug report in post: ' . $post_title, sanitize_text_field( $data['report'] ) );

    wp_send_json_success( __( 'Thanks for reporting!', 'reportabug' ) );

}
To validate the request we have to regenerate the input string, so I’m using the post_id key sent from AJAX. The second parameter is the key in the $_REQUEST array. Third controls the automated wp_die if nonce is not matching.
I don’t want it to die itself. Instead, I’m catching the result of this function and sending JSON error in a nice object.
You may also notice the usage of the sanitize_text_field function in email message parameter. This is just to make sure user will not send any harmful scripts or HTML.
Lastly, we need to wrap the AJAX success callback in JS in if statement to check if the request was successful:
$.post(settings.ajaxurl, data, function(response) {

    if ( response.success == true ) {

        // remove button and textarea
        $button.remove();
        $('.report-a-bug-message').remove();

        // display success message
        $('.report-a-bug-response').html( response.data );

    }

});
Button Protection
You know that user can click the button second time, before AJAX will finish the call. But there’s one simple trick which will block the second click - disabling the button. So after the click, I’m going to block it and unblock it after getting the response:
$('.report-a-bug').on('click', '.send-report', function(event) {

    var $button = $(this);

    $button.width( $button.width() ).text('...').prop('disabled', true);

    // set ajax data
    var data = {...};

    $.post(settings.ajaxurl, data, function(response) {

        if ( response.success == true ) {...}

        // enable button
        $button.prop('disabled', false);

    });

});
Error Handling
Validation
What if the user tries to send an empty message? I don’t want to be bothered with such emails. Let’s block these attempts with validation techniques.
In JS I’m going to add a simple validation, to show the user that something went wrong. If the message is empty the user will see the red border around the textarea. If a message is present there, we are restoring the neutral border:
$('.report-a-bug').on('click', '.send-report', function(event) {

    var $button = $(this);

    // check if message is not empty
    if ( $( '.report-a-bug-message' ).val().length === 0 ) {
        $( '.report-a-bug-message' ).css( 'border', '1px solid red' );
        return false;
    } else {
        $( '.report-a-bug-message' ).css( 'border', '1px solid rgba(51, 51, 51, 0.1)' );
    }

    // ... ajax

});
Checking For Errors In WordPress Action
We may also have a problem with sending the email. If we don’t check the result of the wp_mail function, the user will get a success message even though no email was sent.
Let’s handle this:
function send_bug_report() {

    $data = $_POST;

    // check the nonce
    if ( check_ajax_referer( 'report_a_bug_' . $data['post_id'], 'nonce', false ) == false ) {
        wp_send_json_error();
    }

    $post_title = get_the_title( intval( $data['post_id'] ) );

    $result = wp_mail( 'admin@ema.il', 'Bug report in post: ' . $post_title, sanitize_text_field( $data['report'] ) );

    if ( $result == false ) {
        wp_send_json_success( __( 'Thanks for reporting!', 'reportabug' ) );
    } else {
        wp_send_json_error();
    }

}
As you see we have used the wp_send_json_error function twice, but there’s no need to display unique messages for users. Instead, passing the exact error description, I’m going to add another key to our script settings object which will cover both errors:
// set variables for script
wp_localize_script( 'report-a-bug', 'settings', array(
    'ajaxurl'    => admin_url( 'admin-ajax.php' ),
    'send_label' => __( 'Send report', 'reportabug' ),
    'error'      => __( 'Sorry, something went wrong. Please try again', 'reportabug' )
) );
All that is left to do is display the error to the user:
$.post( settings.ajaxurl, data, function( response ) {

    if ( response.success == true ) {

        // remove button and textarea
        $button.remove();
        $( '.report-a-bug-message' ).remove();

        // display success message
        $( '.report-a-bug-response' ).html( response.data );

    } else {

        // display error message
        $( '.report-a-bug-response' ).html( settings.error );

    }

    // enable button and revert label
    $button.text( settings.send_label ).prop( 'disabled', false );

} );
Complete Example
We’ve done it! Our AJAX request has been made; it is well secured and user friendly. This is what a user is going to see in the case of any errors:
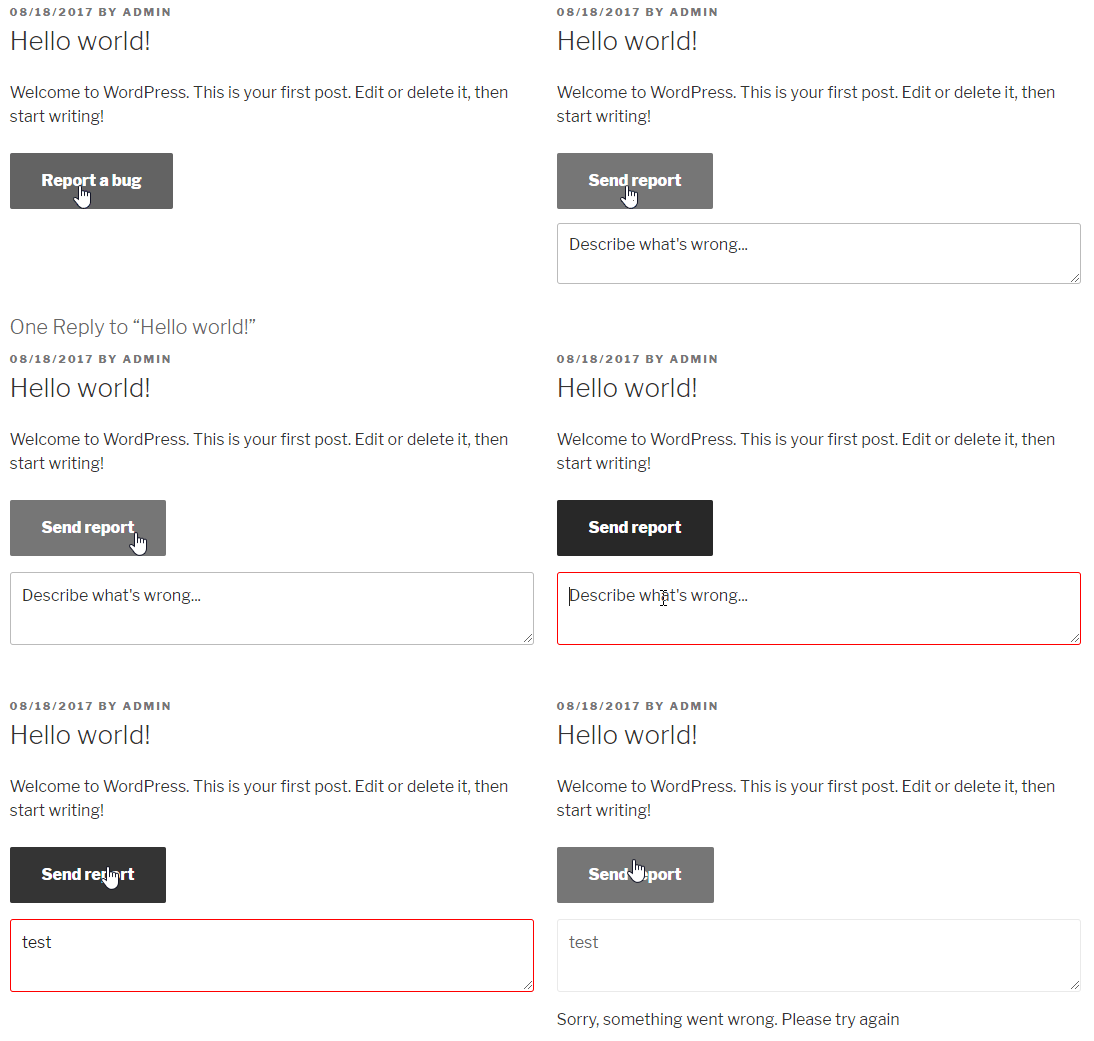
Below you can download the complete plugin and check the user guides:
I hope this gives you a nice foundation for your own “without-page-refresh” solutions. You can do this to all the forms on your website. It’s also a great way to optimize any heavy piece of the website which doesn’t have to be loaded right away, such as a big list of products in a drop-down. You can load them via AJAX just after clicking on the drop-down — it’s that simple.
The possibilities are almost limitless. Let me know in the comments what your ideas are!
Further Reading
- WordPress Full-Site Editing: A Deep Dive Into The New Feature
- WordPress Playground: From 5-Minute Install To Instant Spin-Up
- Why AJAX Isn’t Enough
- Useful React Hooks That You Can Use In Your Projects


 Register For Free
 Bring your design to life
 JavaScript Form Builder — Create JSON-driven forms without coding.

 How To Measure UX and Design Impact, 8h video + UX training

